What fingerpicking is
Fingerpicking — also called fingerstyle — means plucking the strings individually with your thumb and fingertips instead of sweeping them with a pick. Because each finger controls its own string, you can sound a bass note, an inner harmony, and a melody at the same time, so a single guitar can sound like several instruments at once. It is the voice of folk, classical, fingerstyle blues, country, and countless singer-songwriter ballads.
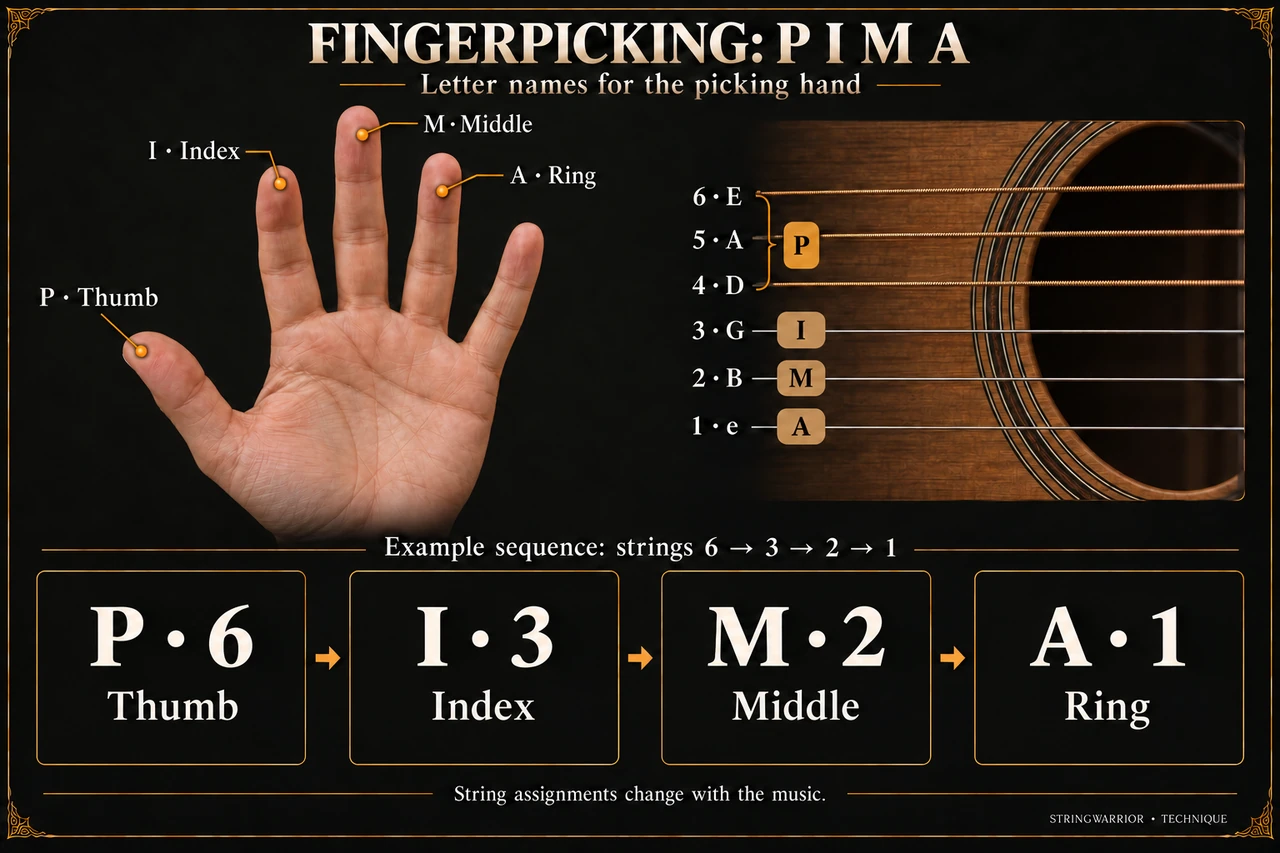
Players label the picking-hand digits with the letters PIMA, from their Spanish names: P (pulgar) is the thumb, I (índice) the index, M (medio) the middle, and A (anular) the ring finger; the pinky is rarely used. The thumb takes the three bass strings — low E, A, and D — while i, m, and a each own one treble string: G, B, and high e. Once those assignments are second nature you can pick without ever looking at your right hand.
The same approach transfers to the ukulele, and to the banjo, where the repeating thumb-and-finger figures are called rolls. On guitar its most famous form is Travis picking — a steady alternating thumb under a syncopated melody — which this guide builds up to.
How to play it
Fingerpicking rewards a relaxed, well-placed hand far more than a strong one. Set it up like this:
Set the hand
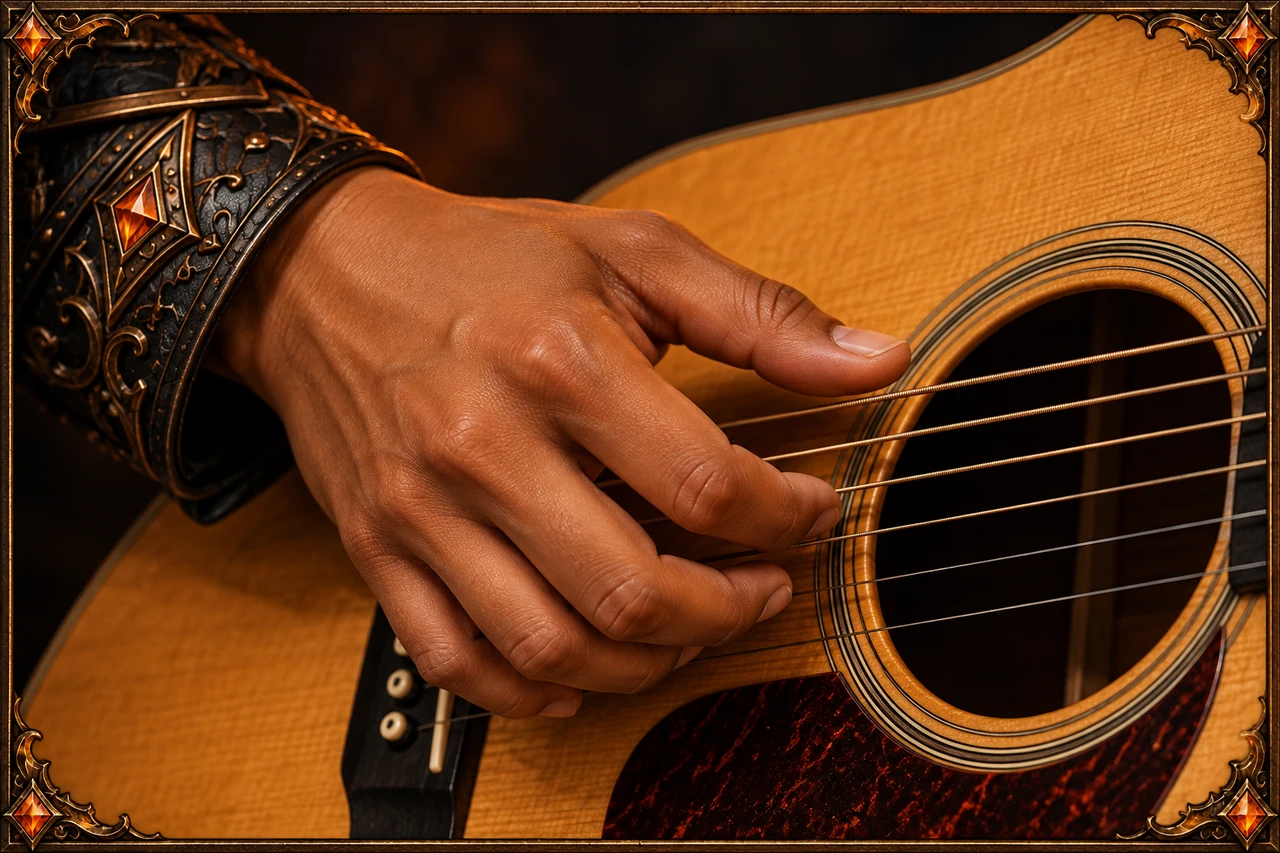
Rest your forearm lightly on the edge of the guitar and let the picking hand hang so the fingers meet the strings at a slight angle. Keep the wrist relaxed and gently arched — not collapsed flat against the top.
Thumb forward
Keep the thumb ahead of the fingers, closer to the headstock, so it and the index never collide. The thumb pushes down and out across a bass string; the fingers pluck up toward your palm.
One finger per string
Assign the thumb (p) to the bass strings E, A, and D, and i, m, a to G, B, and high e. Holding those assignments steady is what lets you fingerpick without staring at your hand.
Flesh or nails
Pluck with the fleshy fingertip for a warm, soft tone, or with a little nail for a brighter, louder attack. Either is correct; many players grow the picking-hand nails slightly for volume and control.
Above all, start with the thumb. Get a steady bass going on its own — thumb alone, one pluck per beat — before you add the fingers on top. That independent, metronomic thumb is the secret behind every alternating-bass and Travis pattern.
Here is a simple forward roll on an open C chord to get the fingers moving. Play the thumb on the A string, then i–m–a on the G, B, and high-e strings, and repeat, letting each note ring into the next so the chord blooms:
e|-------0-------0-|
B|-----1-------1---|
G|---0-------0-----|
D|-----------------|
A|-3-------3-------|
E|-----------------|
Fingers: p (A string), i (G), m (B), a (high e). Keep it slow and even — the goal is four equally spaced, equally loud notes, not speed.
Common mistakes
Watching the picking hand
Trust the finger assignments and watch your fretting hand instead. Staring at your right hand slows you down and actually hurts accuracy once the pattern is learned.
A collapsed wrist
Bending the wrist flat against the guitar chokes your tone and speed. Keep it relaxed and slightly arched, with the forearm resting lightly on the body.
Uneven volume
The thumb drowns the fingers, or the melody vanishes underneath. Balance the voices, and bring whichever finger carries the tune up a touch above the rest.
Thumb and fingers colliding
If the thumb bumps the index, it is sitting too far back. Move it forward toward the headstock so the two pass each other without touching.
Rushing the roll
The inner notes of a roll tend to speed up. Count the subdivision out loud and practise against a metronome until the spacing between notes is dead even.
Muted or buzzing strings
Fret every chord note cleanly and let the open strings ring; a lazy fretting finger brushing a neighbour is the usual culprit. Build the shapes first in the chord library.
Practice patterns
Three original exercises to build real fingerstyle independence. They are written in standard tab — the top line is your high e string, the numbers are frets, and you read left to right. When two numbers stack in one column, pluck those strings together (a "pinch"). New to tab? The how-to-read-tab guide covers it in five minutes.
1. Alternating-bass thumb (Travis picking) — on C
e|-------0-------0-|
B|---1-------1-----|
G|-----------------|
D|-----2-------2---|
A|-3-------3-------|
E|-----------------|
The engine of country and folk fingerpicking: the thumb alternates between two bass strings — here the A string and the D string of a C chord — while the fingers drop treble notes in the gaps. It is the alternating-bass feel made famous by tunes like "Dust in the Wind" (named for reference only; this exercise is original). Fingers: p alternates the A and D strings, m plays the B string, a plays high e. Keep the thumb metronomic and let the fingers float on top.
2. Pinch pattern — on C
e|-0-------0-------|
B|-----1-------1---|
G|---0-------0-----|
D|-------2-------2-|
A|-3-------3-------|
E|-----------------|
A "pinch" plucks the thumb and a finger at the exact same moment, so a bass note and a melody note sound together. Here the thumb (A string) and ring finger (high e) pinch on the beat, then the inner fingers fill the gaps. Fingers: p + a pinch together on the beat, then i (G) and m (B), with the thumb moving to the D string. This is how you put a melody note on top of a steady bass.
3. Arpeggio through a chord change — Am → G
e|-------0-------3-|
B|-----1-----------|
G|---2---------0---|
D|-----------0-----|
A|-0---------------|
E|---------3-------|
The real test is keeping the picking hand steady while the fretting hand moves. Hold the same p-i-m-a shape as the chord changes from A minor to G. Fingers: p on the bass string, then i, m, a climbing the treble strings. Change the chord cleanly on the first beat of each bar without breaking the picking rhythm.
There is no dedicated fingerpicking tool, but you can build the chord shapes these patterns sit on in the chord library, and keep your thumb honest by looping them against the metronome.
How to build it up
Fingerpicking is best built in thin layers. Add one element at a time and keep each rock-steady before moving on:
- Thumb alone. A steady bass on all four beats over a single chord — no fingers yet.
- Add one finger. Thumb plus a single repeated treble note, so the two hands learn to cooperate.
- The full PIMA forward roll from the top of this page.
- Alternating-bass thumb. The big unlock — this is the doorway into Travis picking.
- Pinches and syncopation. Melody notes landing on and off the beat.
- Through chord changes, then over a whole progression and, finally, a song.
Clean, automatic chord shapes come first, so polish them in the chord library and the guided Learn path, then bring these patterns to the Songbook, which is full of simple folk tunes that suit fingerstyle. From here, fingerstyle players often add hammer-ons and pull-offs for ornaments and natural harmonics for chiming accents.
Related on String Warrior
Take fingerpicking further and connect it to the rest of your playing:
- All guitar techniques
- Strumming — the strummed counterpart
- Hammer-ons & pull-offs
- Harmonics
- Guitar chord library
- Guitar licks and exercises
- Guided practice routines
- Songbook — including folk tunes like Scarborough Fair
- How to read tab
Fingerpicking FAQ
- Is fingerpicking hard to learn?
- It is an intermediate-level technique. The individual motions are small and gentle, but coordinating an independent thumb against the fingers takes patience. Build it in layers — thumb alone first, then add one finger at a time — and practise slowly; the independence comes with repetition, not force.
- What instruments does fingerpicking apply to?
- Guitar, ukulele, and banjo, where the patterns are called rolls. The PIMA thumb-and-fingers approach transfers directly, with small adjustments for the number of strings and the string spacing on each instrument.
- What does PIMA mean?
- PIMA labels the picking-hand digits from their Spanish names: P (pulgar) is the thumb, I (índice) the index, M (medio) the middle, and A (anular) the ring finger. The thumb covers the three bass strings; i, m, and a take the G, B, and high-e strings respectively.
- Do I need long fingernails to fingerpick?
- No. You can fingerpick with the flesh of your fingertips for a warm, soft tone. Longer nails on the picking hand give a brighter, louder attack and more control, which is why classical and fingerstyle players often grow and shape them, but they are optional when you start.
- What is Travis picking?
- Travis picking is a country and folk style, named after Merle Travis, in which the thumb keeps a steady alternating bass on two strings while the fingers pick a syncopated melody on top. The alternating-bass exercise on this page is the foundation of that sound.
- Should I learn strumming or fingerpicking first?
- Learn strumming first. It gets you playing songs quickly and builds your sense of rhythm and chord changes, which fingerpicking then relies on. Come to fingerpicking once your chord shapes are clean and automatic.