Free Printable Music Resources

Free, print-ready practice templates: blank tab and fretboard paper for your instrument, chord sheets, staff paper, and reference posters. Print or save as PDF.

Pick a template, choose your instrument where it applies, then print or save it as a PDF — no signup, no watermark.

Illustrated reference library

Open a topic to view its illustration. Teaching charts name their instrument and tuning; editorial scenes set the mood. Keep diagrams in their printed orientation, and use the full illustration link to zoom into labels.

Getting started and guitar construction
Electric guitar exploded anatomy
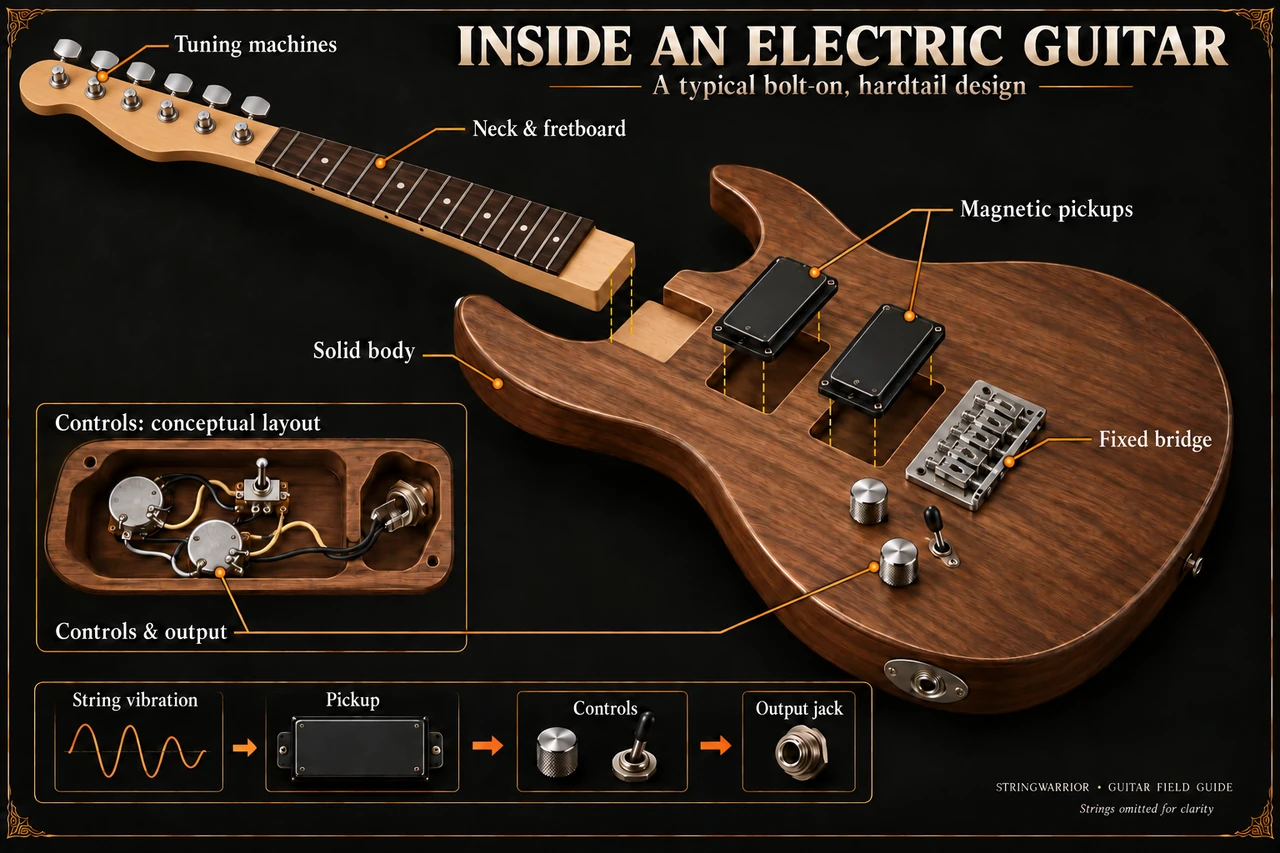
A bolt-on hardtail with its neck lifted off, labelling tuning machines, fretboard, two pickups, fixed bridge and the wired control cavity. A strip traces string to pickup, controls and output jack. Open the full electric guitar exploded anatomy illustration
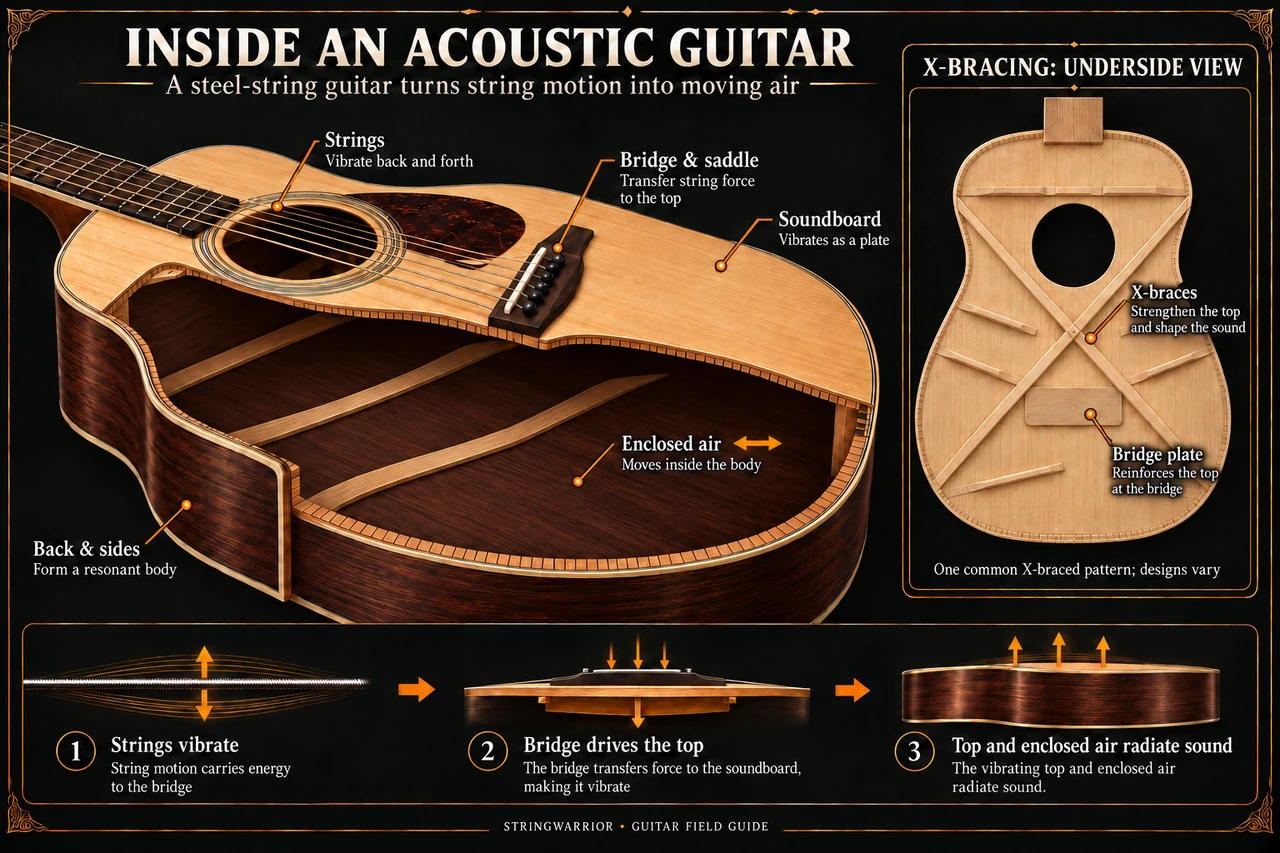
Acoustic guitar cutaway
A cutaway steel-string body labels strings, bridge and saddle, soundboard, back and sides and enclosed air, beside an underside view of X-braces and bridge plate. Three steps show the top radiating sound. Open the full acoustic guitar cutaway illustration
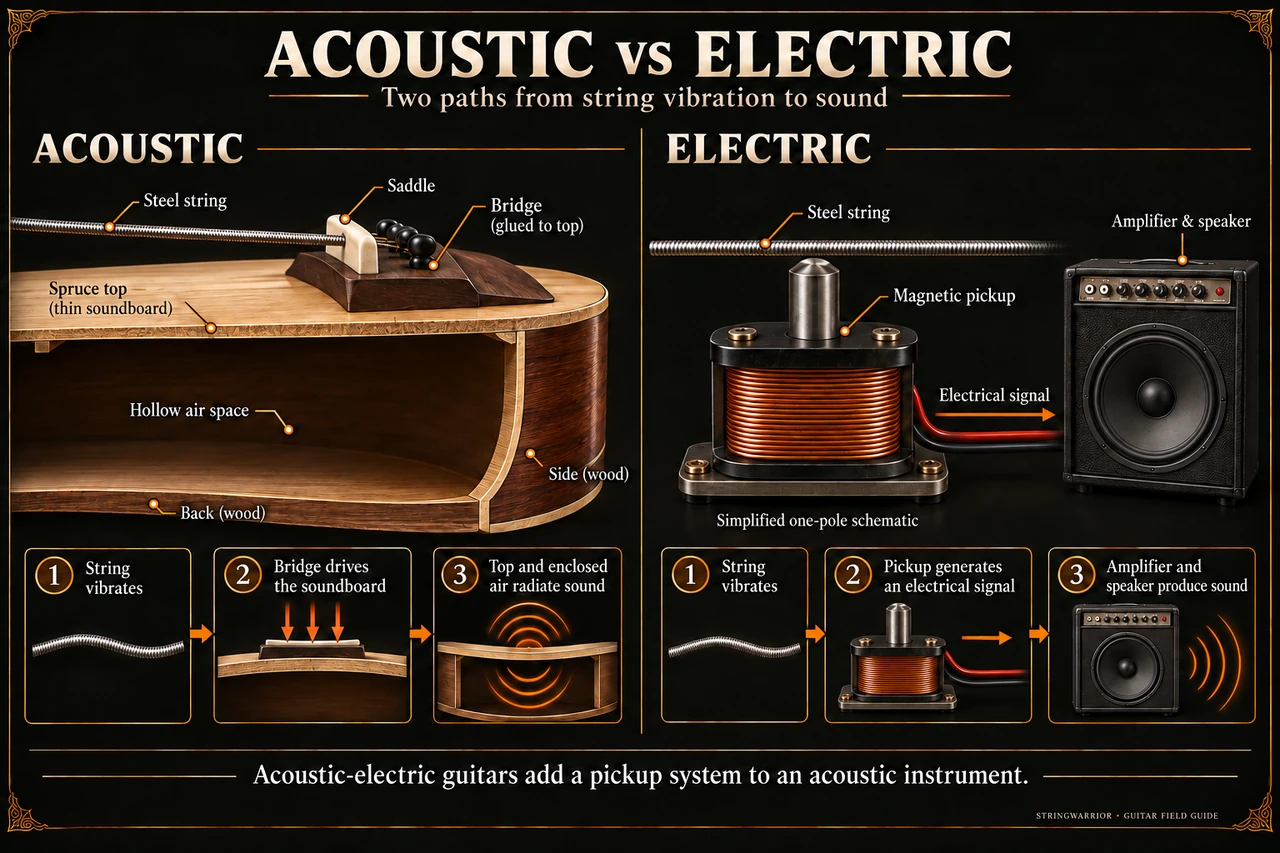
Acoustic vs electric sound paths
Side by side: an acoustic's bridge drives a thin spruce top and hollow air space to radiate sound, while an electric's magnetic pickup turns string motion into a signal for an amplifier and speaker. Open the full acoustic vs electric sound paths illustration
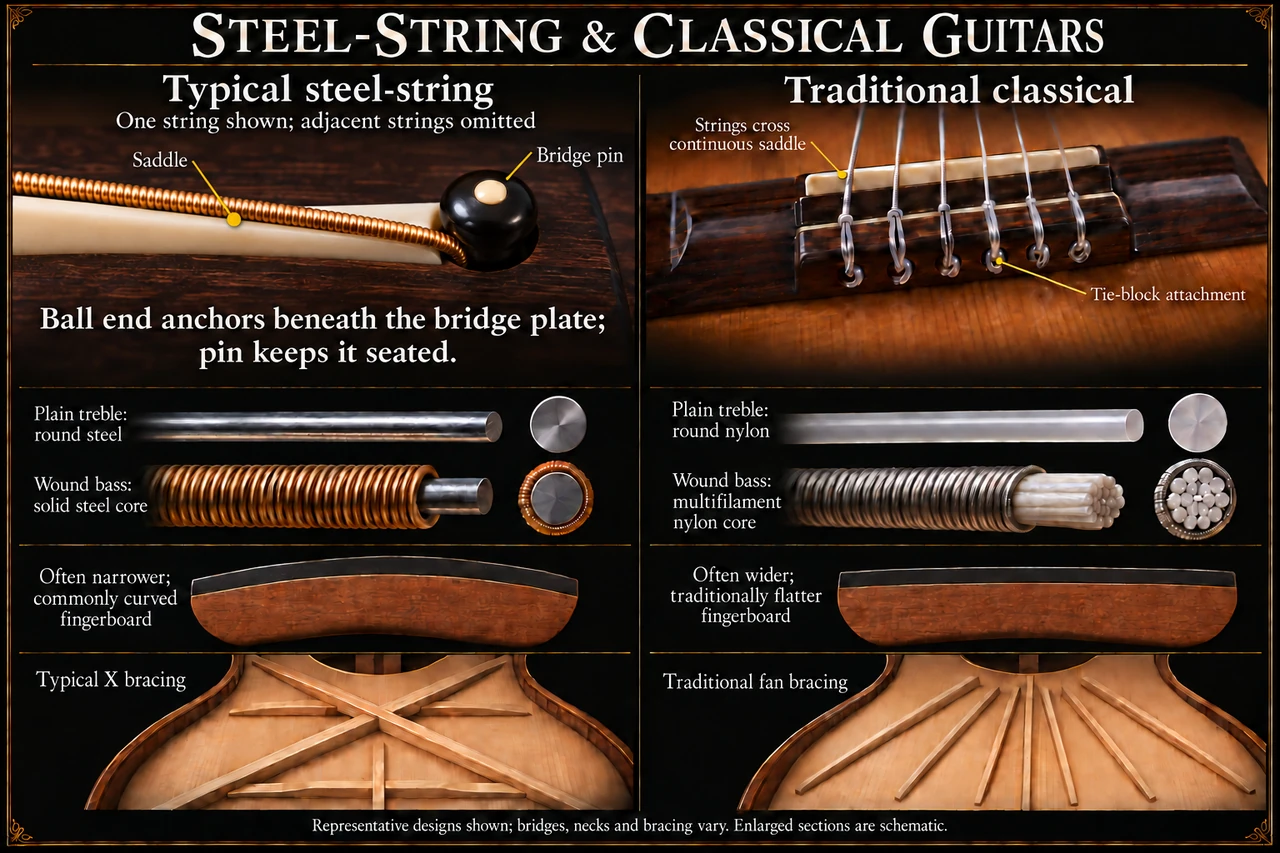
Steel string versus classical guitar
Compares a bridge pin and ball end with a tie-block bridge, steel-core strings with nylon and multifilament-core ones, a narrower curved fingerboard with a wider flatter one, and X bracing with fan bracing. Open the full steel string versus classical guitar illustration
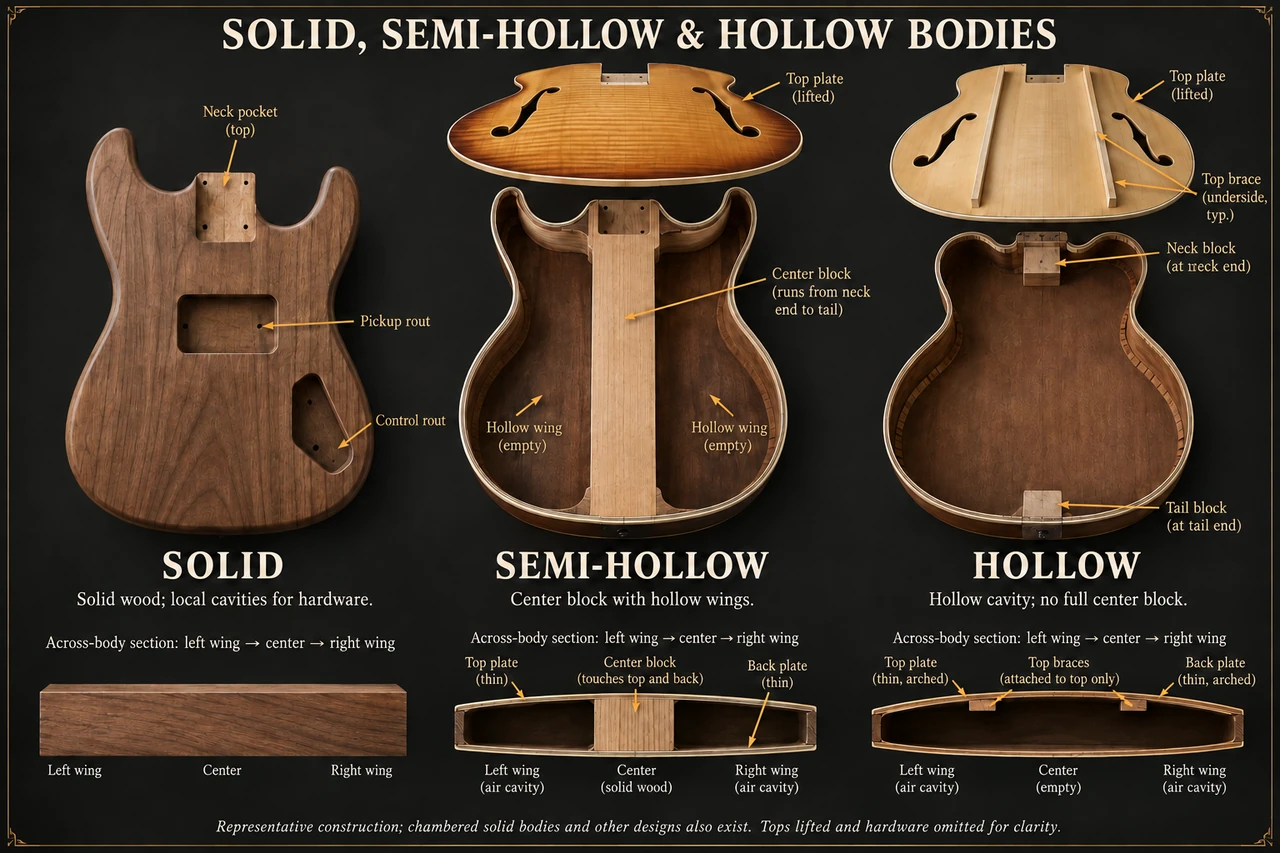
Solid semi hollow and hollow bodies
Three bodies with their tops lifted: a solid slab with pickup and control routs, a center block flanked by empty hollow wings, and an open cavity with only neck and tail blocks. Cross-sections show where the air sits. Open the full solid semi hollow and hollow bodies illustration
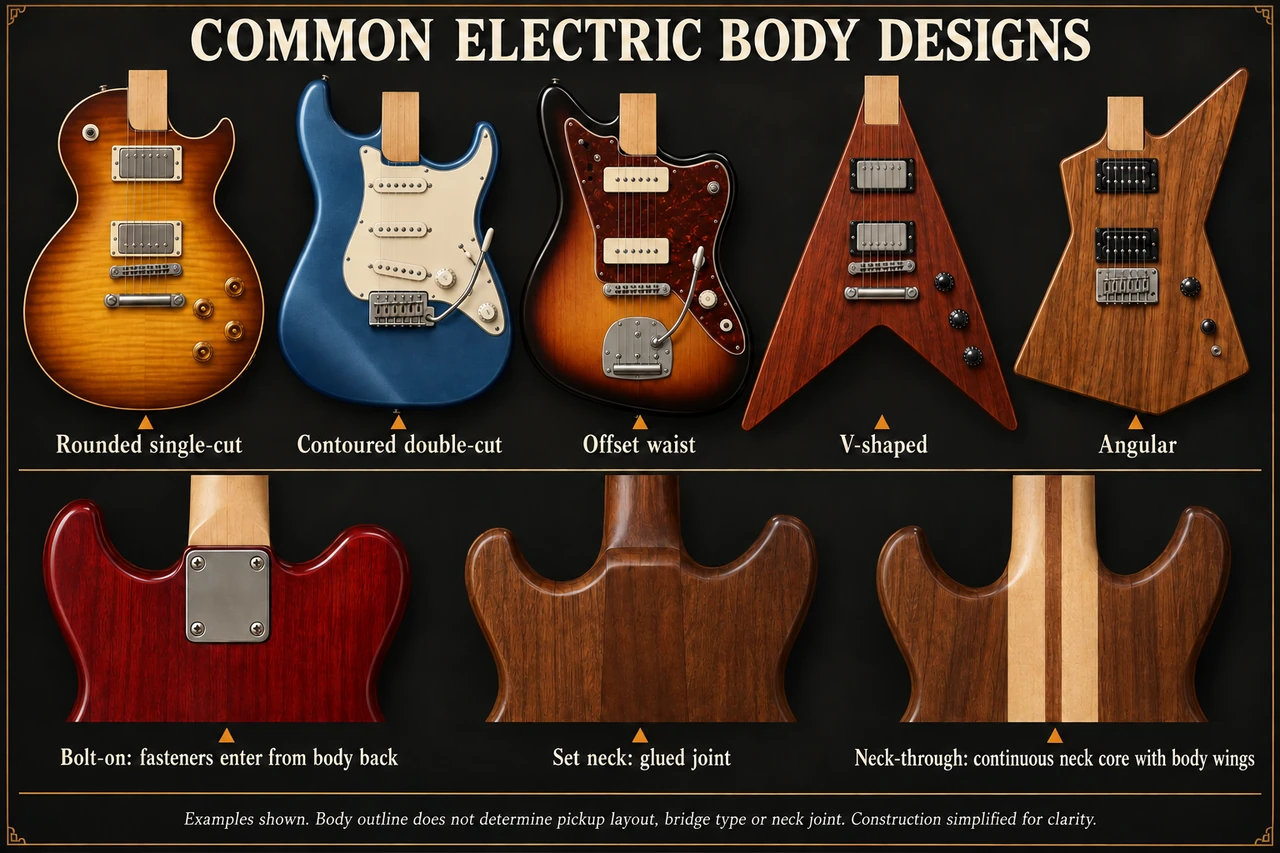
Common electric guitar body designs
Five outlines are shown: rounded single-cut, contoured double-cut, offset waist, V-shaped and angular. Below, three heels compare a bolt-on plate, a glued set neck and a neck-through core with body wings. Open the full common electric guitar body designs illustration
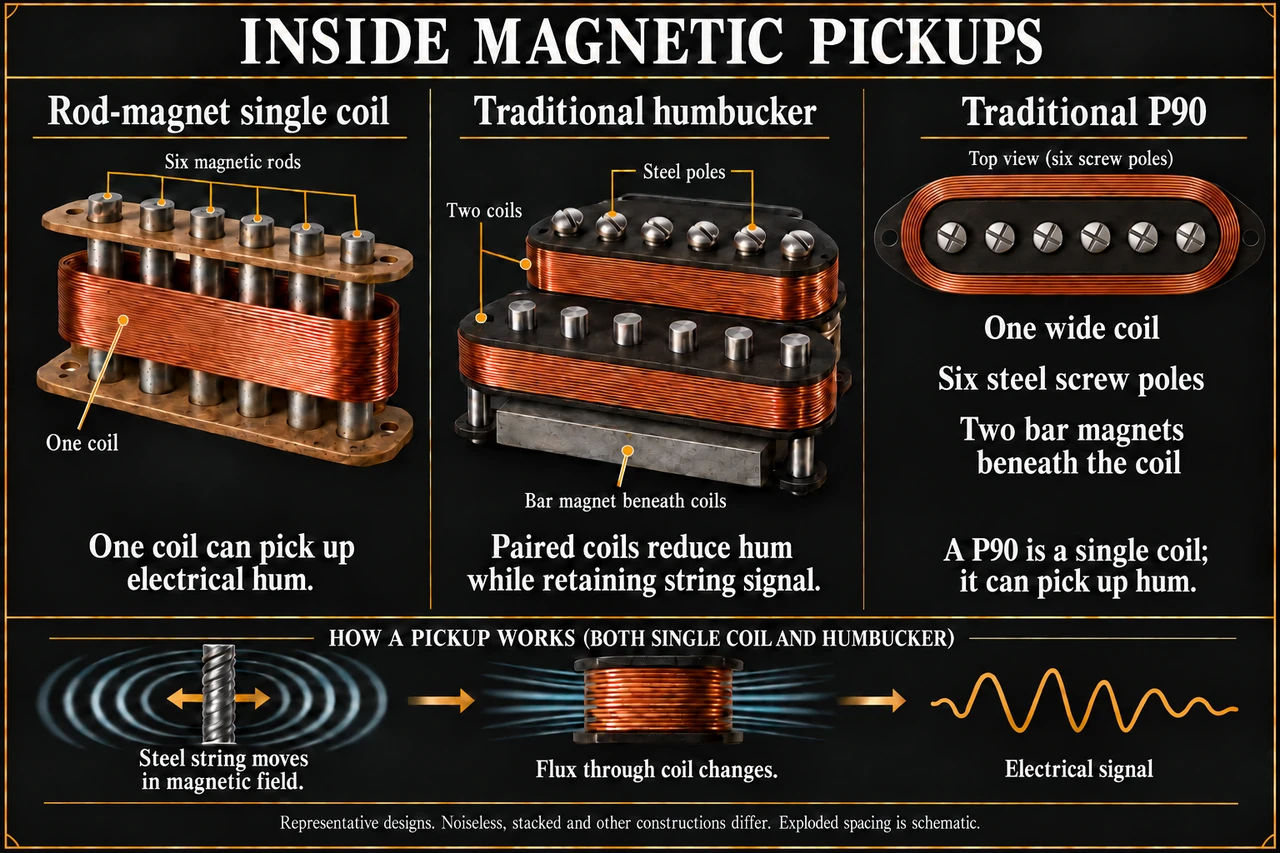
Single coil humbucker and p90
A rod-magnet single coil with six magnetic rods, a humbucker with two coils over a bar magnet, and a P90 with one wide coil and six screw poles. A strip shows a moving string changing flux to make a signal. Open the full single coil humbucker and p90 illustration
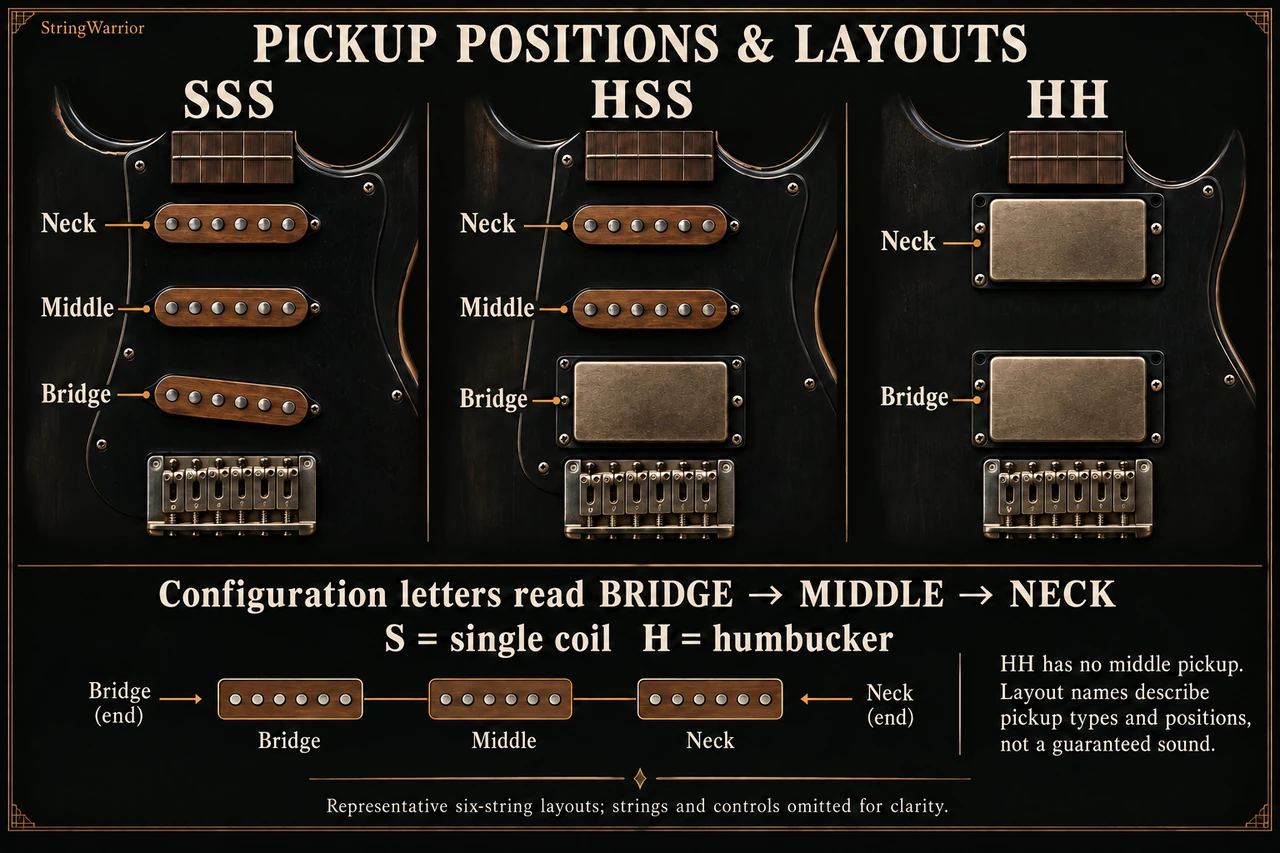
Pickup positions and layouts
Three pickguards show SSS, HSS and HH with neck, middle and bridge slots labelled. The letters read from bridge to neck, S for single coil and H for humbucker, and HH has no middle pickup. Open the full pickup positions and layouts illustration
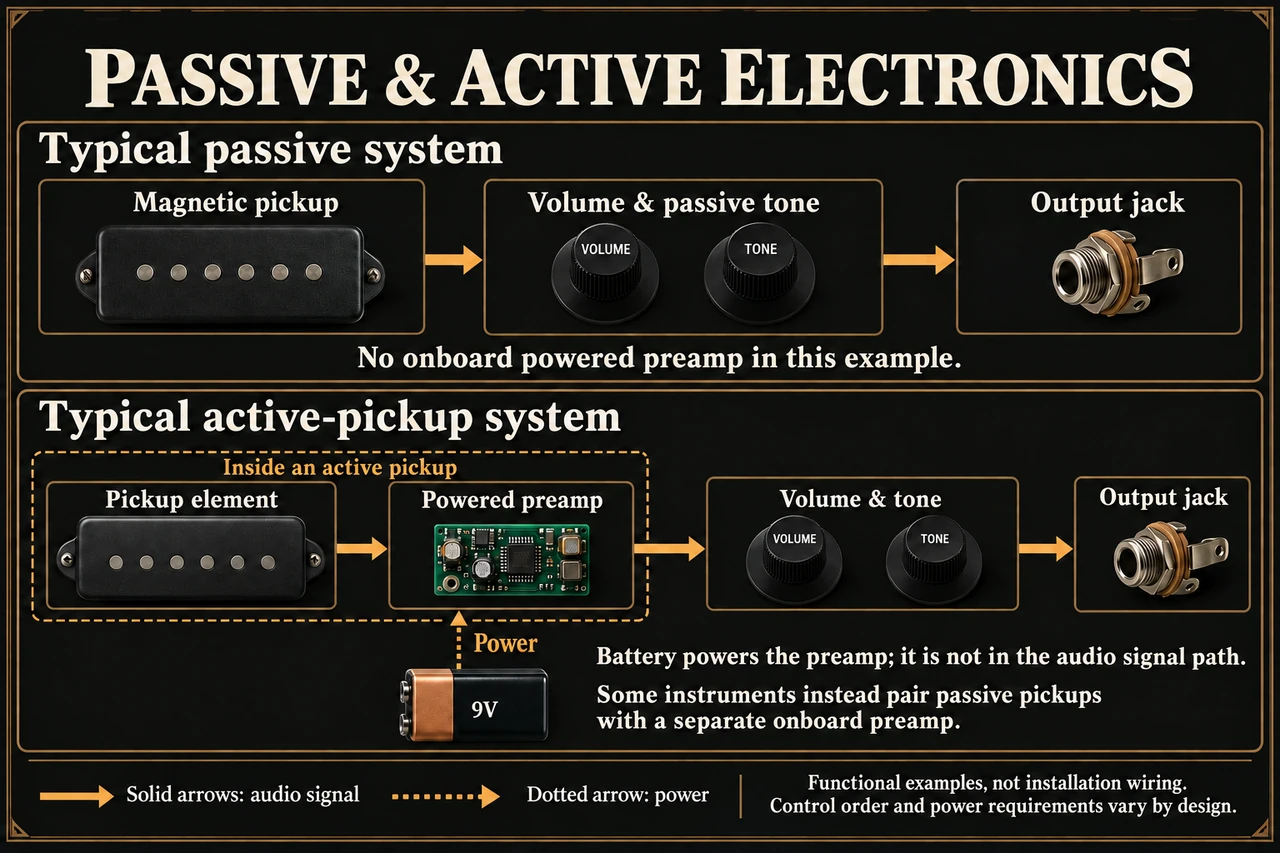
Passive versus active electronics
The passive chain runs pickup to volume and tone knobs to output jack. The active chain adds a powered preamp inside the pickup, fed by a 9V battery that powers the circuit but carries no signal. Open the full passive versus active electronics illustration
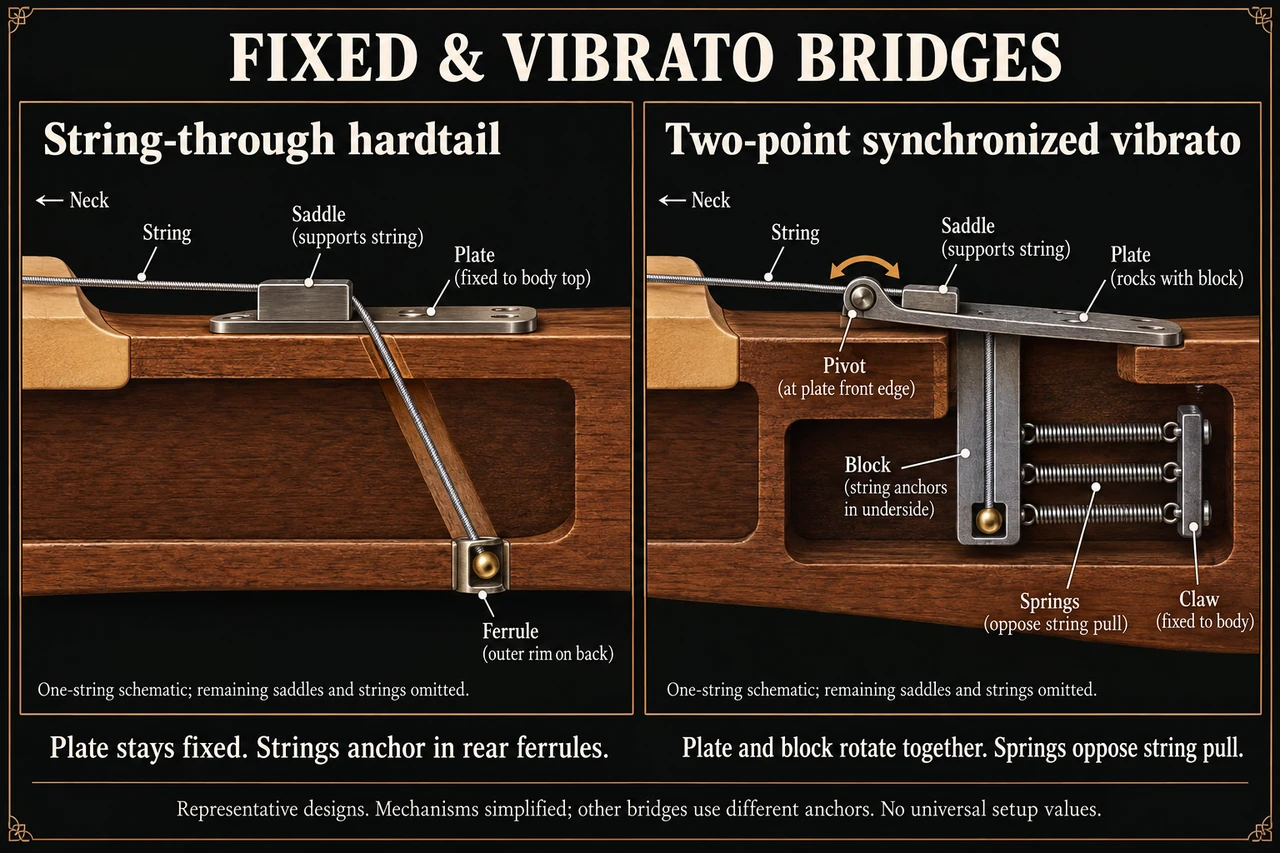
Fixed and vibrato bridge mechanisms
A string-through hardtail anchors each string in a rear ferrule under a plate fixed to the top. A two-point vibrato rocks its plate and block on a front pivot while springs to a claw oppose string pull. Open the full fixed and vibrato bridge mechanisms illustration
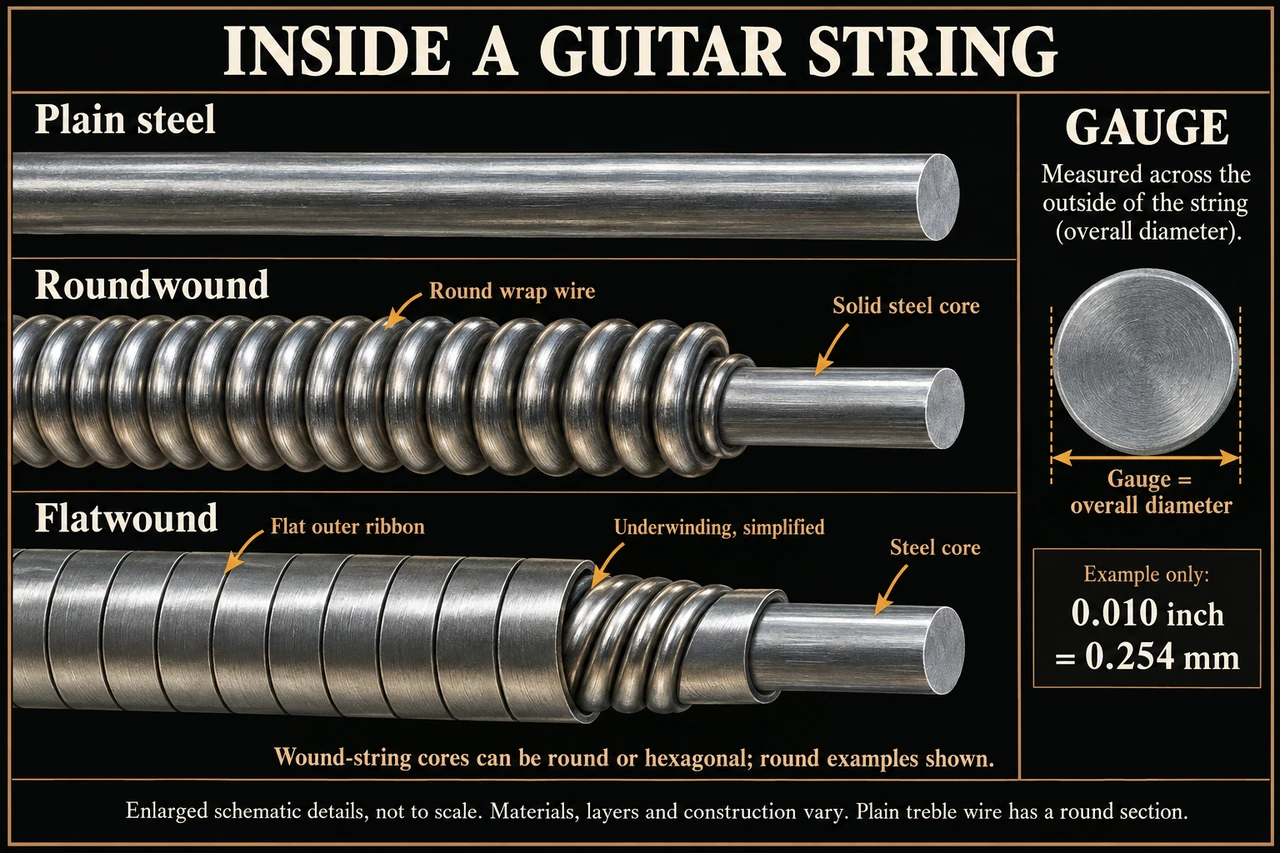
Inside a guitar string
Plain steel wire, a roundwound string with round wrap wire over a solid core, and a flatwound with flat ribbon over underwinding are shown enlarged. Gauge is the overall diameter, for example 0.010 inch or 0.254 mm. Open the full inside a guitar string illustration
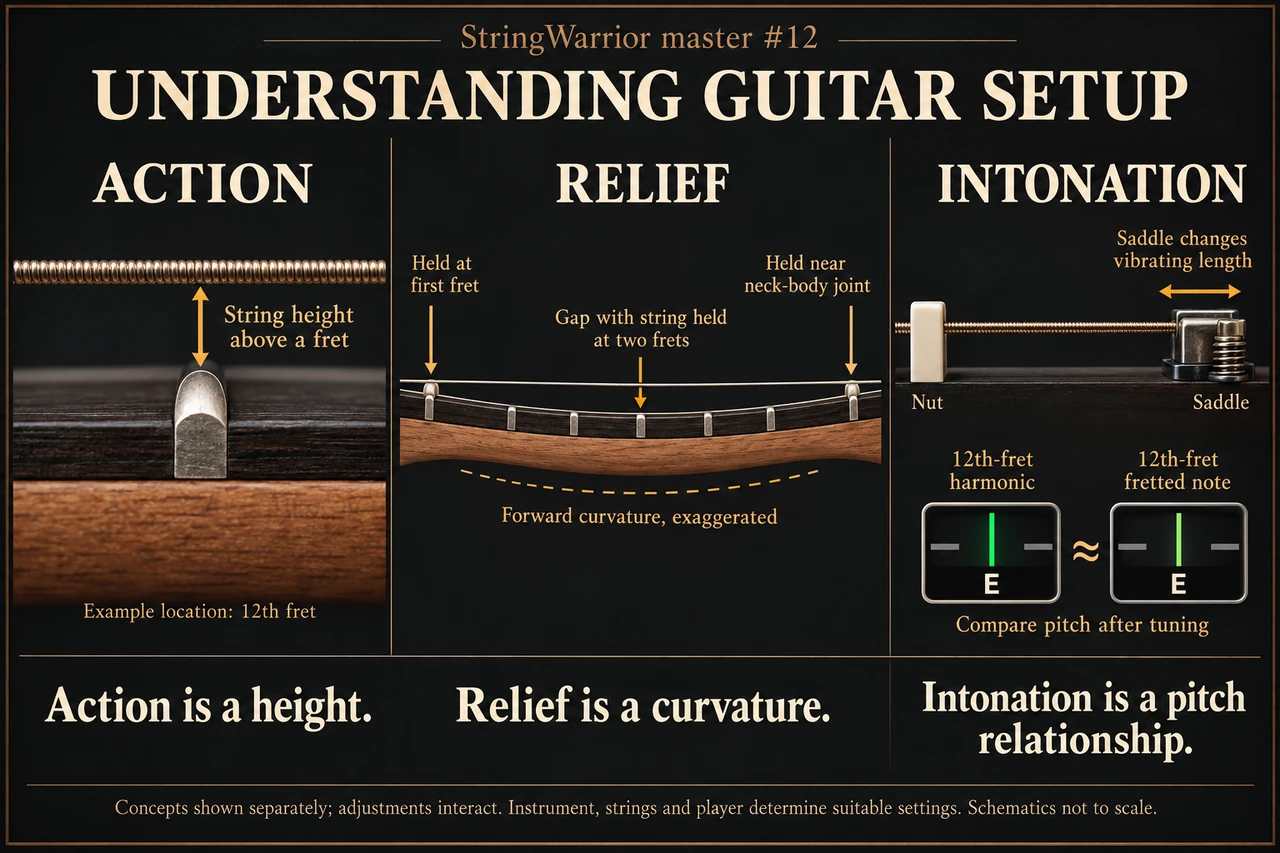
Understanding guitar setup
Action is string height above a fret, relief is the neck's forward curve measured with the string held at two frets, and intonation compares a 12th-fret harmonic with the fretted note while the saddle sets length. Open the full understanding guitar setup illustration
Playing technique
Holding and supporting the guitar
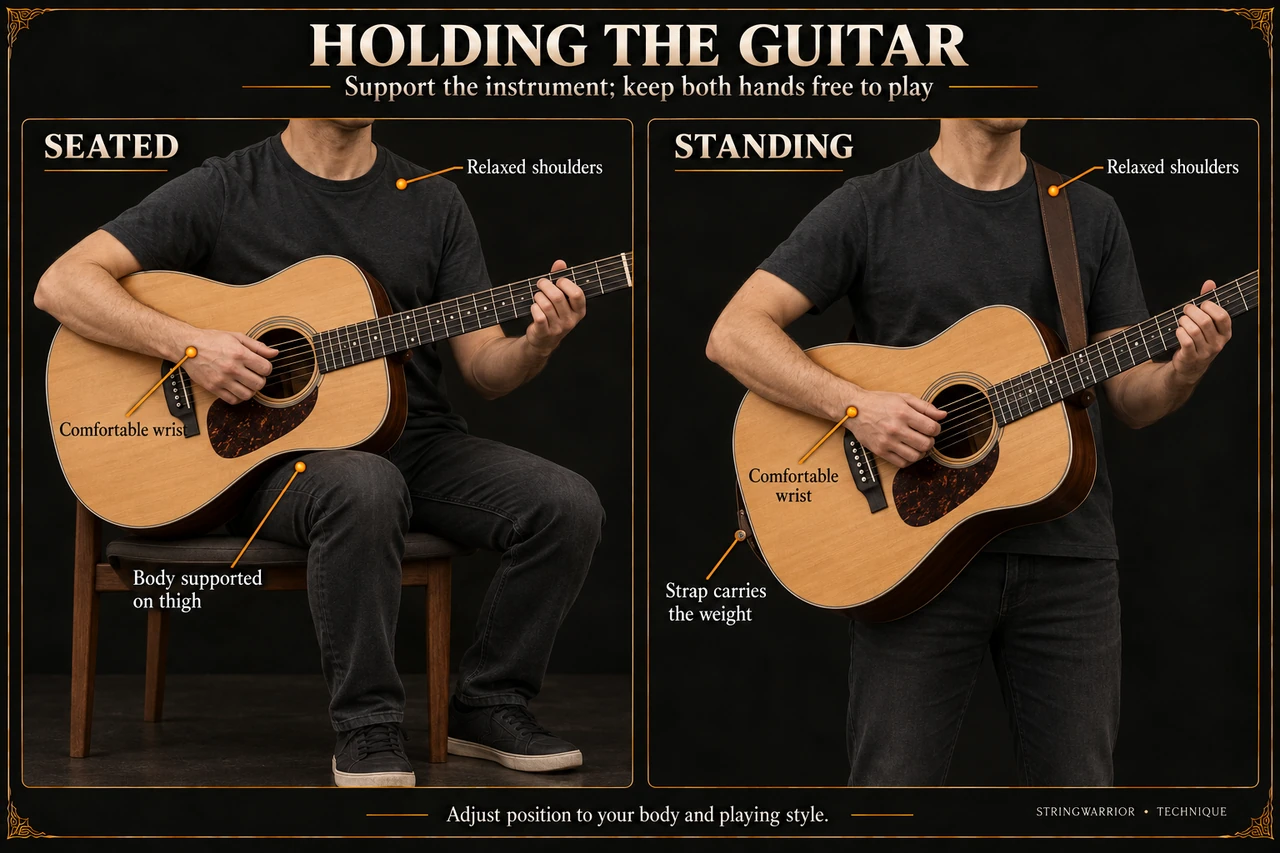
A seated player rests the body on the thigh and a standing player lets a strap carry the weight. Both photos point to relaxed shoulders and a comfortable wrist, leaving both hands free to play. Open the full holding and supporting the guitar illustration
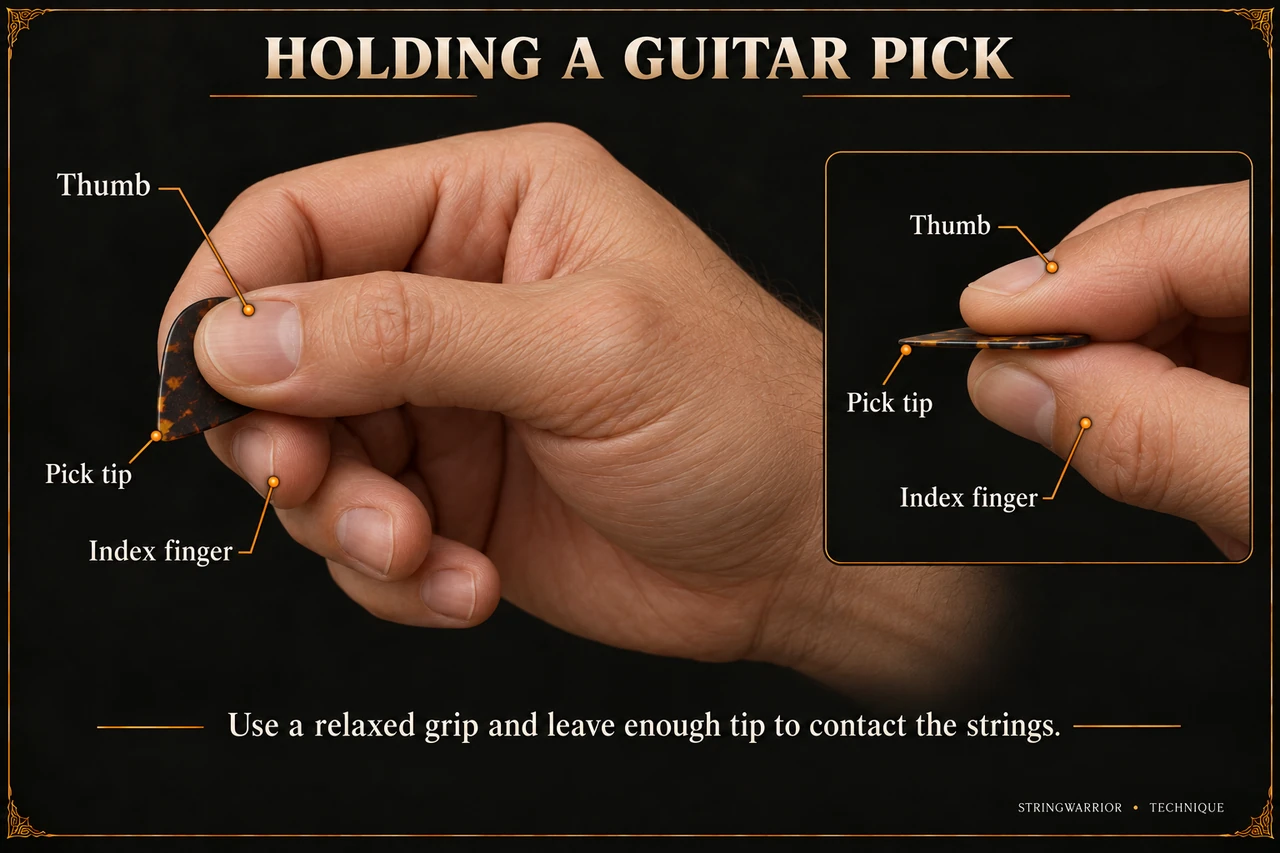
Holding a pick
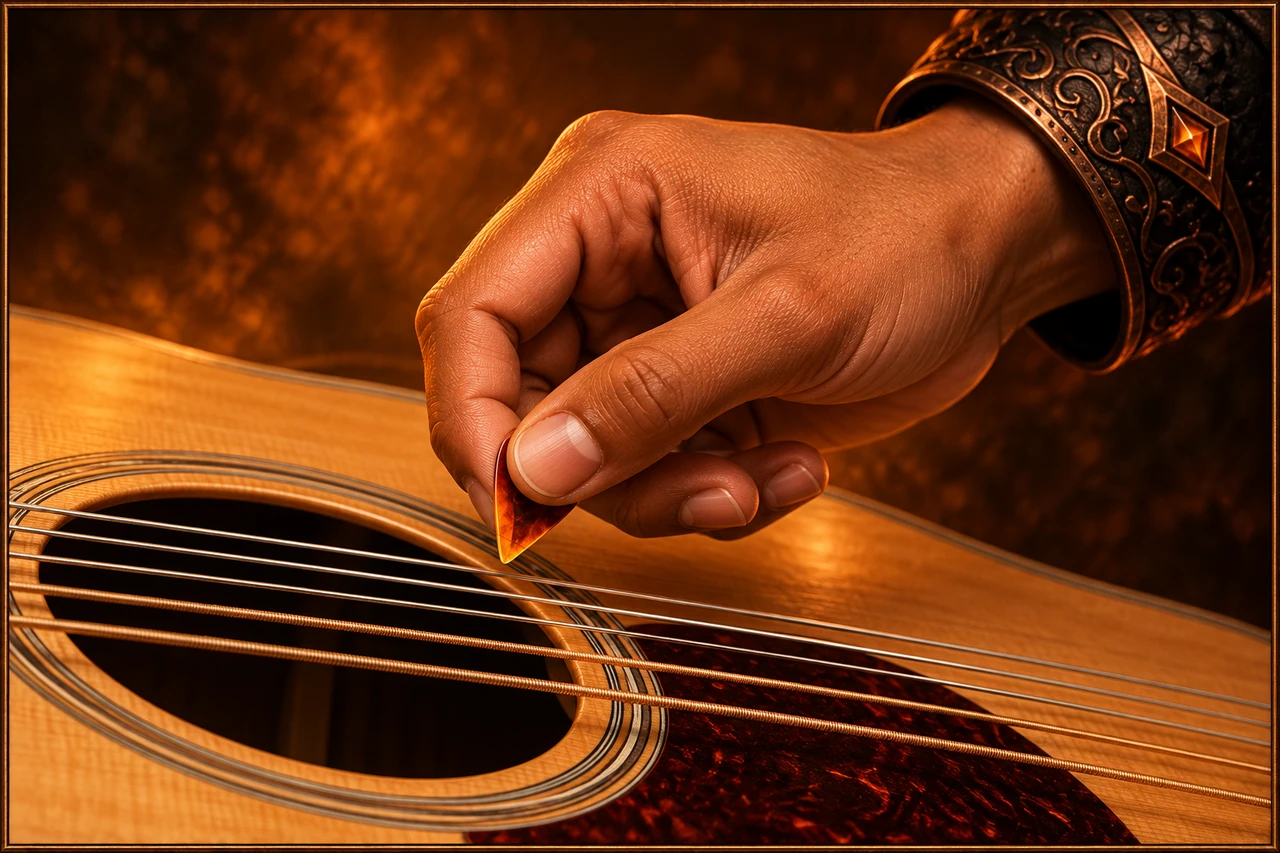
A close-up and an inset show the pick pinched between thumb and index finger with only the tip showing. The note advises a relaxed grip that leaves enough tip to contact the strings. Open the full holding a pick illustration
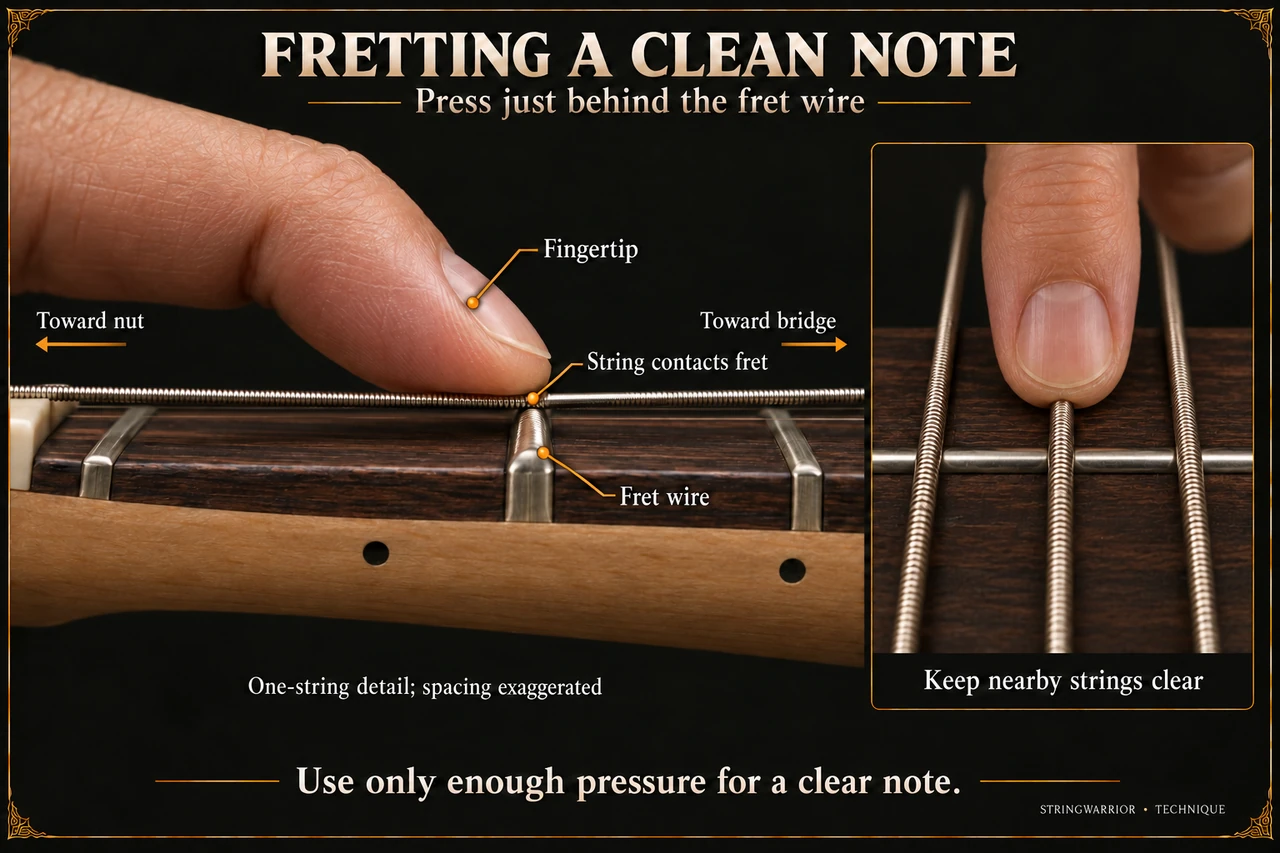
Fretting a clean note
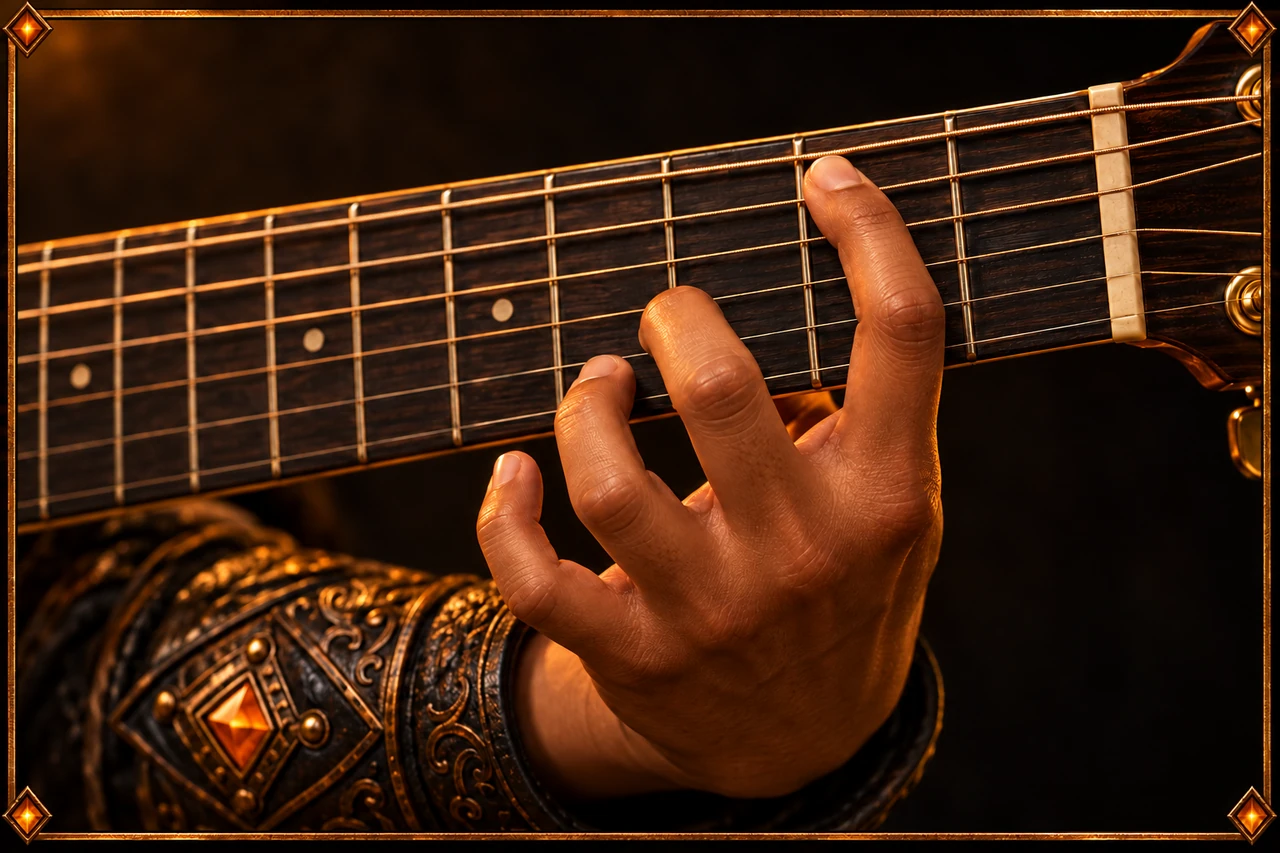
The fingertip presses just behind the fret wire so the string meets the fret, with the nut and bridge directions marked. An inset shows one finger pressing a string while the neighbouring strings stay clear. Open the full fretting a clean note illustration
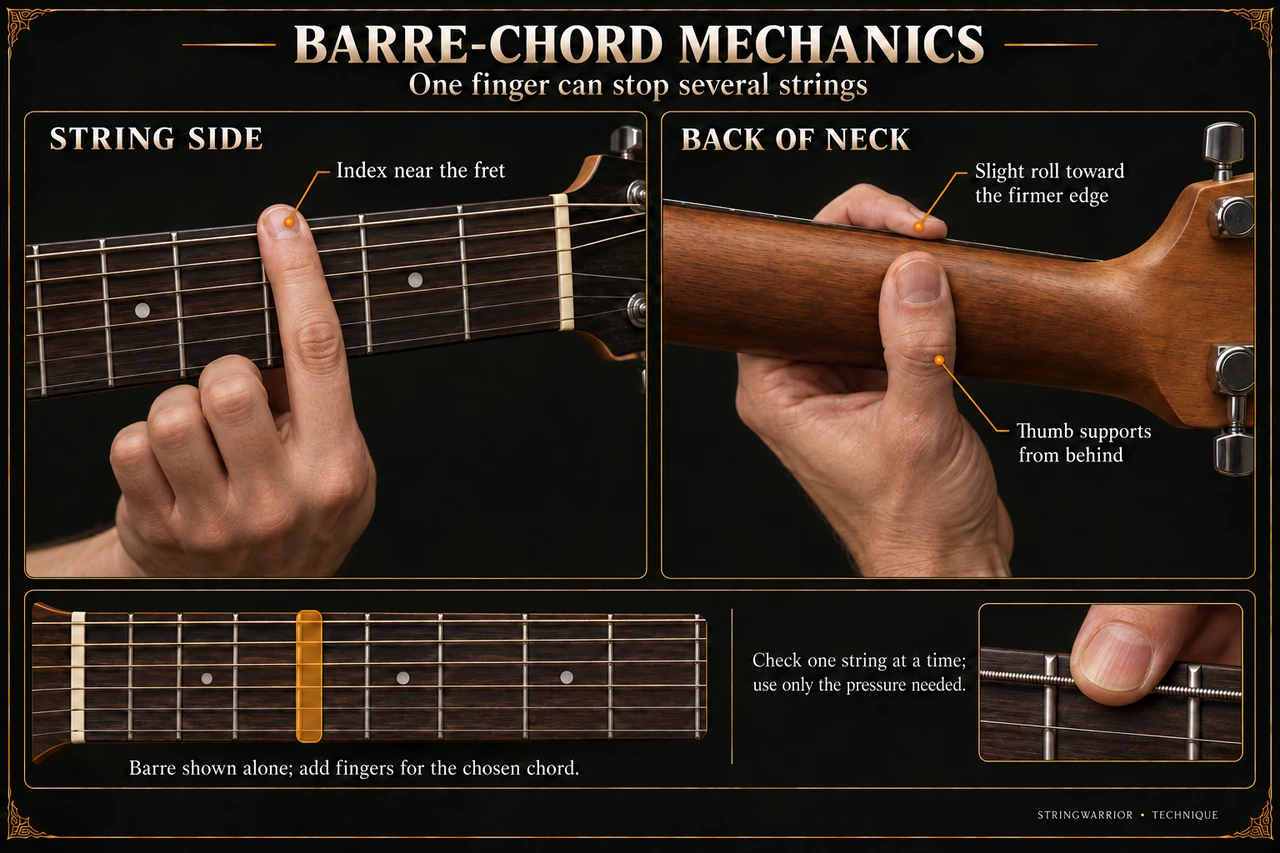
Barre chord mechanics
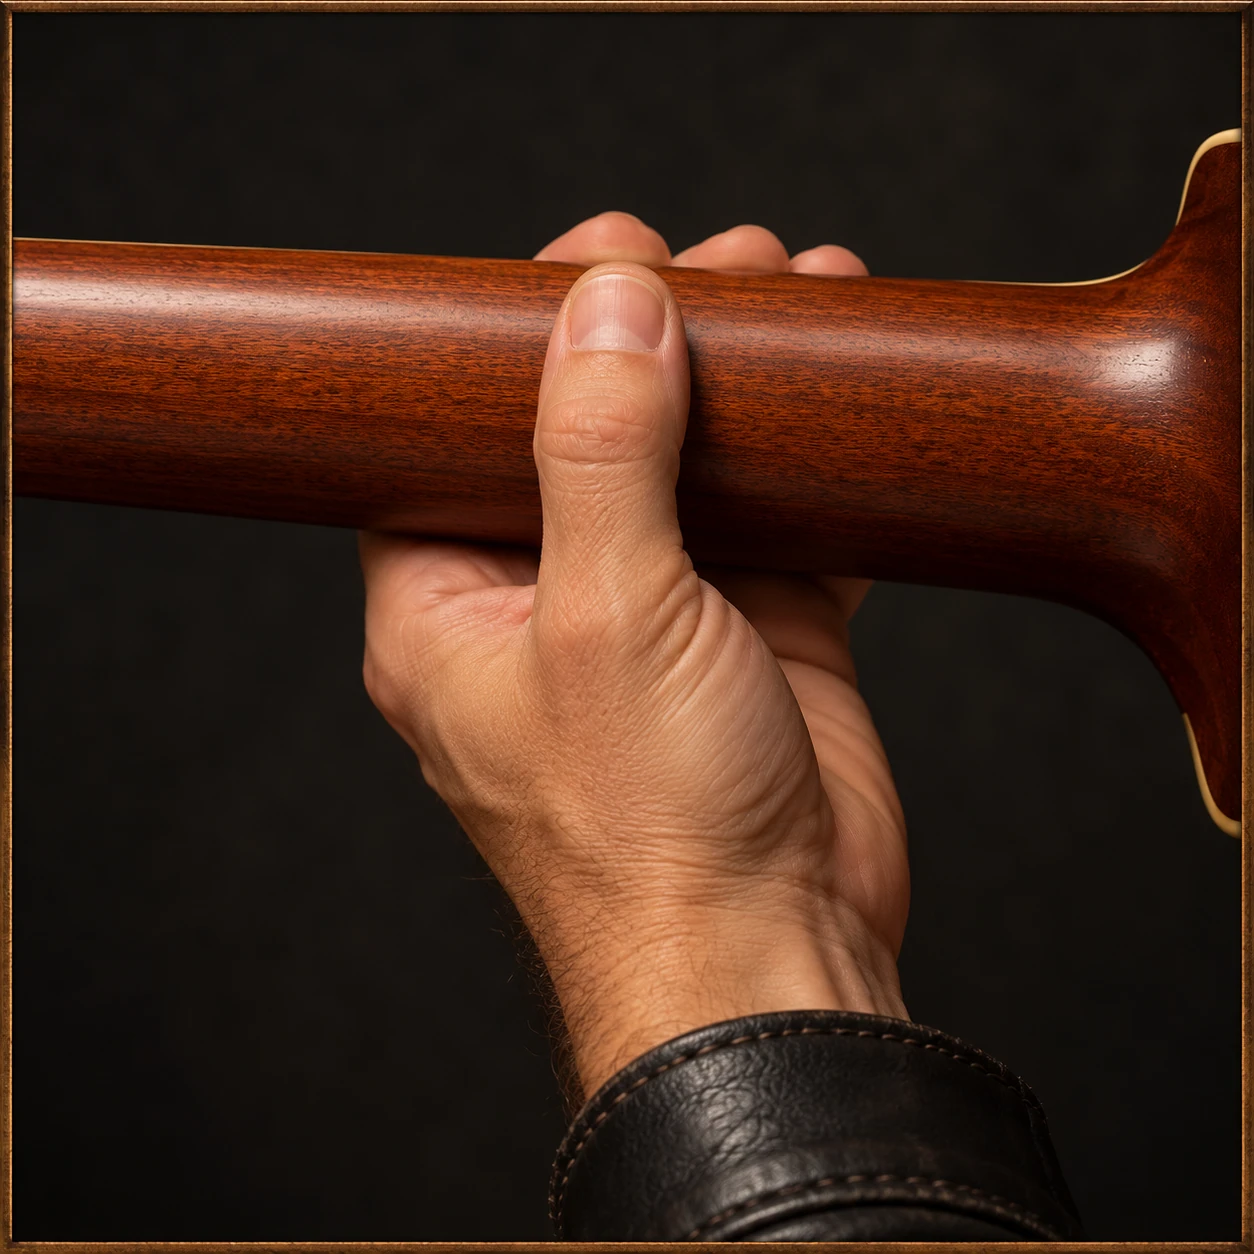
The index finger lies flat across every string near the fret while the thumb supports from behind the neck, with a tip to check one string at a time using only the pressure needed. Open the full barre chord mechanics illustration
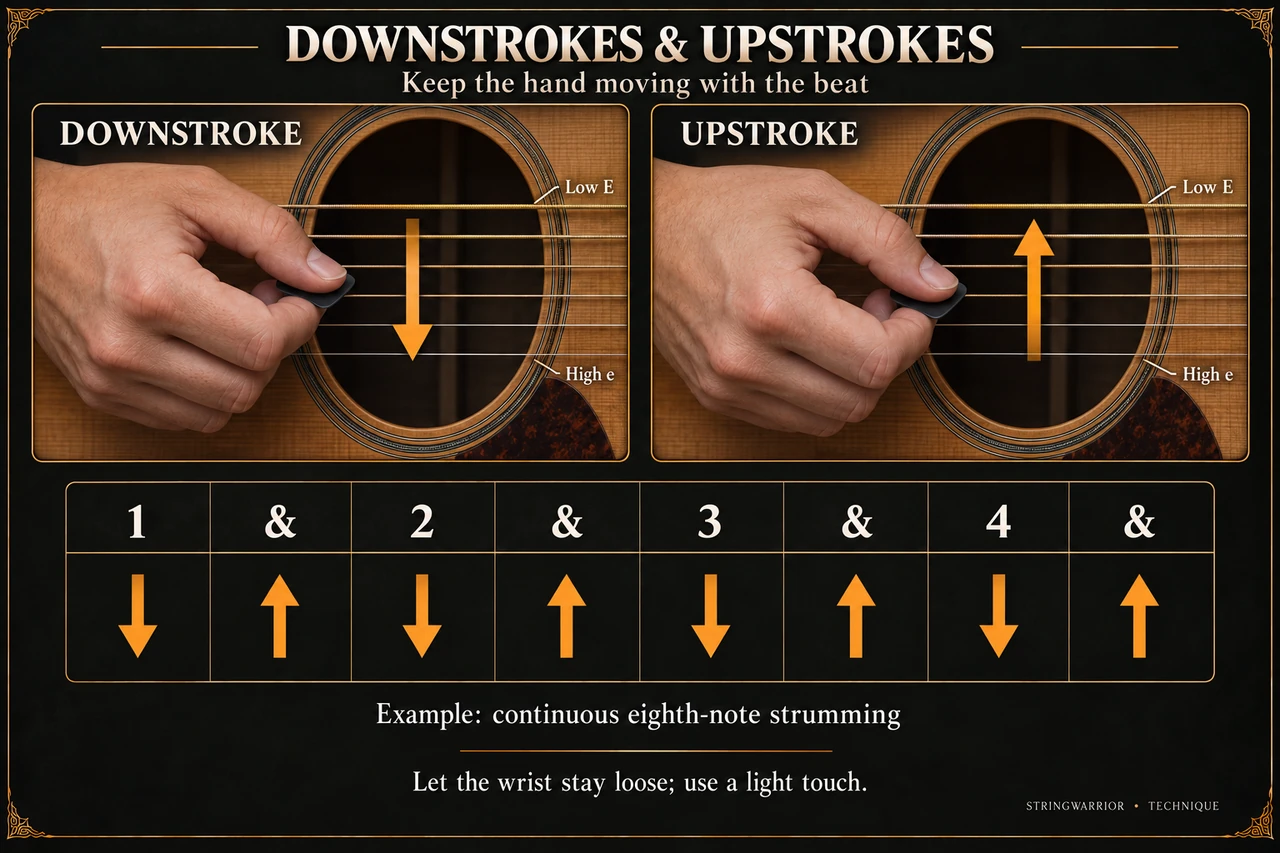
Downstrokes and upstrokes
A pick moves down from low E toward high e, then back up, and a count of 1 & 2 & 3 & 4 & pairs each beat with a downstroke and each & with an upstroke for continuous eighth notes. Open the full downstrokes and upstrokes illustration
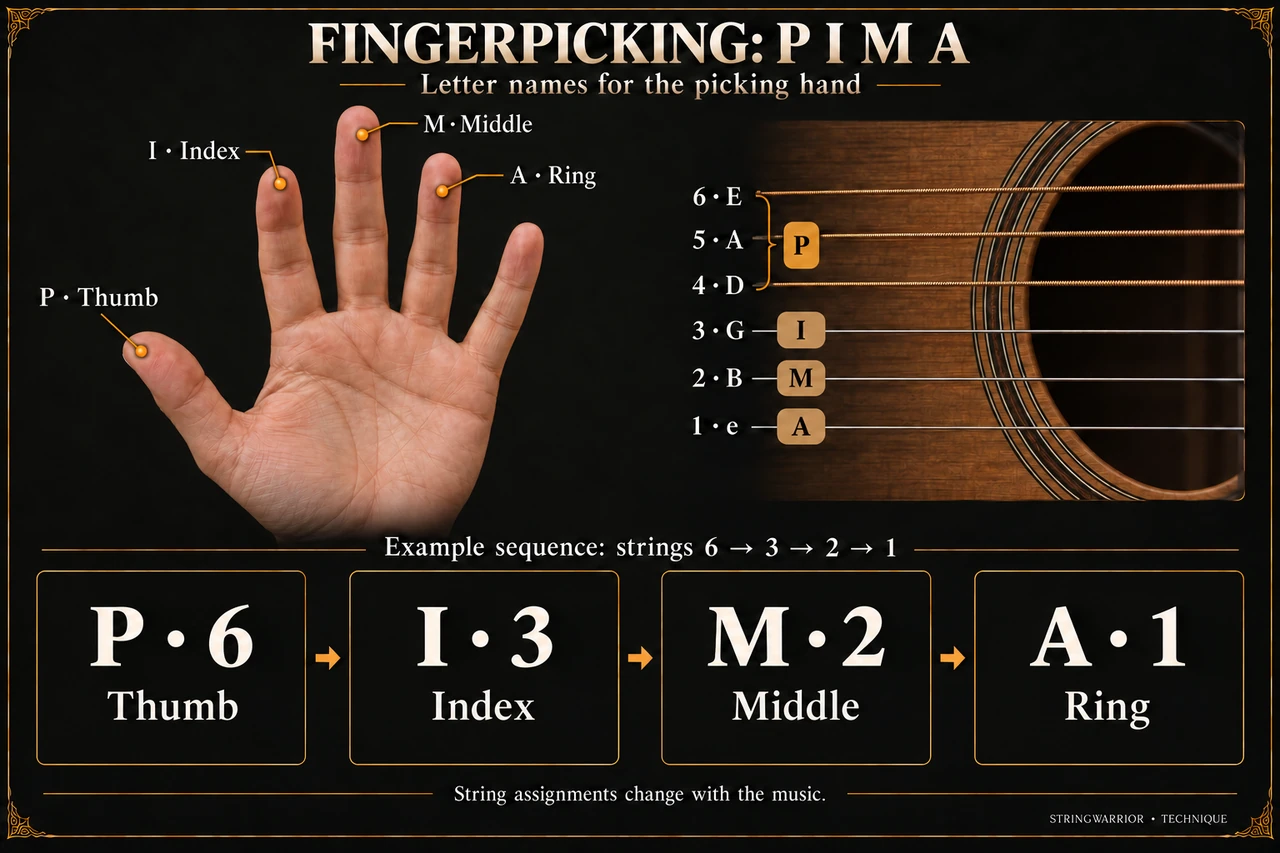
Fingerpicking and pima
Letters P, I, M and A name the thumb, index, middle and ring fingers; the thumb covers strings 6 to 4 while I, M and A take strings 3, 2 and 1 in a sample pattern. Open the full fingerpicking and pima illustration
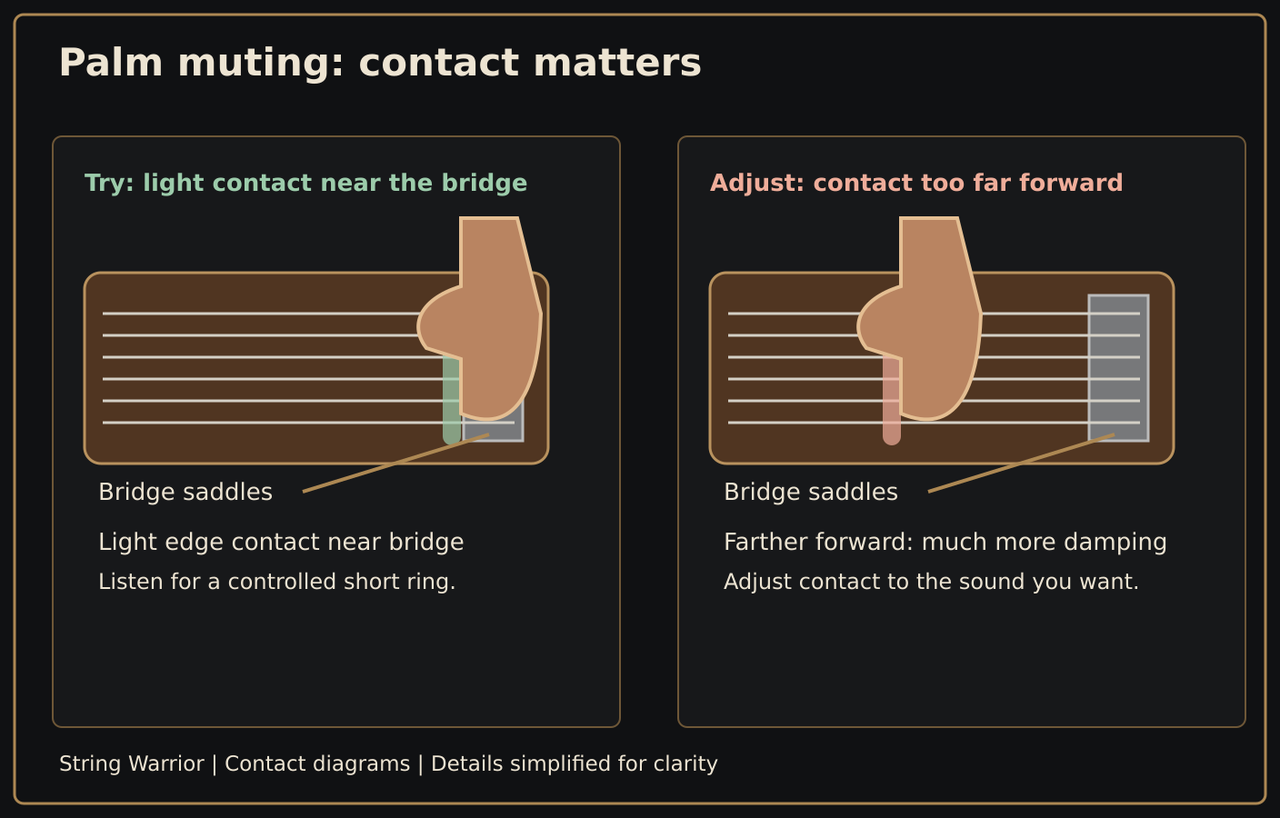
Palm muting
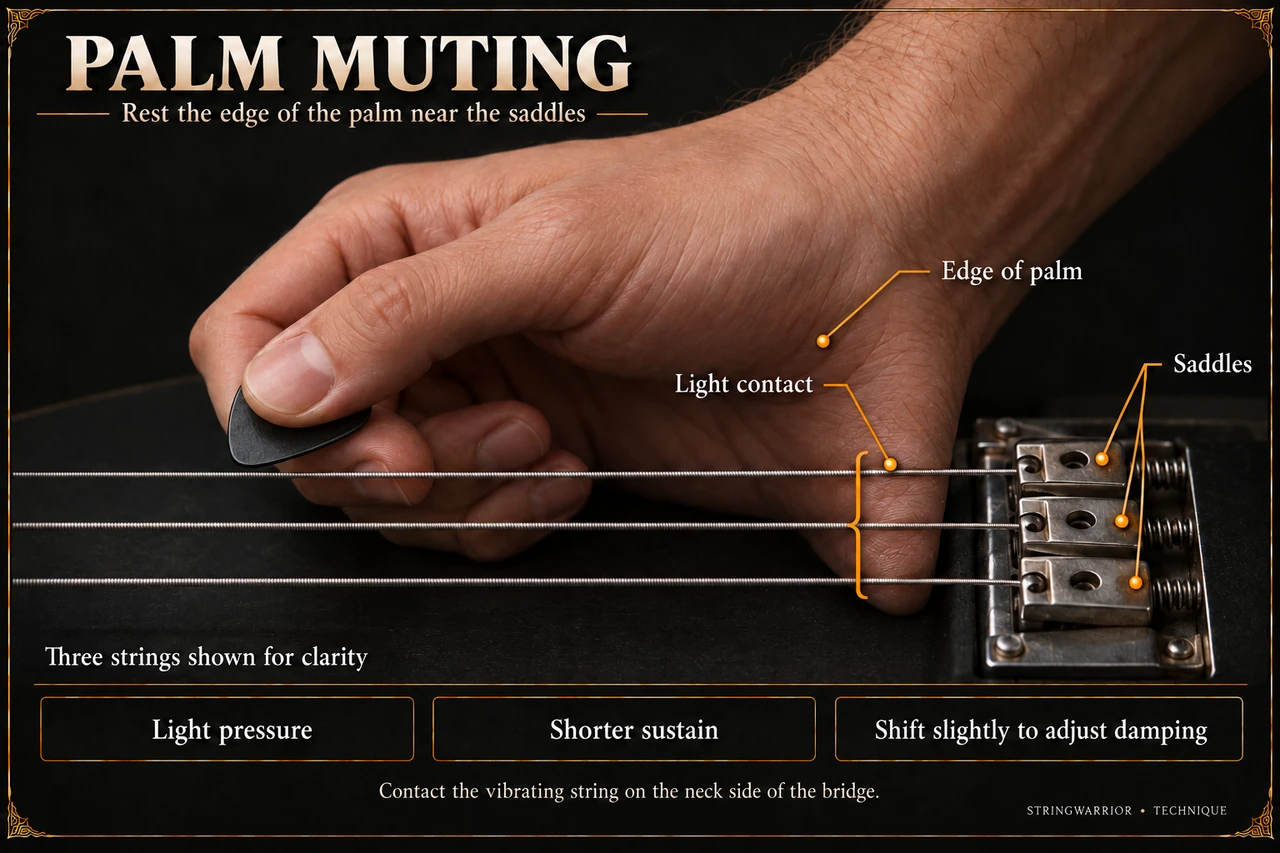
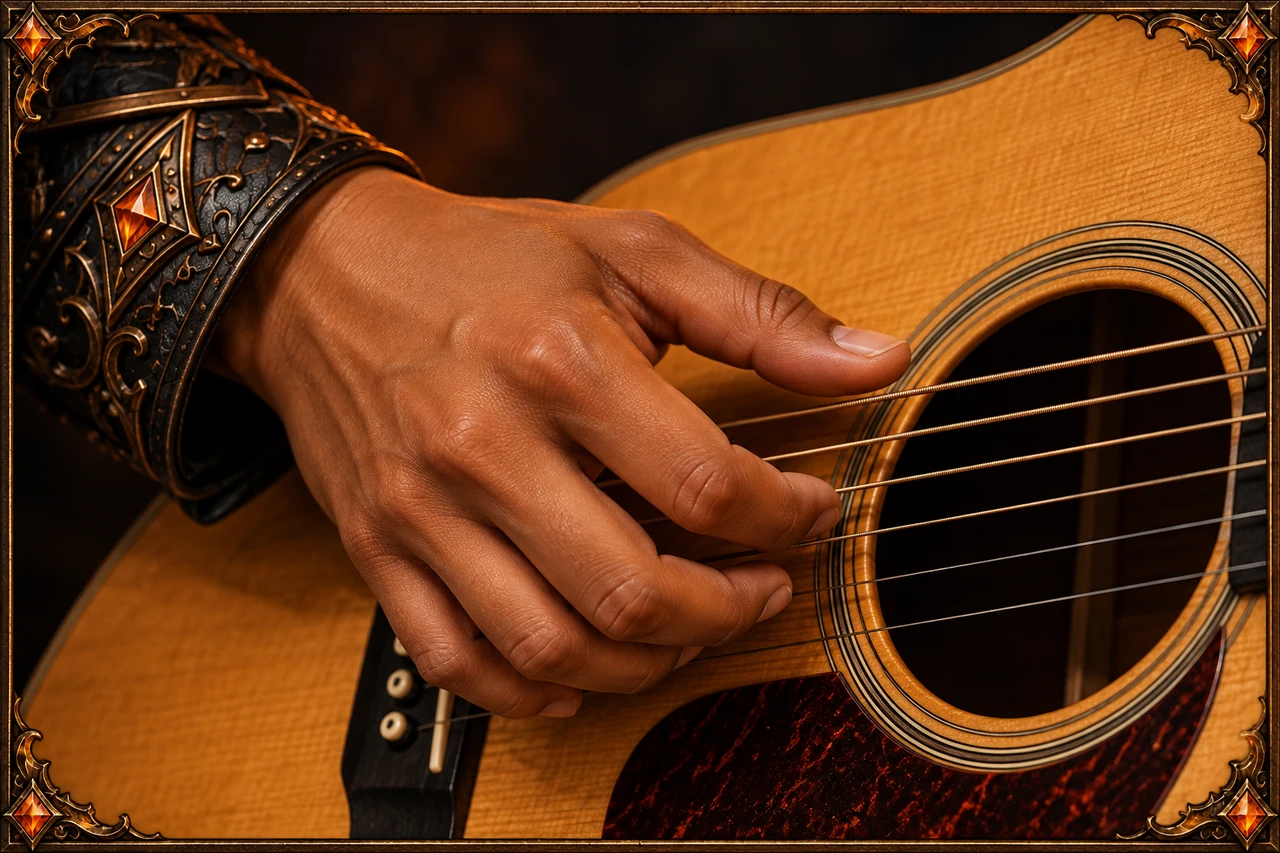
The edge of the picking-hand palm rests in light contact on the strings just in front of the bridge saddles, giving shorter sustain; shifting slightly adjusts how much the notes are damped. Open the full palm muting illustration
Fretting hand muting
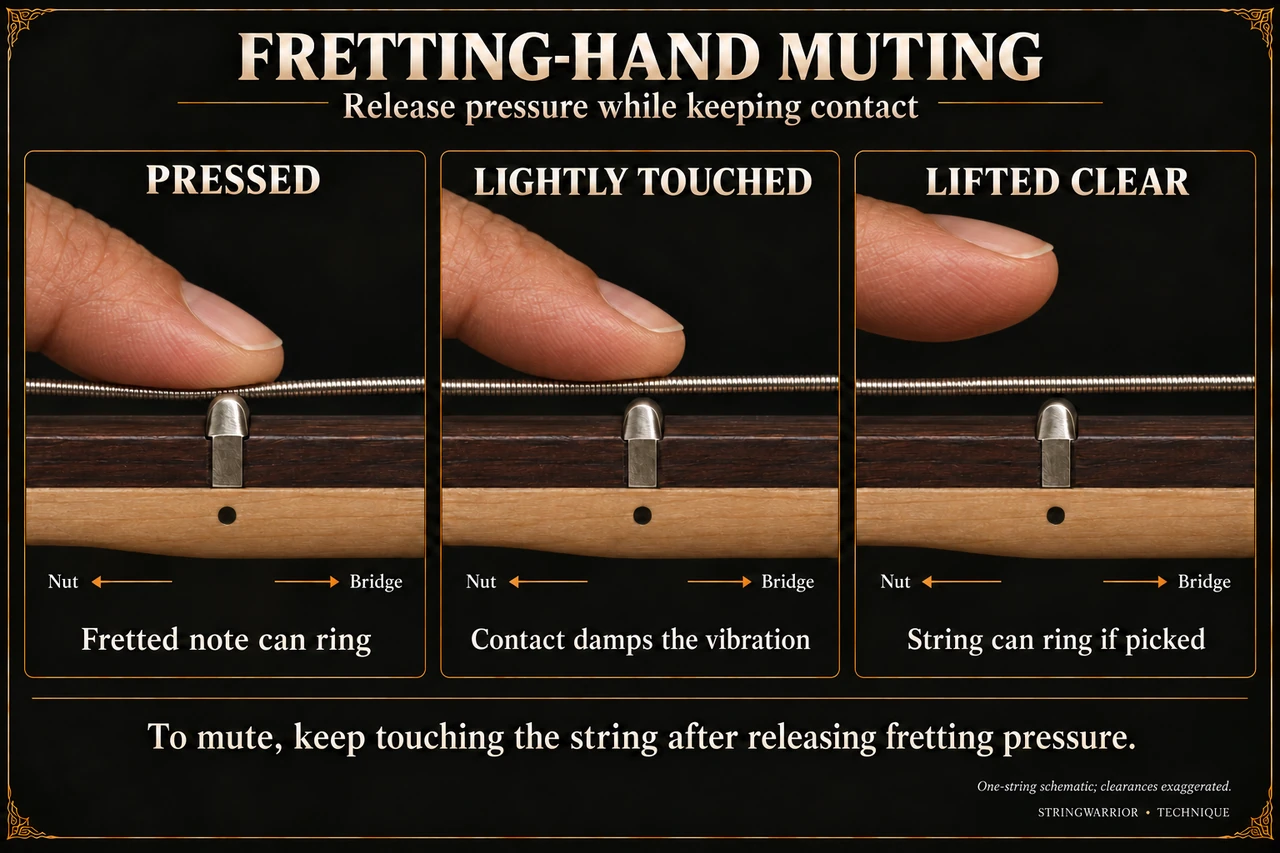
Three side views of one string over a fret compare a pressed finger that lets the note ring, a light touch that damps the vibration, and a lifted finger that leaves the string free. Open the full fretting hand muting illustration
Hammer ons and pull offs
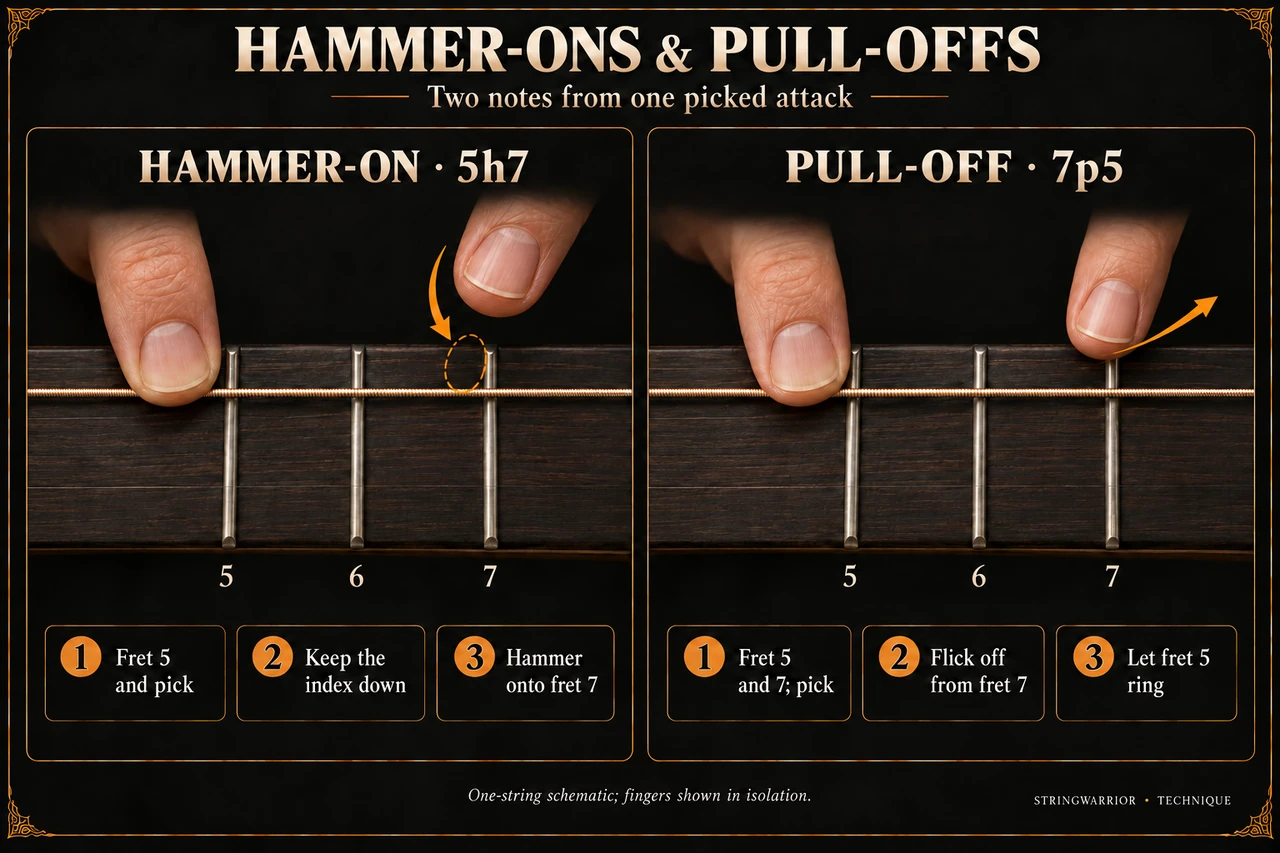
On one string, the hammer-on frets 5, picks, then brings another finger down onto fret 7 (5h7); the pull-off holds 5 and 7, picks, then flicks off fret 7 so fret 5 rings (7p5). Open the full hammer ons and pull offs illustration
Fretted slides
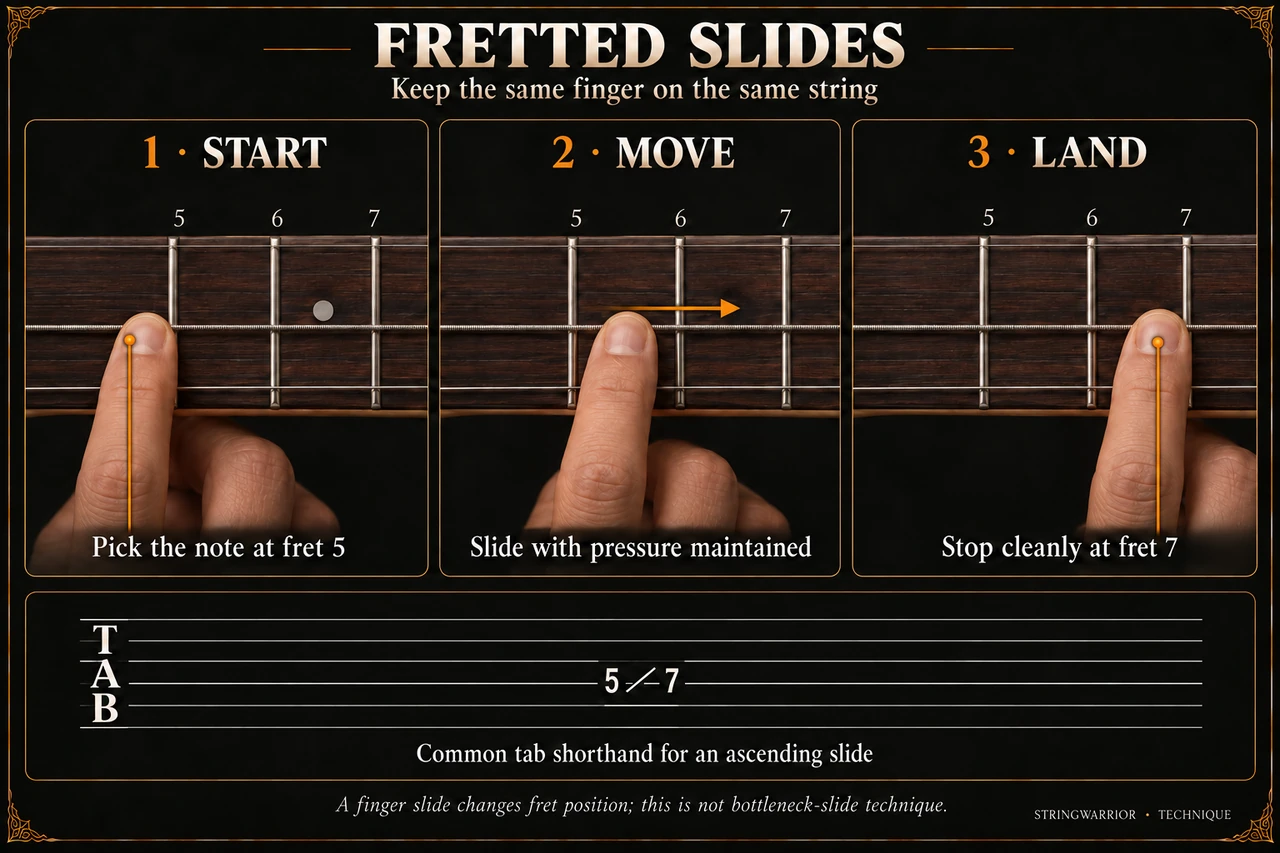
Three steps show one finger picking at fret 5, sliding up the string with pressure kept, and stopping cleanly at fret 7, with tab shorthand 5/7 for an ascending slide. Open the full fretted slides illustration
Bends and target pitch
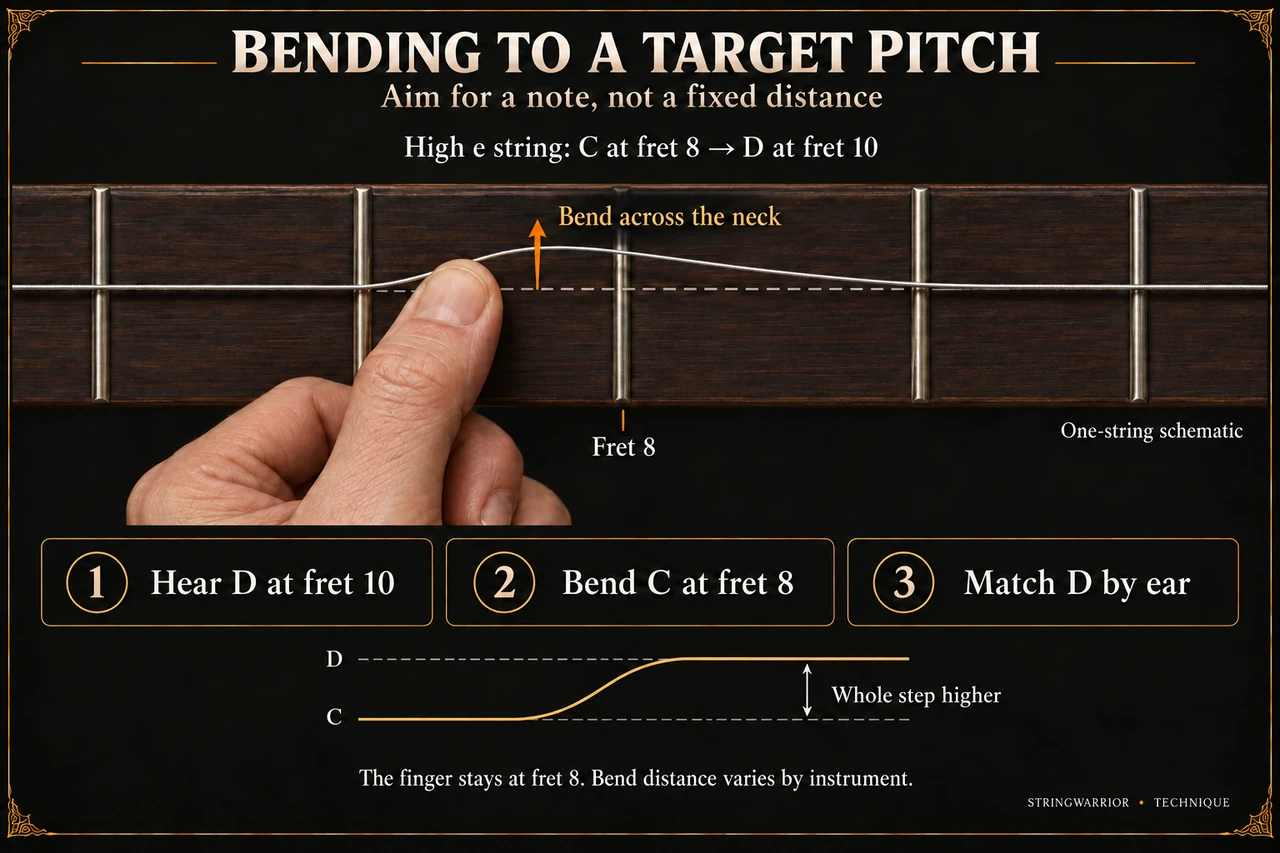
On the high e string, the finger stays at fret 8 and pushes C across the neck until it matches D from fret 10 by ear, a whole step higher, shown on a pitch curve. Open the full bends and target pitch illustration
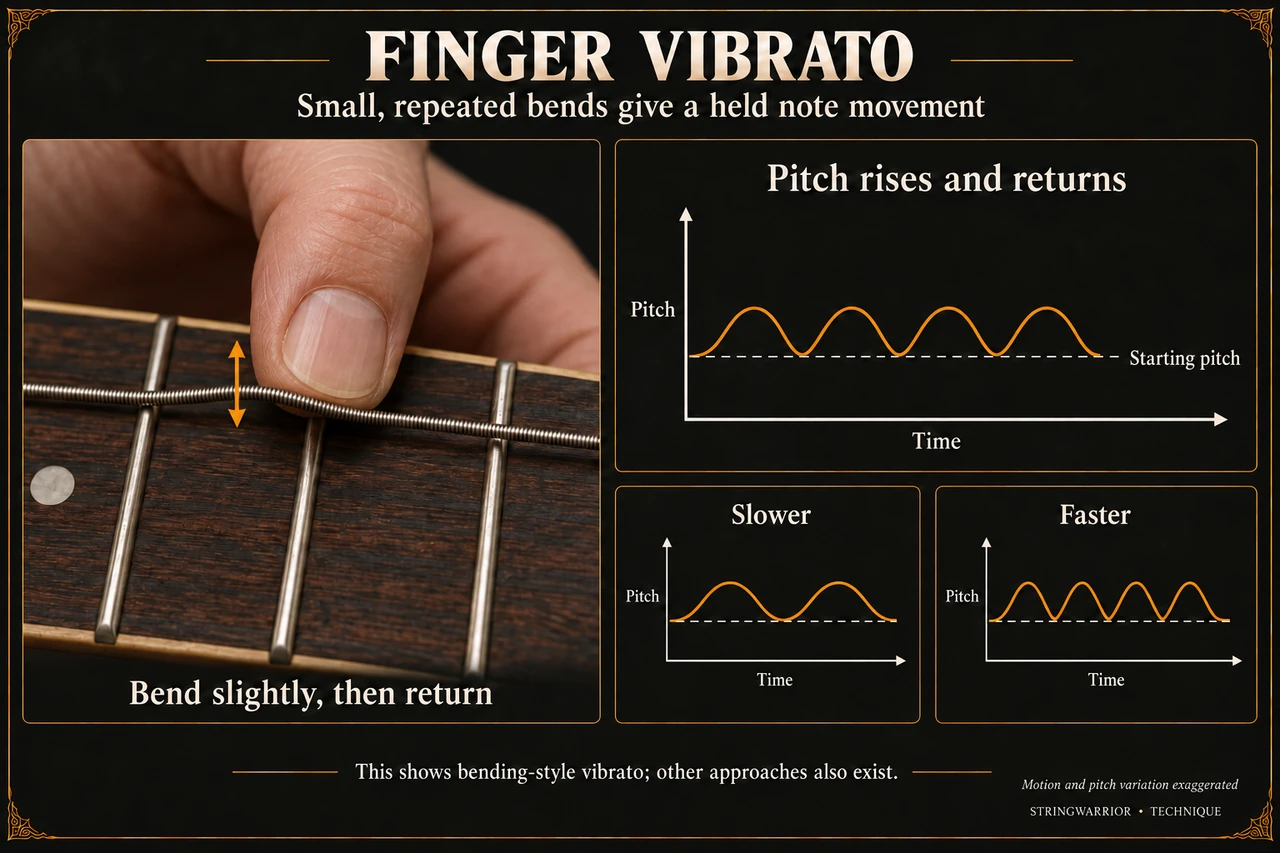
Finger vibrato
A fingertip bends the string slightly and lets it return, and pitch-over-time graphs show the note rising above its starting pitch and falling back, slower in one example and faster in another. Open the full finger vibrato illustration
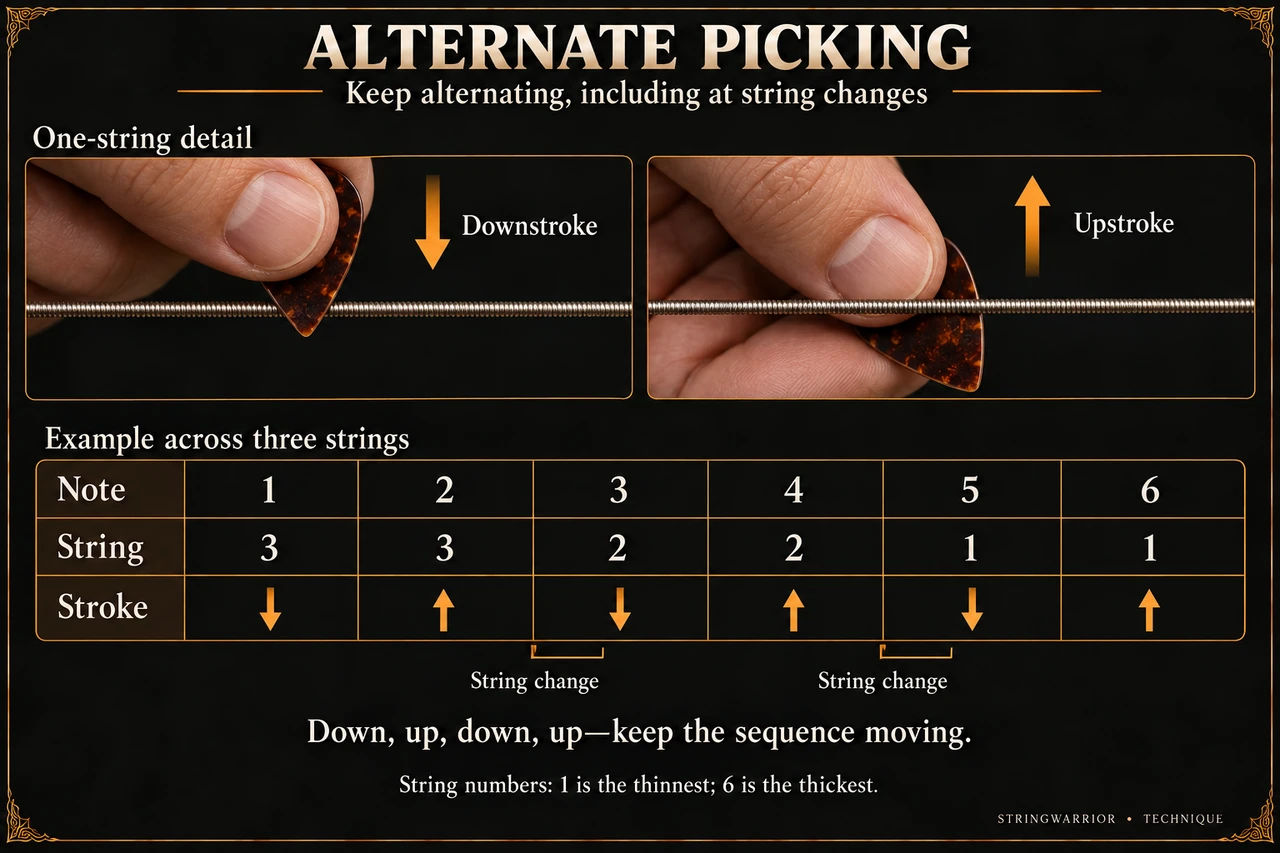
Alternate picking
Close-ups show the pick in a downstroke and an upstroke, and a table of six notes across strings 3, 2 and 1 keeps down-up order unbroken through each string change. Open the full alternate picking illustration
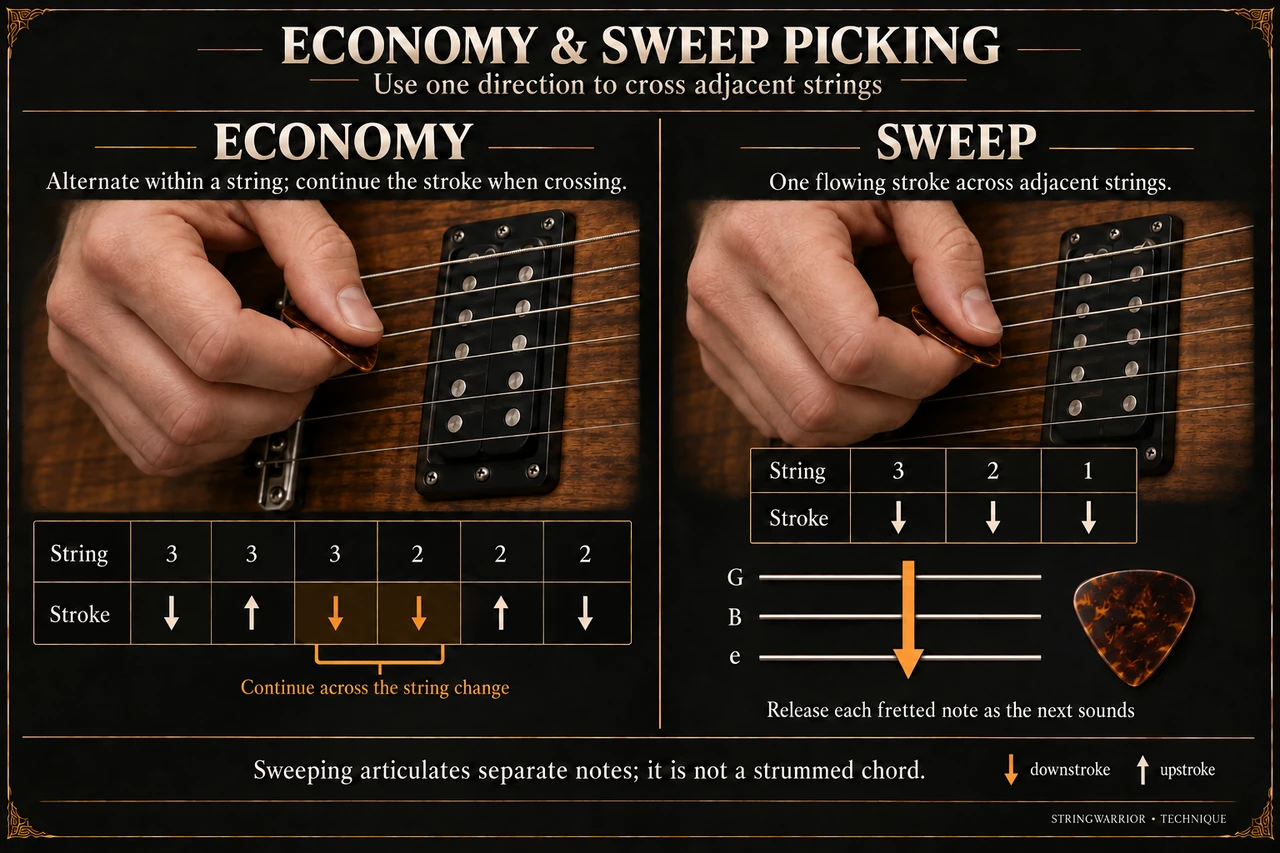
Economy and sweep picking
Economy picking alternates on one string but continues the same stroke across a string change, while sweep picking drags one downstroke across the G, B and e strings, sounding separate notes rather than a strum. Open the full economy and sweep picking illustration
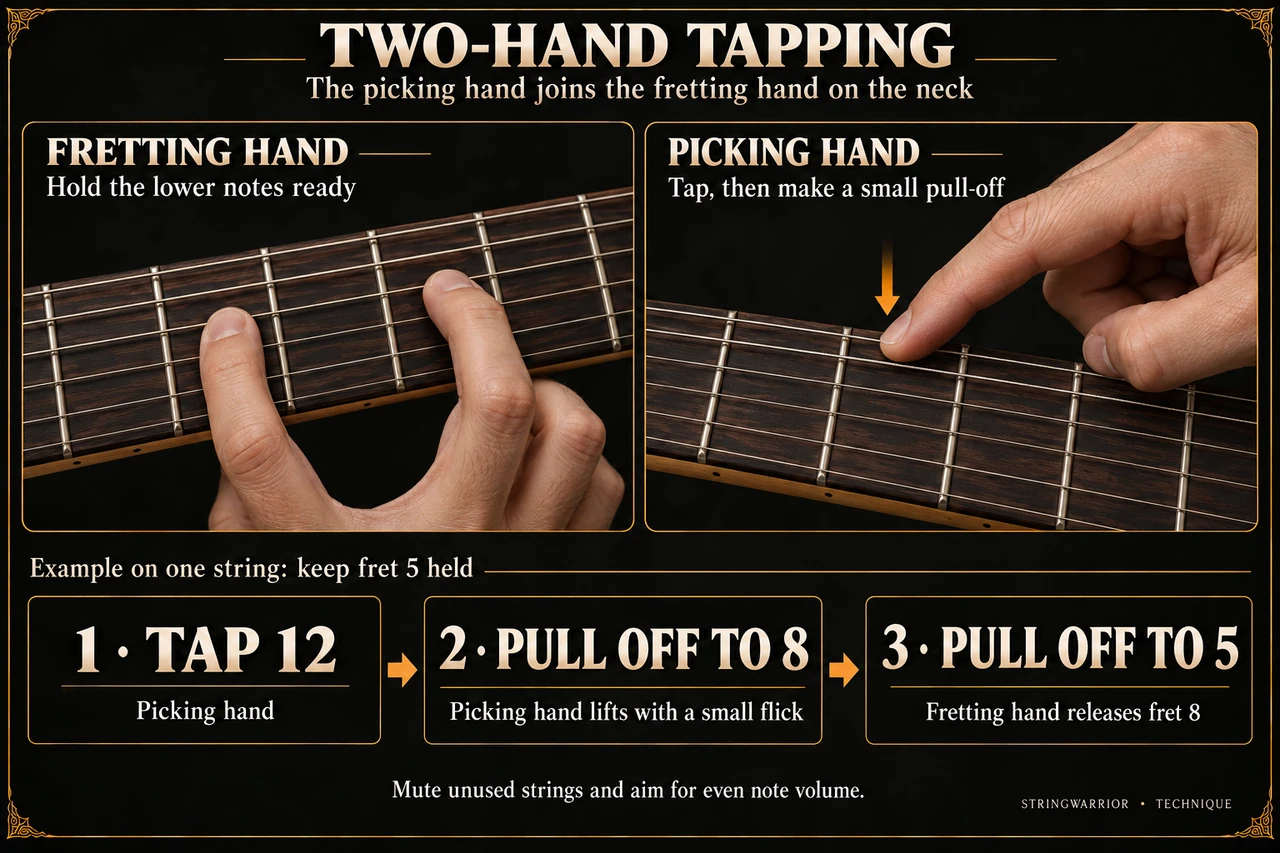
Two hand tapping
The fretting hand holds fret 5 while the picking hand taps fret 12, then the picking hand pulls off to 8 and the fretting hand releases to sound fret 5, muting unused strings. Open the full two hand tapping illustration
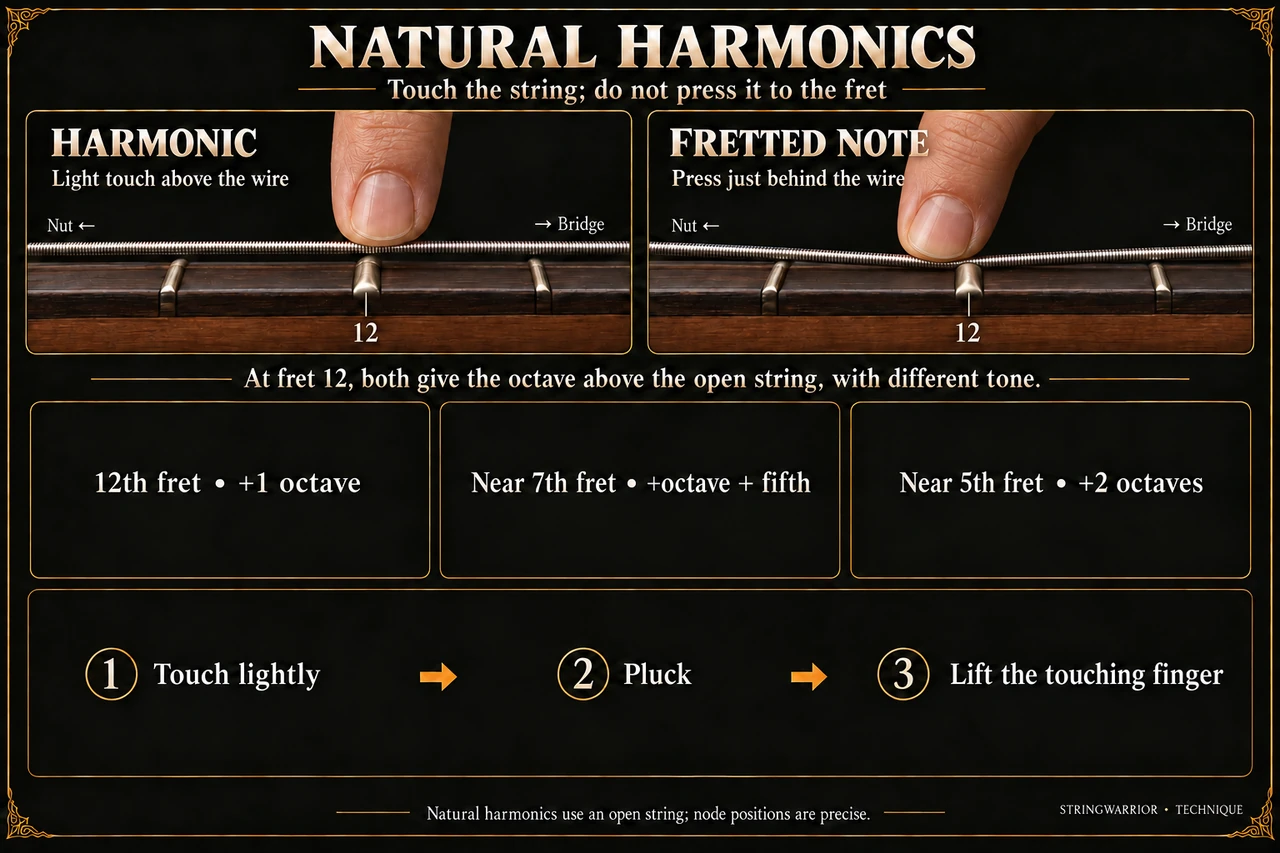
Natural harmonics
A light touch over the 12th fret wire is compared with pressing behind it, then the pitch gained near frets 12, 7 and 5 is listed with three steps: touch lightly, pluck, lift the finger. Open the full natural harmonics illustration
Instrument families
Four string electric bass anatomy
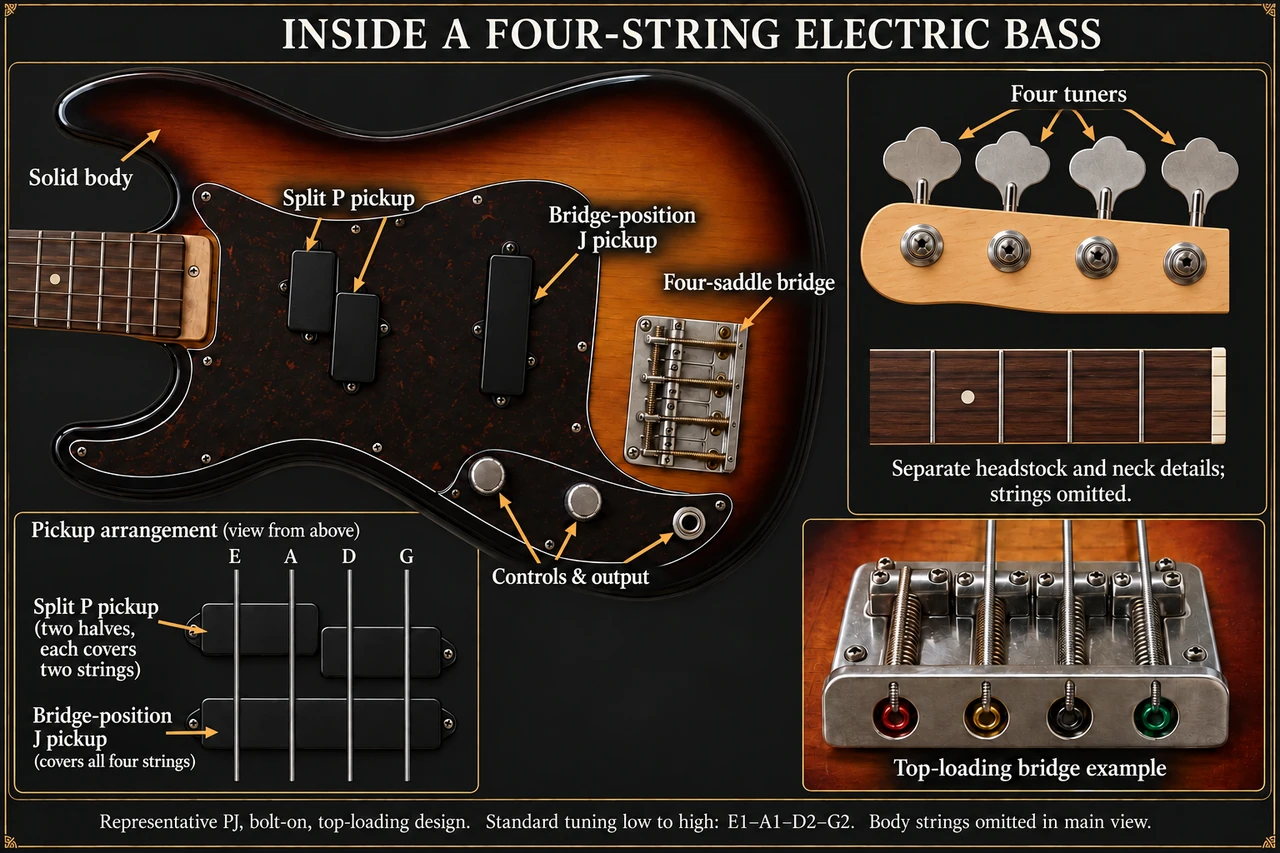
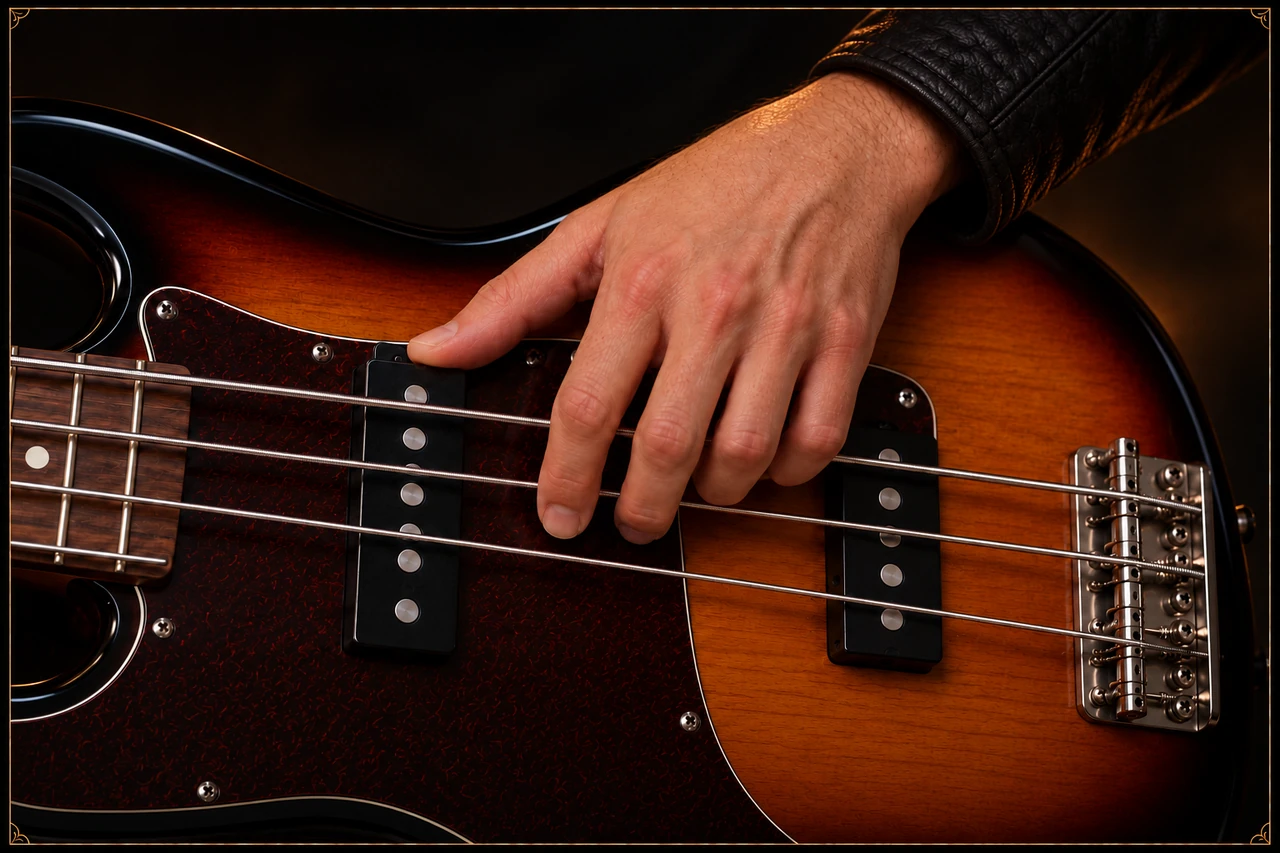
Labels mark the solid body, split P pickup, bridge-position J pickup, four-saddle bridge, controls and output, four tuners, and a top-loading bridge, with standard tuning E1-A1-D2-G2. Open the full four string electric bass anatomy illustration
Flathead resonator banjo exploded anatomy
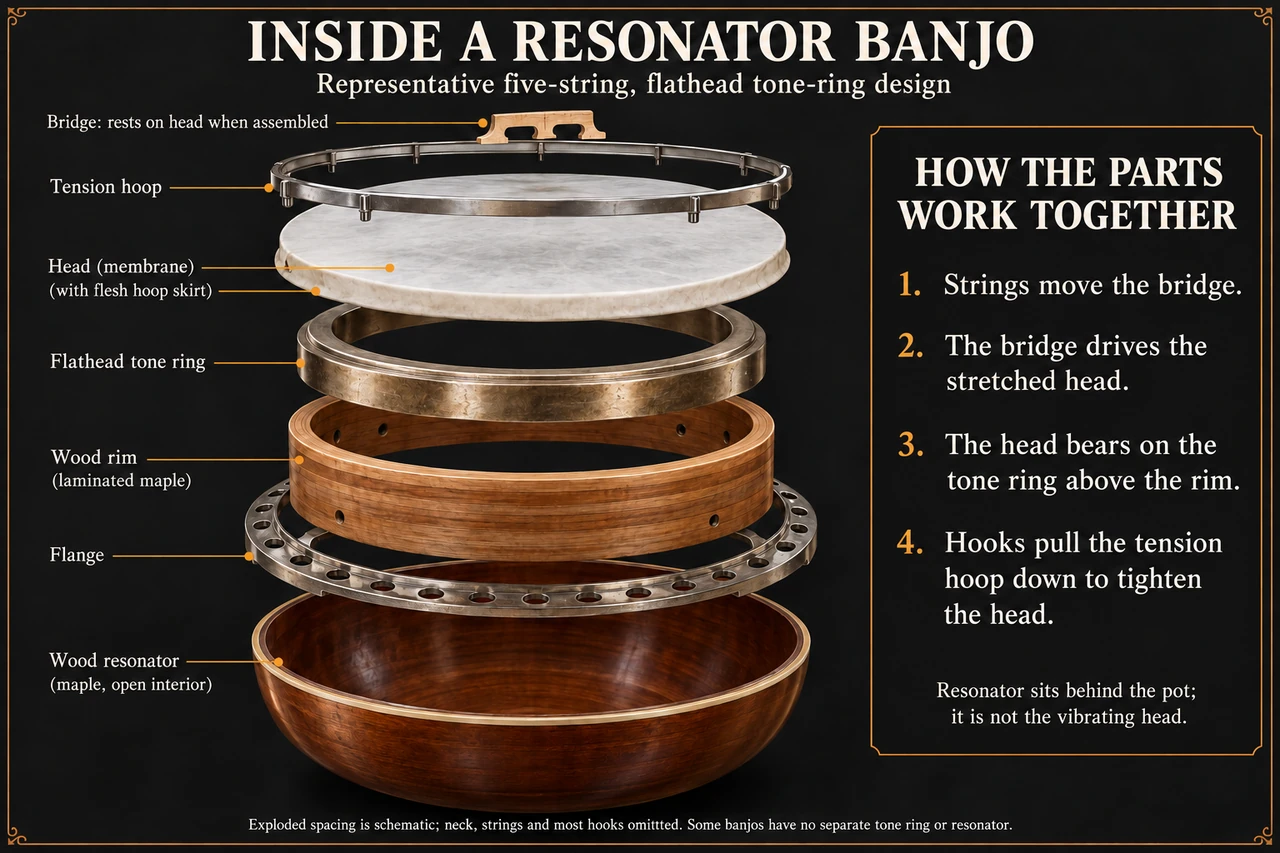
An exploded stack shows the bridge, tension hoop, head, flathead tone ring, maple rim, flange and wood resonator, with numbered notes on how strings drive the bridge and hooks tighten the head. Open the full flathead resonator banjo exploded anatomy illustration
Five string tenor and plectrum banjos
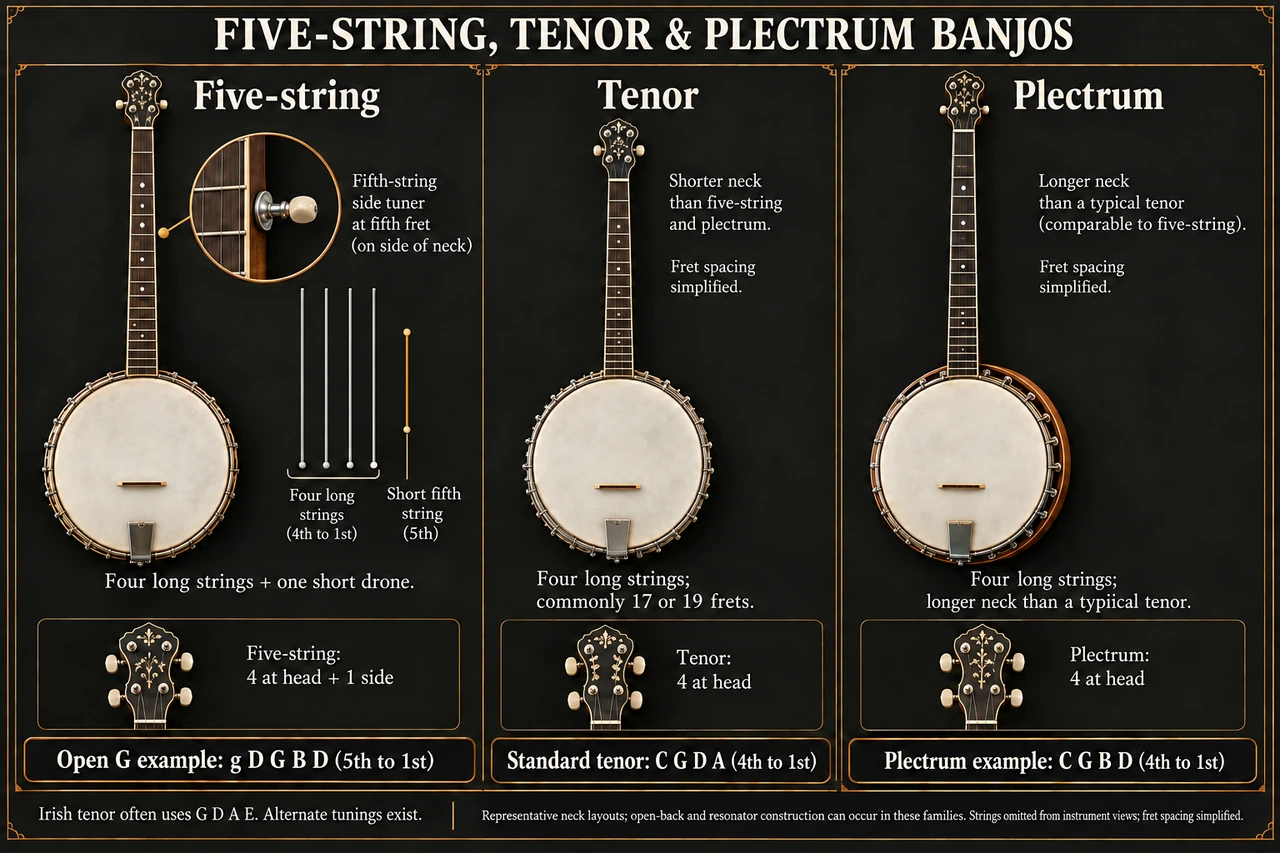
Side by side, the five-string has four long strings plus a short drone with a side tuner at the fifth fret, while tenor and plectrum have four at the head. Tunings shown: g D G B D, C G D A and C G B D. Open the full five string tenor and plectrum banjos illustration
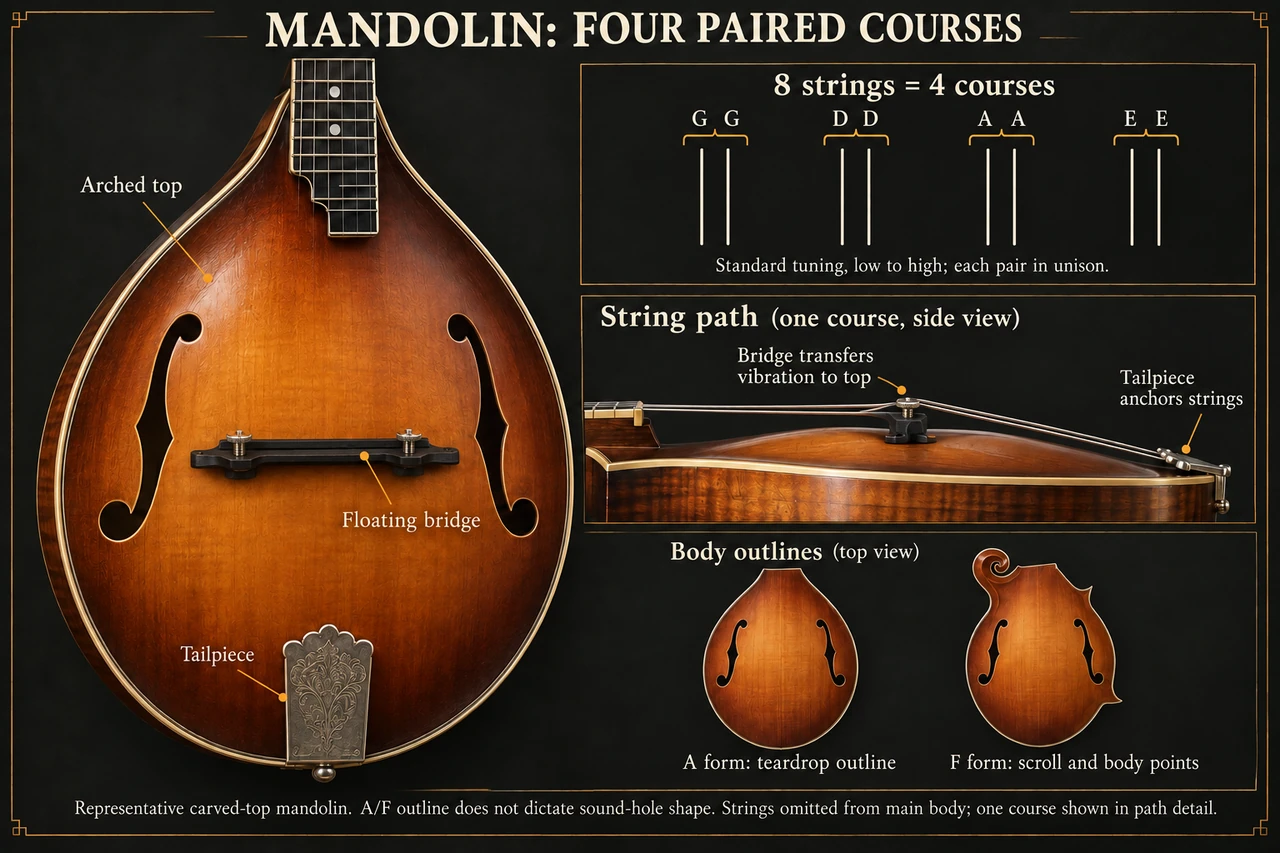
Mandolin construction and courses
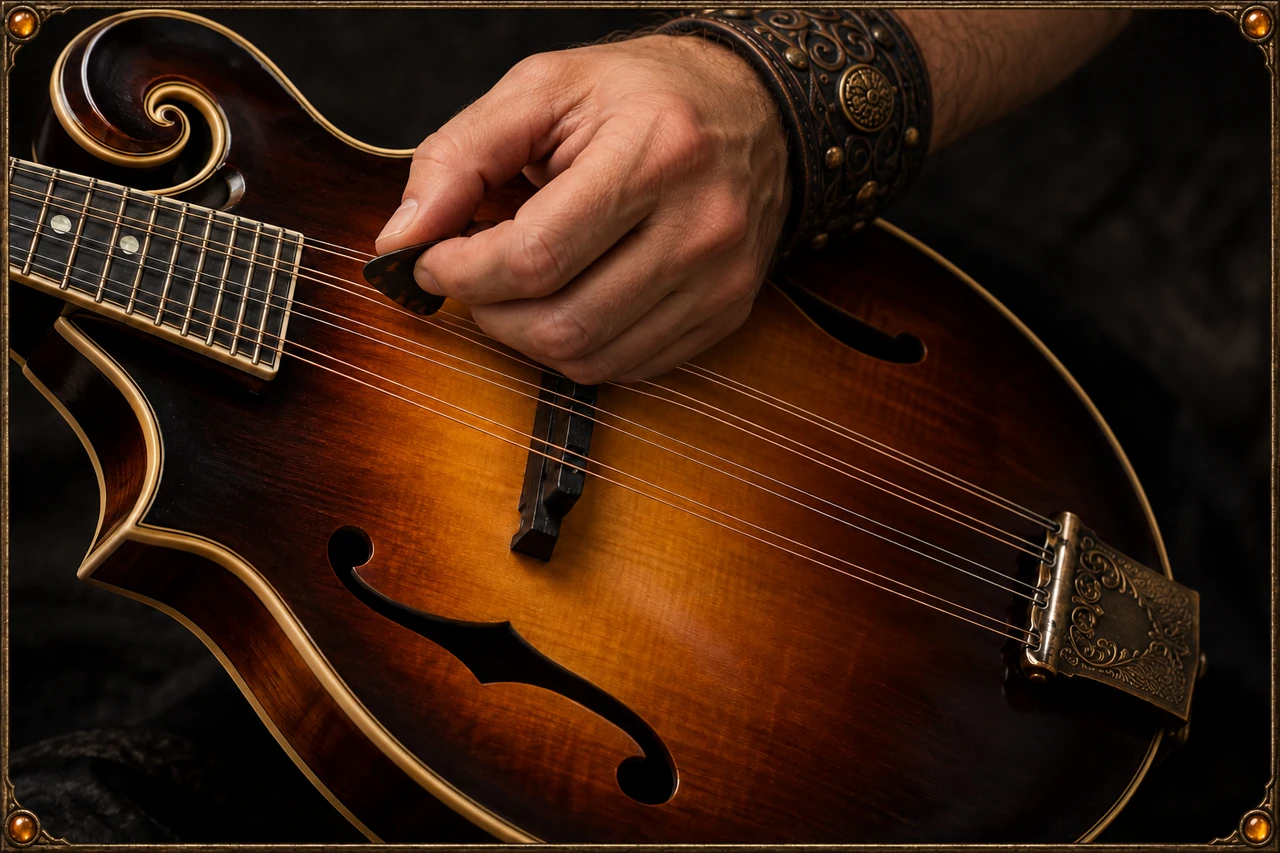
Eight strings form four unison pairs tuned G, D, A, E. Labels mark the arched top, floating bridge and tailpiece, a side view traces the string path, and A form and F form body outlines are compared. Open the full mandolin construction and courses illustration
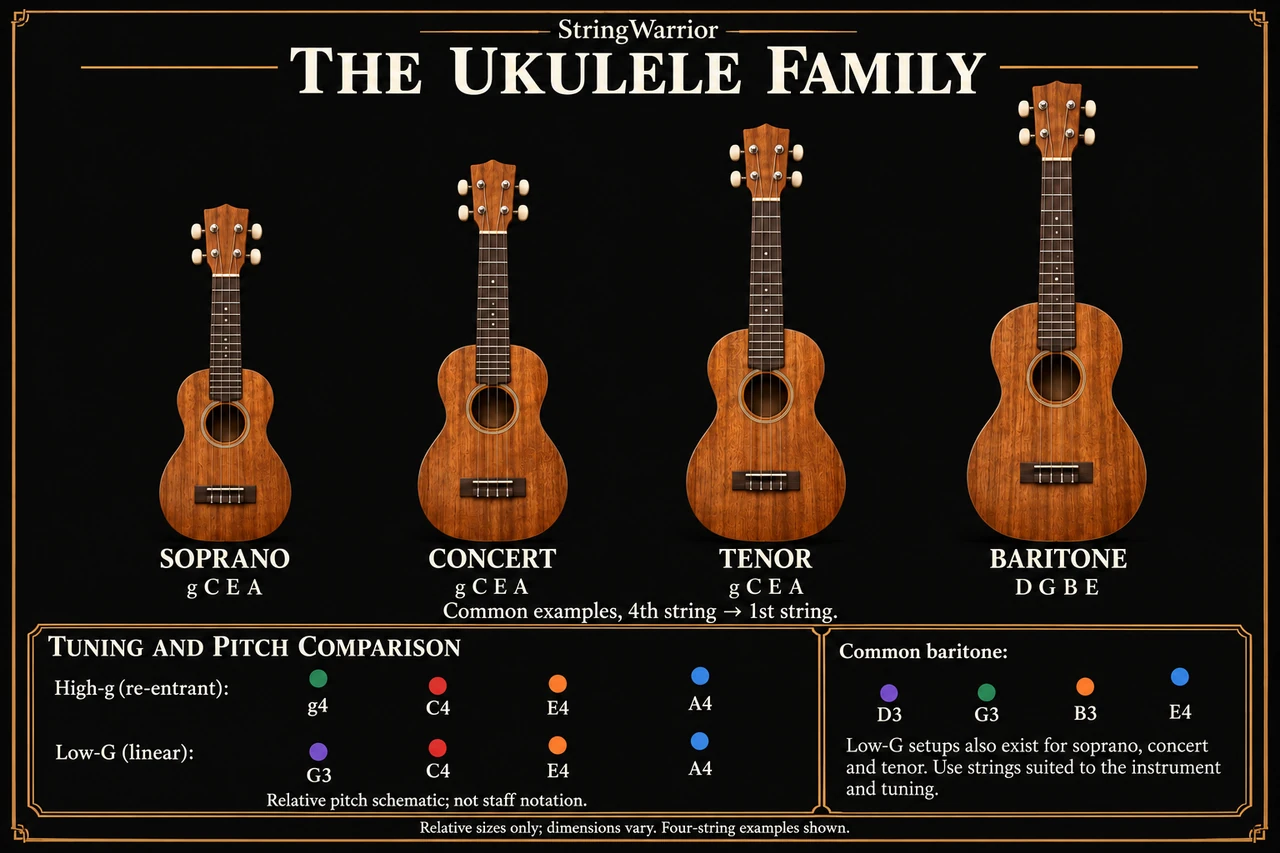
Ukulele family and tuning
Soprano, concert and tenor sizes share g C E A tuning, and baritone uses D G B E. Pitch charts compare high-g re-entrant (g4 C4 E4 A4) with low-G linear (G3 C4 E4 A4). Open the full ukulele family and tuning illustration
Violin and viola anatomy
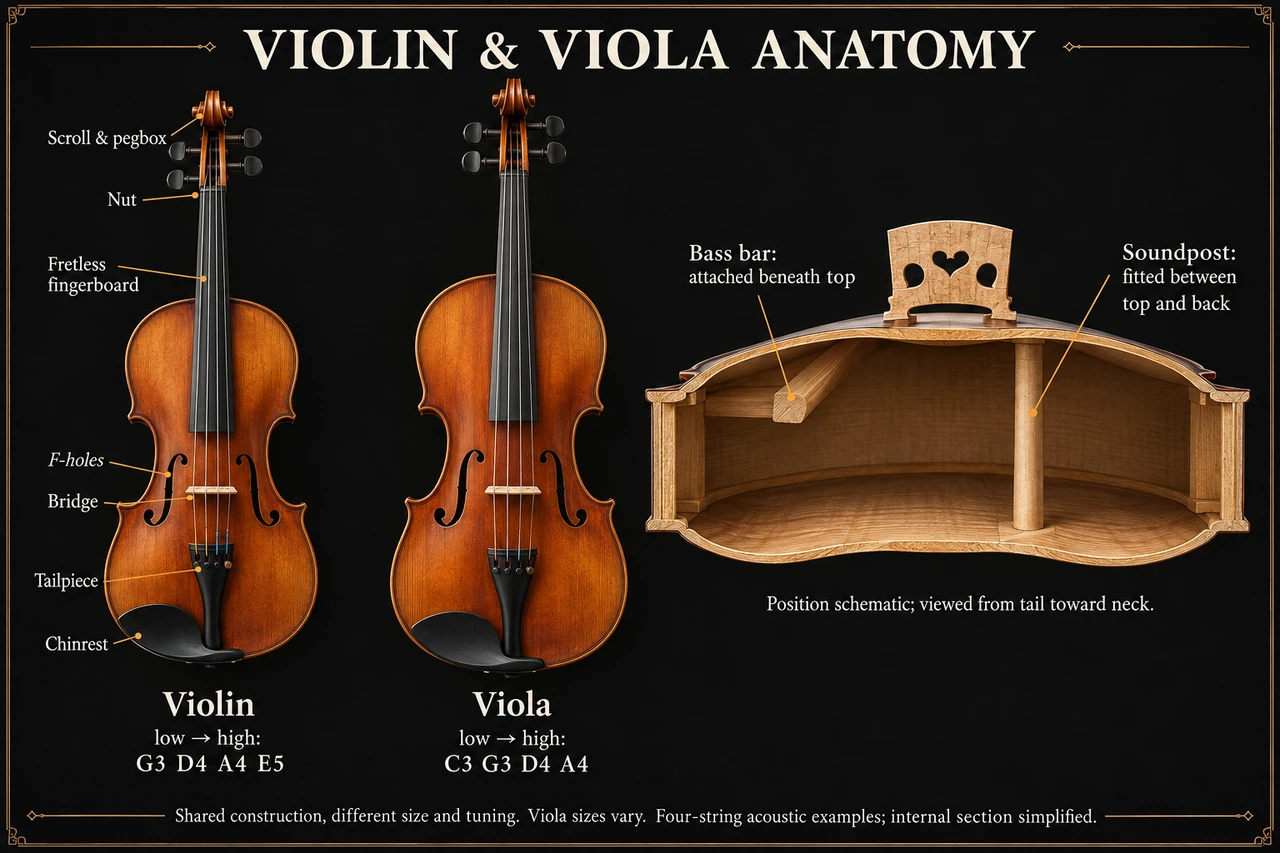
Labels mark the scroll and pegbox, nut, fretless fingerboard, f-holes, bridge, tailpiece and chinrest. Violin tunes G3 D4 A4 E5, viola C3 G3 D4 A4, and a cutaway shows the bass bar and soundpost. Open the full violin and viola anatomy illustration
Cello and double bass anatomy
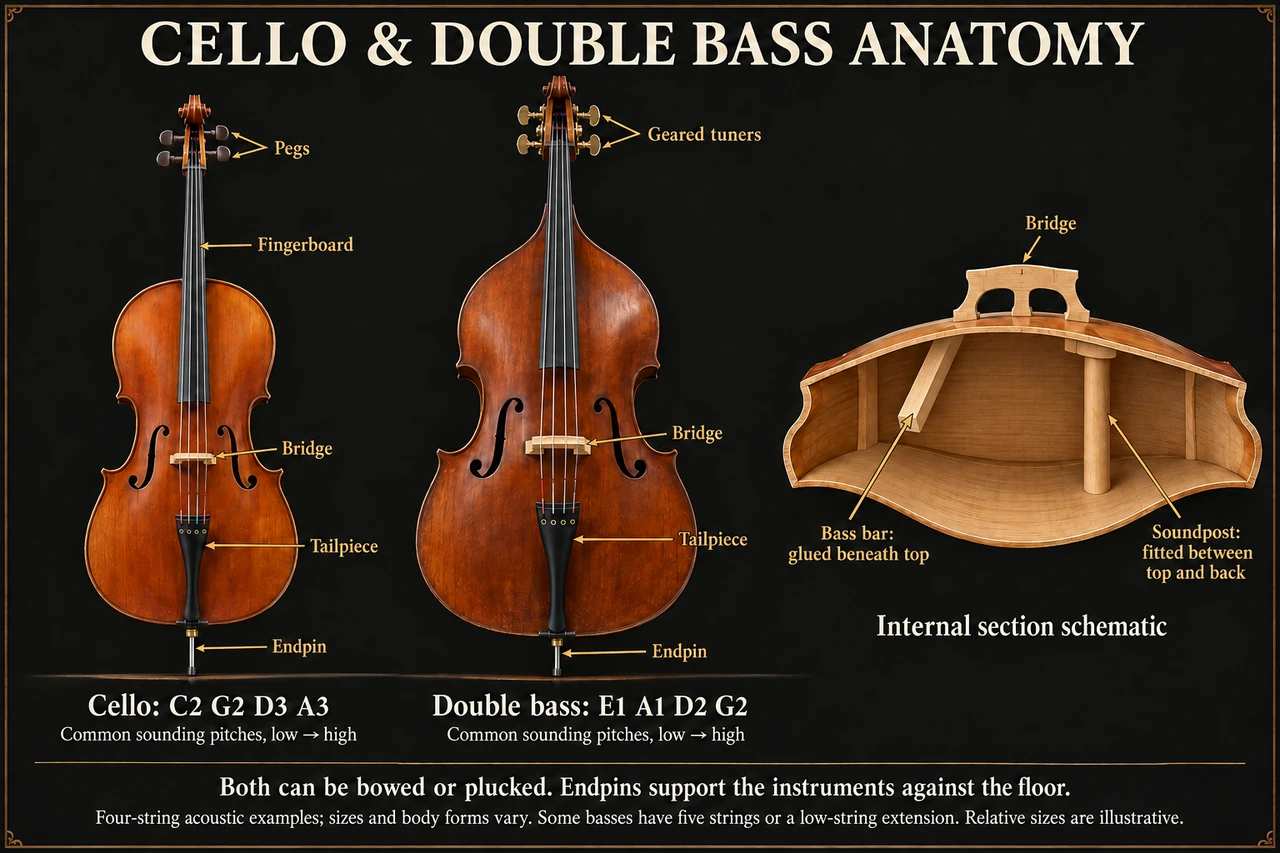
Labels mark pegs, geared tuners, fingerboard, bridge, tailpiece and endpin. Cello tunes C2 G2 D3 A3, bass E1 A1 D2 G2, and a cutaway places the bass bar and soundpost under the bridge. Open the full cello and double bass anatomy illustration
How bowed instruments make sound
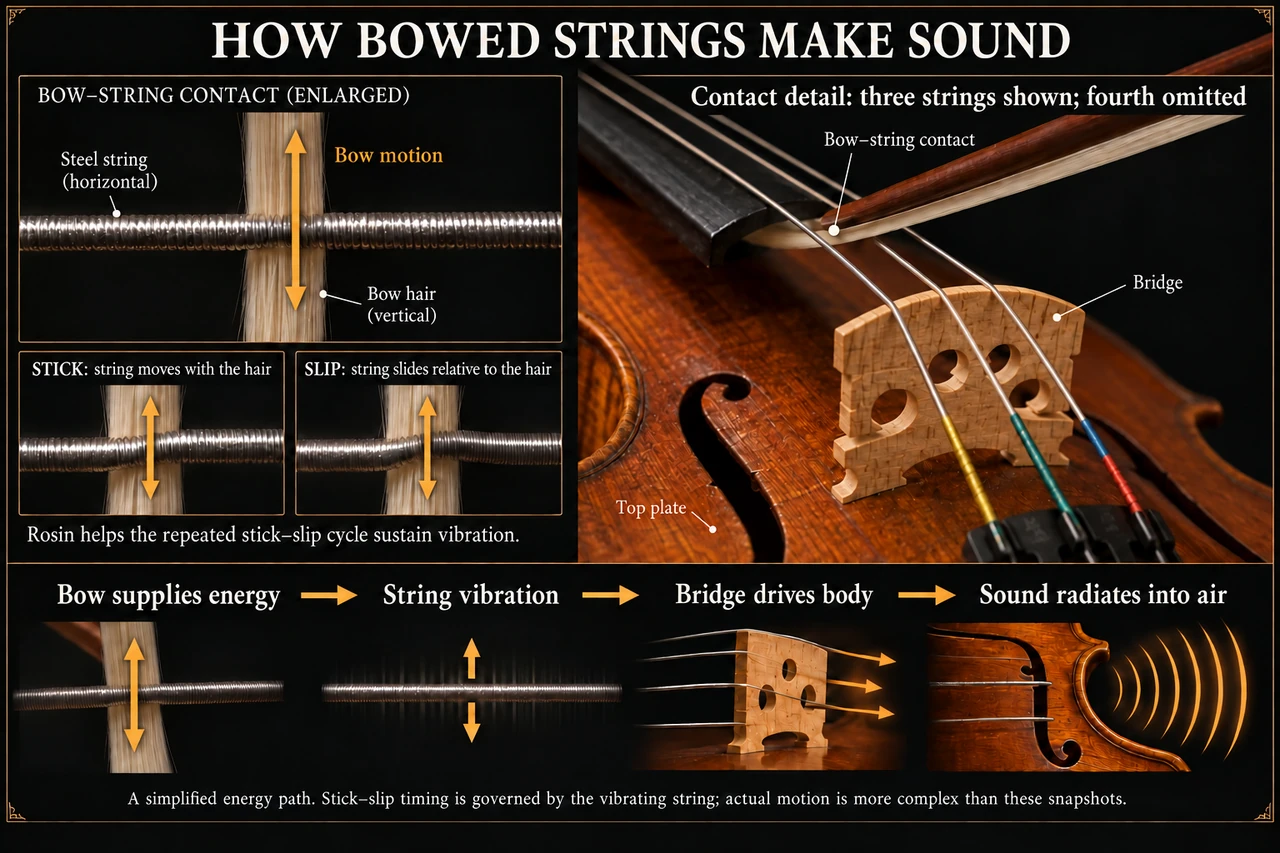
Enlarged views show bow hair gripping a steel string (stick) then sliding (slip), a cycle rosin helps sustain. Energy then flows from bow to vibrating string, through the bridge into the body and out as sound. Open the full how bowed instruments make sound illustration
Six string lap steel anatomy
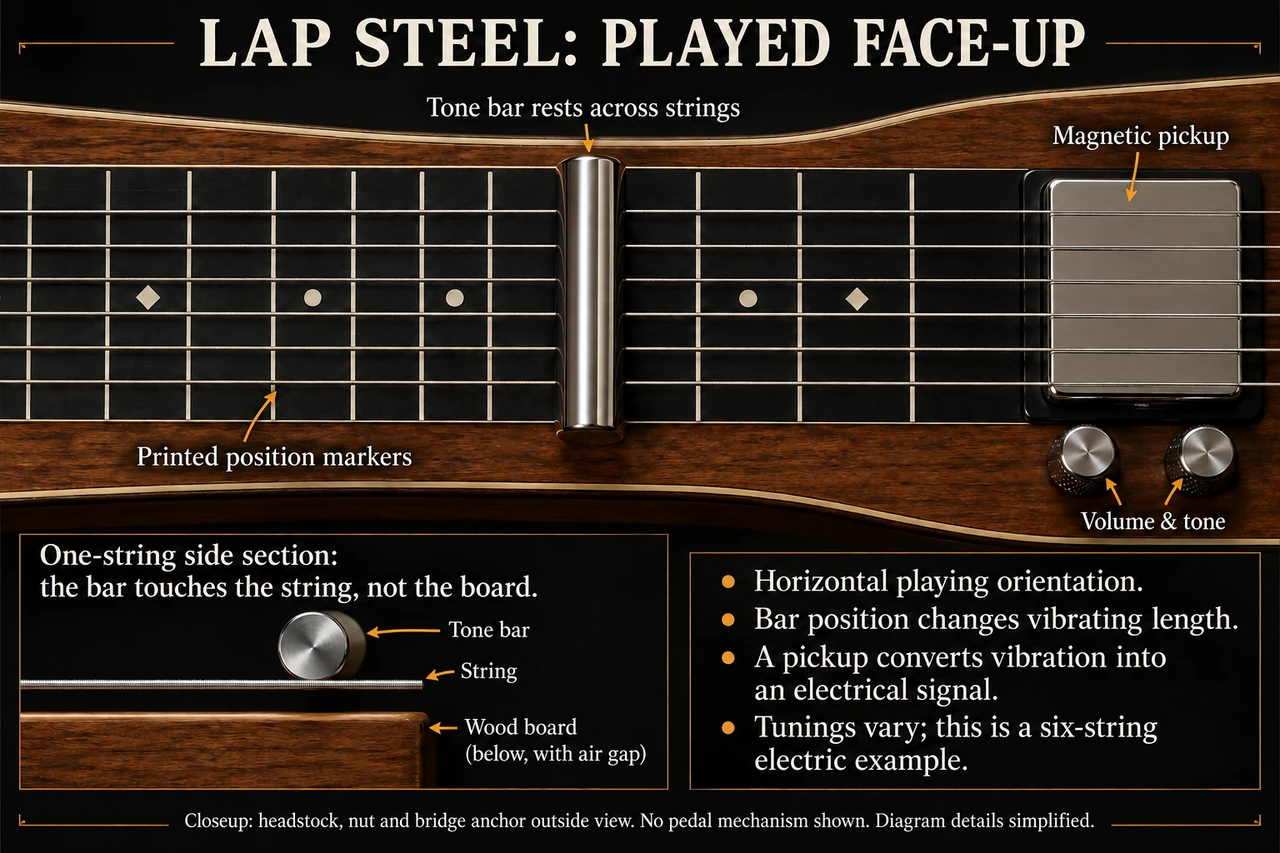
A tone bar rests across six strings above printed position markers, near a magnetic pickup with volume and tone knobs. A side section shows the bar touches the string, not the wood board, changing vibrating length. Open the full six string lap steel anatomy illustration
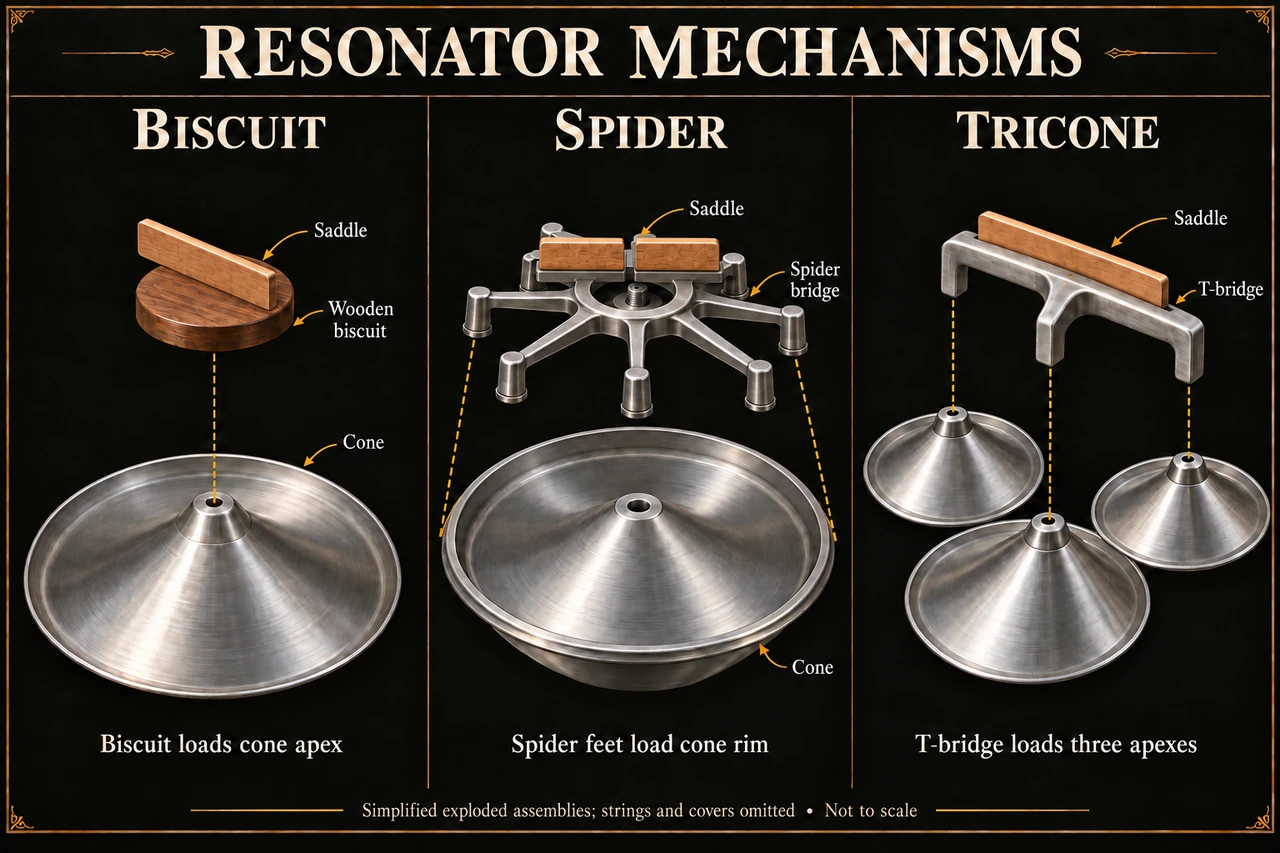
Resonator mechanisms
Exploded views compare three cone setups: a wooden biscuit and saddle loading one cone apex, spider bridge feet loading a cone rim, and a T-bridge loading the apexes of three small cones. Open the full resonator mechanisms illustration
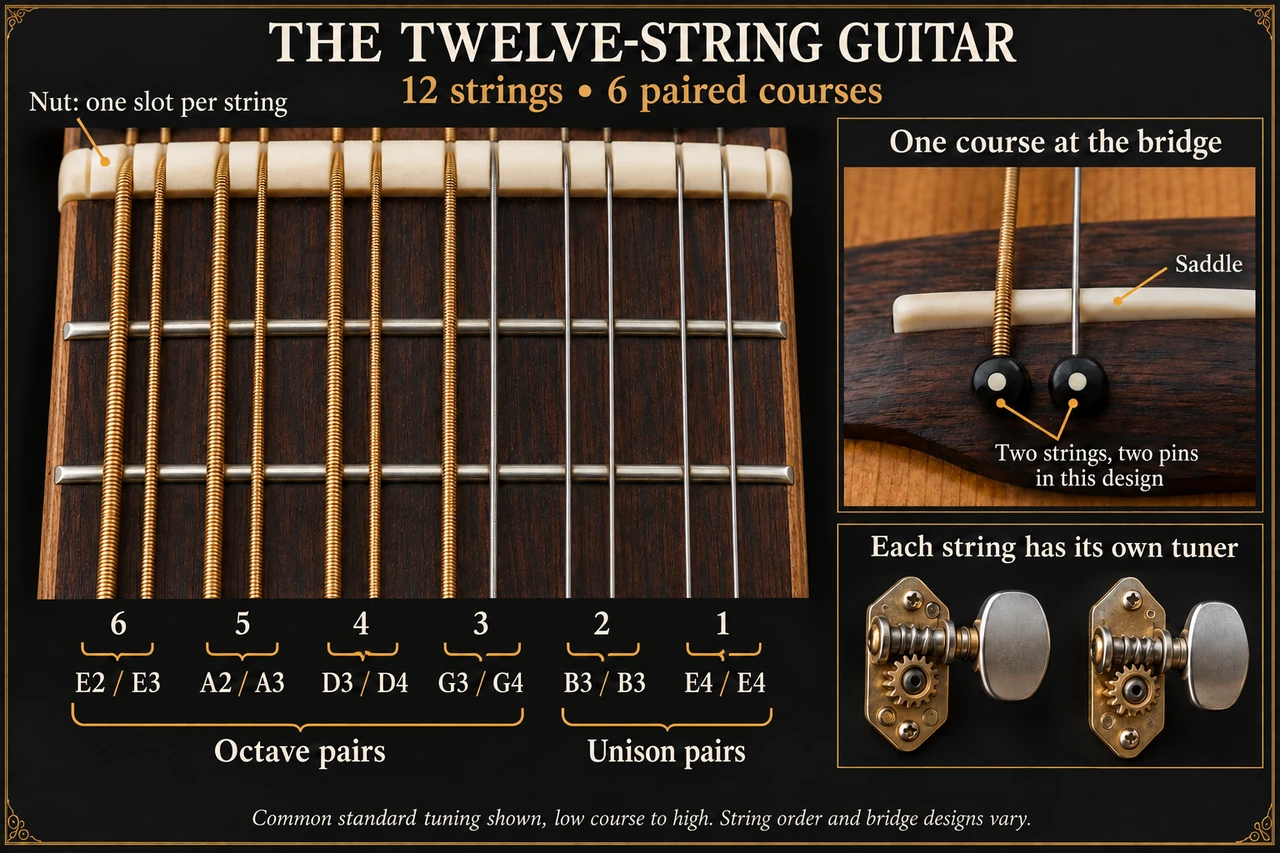
Twelve string guitar
Twelve strings pass through a nut slot each, grouped as octave pairs E2/E3, A2/A3, D3/D4, G3/G4 and unison pairs B3/B3, E4/E4. Insets show two bridge pins per course and one tuner per string. Open the full twelve string guitar illustration
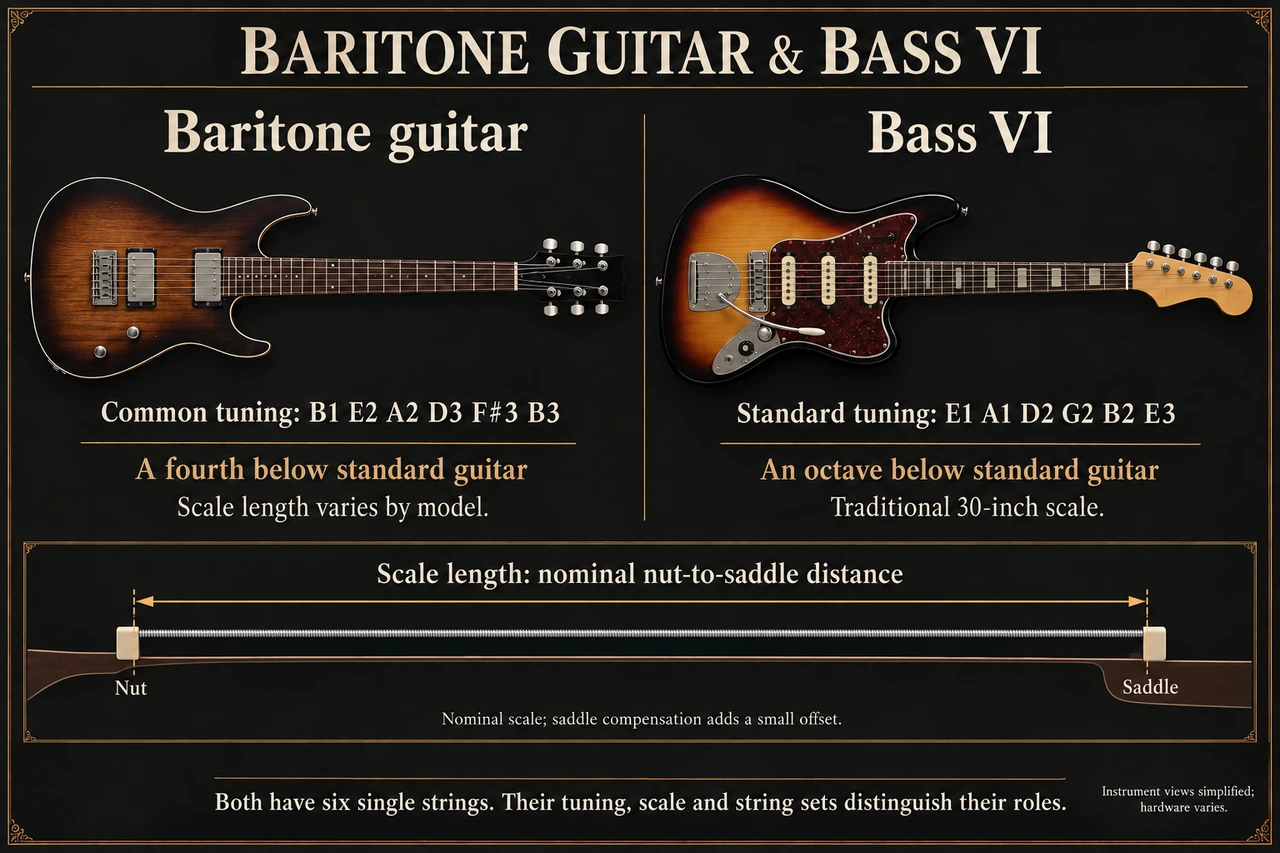
Baritone guitar versus bass vi
A baritone tuned B1 E2 A2 D3 F#3 B3 sits a fourth below standard guitar, while Bass VI tuned E1 A1 D2 G2 B2 E3 sits an octave below on a 30-inch scale. A strip measures scale from nut to saddle. Open the full baritone guitar versus bass vi illustration
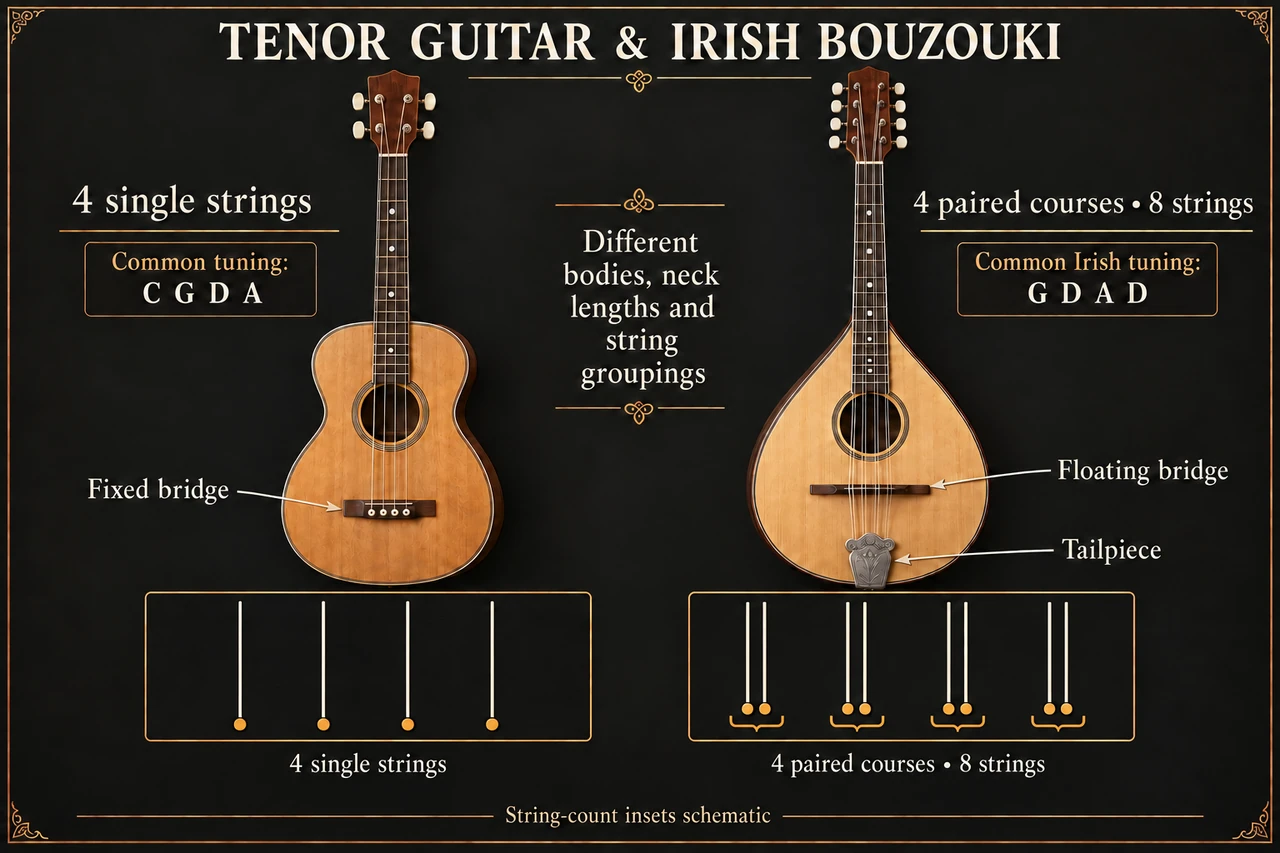
Tenor guitar versus irish bouzouki
A tenor guitar with four single strings tuned C G D A and a fixed bridge stands beside a bouzouki with four paired courses tuned G D A D, a floating bridge and tailpiece. Insets show single strings versus pairs. Open the full tenor guitar versus irish bouzouki illustration
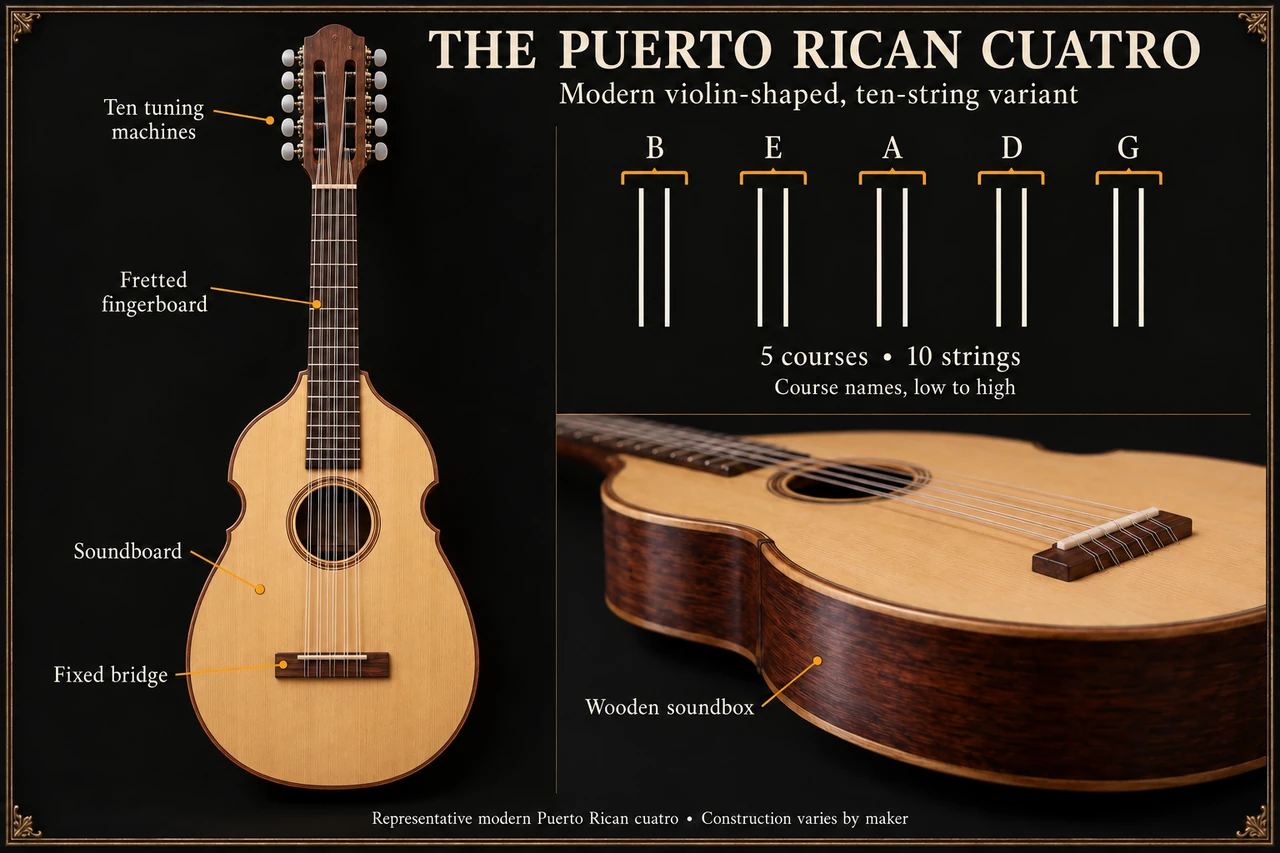
Puerto rican cuatro anatomy
Labels mark ten tuning machines, fretted fingerboard, soundboard, fixed bridge and wooden soundbox on a violin-shaped body. Its ten strings form five paired courses named B, E, A, D, G from low to high. Open the full puerto rican cuatro anatomy illustration
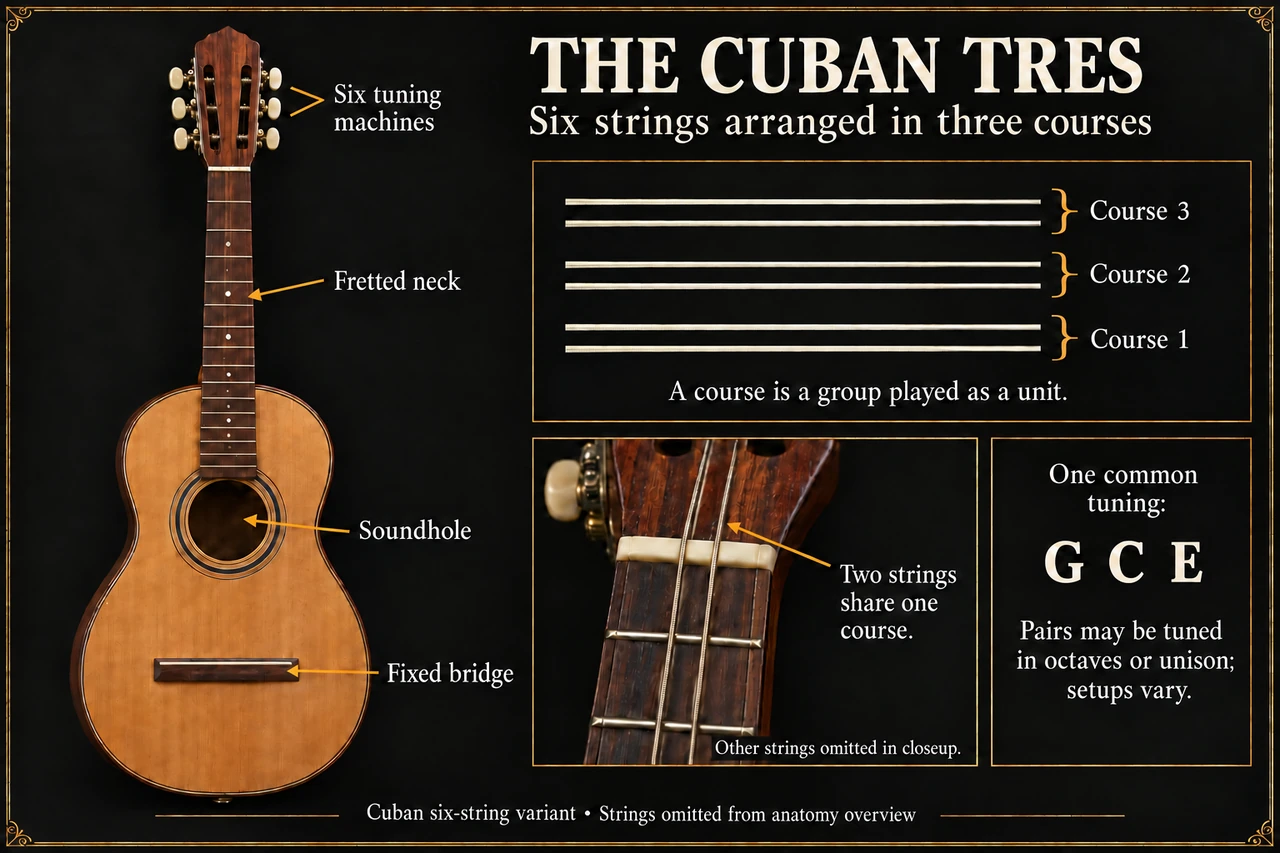
Cuban tres anatomy
Labels mark six tuning machines, fretted neck, soundhole and fixed bridge. Six strings form three courses, a closeup shows two strings sharing one, and one common tuning is G C E, with pairs in octaves or unison. Open the full cuban tres anatomy illustration
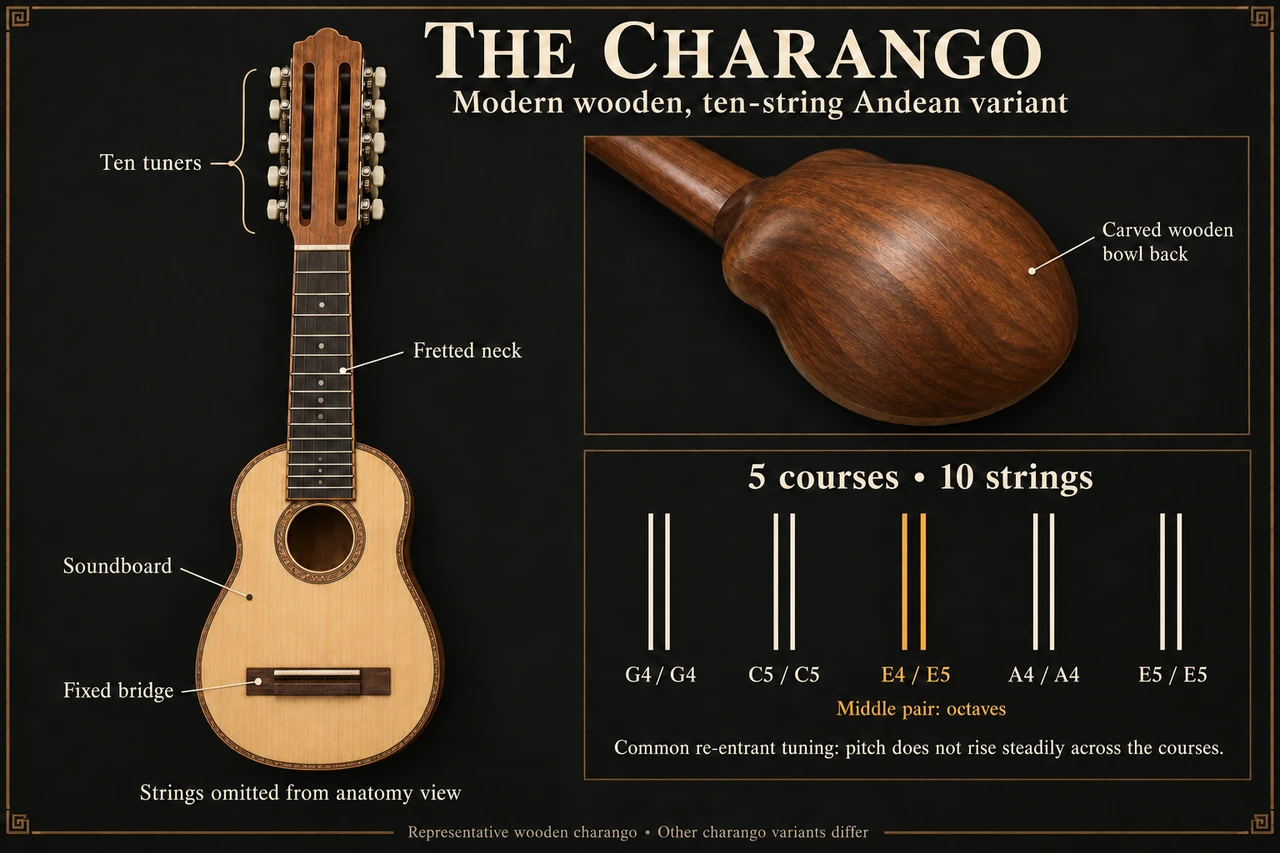
Wooden charango anatomy
Labels mark ten tuners, fretted neck, soundboard, fixed bridge and carved wooden bowl back. Ten strings form five courses tuned G4, C5, E4/E5, A4, E5, a re-entrant tuning with an octave middle pair. Open the full wooden charango anatomy illustration
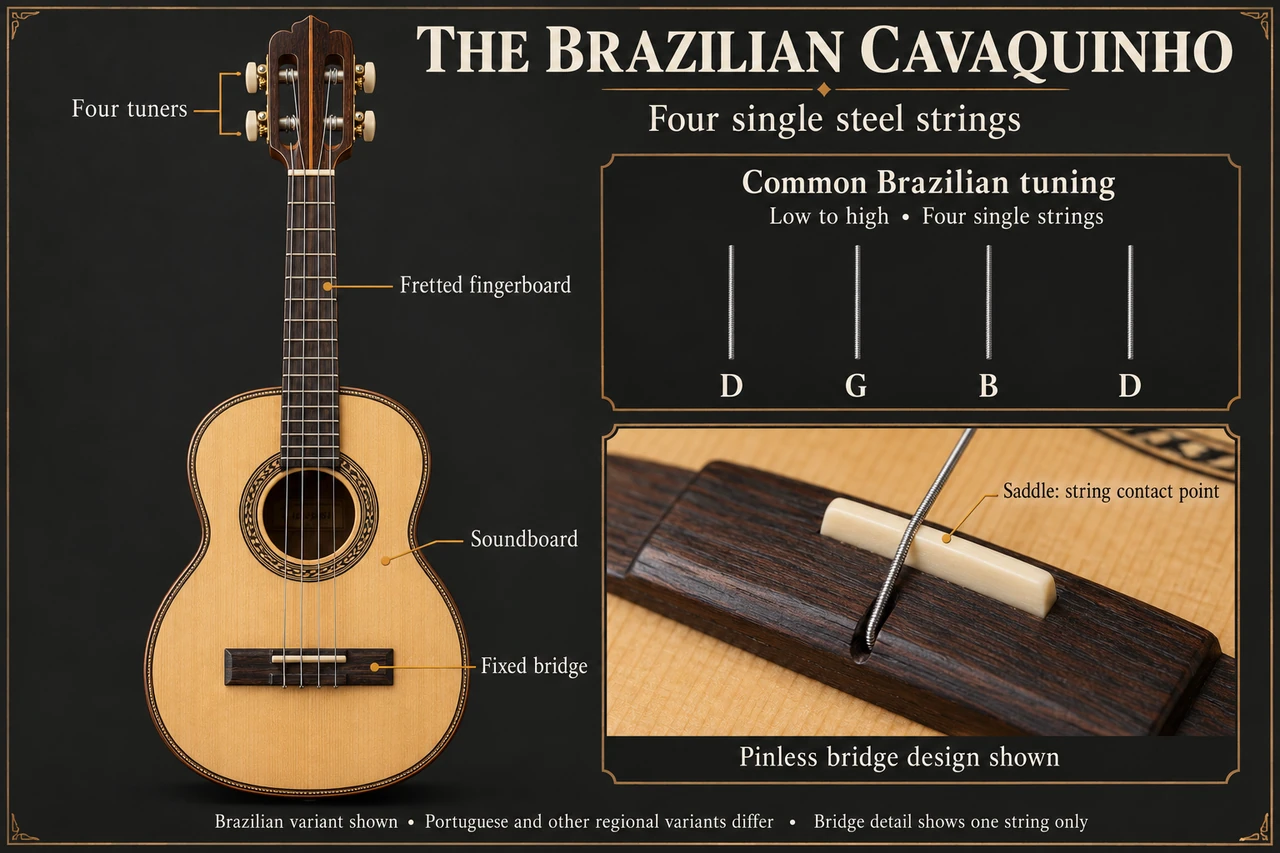
Brazilian cavaquinho anatomy
Labels mark four tuners, fretted fingerboard, soundboard and fixed bridge on a small guitar-shaped body. Four single steel strings tune D G B D from low to high, and a closeup shows the saddle of a pinless bridge. Open the full brazilian cavaquinho anatomy illustration
Arabic oud anatomy
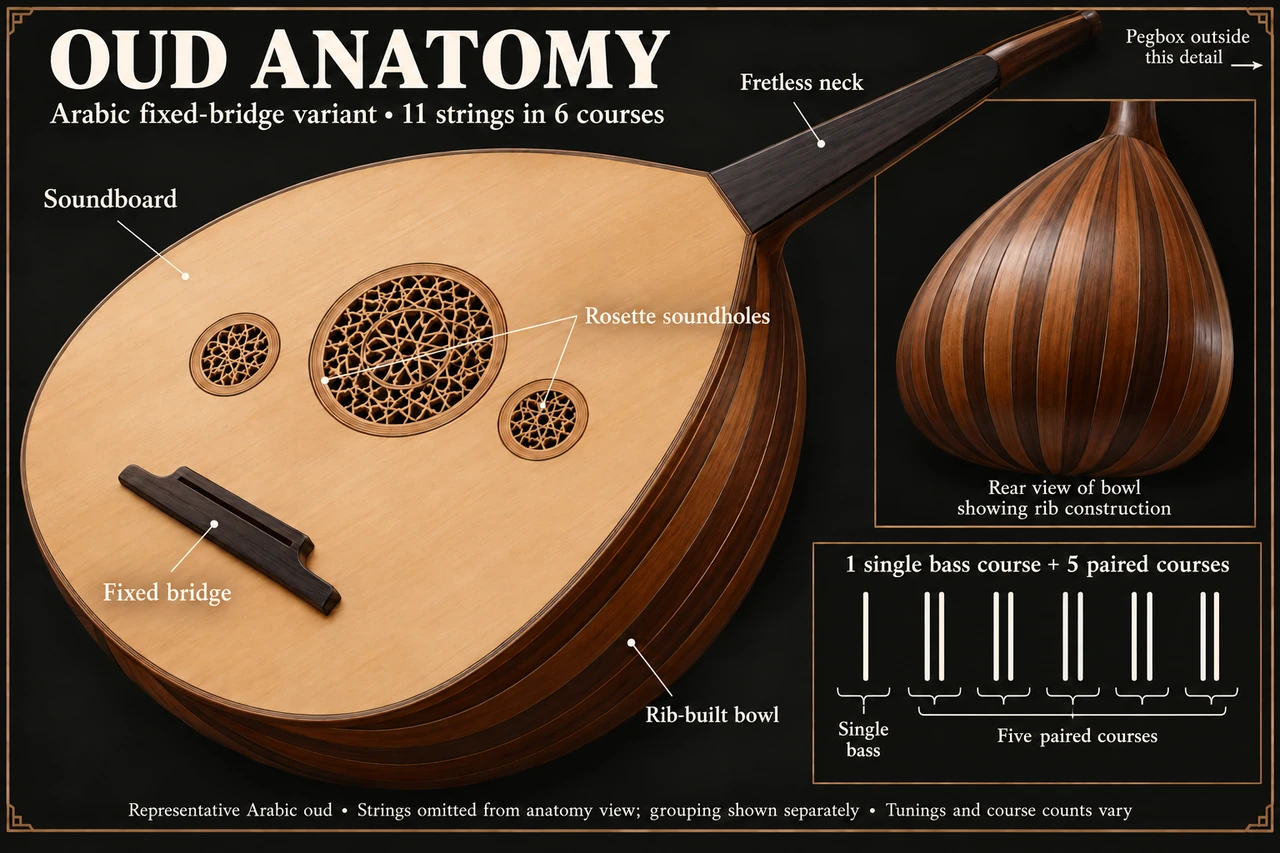
Labels the soundboard, three rosette soundholes, fixed bridge, fretless neck and rib-built bowl, with a rear view of the ribs and a chart of one single bass course plus five paired courses. Open the full arabic oud anatomy illustration
Sitar string layers and anatomy
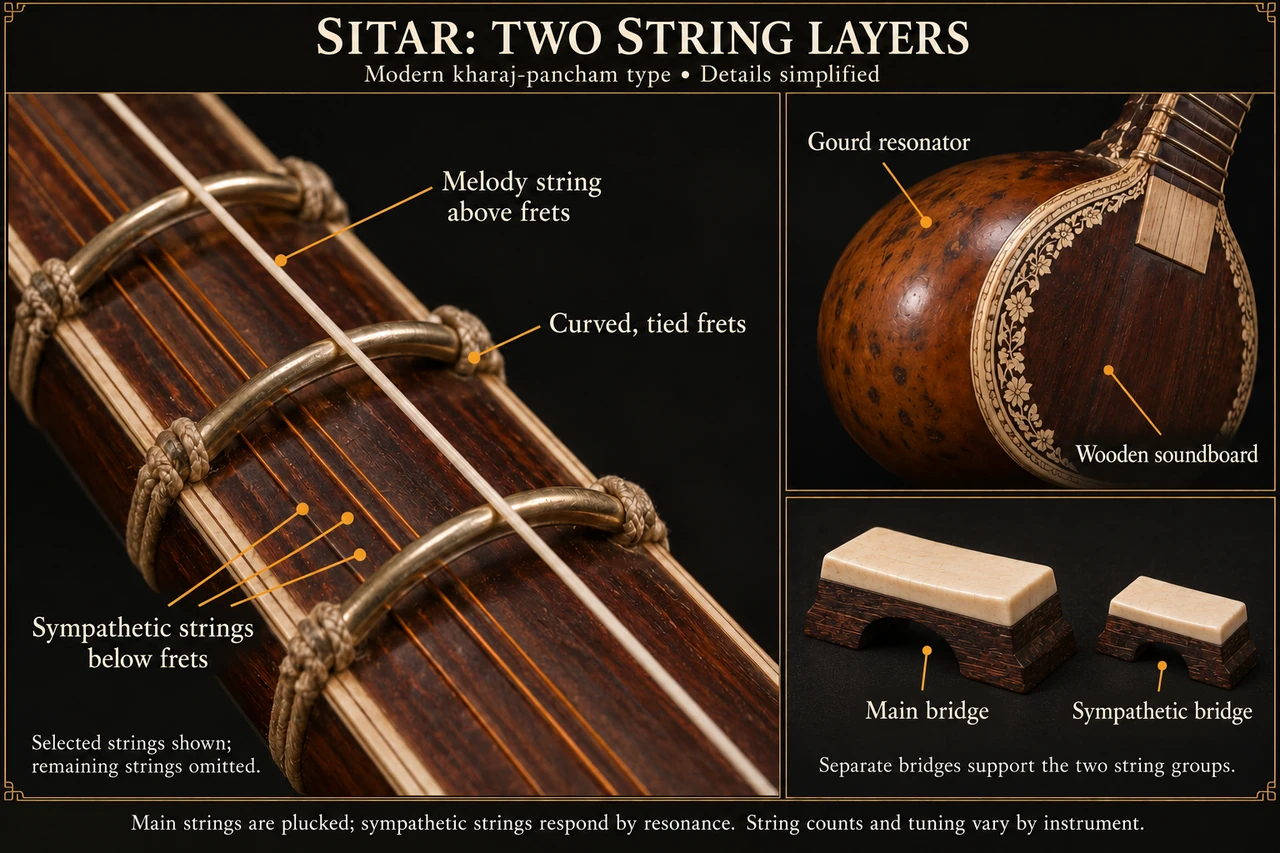
A neck close-up shows the melody string above curved, tied frets with sympathetic strings below them; side panels show the gourd resonator, wooden soundboard, and separate main and sympathetic bridges. Open the full sitar string layers and anatomy illustration
Strings versus courses
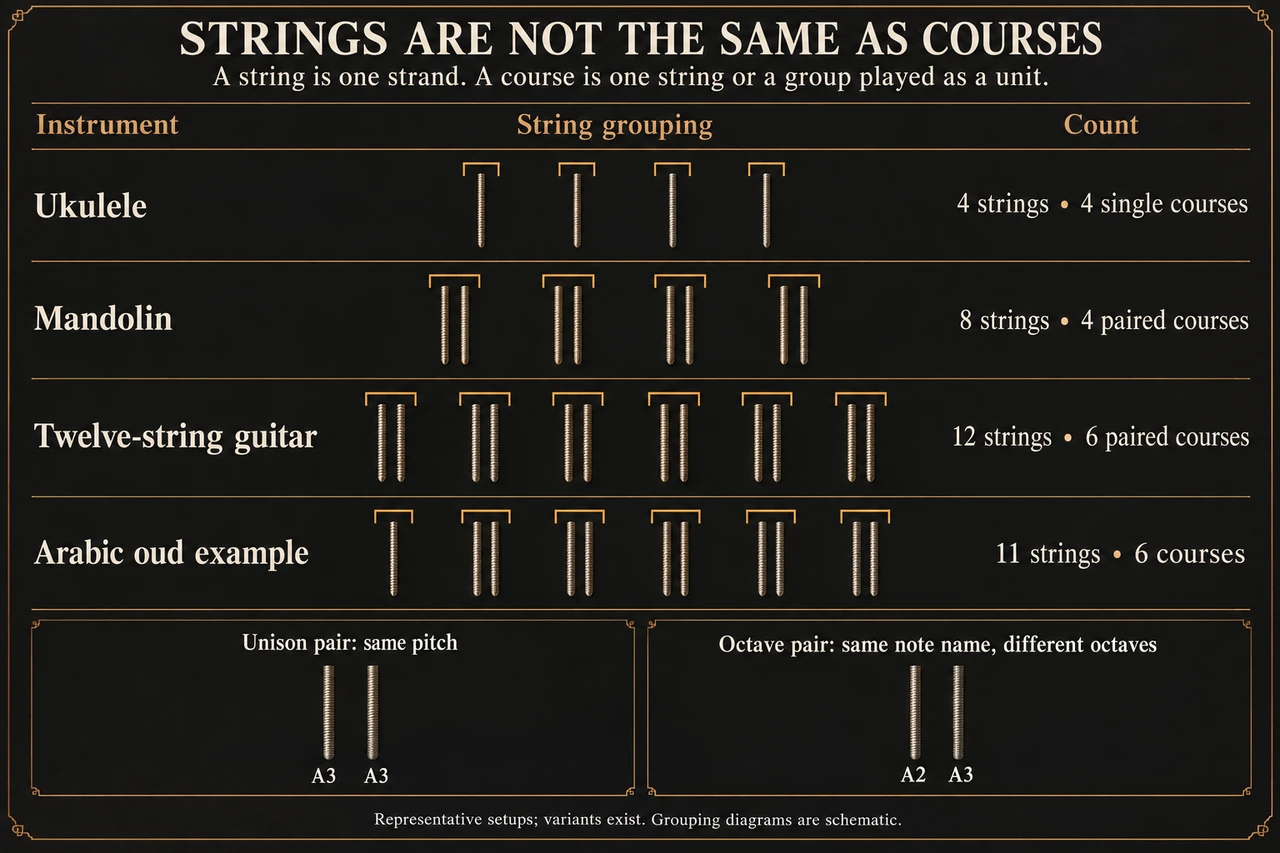
Compares ukulele (4 strings, 4 courses), mandolin (8 strings, 4 pairs), twelve-string guitar (12 strings, 6 pairs) and an 11-string oud, then contrasts unison pairs (A3 A3) with octave pairs (A2 A3). Open the full strings versus courses illustration
Reading and theory
Reading chord diagrams
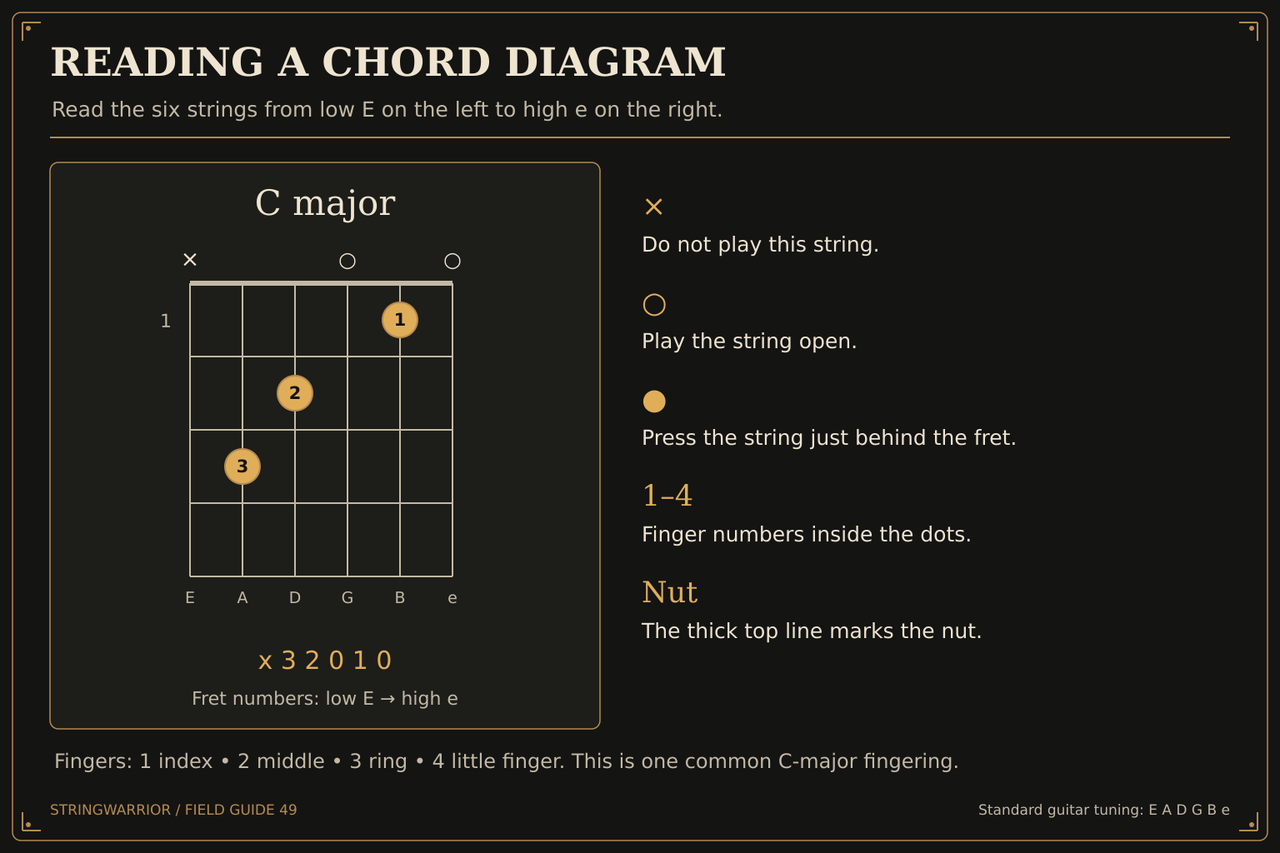
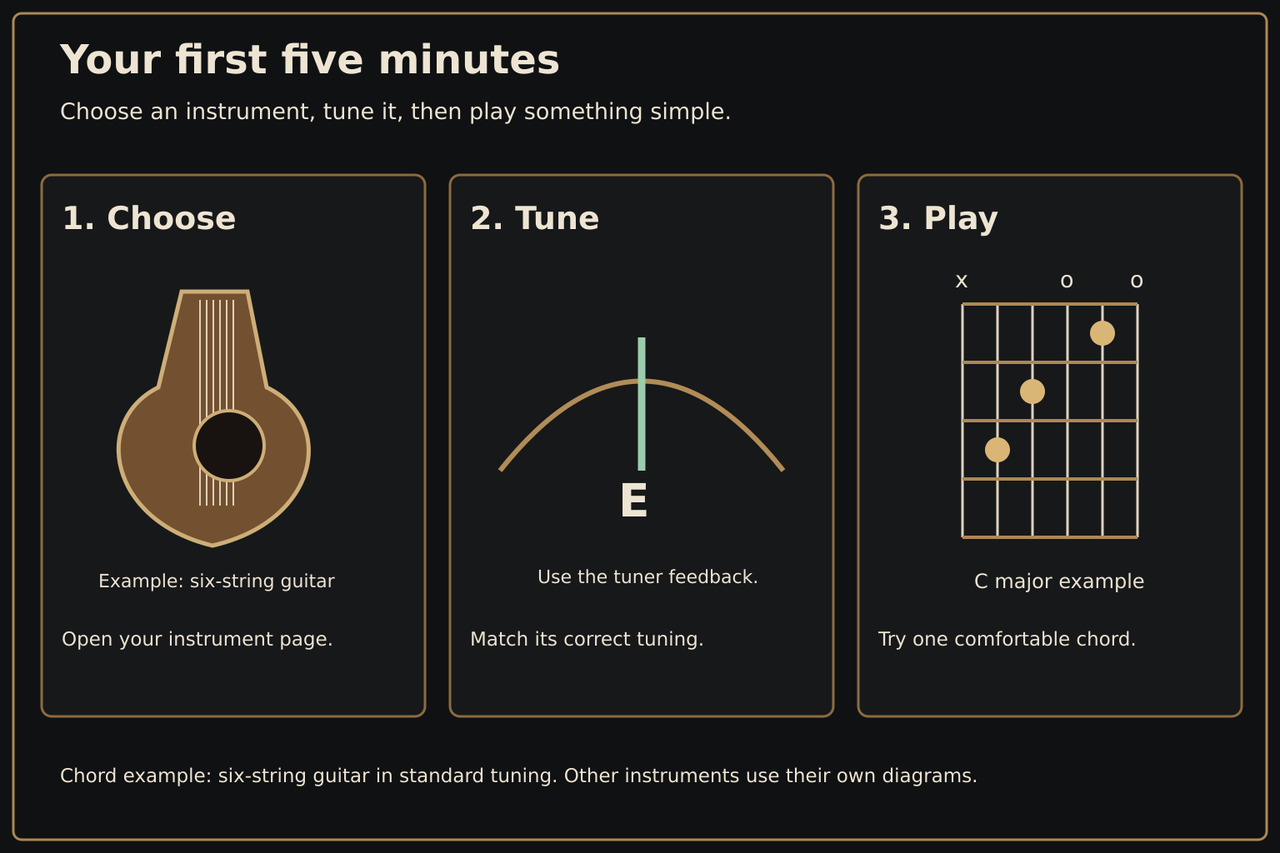
A C major chart, x32010, shows finger dots 1, 2 and 3, with a key explaining x for an unplayed string, an open circle, a fretted dot, finger numbers and the thick nut line. Open the full reading chord diagrams illustration
Reading tablature
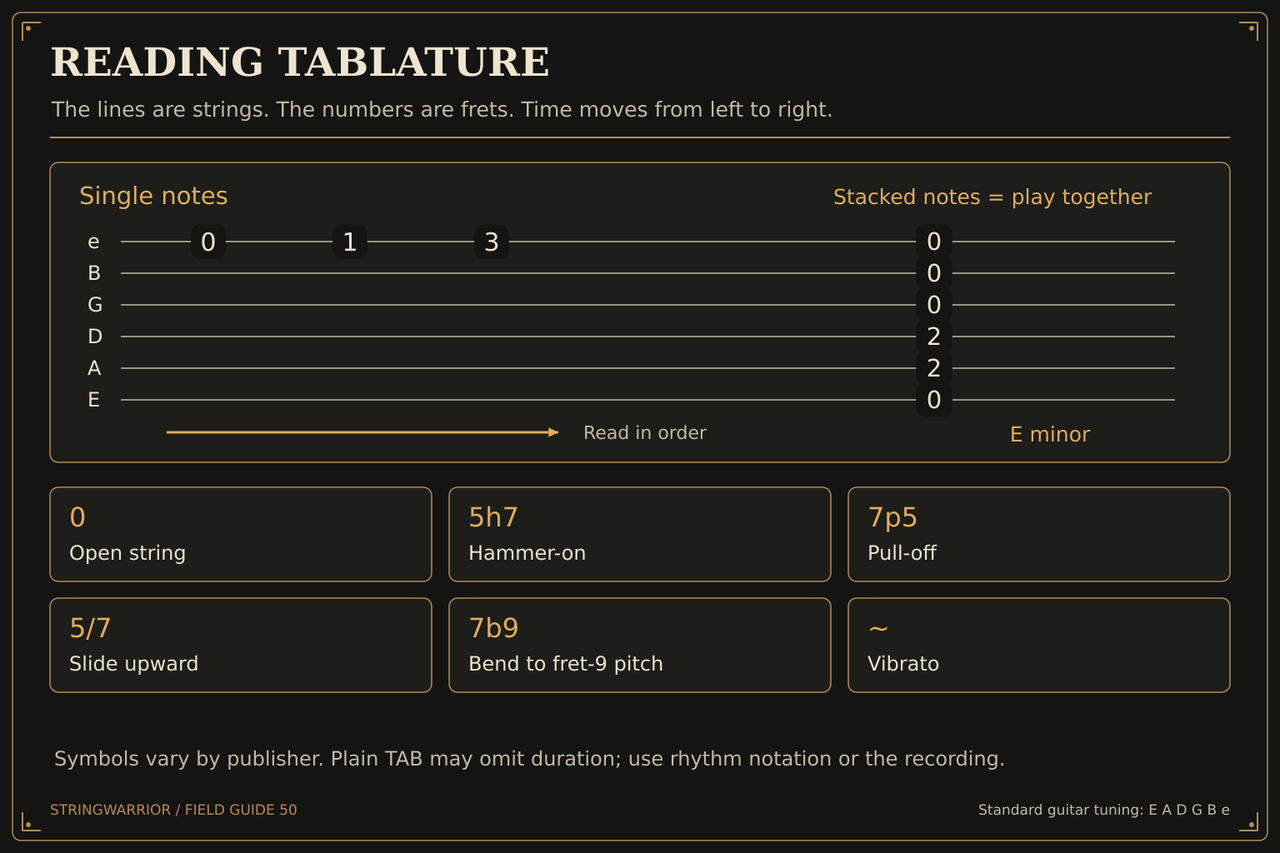
Six string lines from low E to high e carry fret numbers read left to right, with stacked numbers forming an E minor chord, plus symbols for open string, hammer-on, pull-off, slide, bend and vibrato. Open the full reading tablature illustration
Fretboard intervals and octaves
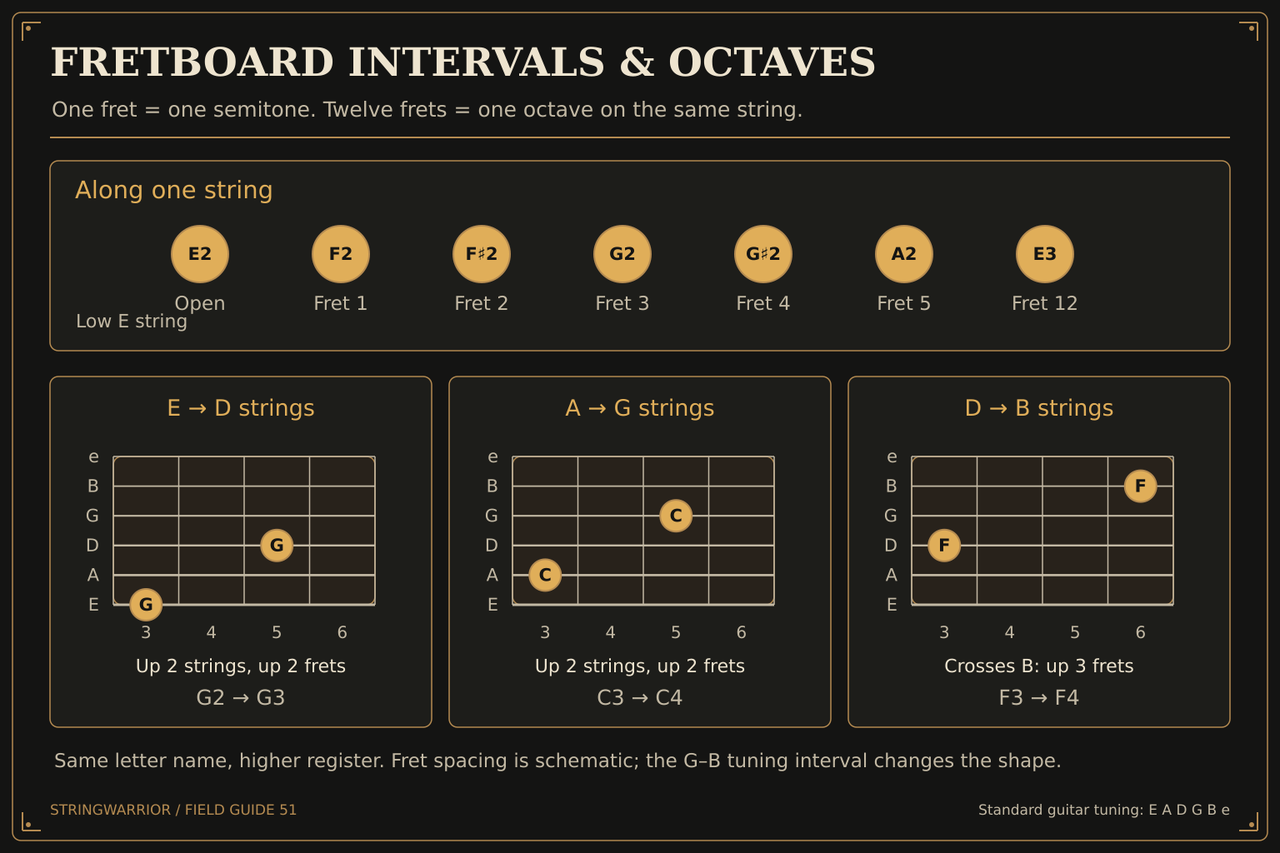
Low E string notes climb one semitone per fret from E2 to E3 at fret 12, then three grids show octave shapes G2 to G3, C3 to C4, and F3 to F4, where crossing the B string adds a fret. Open the full fretboard intervals and octaves illustration
Building triads and seventh chords
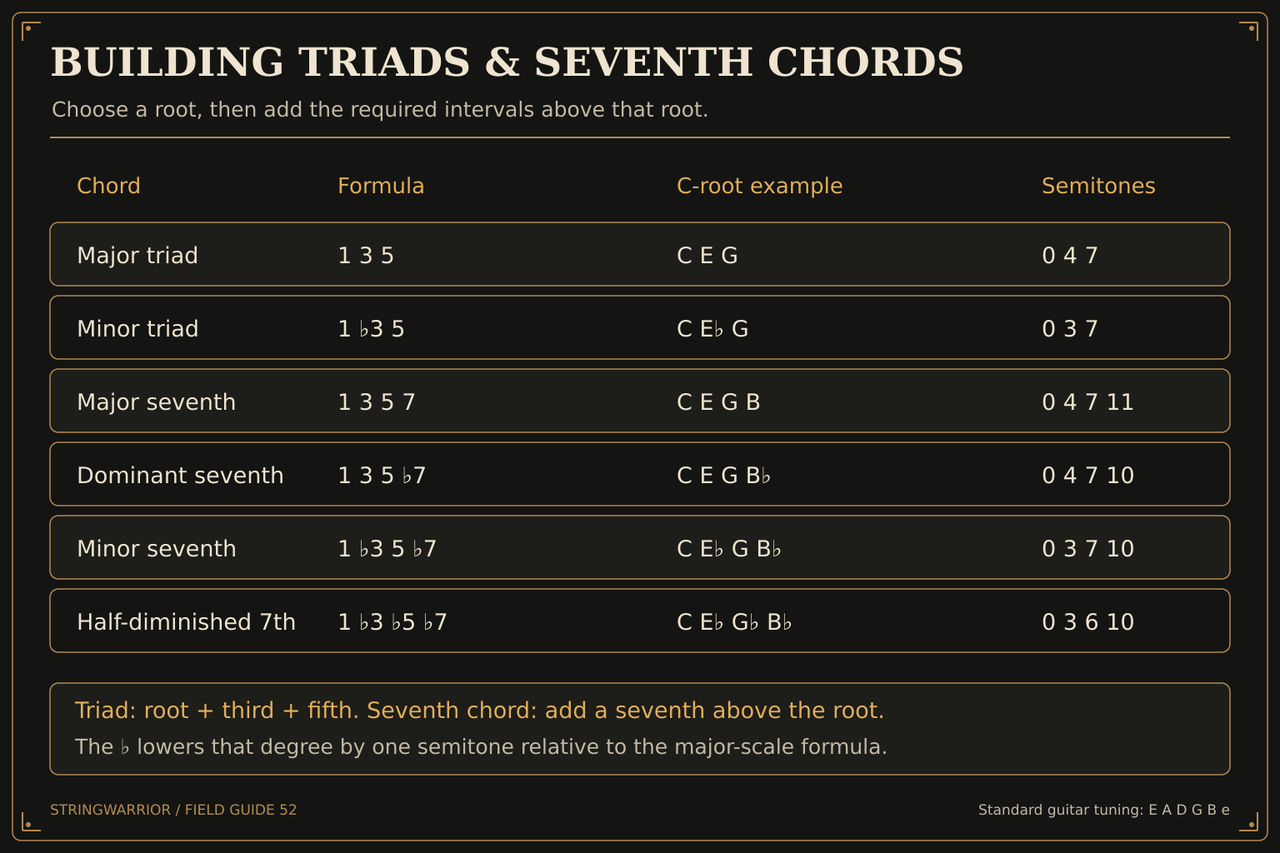
A table gives the formula, C-root notes and semitone counts for major and minor triads plus major, dominant, minor and half-diminished seventh chords, such as 1 3 5 7 for C E G B. Open the full building triads and seventh chords illustration
Connecting caged shapes
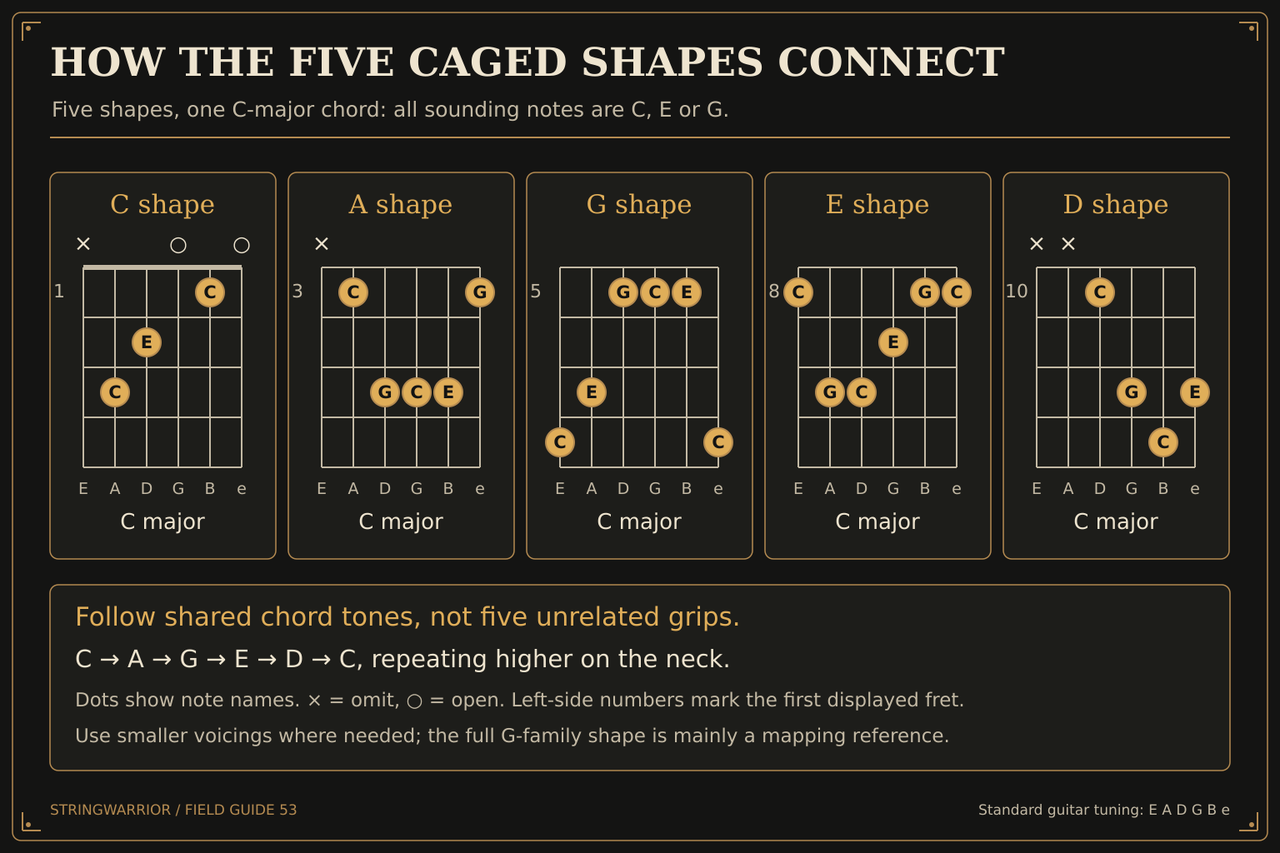
Five C major grids, built from the C, A, G, E and D shapes at frets 1, 3, 5, 8 and 10, mark each note as C, E or G to show how neighbouring grips share chord tones up the neck. Open the full connecting caged shapes illustration
Connecting pentatonic and blues
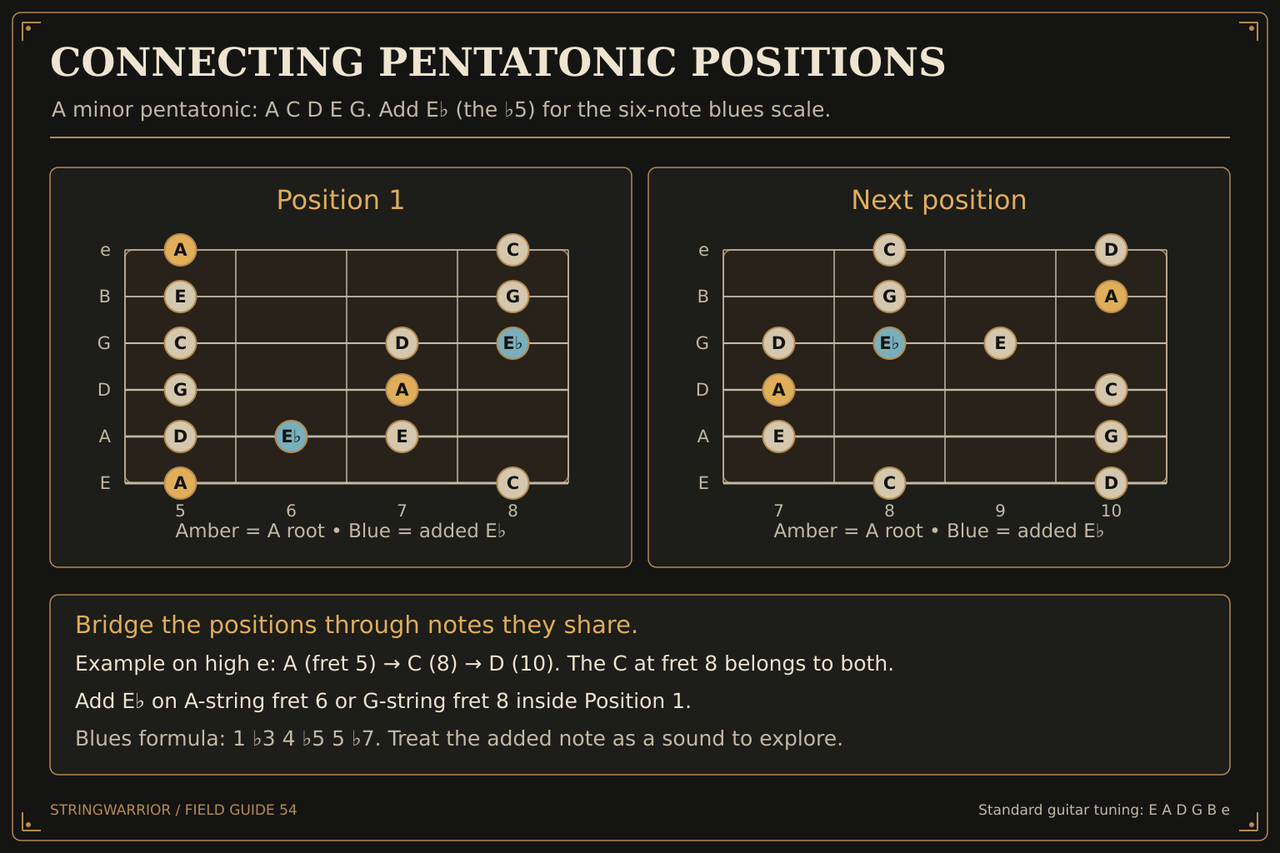
Two A minor pentatonic fretboard boxes, frets 5 to 8 and 7 to 10, mark A roots in amber and the added blue Eb blues note, showing the C at fret 8 on high e shared by both. Open the full connecting pentatonic and blues illustration
Reading circle of fifths
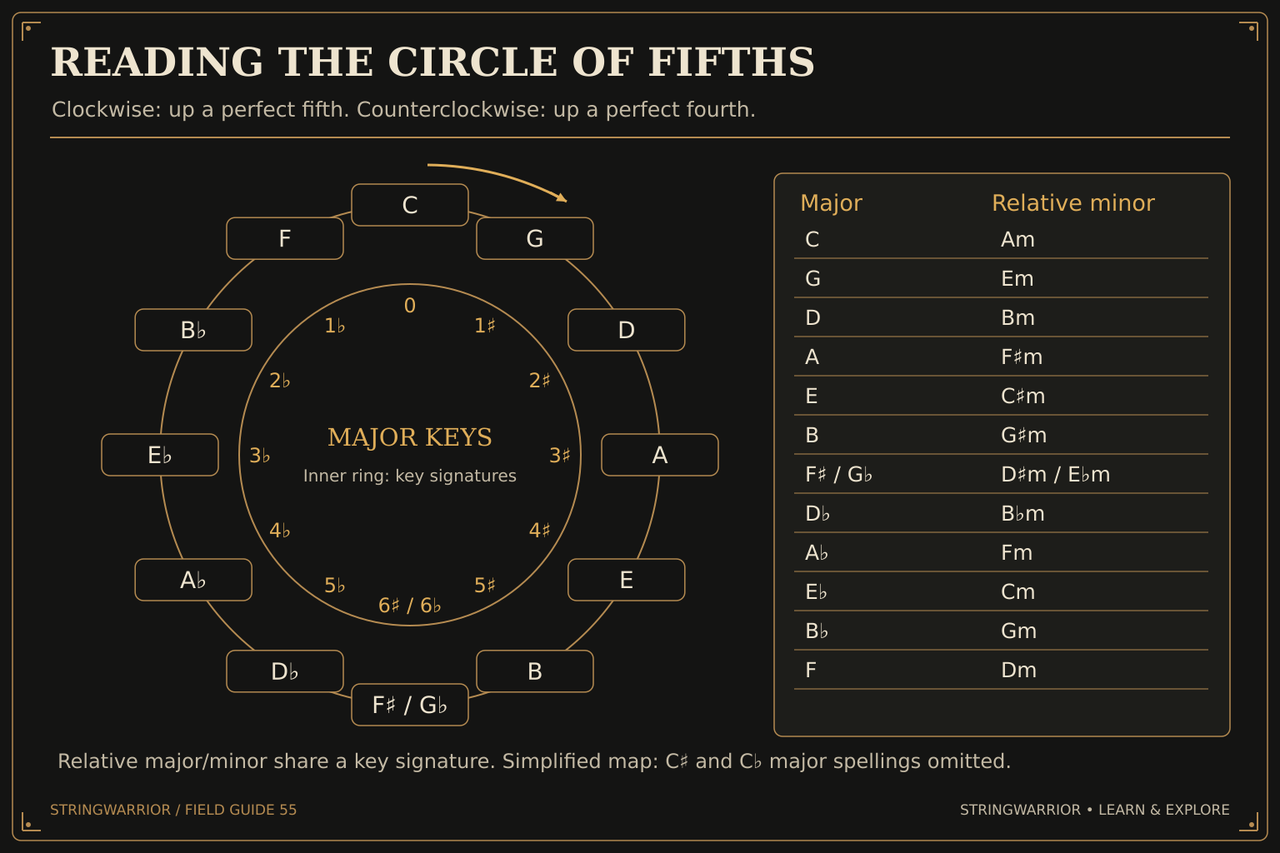
Twelve major keys ring the circle clockwise from C through G, D and A, an inner ring counts sharps and flats, and a side table pairs each major with its relative minor, such as C with Am. Open the full reading circle of fifths illustration
Comparing modes
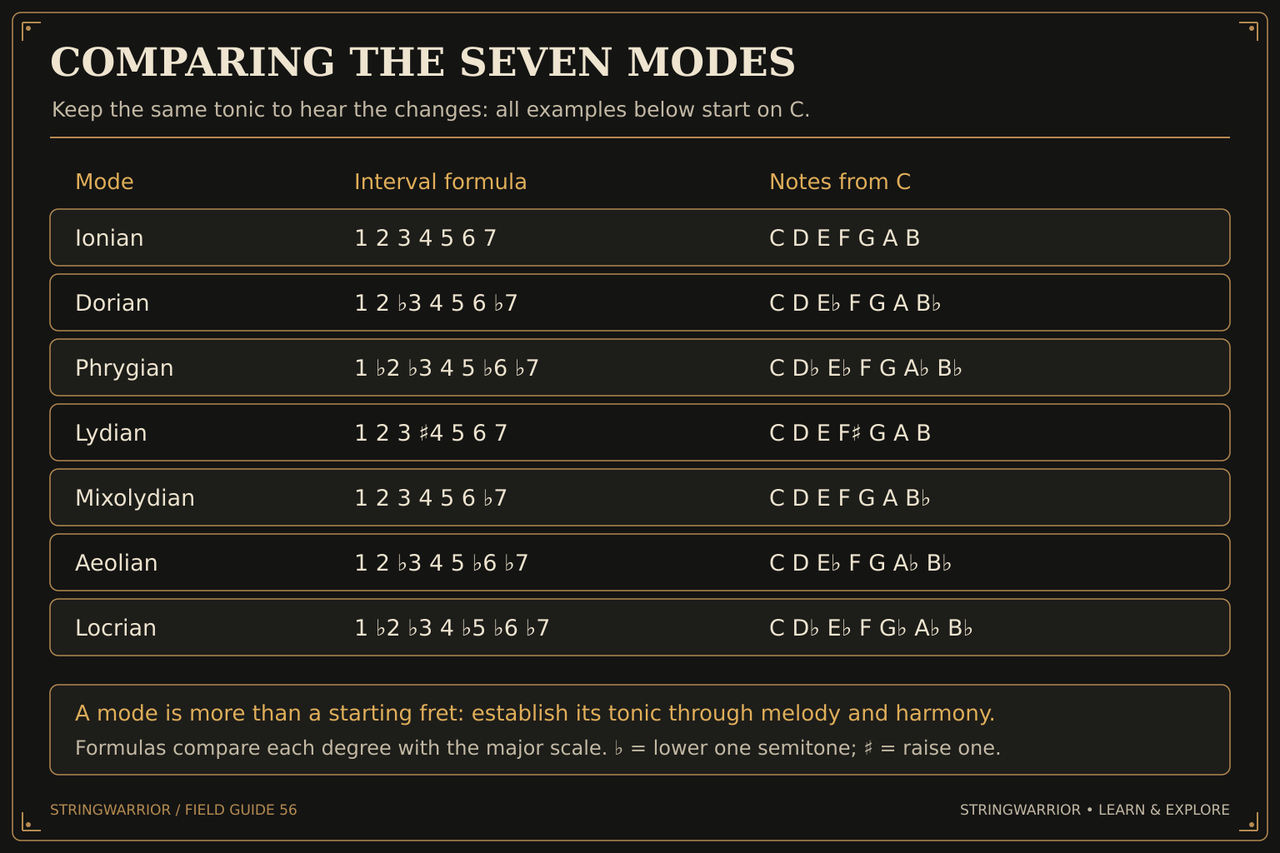
A table sets Ionian, Dorian, Phrygian, Lydian, Mixolydian, Aeolian and Locrian side by side, all from C, giving each one's interval formula and notes, such as Lydian's raised 4 on F#. Open the full comparing modes illustration
Diatonic harmony and nashville
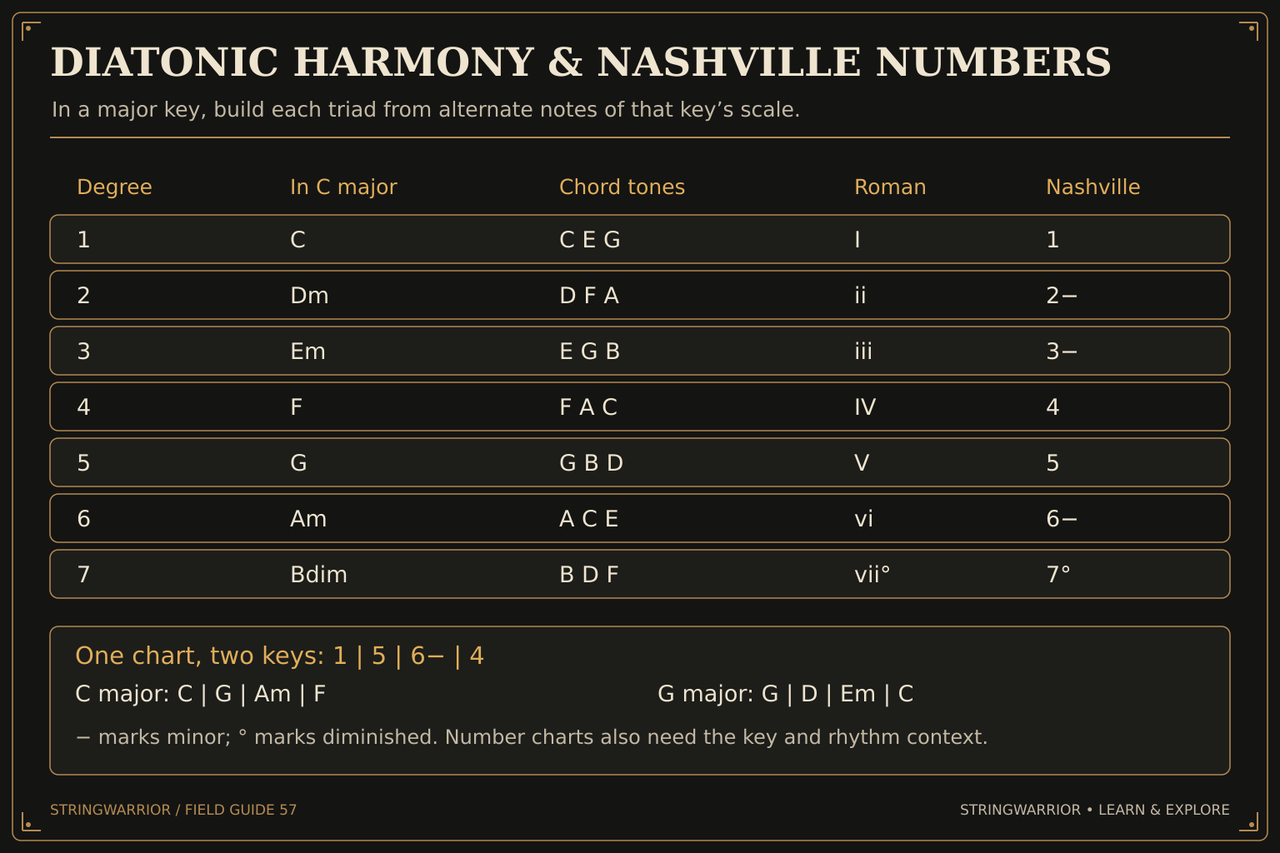
A table builds the seven triads of C major, C Dm Em F G Am Bdim, with chord tones, Roman numerals and Nashville numbers, then plays 1 5 6- 4 as C G Am F and as G D Em C in G major. Open the full diatonic harmony and nashville illustration
Beats subdivisions and rests
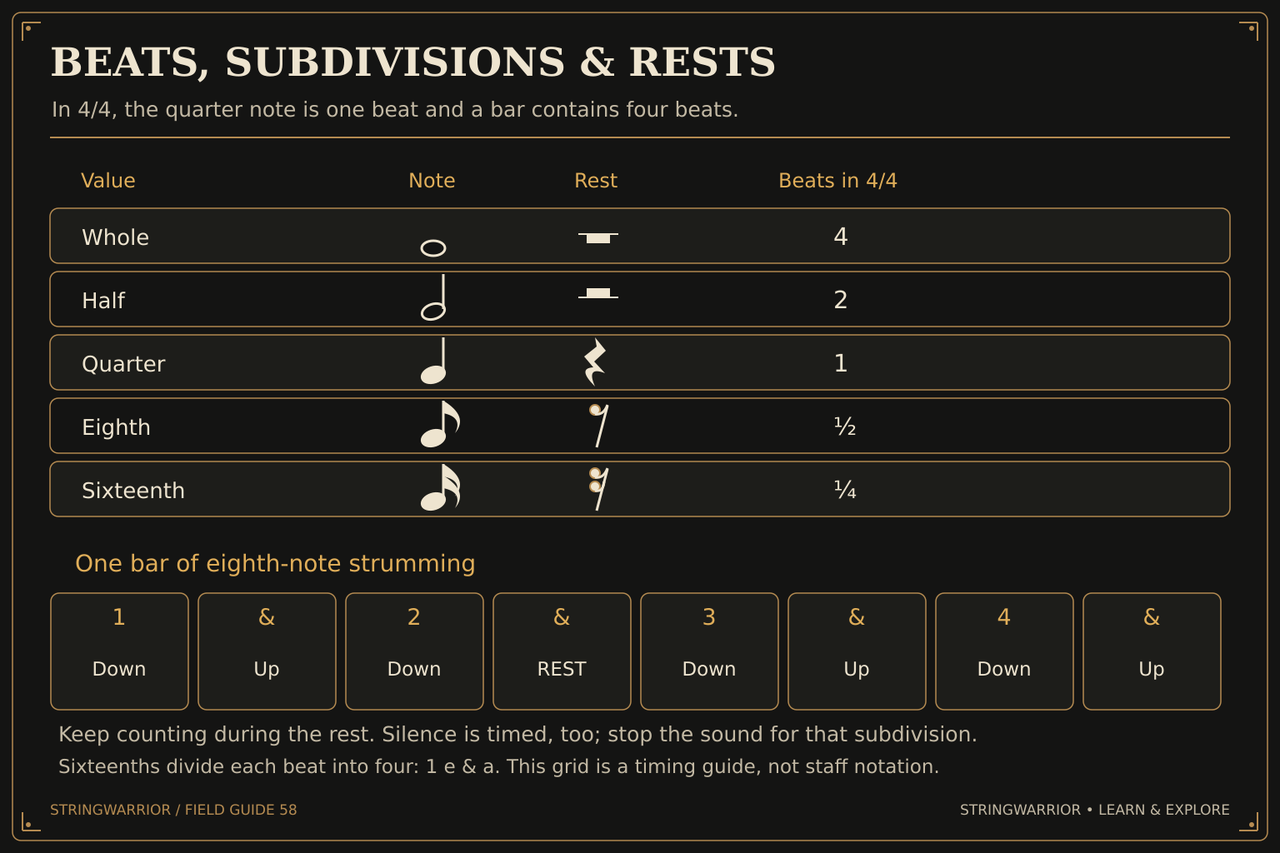
Whole, half, quarter, eighth and sixteenth notes and rests are listed with their beats in 4/4, then a bar of eighth-note strumming counts 1 & 2 & 3 & 4 & with down and up strokes and one rest. Open the full beats subdivisions and rests illustration
String instrument family guide
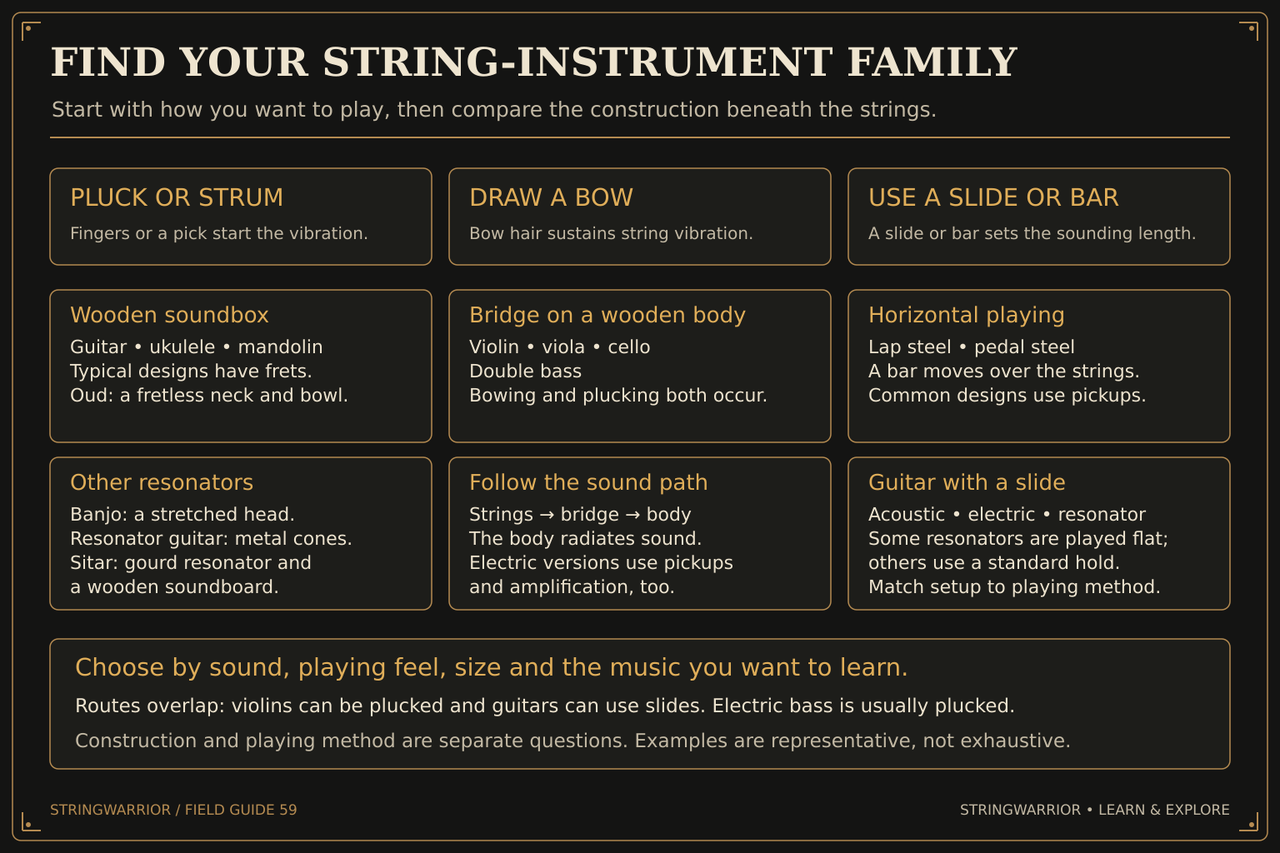
Sorts instruments by playing method: plucked guitar, ukulele, mandolin and oud; bowed violin, viola, cello and double bass; lap and pedal steel played with a bar; plus banjo, resonator guitar and sitar. Open the full string instrument family guide illustration
Learning and practice roadmap
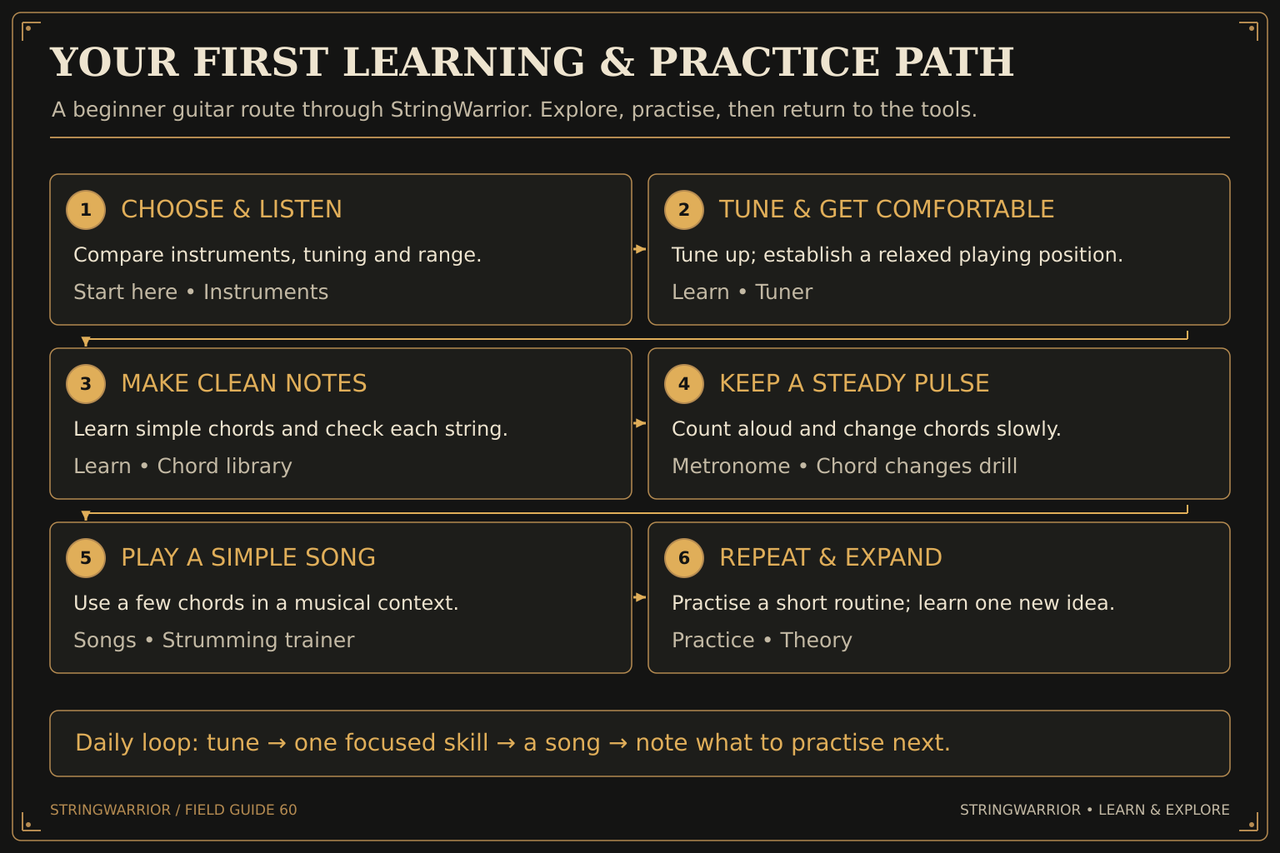
Six numbered steps run from choosing and tuning an instrument through clean notes, a steady pulse and a simple song to repeating and expanding, each paired with site tools, then a daily loop. Open the full learning and practice roadmap illustration
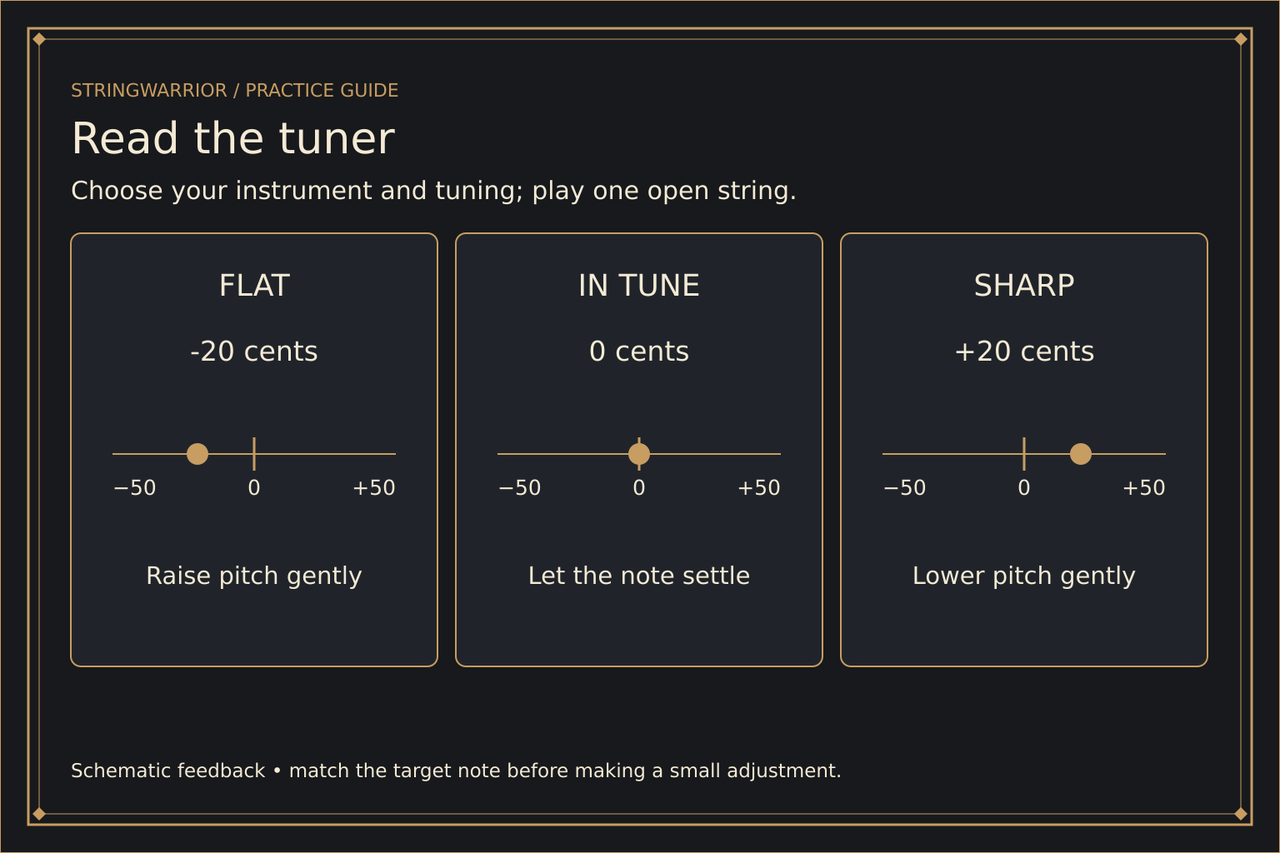
Reading a chromatic tuner
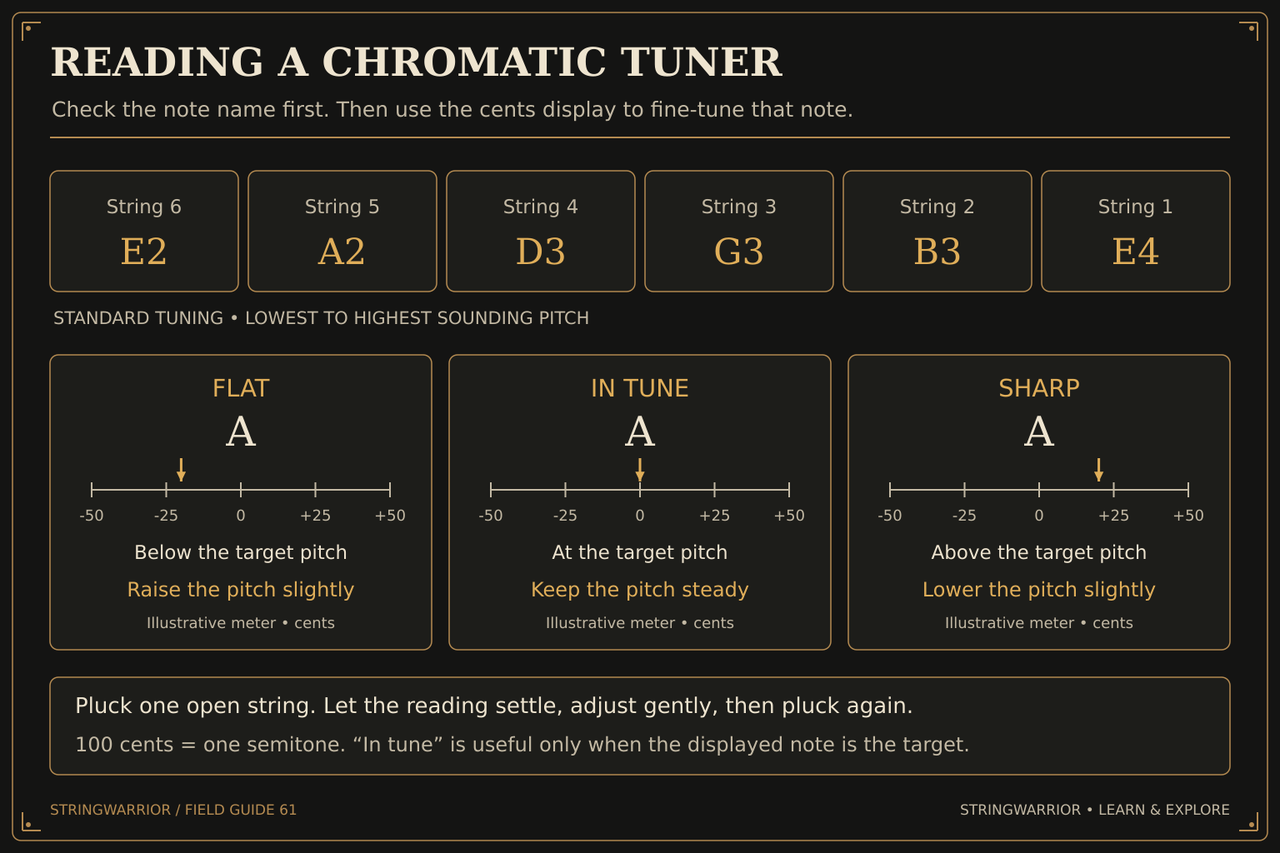
Standard sounding pitches E2 A2 D3 G3 B3 E4; three illustrative meters compare flat, centered and sharp readings. Open the full Reading a chromatic tuner illustration
How a capo works
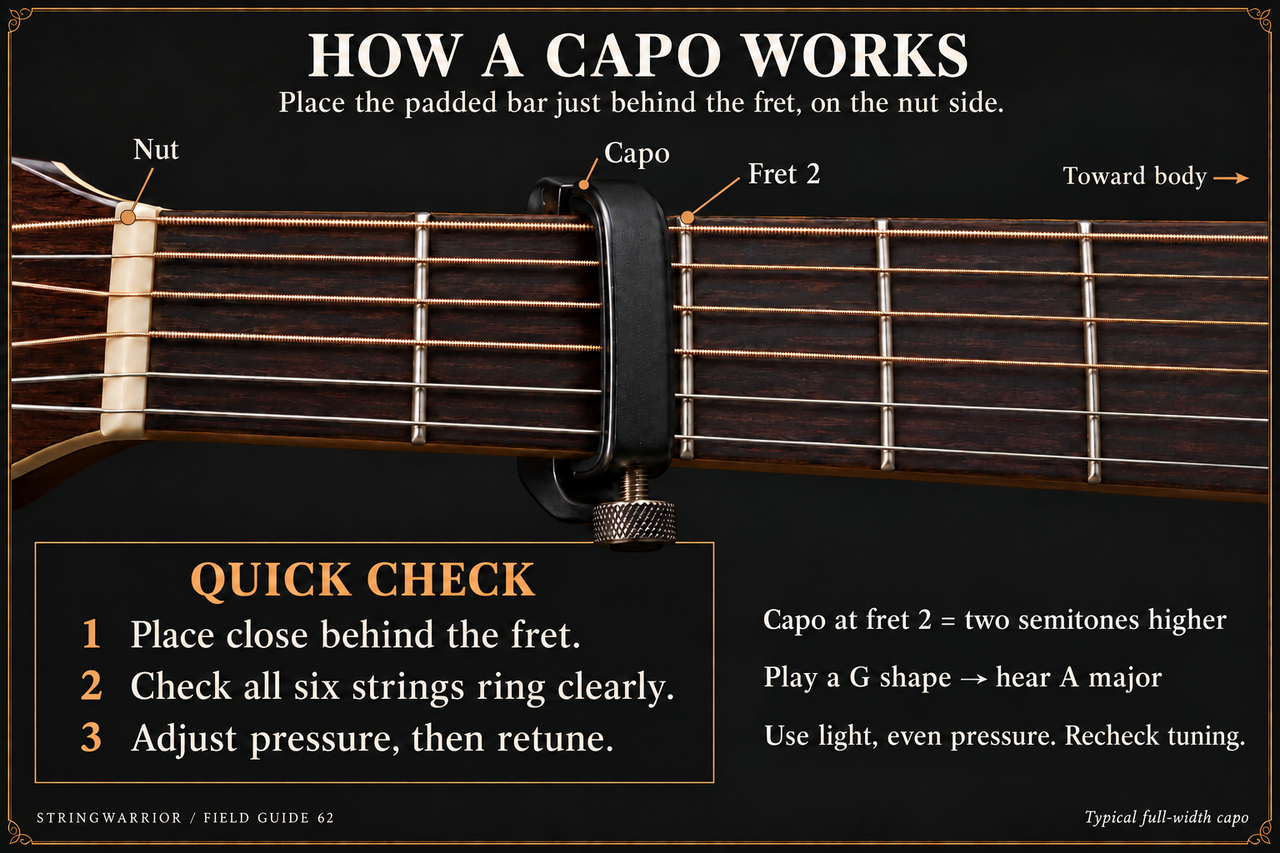
Six-string neck with capo immediately on nut side of fret 2; G chord shape transposes to A major. Open the full How a capo works illustration
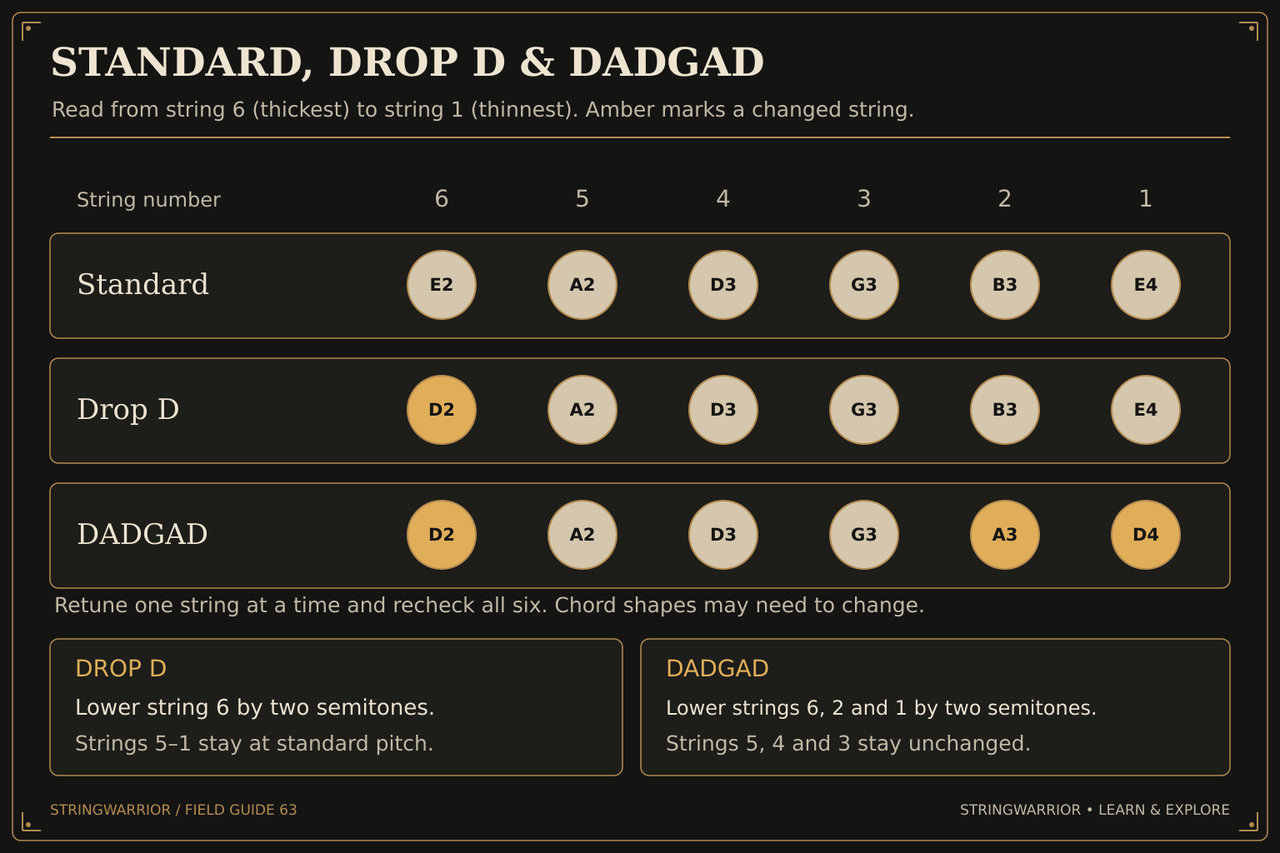
Standard, Drop D and DADGAD
Three exact six-string tuning rows. Open the full Standard, Drop D and DADGAD illustration
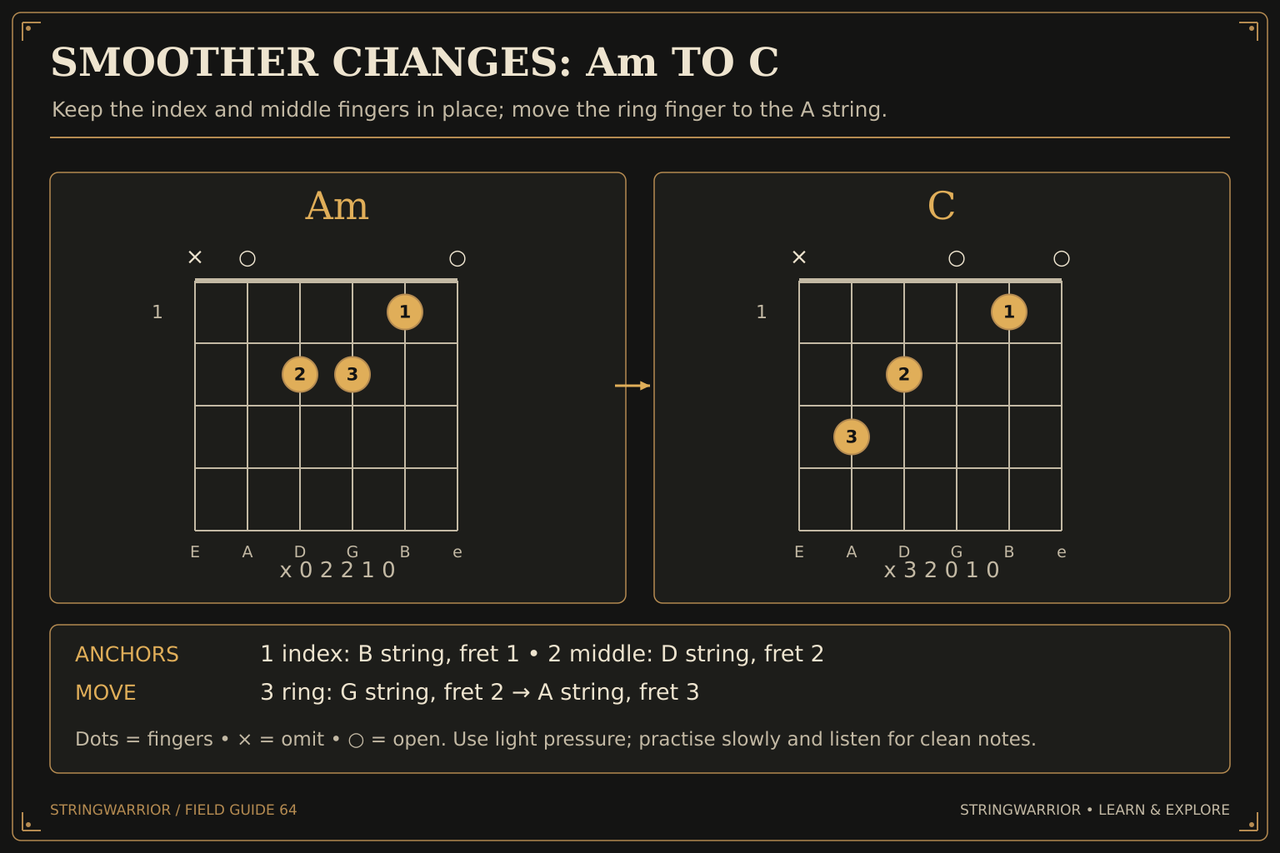
Anchor fingers: Am to C
Common Am x02210 to C x32010 transition: index on B1 and middle on D2 stay; ring moves G2 to A3. Open the full Anchor fingers: Am to C illustration
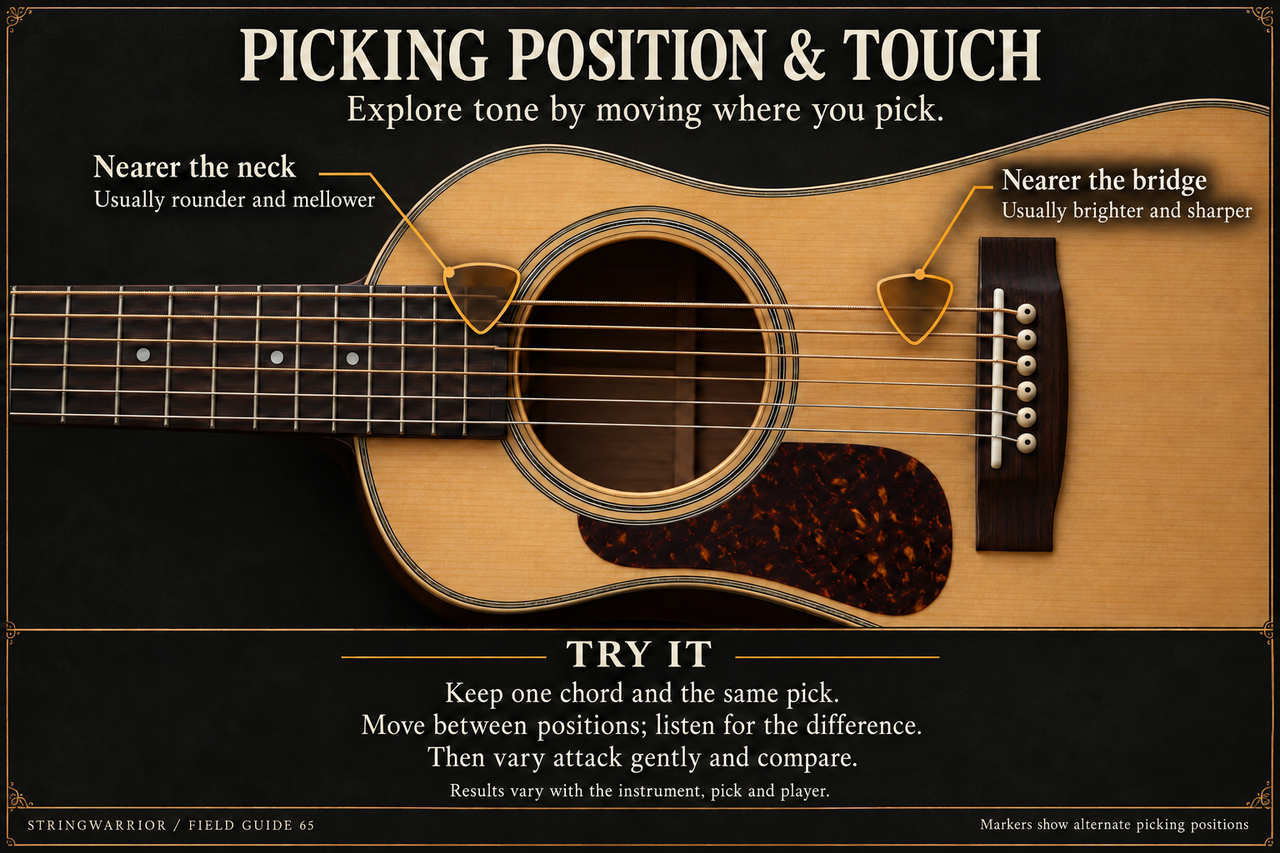
Picking position and touch
Two alternate picking markers on one six-string acoustic guitar; neck-side versus bridge-side position. Open the full Picking position and touch illustration
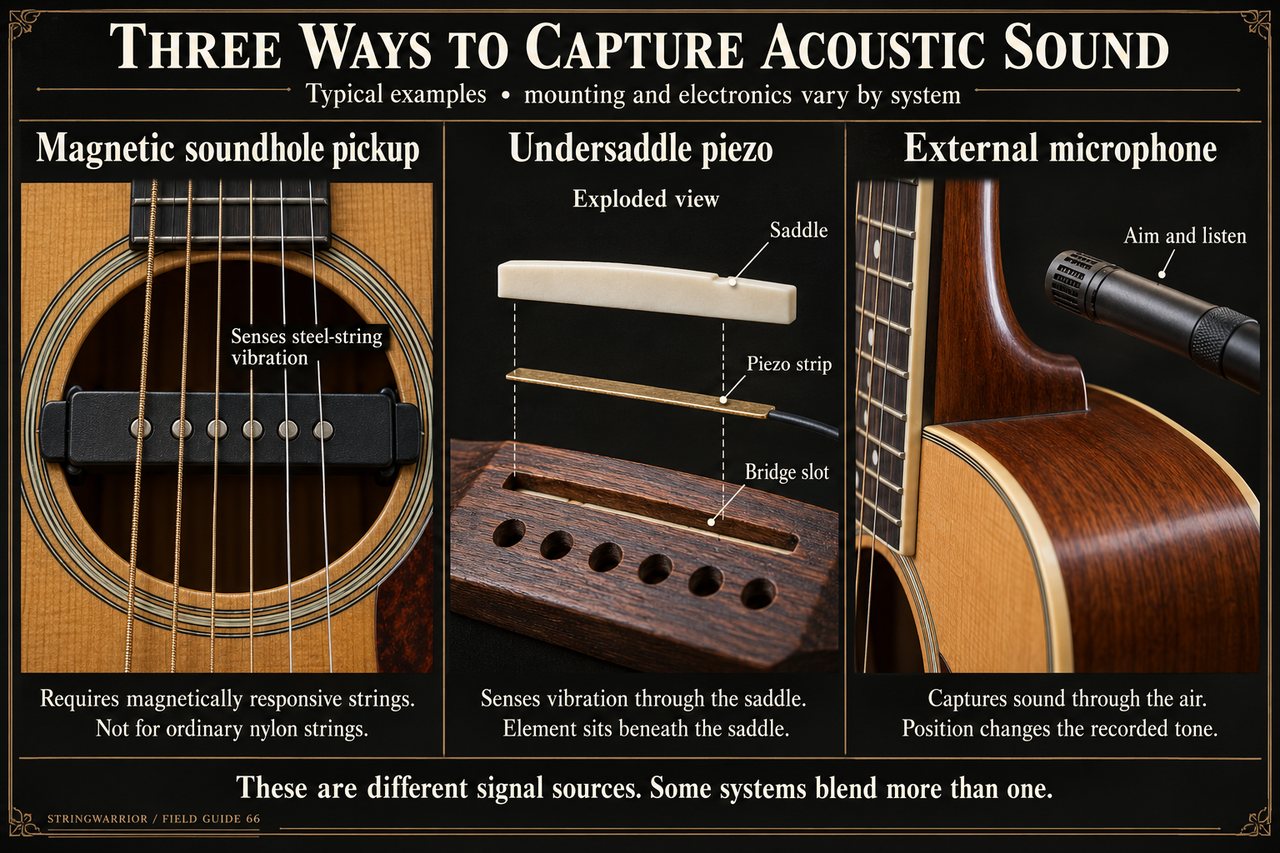
Capturing acoustic sound
Three typical capture methods: magnetic soundhole pickup under strings, exploded undersaddle piezo stack, and external microphone. Open the full Capturing acoustic sound illustration
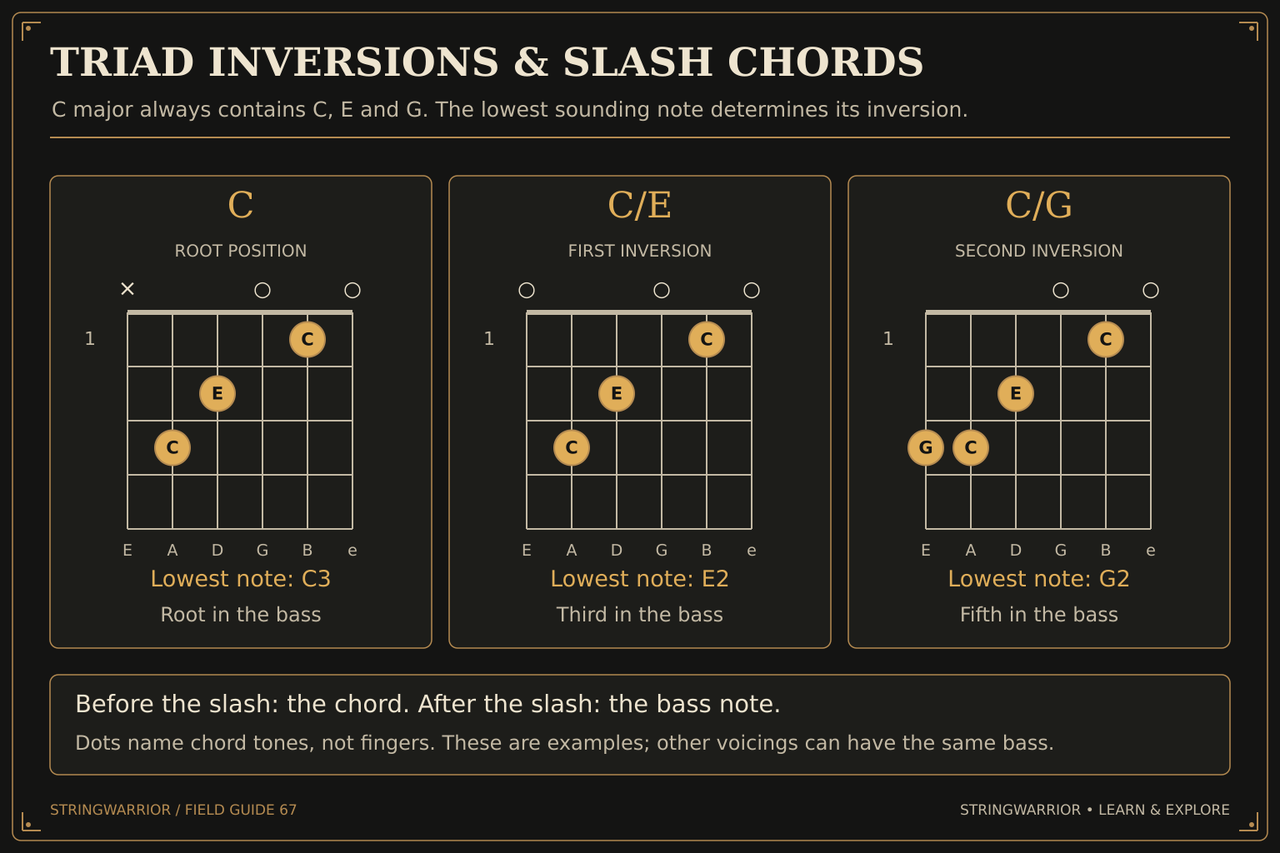
Triad inversions and slash chords
C, C/E and C/G voicings verified against standard tuning, with actual bass notes C3, E2 and G2. Open the full Triad inversions and slash chords illustration
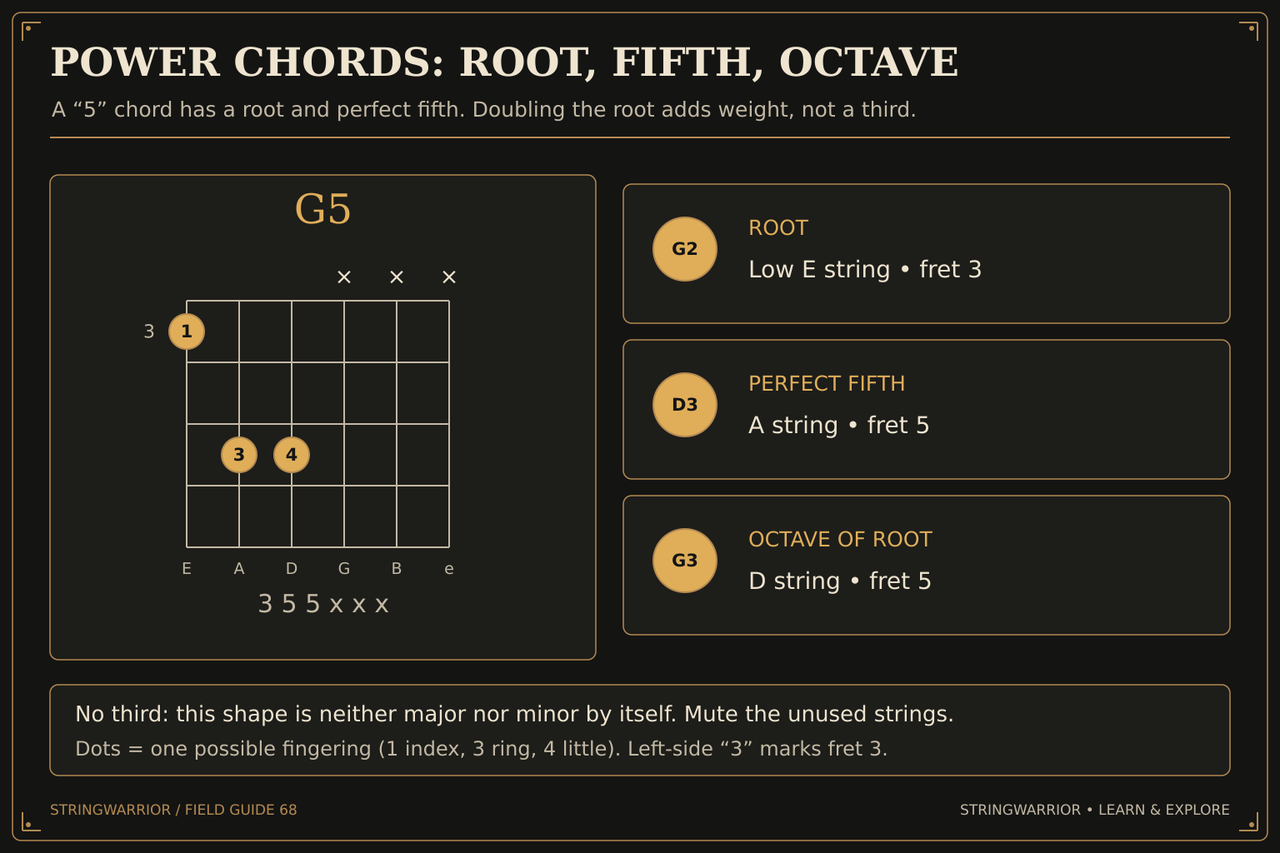
Power chords: root, fifth, octave
G5 355xxx has G2 D3 G3 and no third. Open the full Power chords: root, fifth, octave illustration
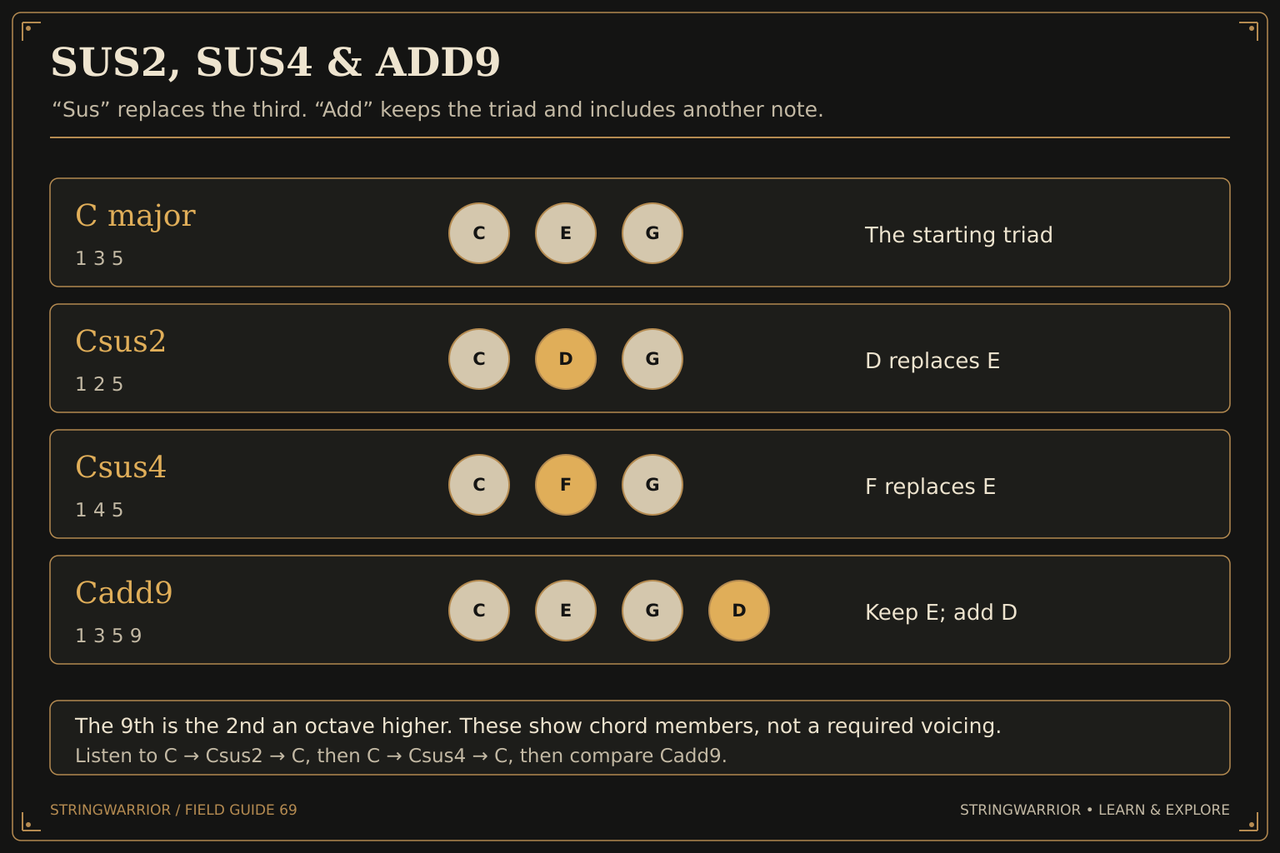
Sus2, sus4 and add9
C major C E G; Csus2 C D G; Csus4 C F G; Cadd9 C E G D. Open the full Sus2, sus4 and add9 illustration
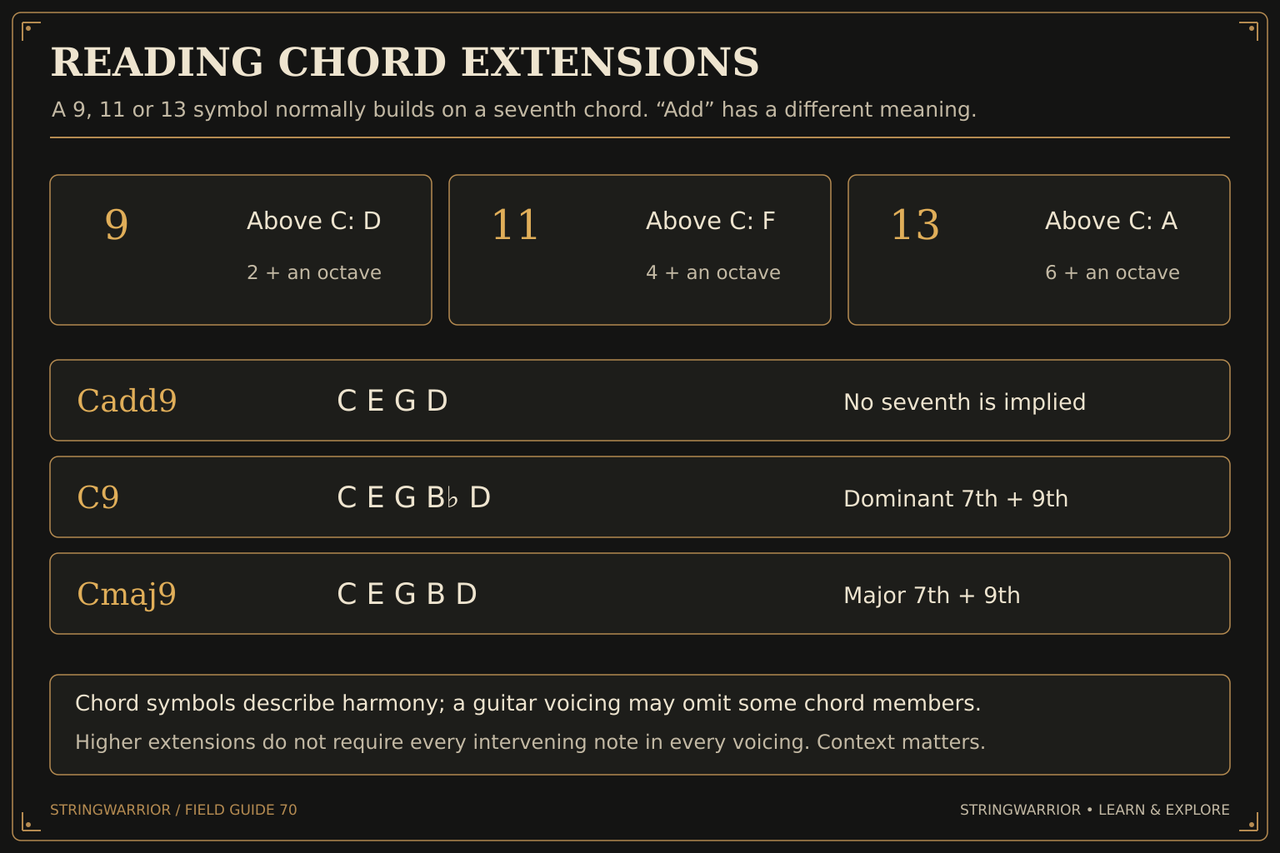
Reading chord extensions
Cadd9 C E G D versus C9 C E G B-flat D and Cmaj9 C E G B D. Open the full Reading chord extensions illustration
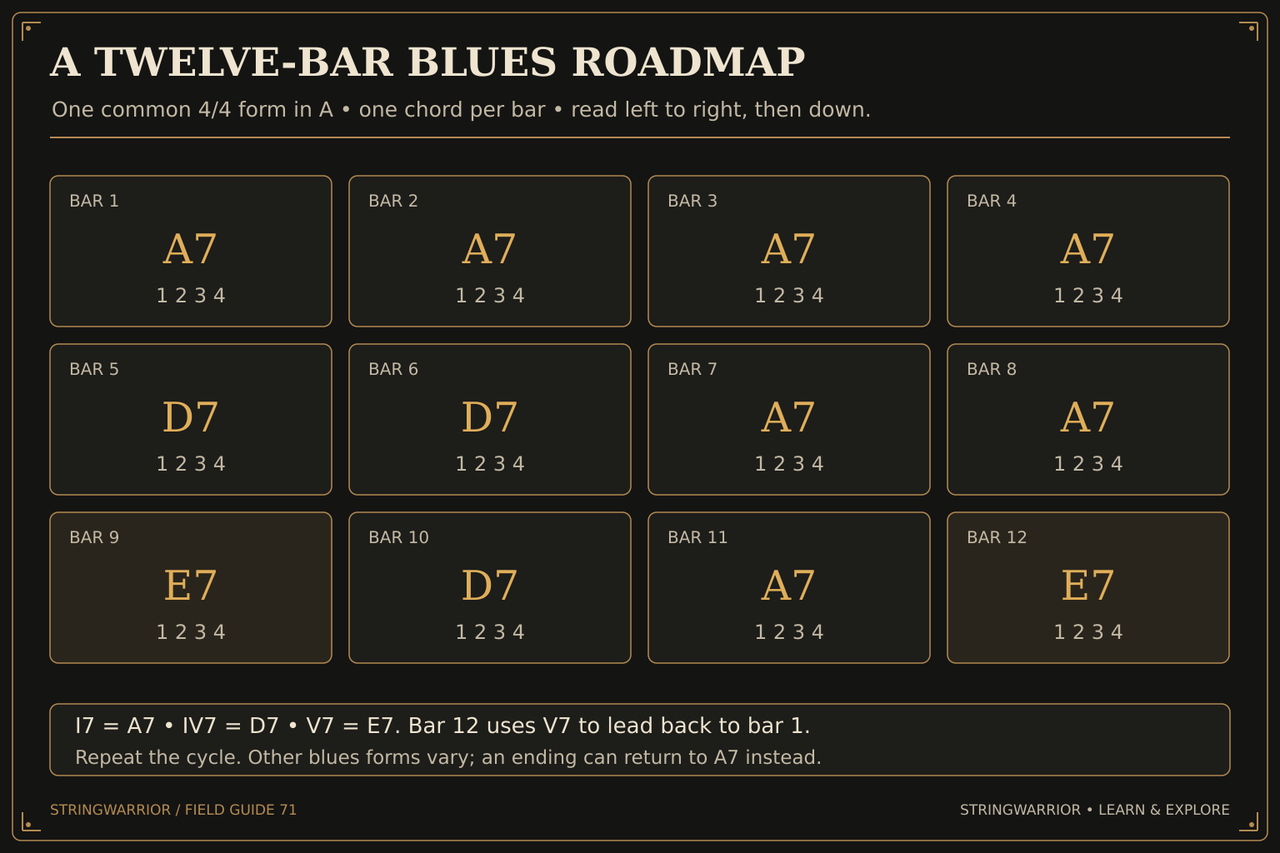
A twelve-bar blues roadmap
One common 12-bar 4/4 form in A: A7 A7 A7 A7 / D7 D7 A7 A7 / E7 D7 A7 E7. Open the full A twelve-bar blues roadmap illustration
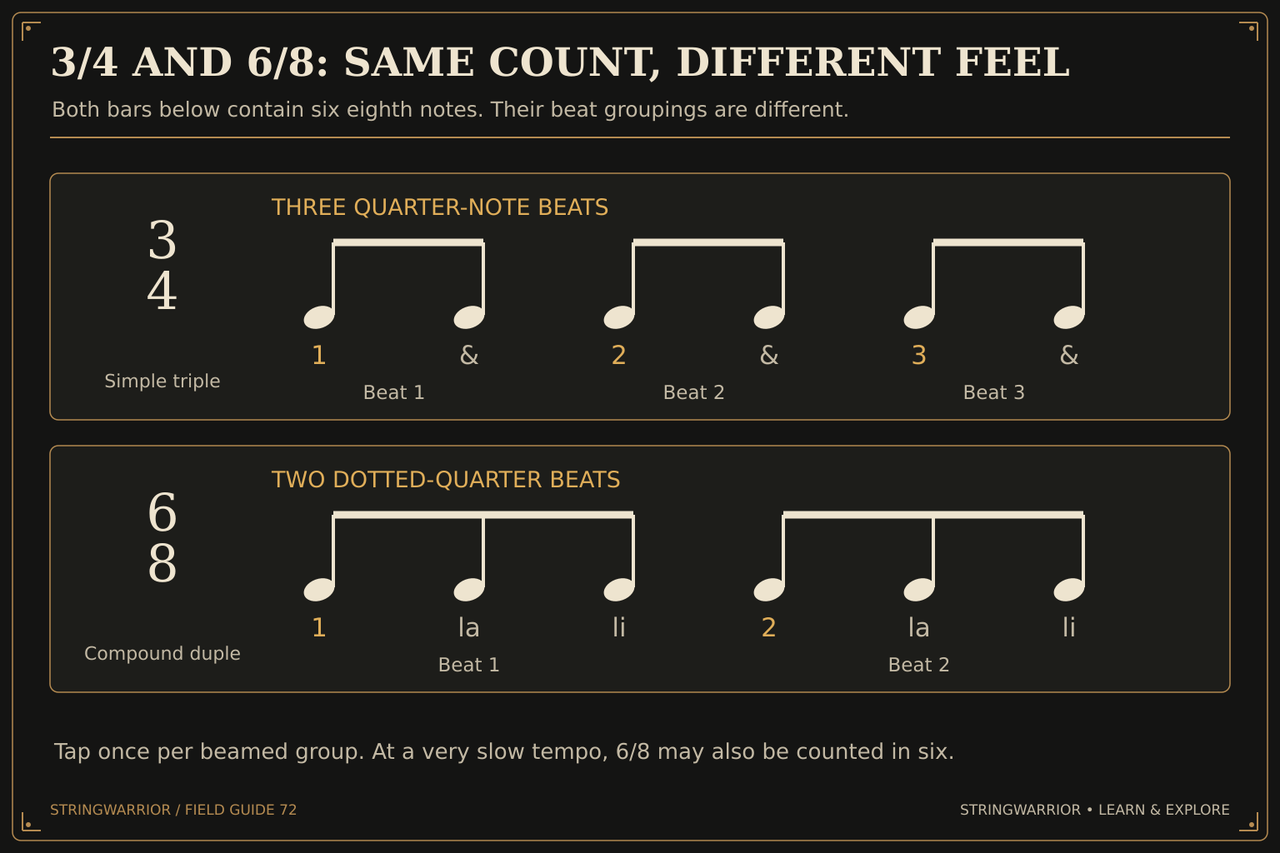
3/4 versus 6/8
Six eighth notes in each example, grouped 2+2+2 for three quarter-note beats and 3+3 for two dotted-quarter beats. Open the full 3/4 versus 6/8 illustration
Bass
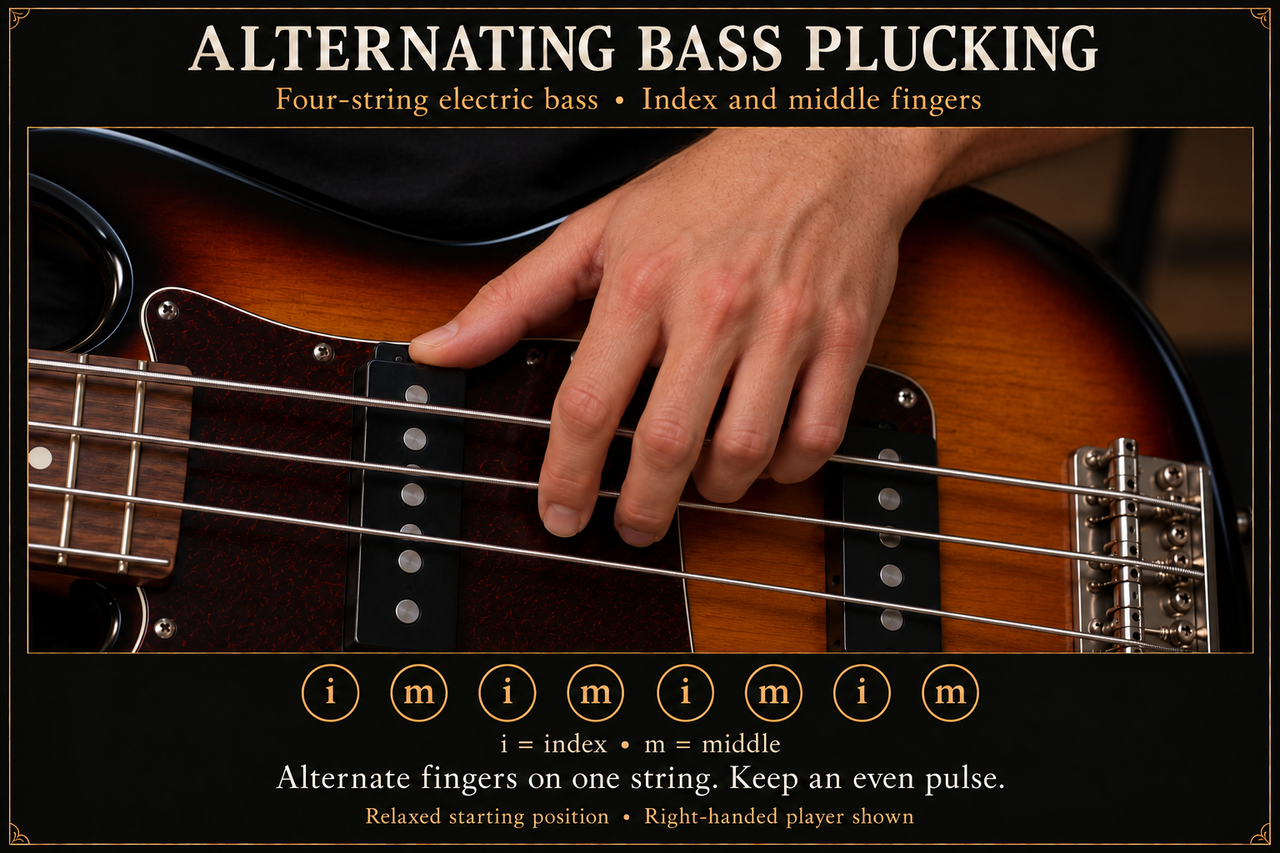
Alternating bass plucking
A small, repeatable motion is enough. Open the full Alternating bass plucking illustration

Take turns: i = index; m = middle. Each mark is one pluck. Finger | i, m, i, m, i, m, i, m

Build an even pulse: Start slowly on one open string. Relax: Let the fingers stay curved. Alternate: Use index, then middle. Listen: Match their timing and volume.

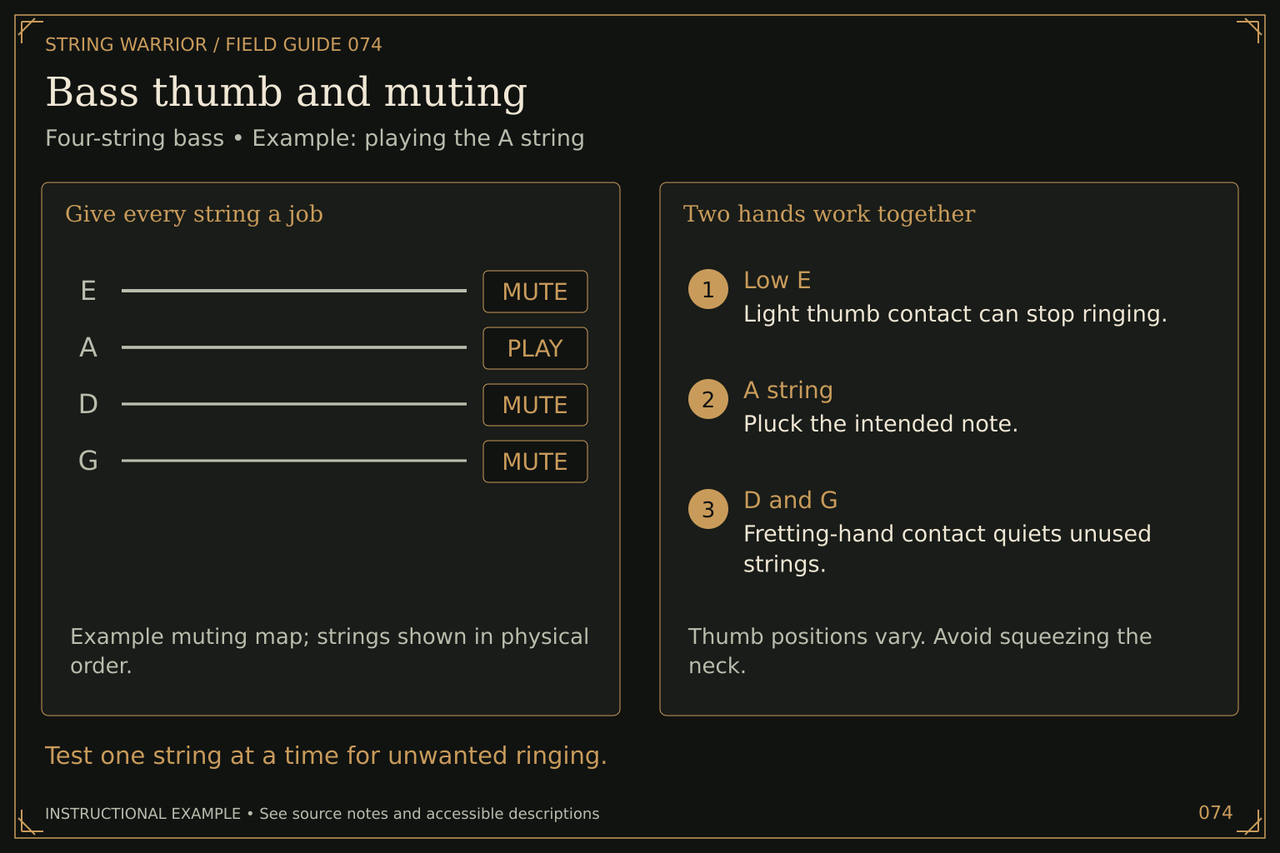
Bass thumb and muting
Test one string at a time for unwanted ringing. Open the full Bass thumb and muting illustration

Give every string a job: Example muting map; strings shown in physical order.

Two hands work together: Thumb positions vary. Avoid squeezing the neck. Low E: Light thumb contact can stop ringing. A string: Pluck the intended note. D and G: Fretting-hand contact quiets unused strings.

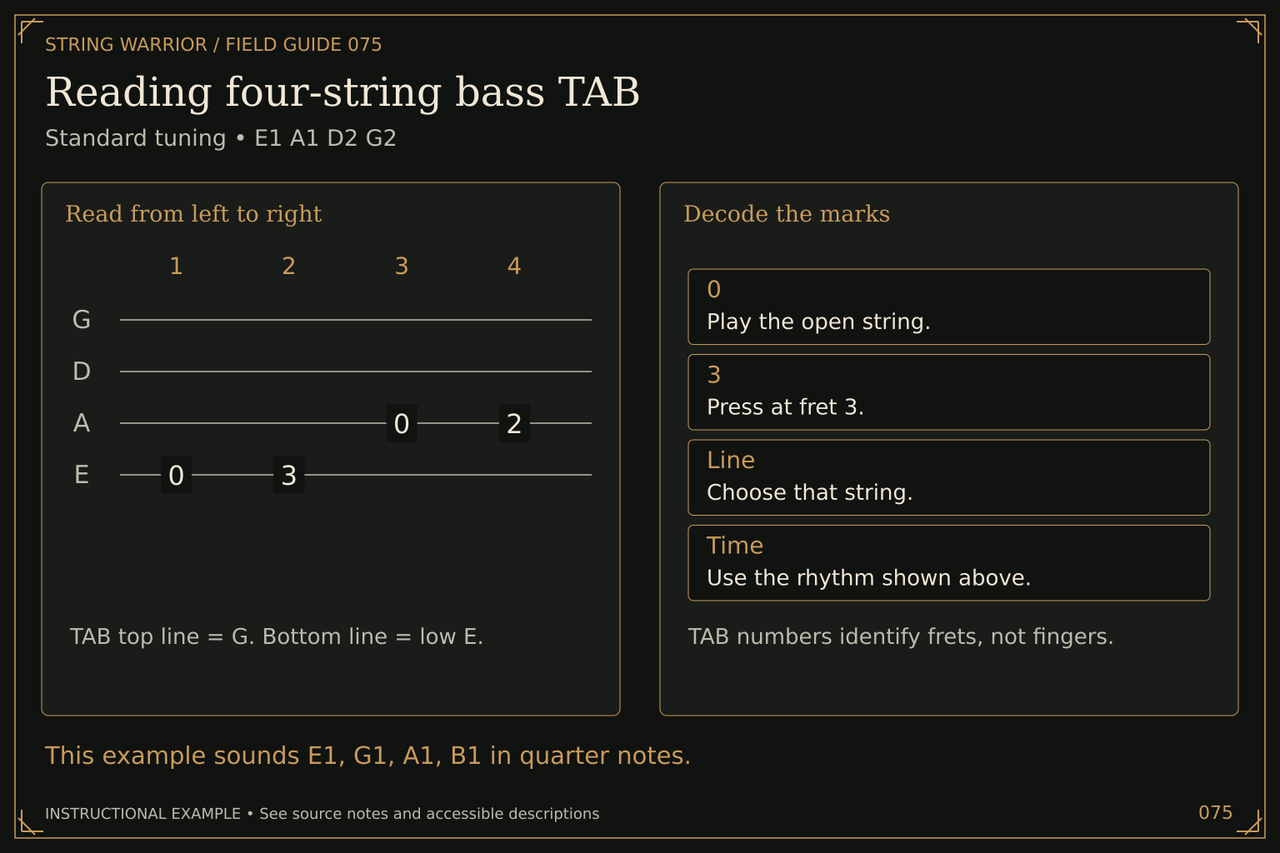
Reading four-string bass TAB
This example sounds E1, G1, A1, B1 in quarter notes. Open the full Reading four-string bass TAB illustration

Read from left to right: TAB top line = G. Bottom line = low E.

Decode the marks: TAB numbers identify frets, not fingers.

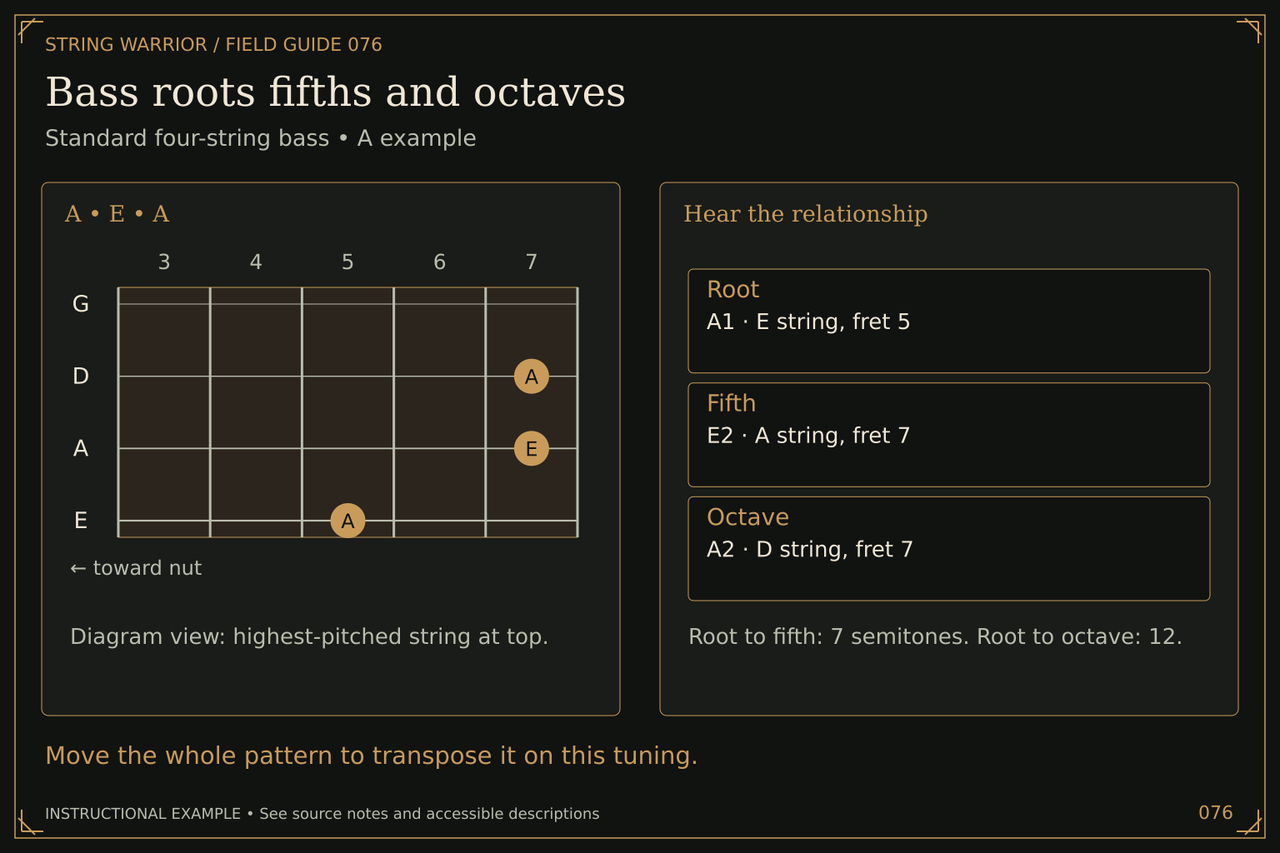
Bass roots fifths and octaves
Move the whole pattern to transpose it on this tuning. Open the full Bass roots fifths and octaves illustration

A • E • A: Diagram view: highest-pitched string at top.

Hear the relationship: Root to fifth: 7 semitones. Root to octave: 12.

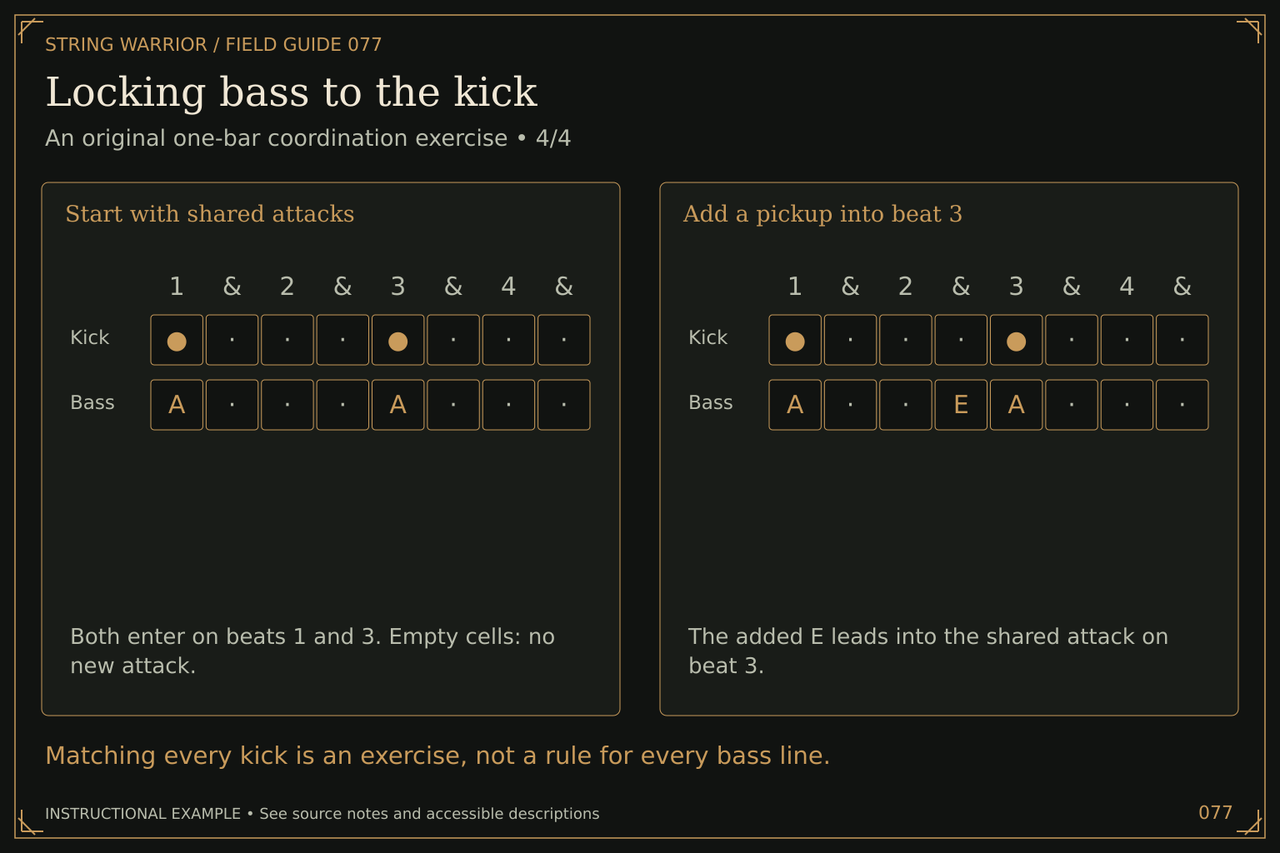
Locking bass to the kick
Matching every kick is an exercise, not a rule for every bass line. Open the full Locking bass to the kick illustration

Start with shared attacks: Both enter on beats 1 and 3. Empty cells: no new attack. Kick | ●, , , , ●, , , Bass | A, , , , A, , ,

Add a pickup into beat 3: The added E leads into the shared attack on beat 3. Kick | ●, , , , ●, , , Bass | A, , , E, A, , ,

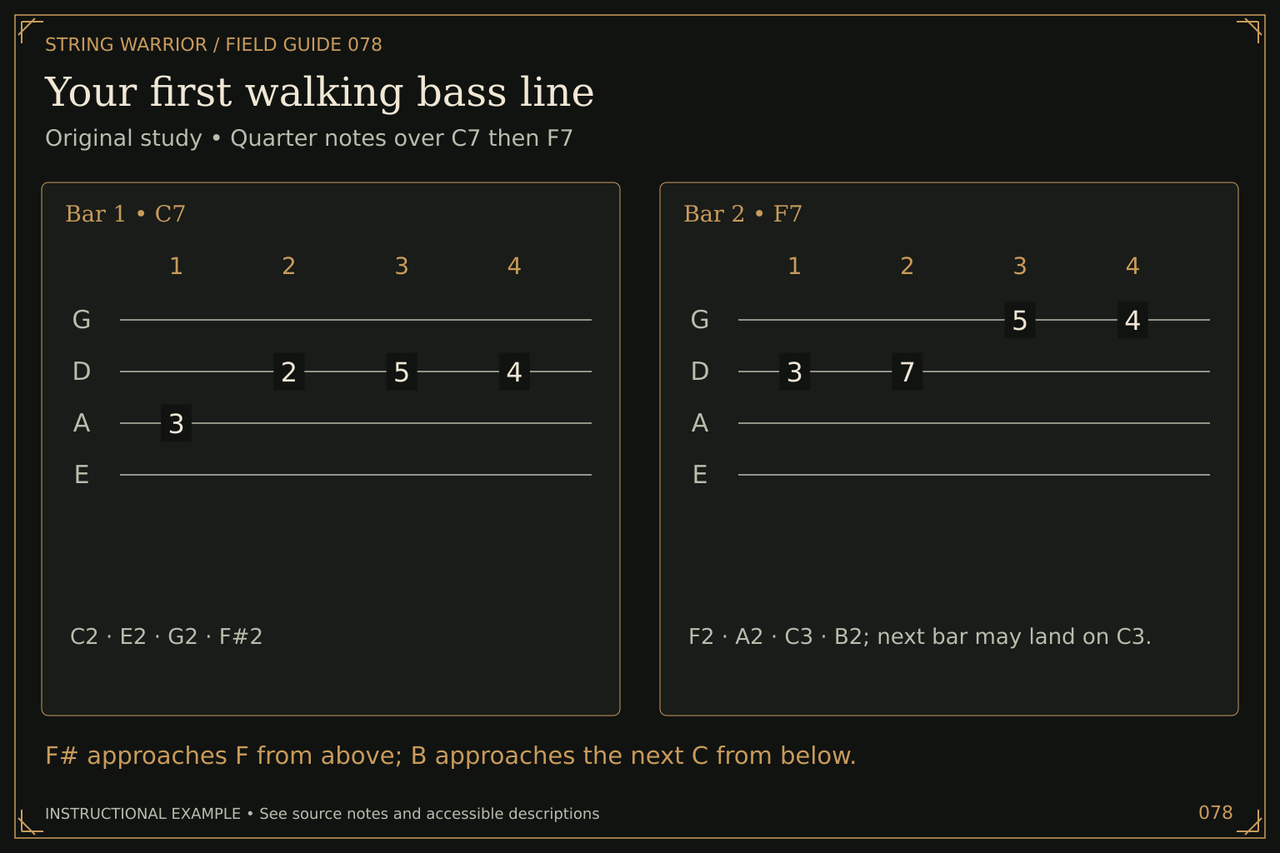
Your first walking bass line
F# approaches F from above; B approaches the next C from below. Open the full Your first walking bass line illustration

Bar 1 • C7: C2 · E2 · G2 · F#2

Bar 2 • F7: F2 · A2 · C3 · B2; next bar may land on C3.

Playing styles
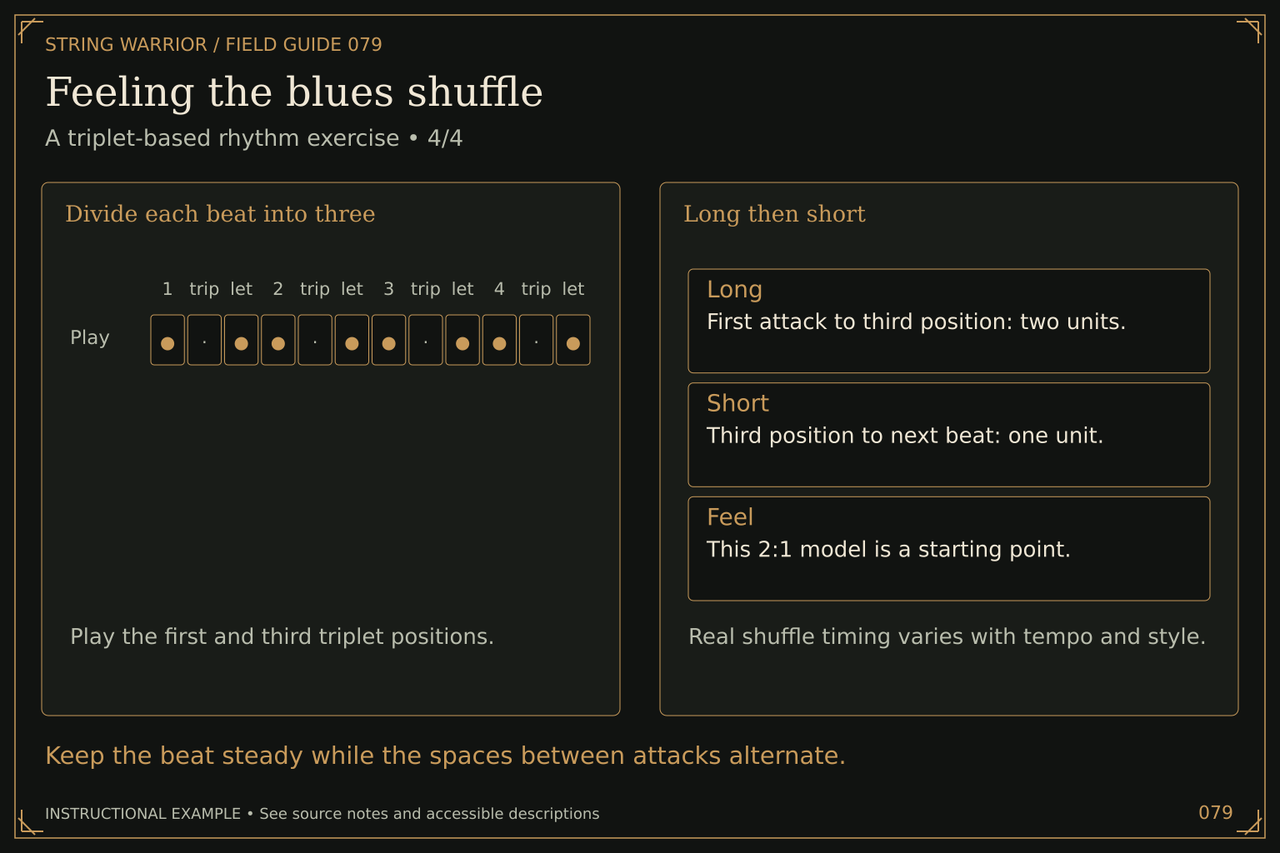
Feeling the blues shuffle
Keep the beat steady while the spaces between attacks alternate. Open the full Feeling the blues shuffle illustration

Divide each beat into three: Play the first and third triplet positions. Play | ●, , ●, ●, , ●, ●, , ●, ●, , ●

Long then short: Real shuffle timing varies with tempo and style.

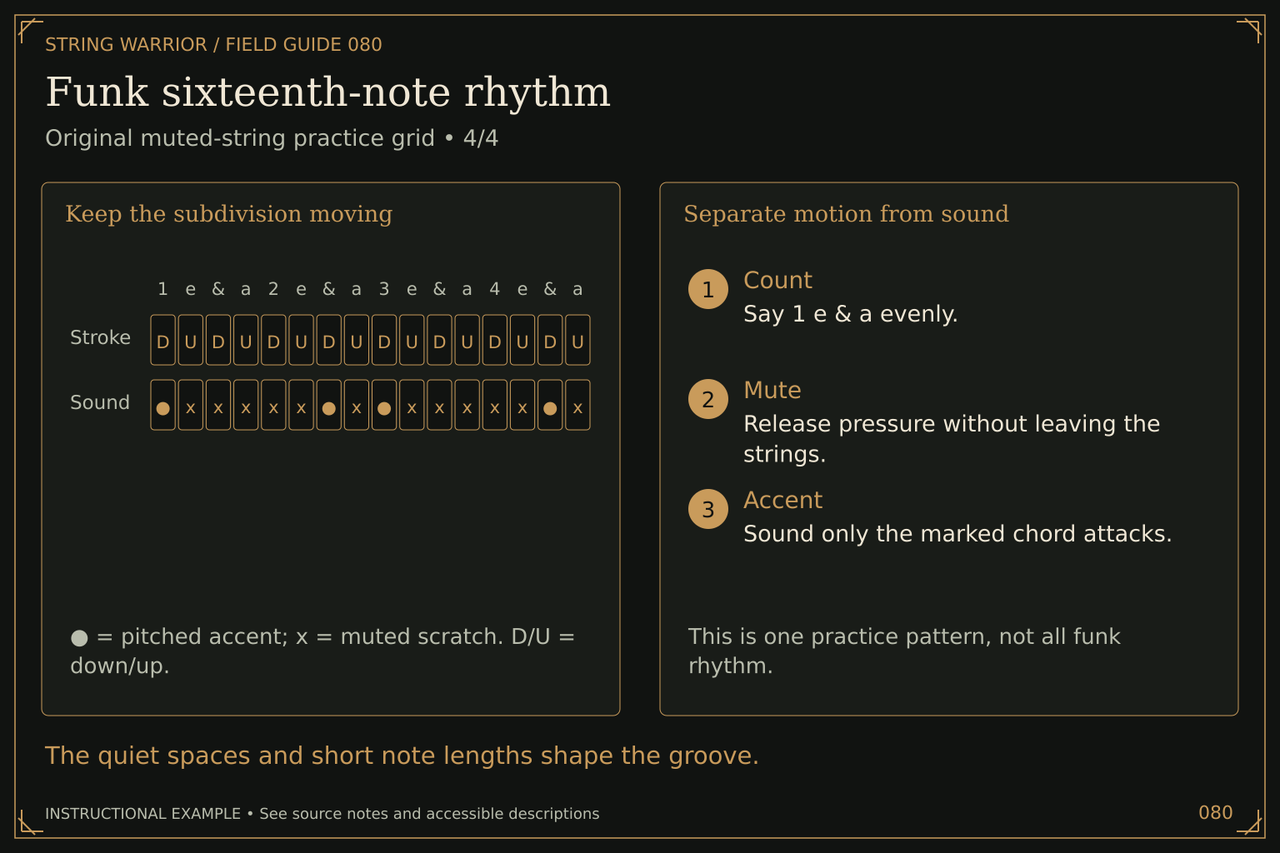
Funk sixteenth-note rhythm
The quiet spaces and short note lengths shape the groove. Open the full Funk sixteenth-note rhythm illustration

Keep the subdivision moving: ● = pitched accent; x = muted scratch. D/U = down/up. Stroke | D, U, D, U, D, U, D, U, D, U, D, U, D, U, D, U Sound | ●, x, x, x, x, x, ●, x, ●, x, x, x, x, x, ●, x

Separate motion from sound: This is one practice pattern, not all funk rhythm. Count: Use an even four-part count. Mute: Release pressure without leaving the strings. Accent: Sound only the marked chord attacks.

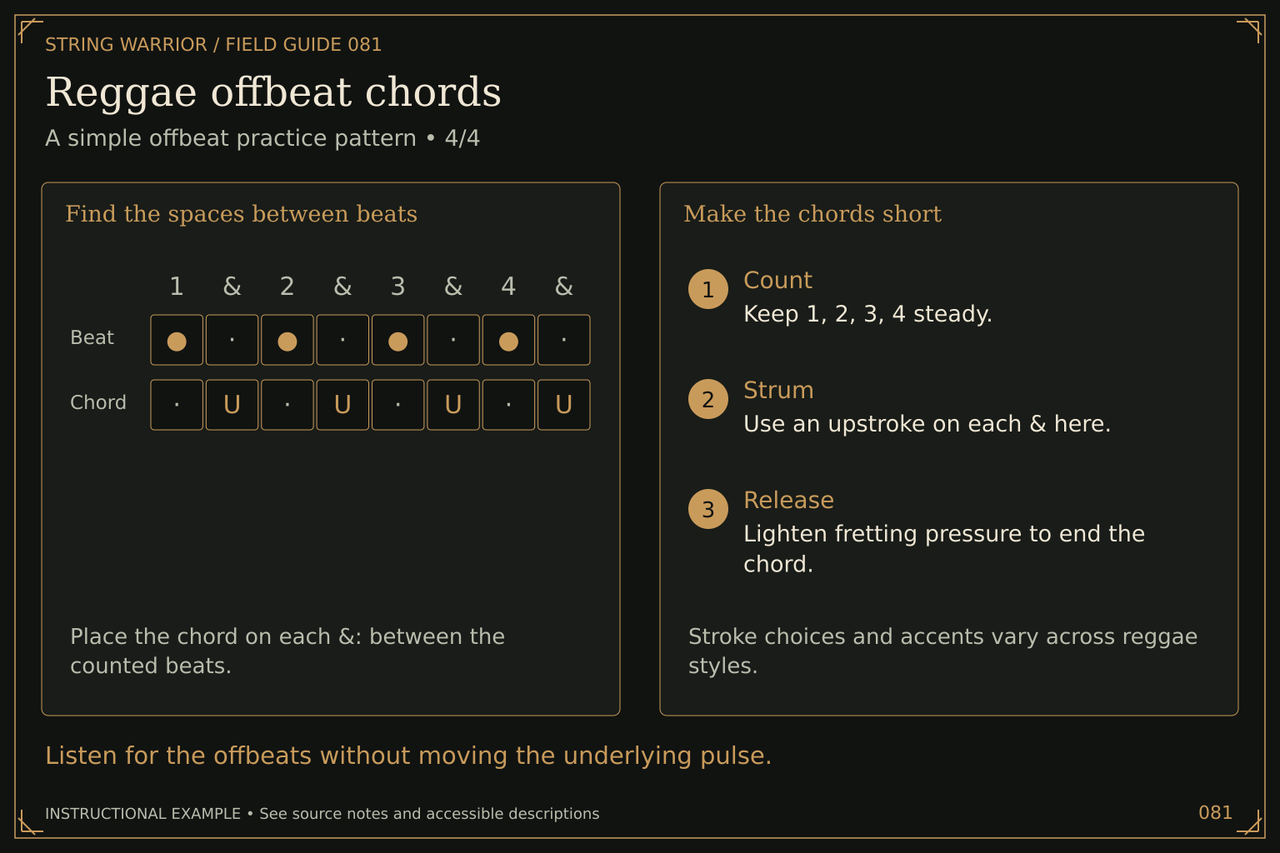
Reggae offbeat chords
Listen for the offbeats without moving the underlying pulse. Open the full Reggae offbeat chords illustration

Find the spaces between beats: Place the chord on each &: between the counted beats. Beat | ●, , ●, , ●, , ●, Chord | , U, , U, , U, , U

Make the chords short: Stroke choices and accents vary across reggae styles. Count: Keep 1, 2, 3, 4 steady. Strum: Use an upstroke on each & here. Release: Lighten fretting pressure to end the chord.

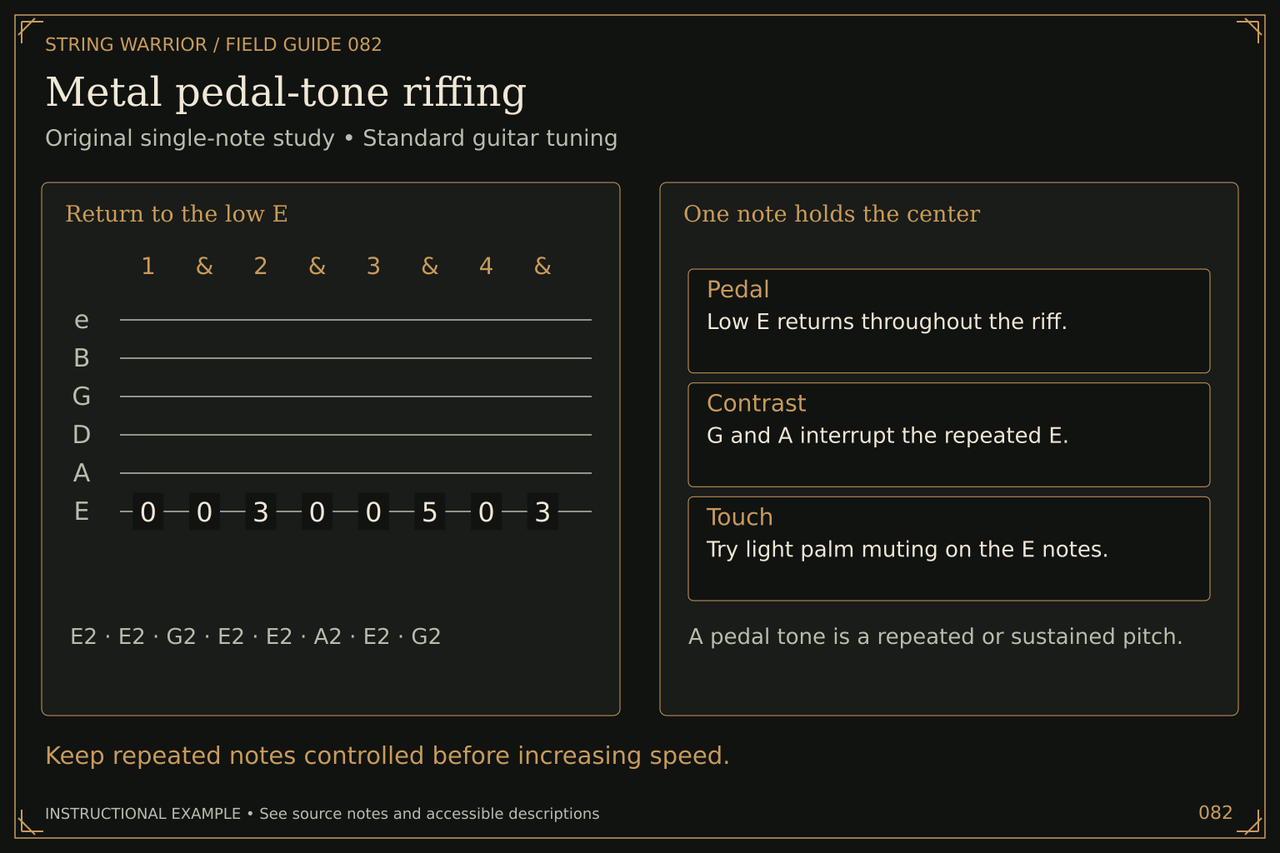
Metal pedal-tone riffing
Keep repeated notes controlled before increasing speed. Open the full Metal pedal-tone riffing illustration

Return to the low E: E2 · E2 · G2 · E2 · E2 · A2 · E2 · G2

One note holds the center: A pedal tone is a repeated or sustained pitch.

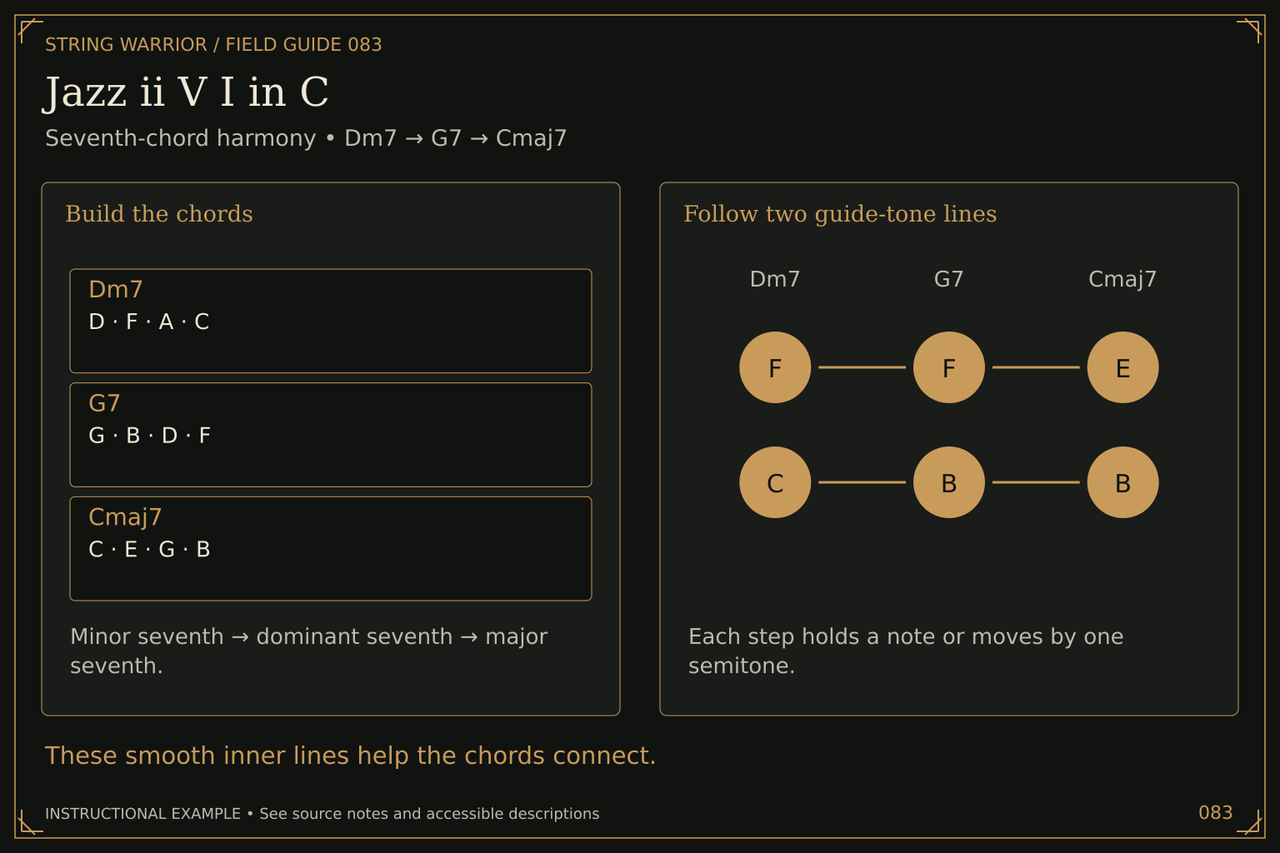
Jazz ii V I in C
These smooth inner lines help the chords connect. Open the full Jazz ii V I in C illustration

Build the chords: Minor seventh to dominant seventh to major seventh.

Follow two guide-tone lines: Each step holds a note or moves by one semitone.

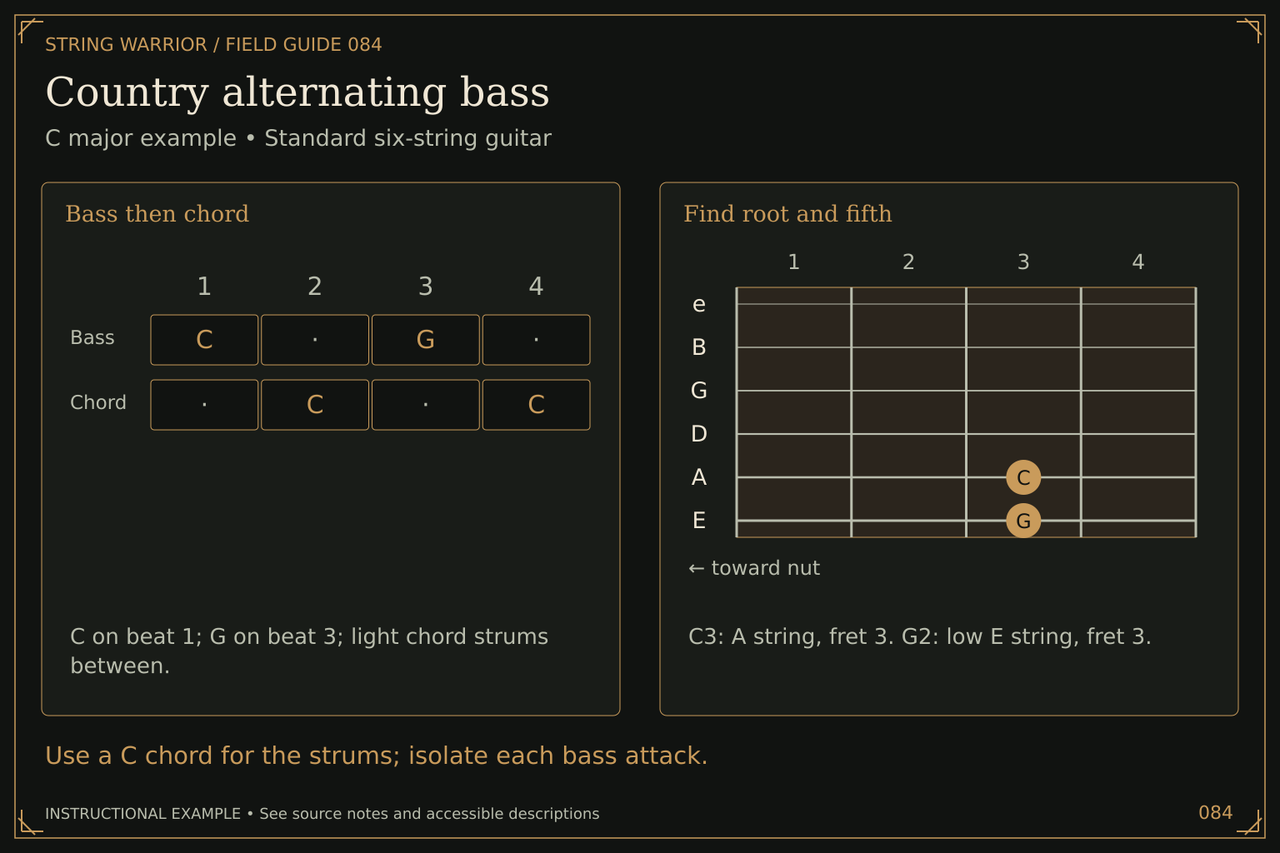
Country alternating bass
Use a C chord for the strums; isolate each bass attack. Open the full Country alternating bass illustration

Bass then chord: C on beat 1; G on beat 3; light chord strums between. Bass | C, , G, Chord | , C, , C

Find root and fifth: C3: A string, fret 3. G2: low E string, fret 3.

Ukulele
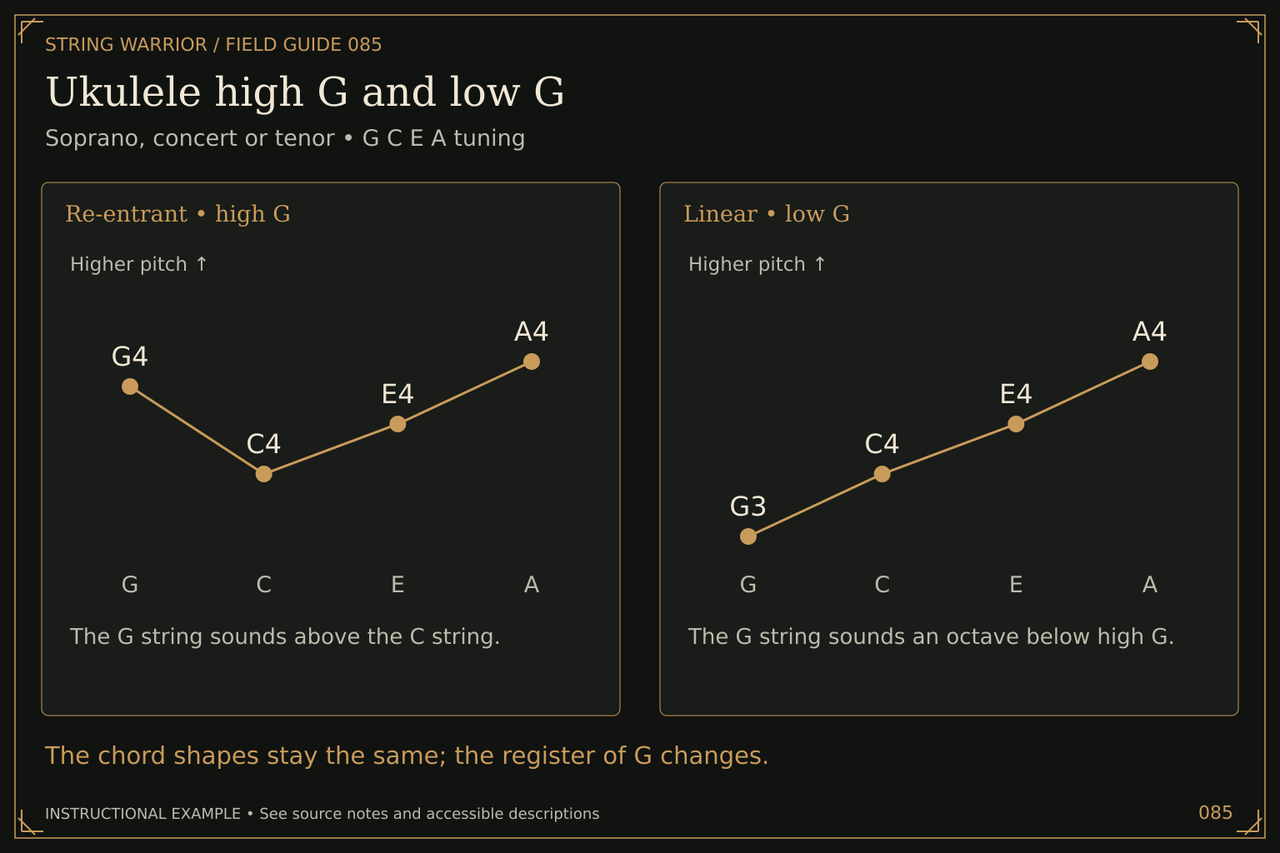
Ukulele high G and low G
The chord shapes stay the same; the register of G changes. Open the full Ukulele high G and low G illustration

Re-entrant • high G: The G string sounds above the C string.

Linear • low G: The G string sounds an octave below high G.

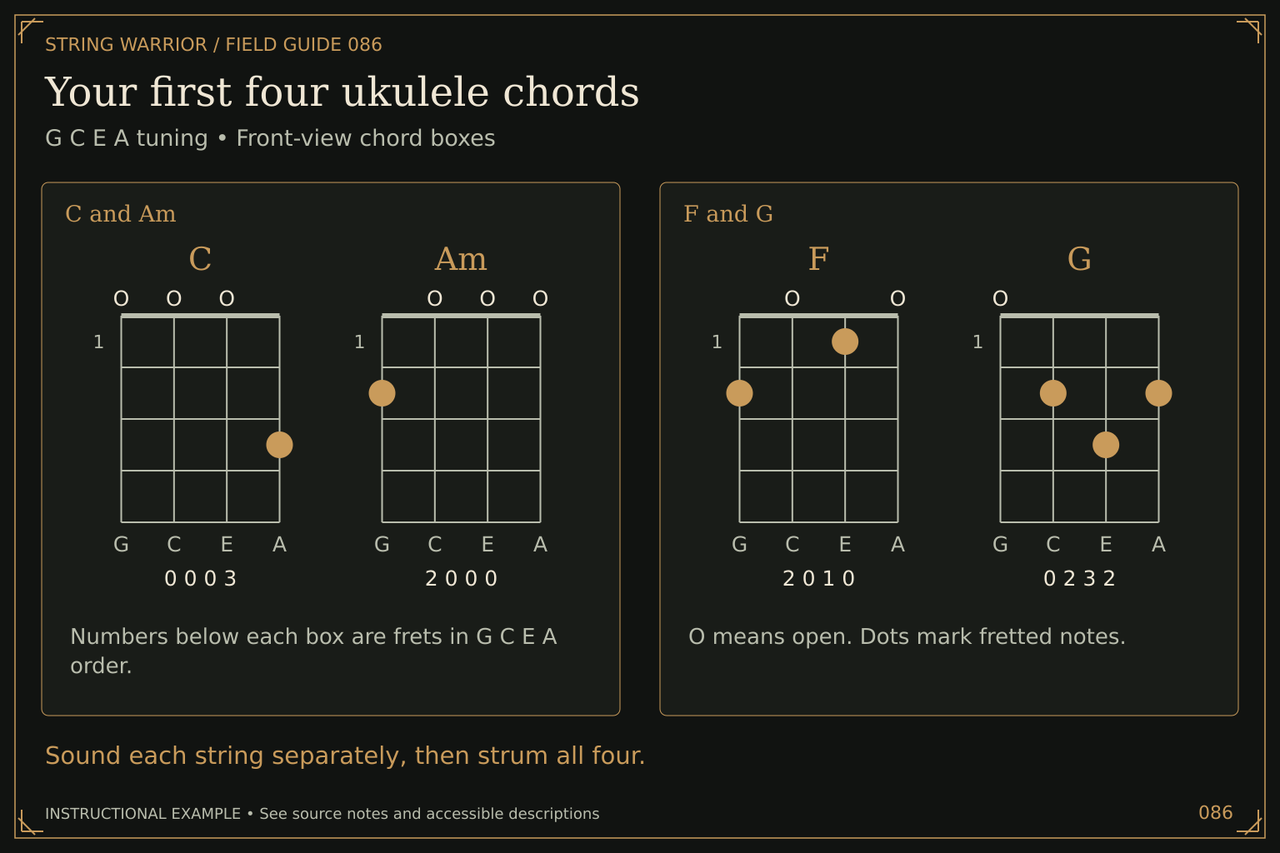
Your first four ukulele chords
Sound each string separately, then strum all four. Open the full Your first four ukulele chords illustration

C and Am: Numbers below each box are frets in G C E A order.

F and G: O means open. Dots mark fretted notes.

Ukulele strumming pulse
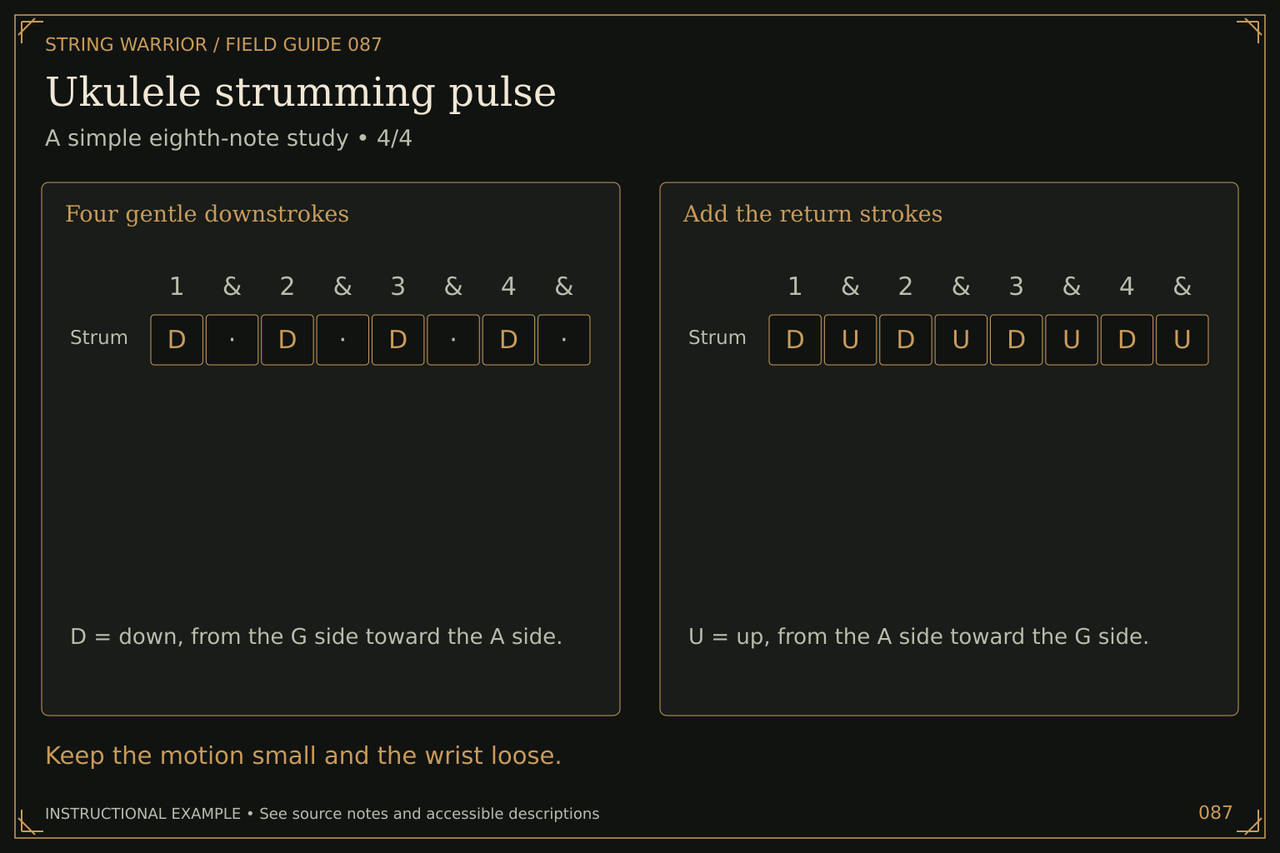
Keep the motion small and the wrist loose. Open the full Ukulele strumming pulse illustration

Four gentle downstrokes: D = down, from the G side toward the A side. Strum | D, , D, , D, , D,

Add the return strokes: U = up, from the A side toward the G side. Strum | D, U, D, U, D, U, D, U

Ukulele chord transitions
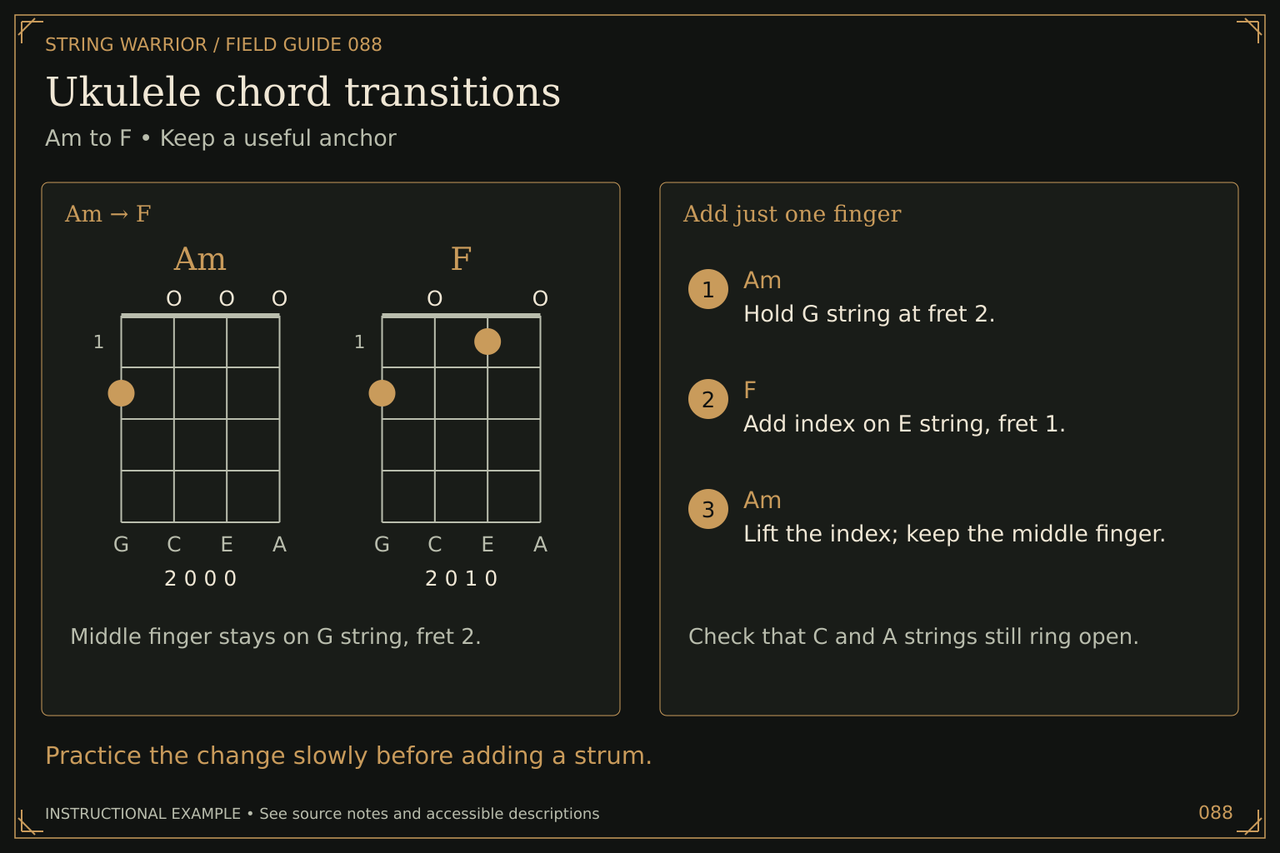
Practice the change slowly before adding a strum. Open the full Ukulele chord transitions illustration

Am to F: Middle finger stays on G string, fret 2.

Add just one finger: Check that C and A strings still ring open. Am: Hold G string at fret 2. F: Add index on E string, fret 1. Am: Lift the index; keep the middle finger.

Ukulele fingerpicking
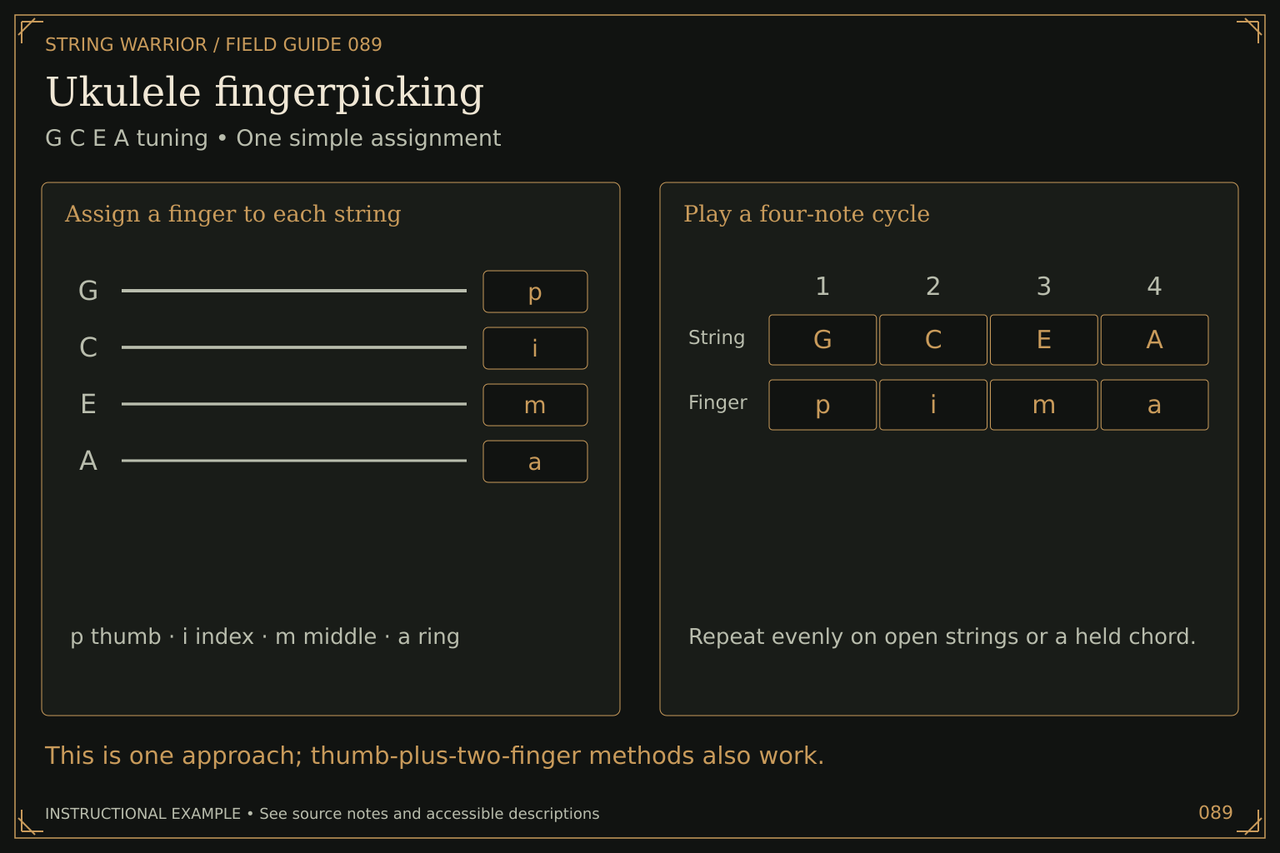
This is one approach; thumb-plus-two-finger methods also work. Open the full Ukulele fingerpicking illustration

Assign a finger to each string: p thumb · i index · m middle · a ring

Play a four-note cycle: Repeat evenly on open strings or a held chord. String | G, C, E, A Finger | p, i, m, a

Movable ukulele barre chords
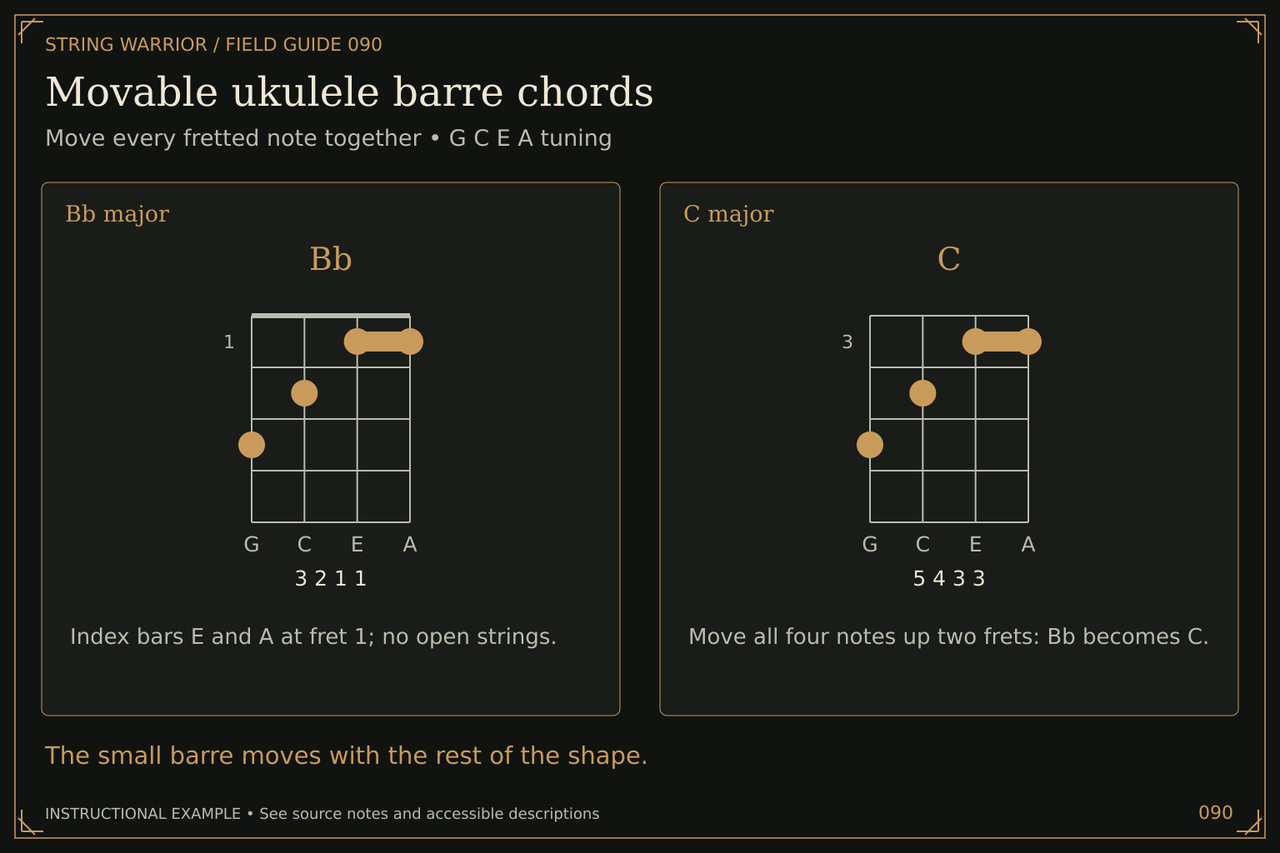
The small barre moves with the rest of the shape. Open the full Movable ukulele barre chords illustration

Bb major: Index bars E and A at fret 1; no open strings.

C major: Move all four notes up two frets: Bb becomes C.

Technique troubleshooting
Clean pull-offs
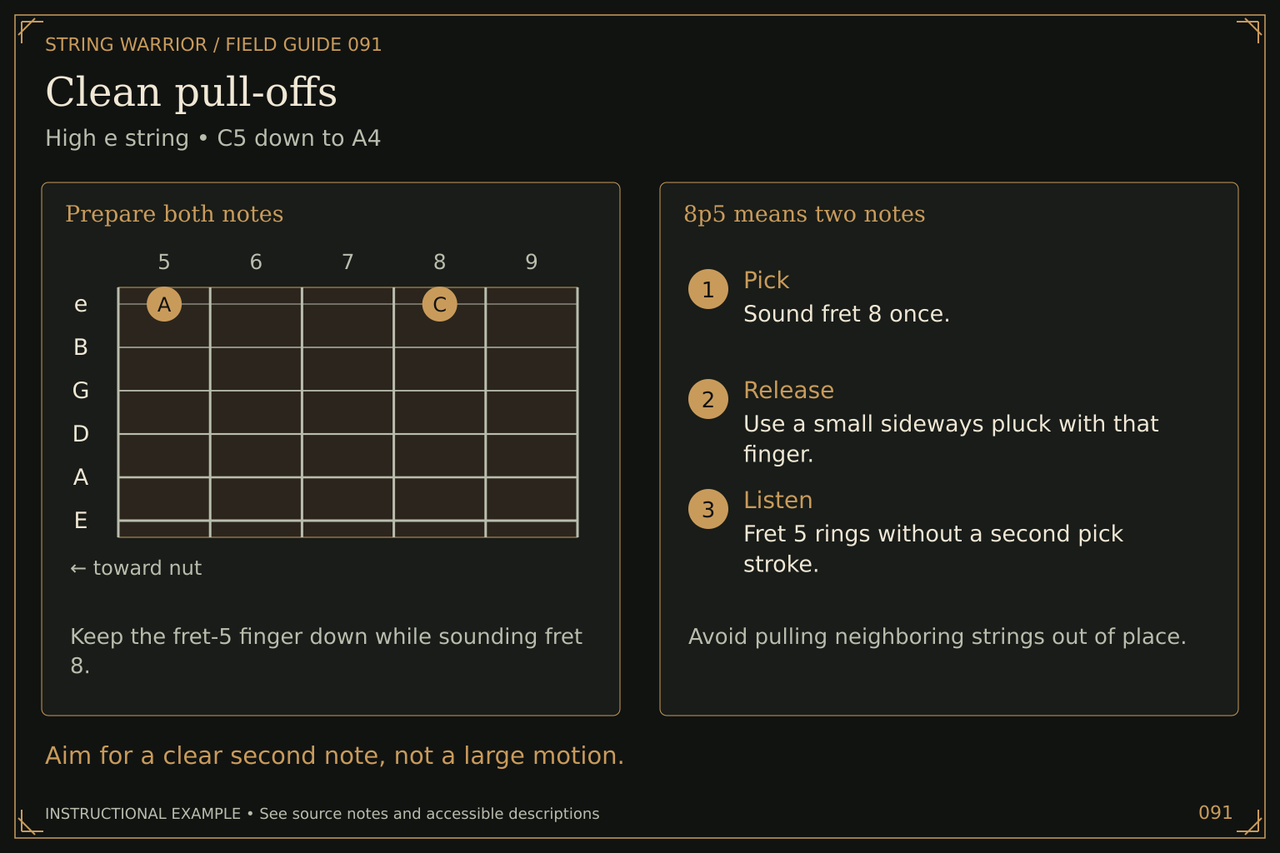
Aim for a clear second note, not a large motion. Open the full Clean pull-offs illustration

Prepare both notes: Keep the fret-5 finger down while sounding fret 8.

8p5 means two notes: Avoid pulling neighboring strings out of place. Pick: Sound fret 8 once. Release: Use a small sideways pluck with that finger. Listen: Fret 5 rings without a second pick stroke.

Bending to a target pitch
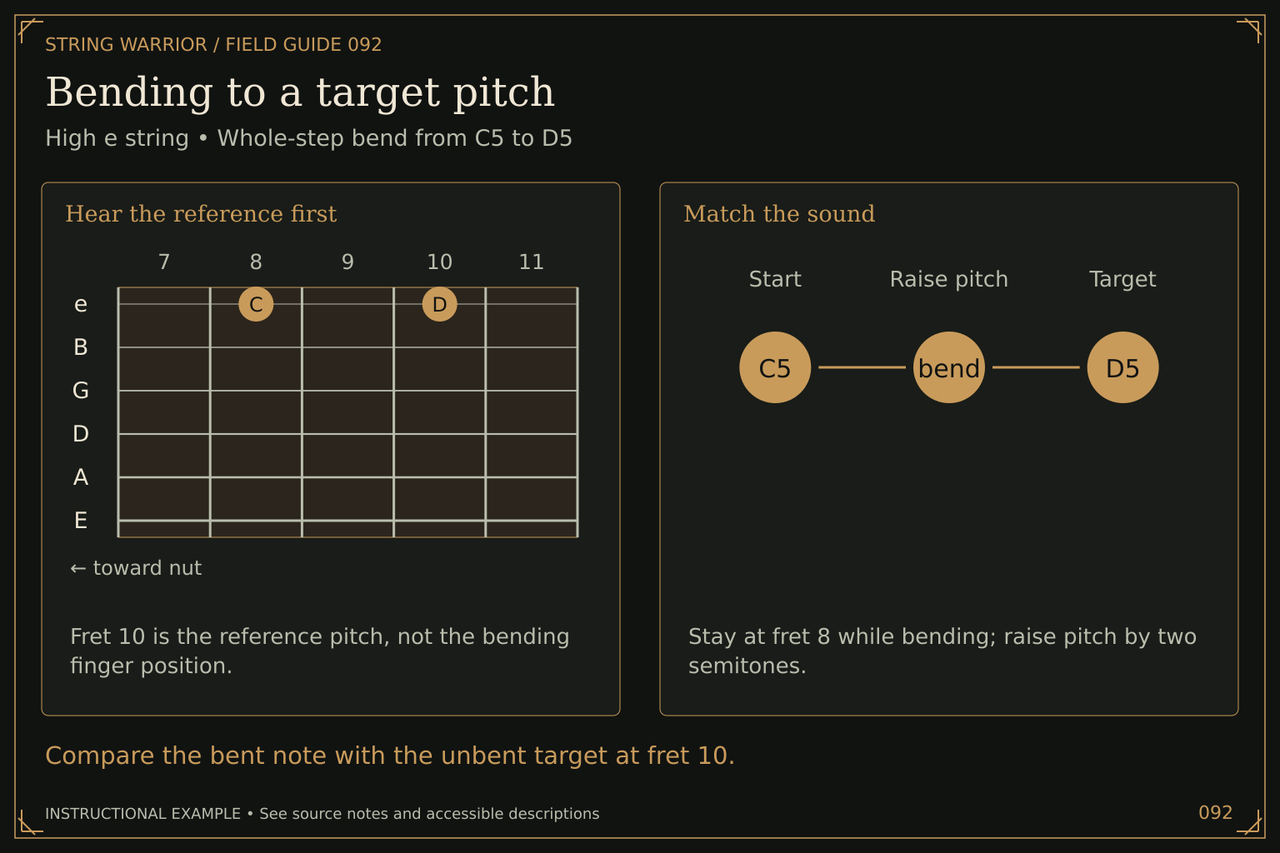
Compare the bent note with the unbent target at fret 10. Open the full Bending to a target pitch illustration

Hear the reference first: Fret 10 is the reference pitch, not the bending finger position.

Match the sound: Stay at fret 8 while bending; raise pitch by two semitones.

Finding unwanted string noise
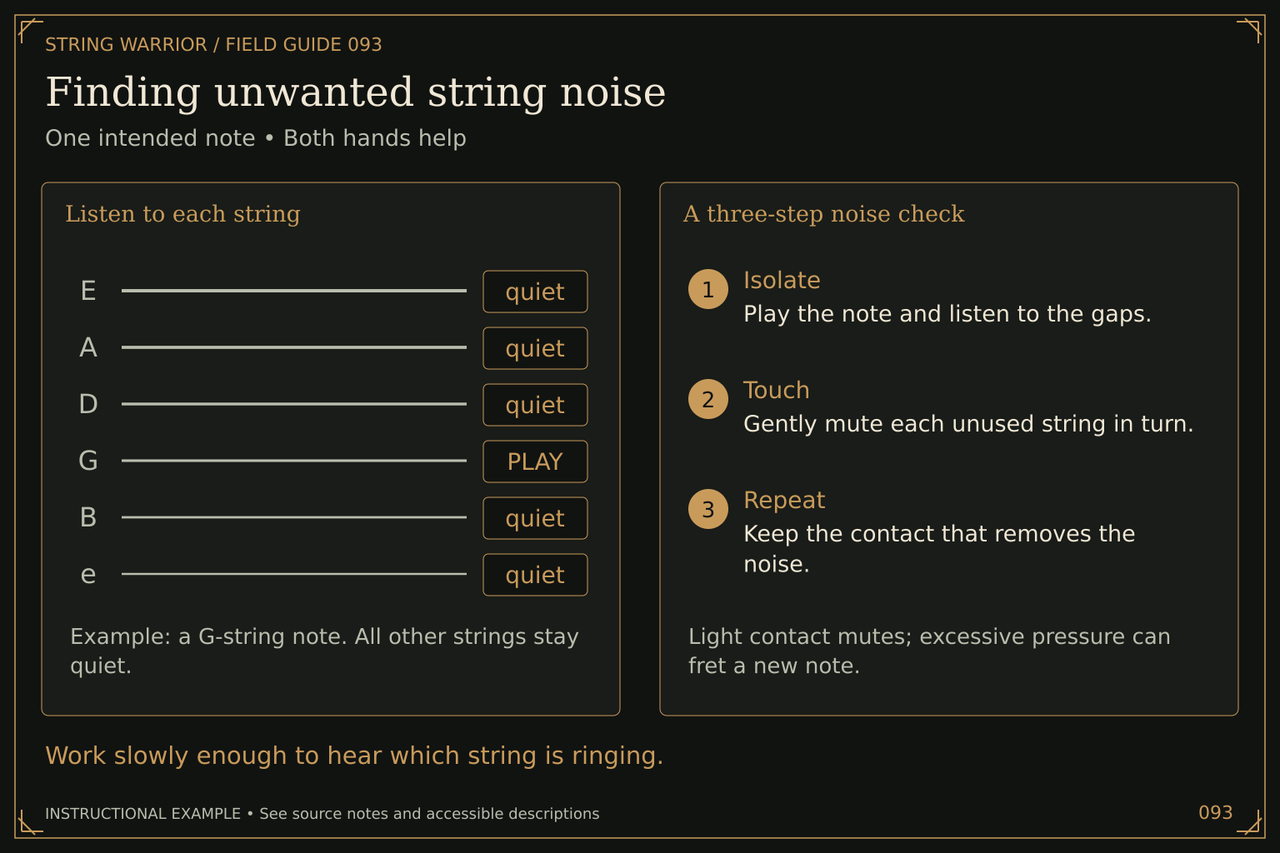
Work slowly enough to hear which string is ringing. Open the full Finding unwanted string noise illustration

Listen to each string: Example: a G-string note. All other strings stay quiet.

A three-step noise check: Light contact mutes; excessive pressure can fret a new note. Isolate: Play the note and listen to the gaps. Touch: Gently mute each unused string in turn. Repeat: Keep the contact that removes the noise.

Travis picking foundation
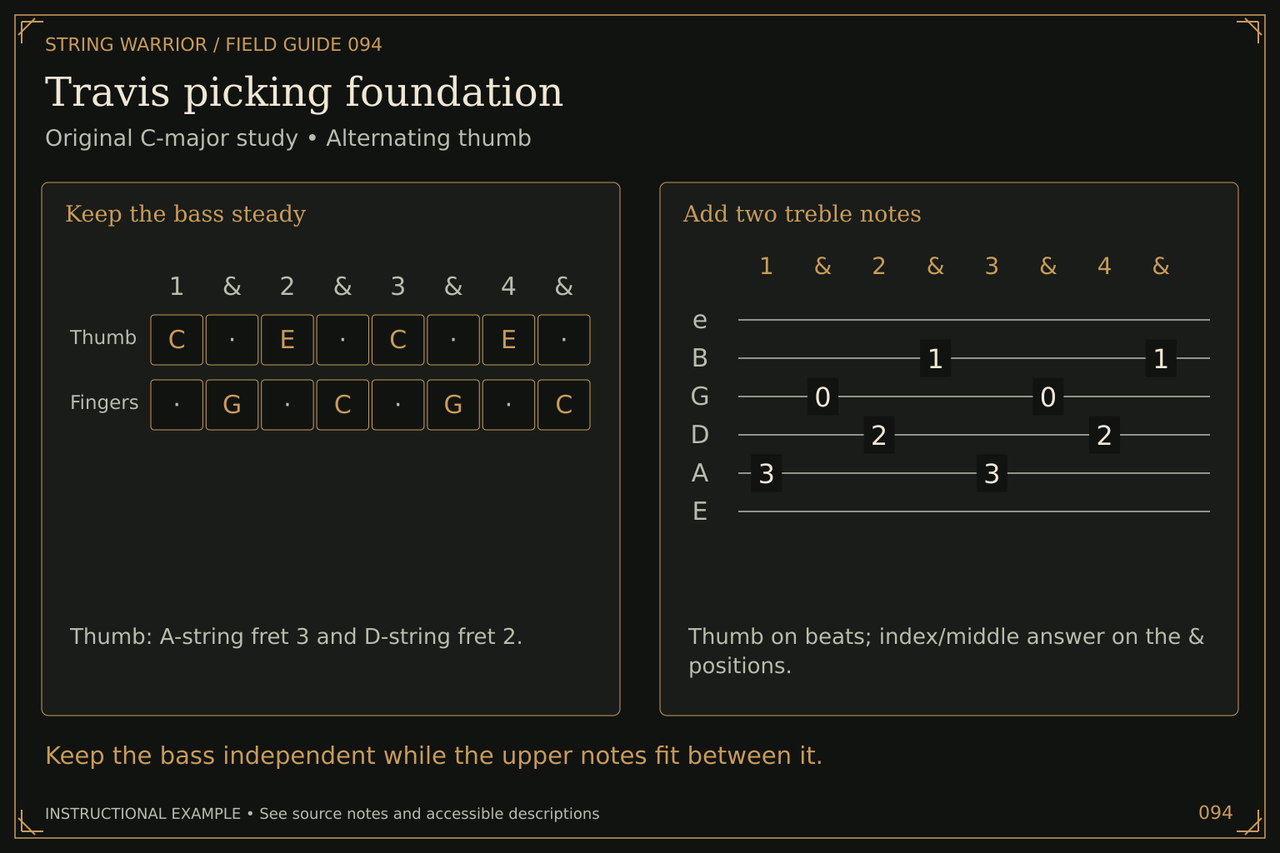
Keep the bass independent while the upper notes fit between it. Open the full Travis picking foundation illustration

Keep the bass steady: Thumb: A-string fret 3 and D-string fret 2. Thumb | C, , E, , C, , E, Fingers | , G, , C, , G, , C

Add two treble notes: Thumb on beats; index/middle answer on the & positions.

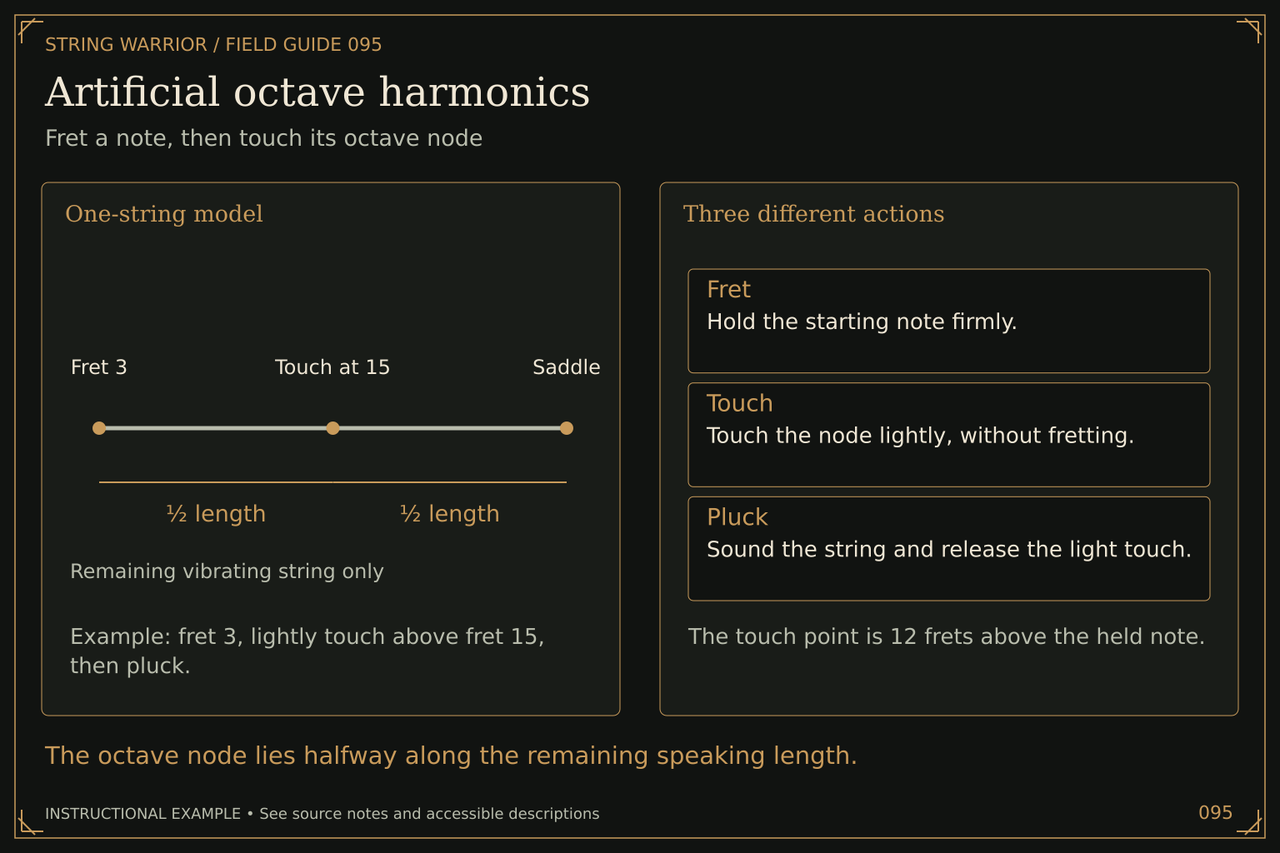
Artificial octave harmonics
The octave node lies halfway along the remaining speaking length. Open the full Artificial octave harmonics illustration

One-string model: Example: fret 3, lightly touch above fret 15, then pluck.

Three different actions: The touch point is 12 frets above the held note.

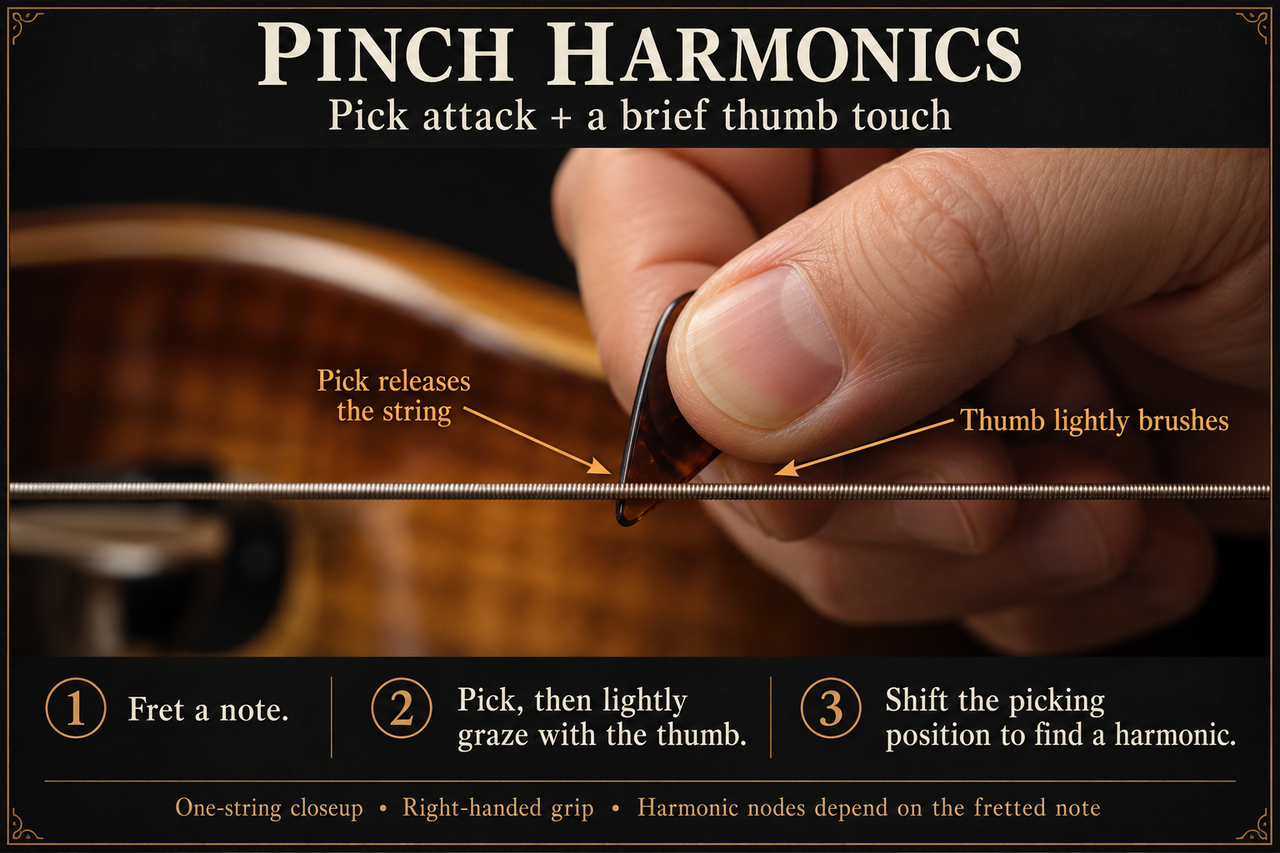
Pinch harmonics
This is a harmonic technique, not a second hard pluck. Open the full Pinch harmonics illustration

A brief touch after the pick: Keep the touch momentary so the harmonic can ring. Grip: Expose only a small part of the pick tip. Pick: Strike a fretted note. Brush: Let the thumb edge graze the string.

Search for the response: The useful positions change with the fretted note.

Little Warriors reference
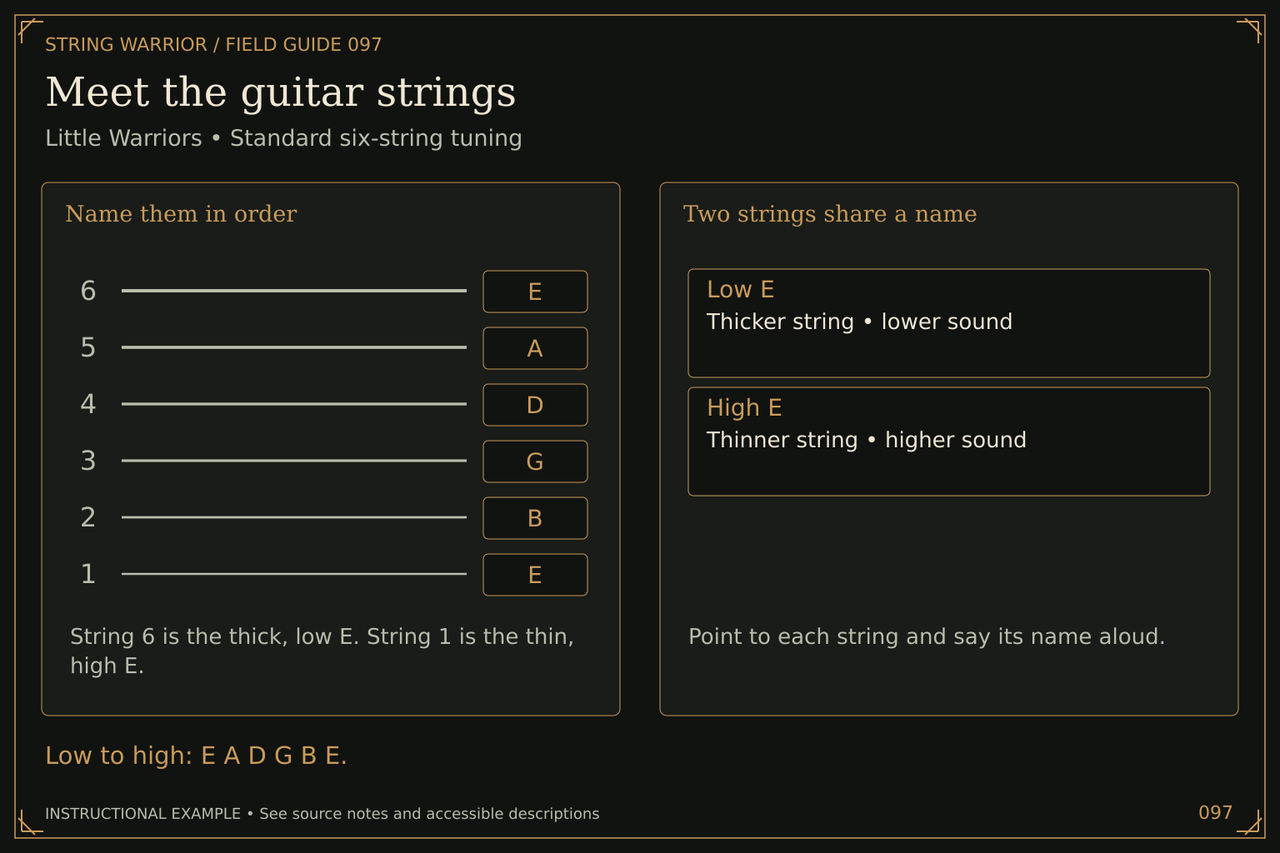
Meet the guitar strings
Low to high: E A D G B E. Open the full Meet the guitar strings illustration

Name them in order: String 6 is the thick, low E. String 1 is the thin, high E.

Two strings share a name: Point to each string and say its name aloud.

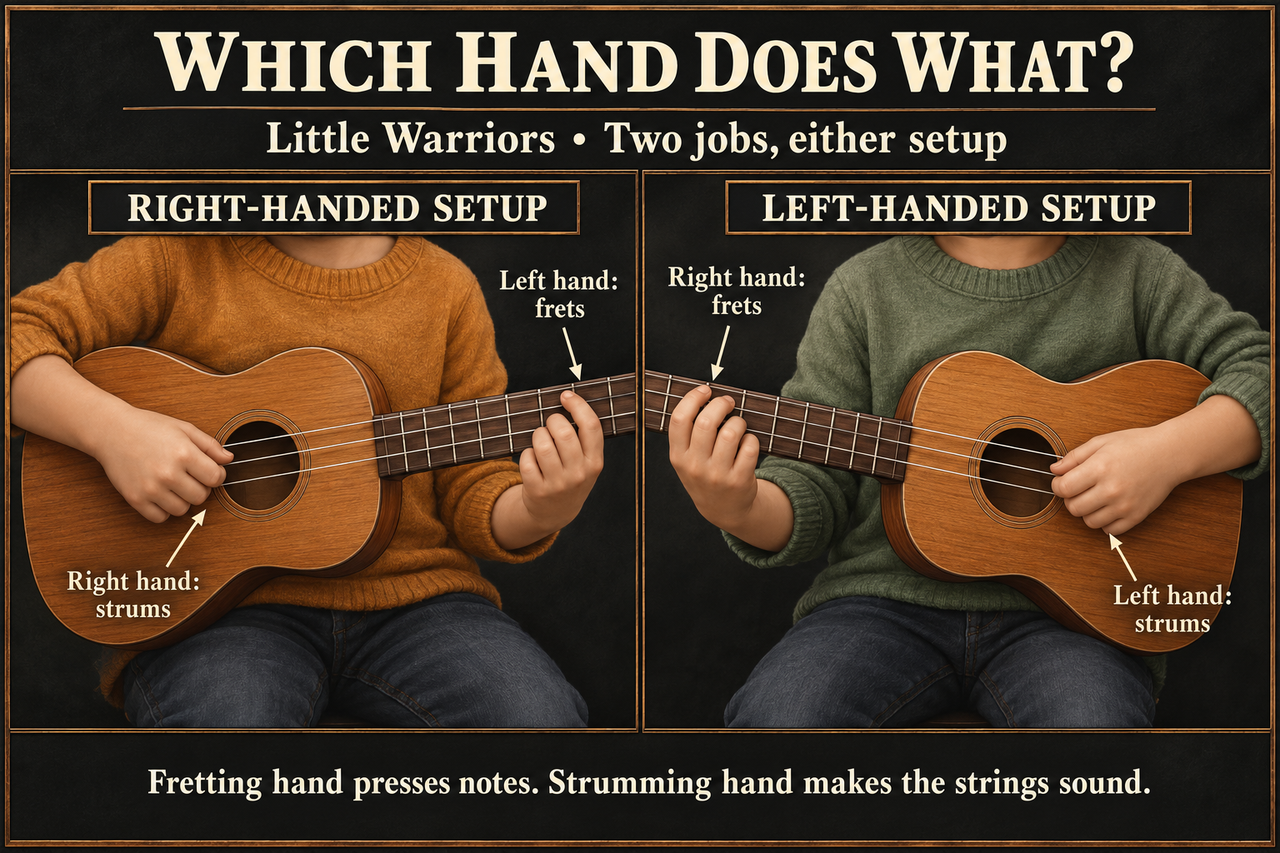
Which hand does what
Learn the jobs of the hands, whichever setup you play. Open the full Which hand does what illustration

Right-handed setup: Fretting hand = left; strumming hand = right.

Left-handed setup: Fretting hand = right; strumming hand = left.

Your first fretted note
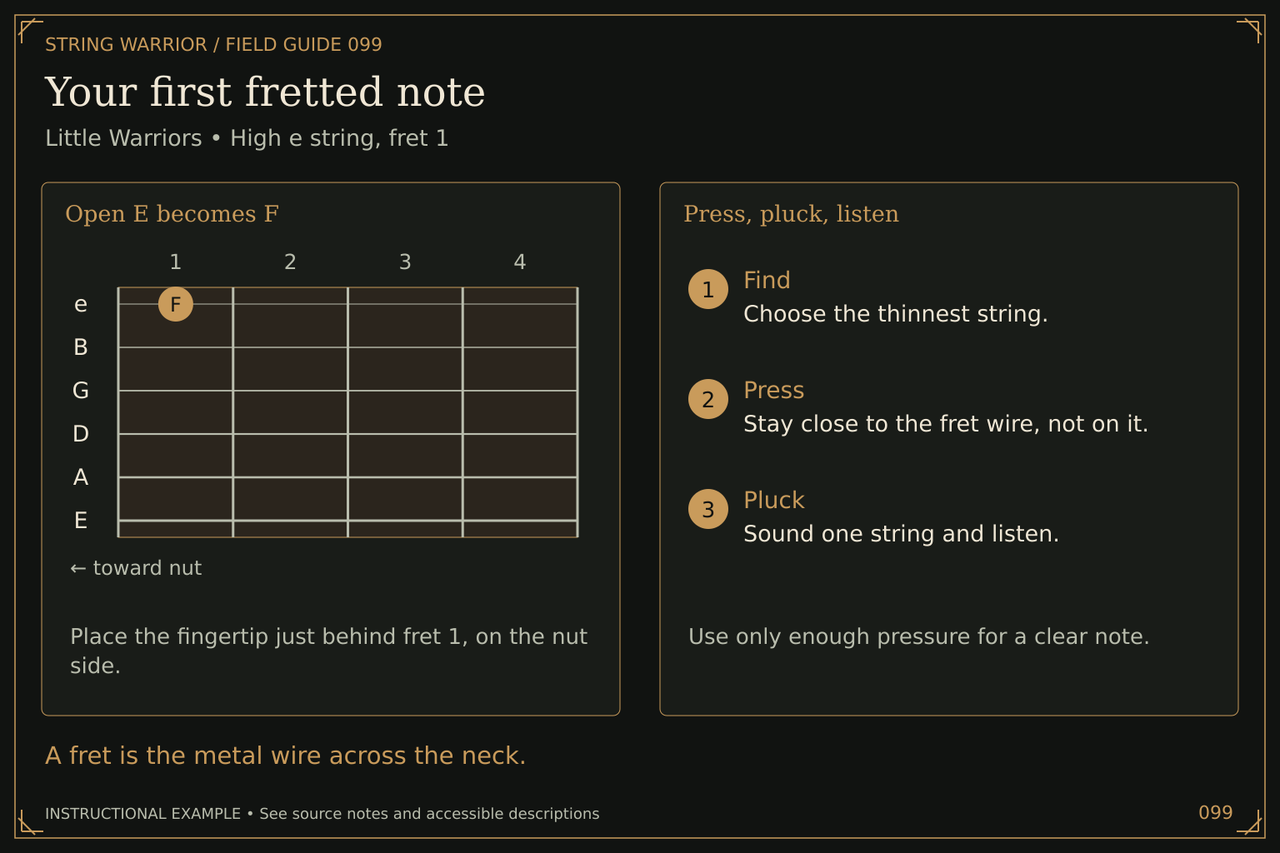
A fret is the metal wire across the neck. Open the full Your first fretted note illustration

Open E becomes F: Place the fingertip just behind fret 1, on the nut side.

Press, pluck, listen: Use only enough pressure for a clear note. Find: Choose the thinnest string. Press: Stay close to the fret wire, not on it. Pluck: Sound one string and listen.

Follow the beat
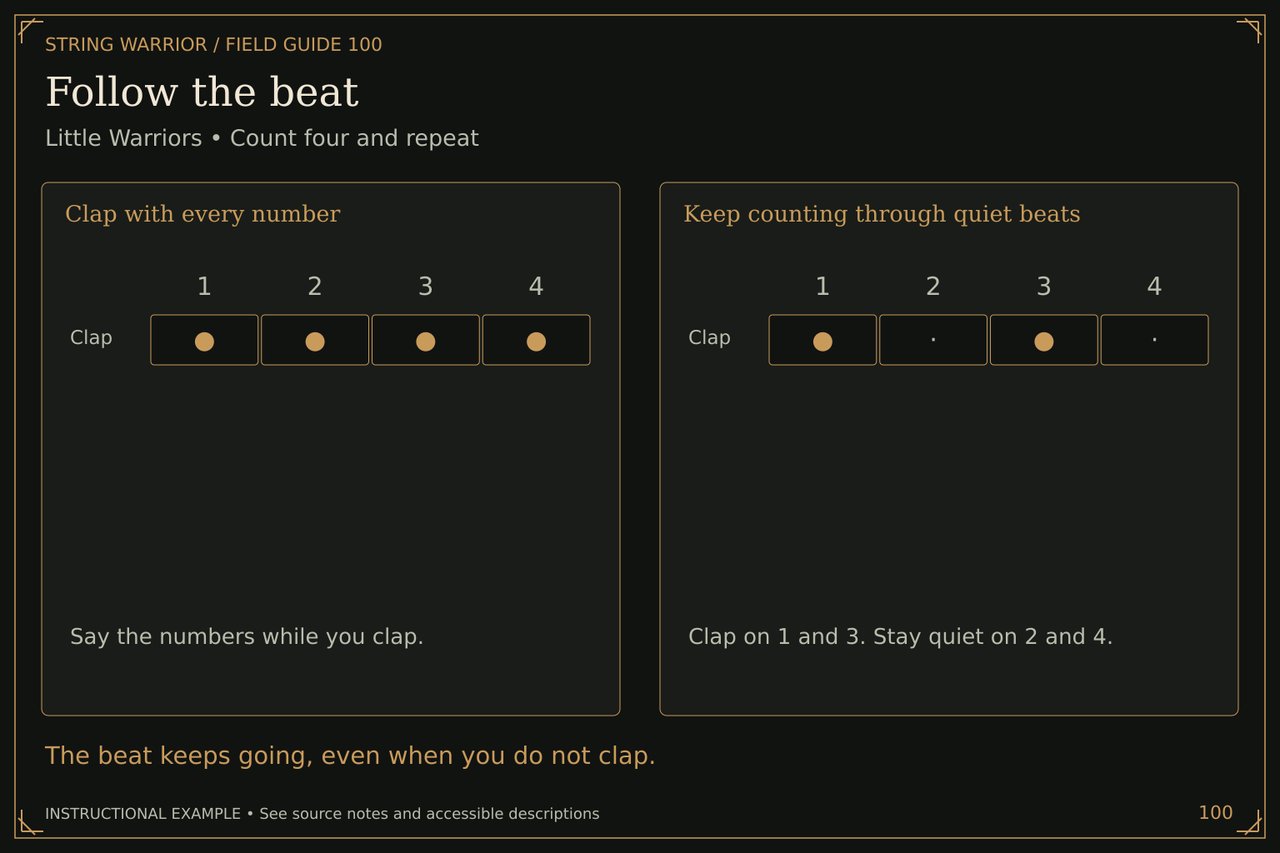
The beat keeps going, even when you do not clap. Open the full Follow the beat illustration

Clap with every number: Say the numbers while you clap. Clap | ●, ●, ●, ●

Keep counting through quiet beats: Clap on 1 and 3. Stay quiet on 2 and 4. Clap | ●, , ●,

Your first chord change
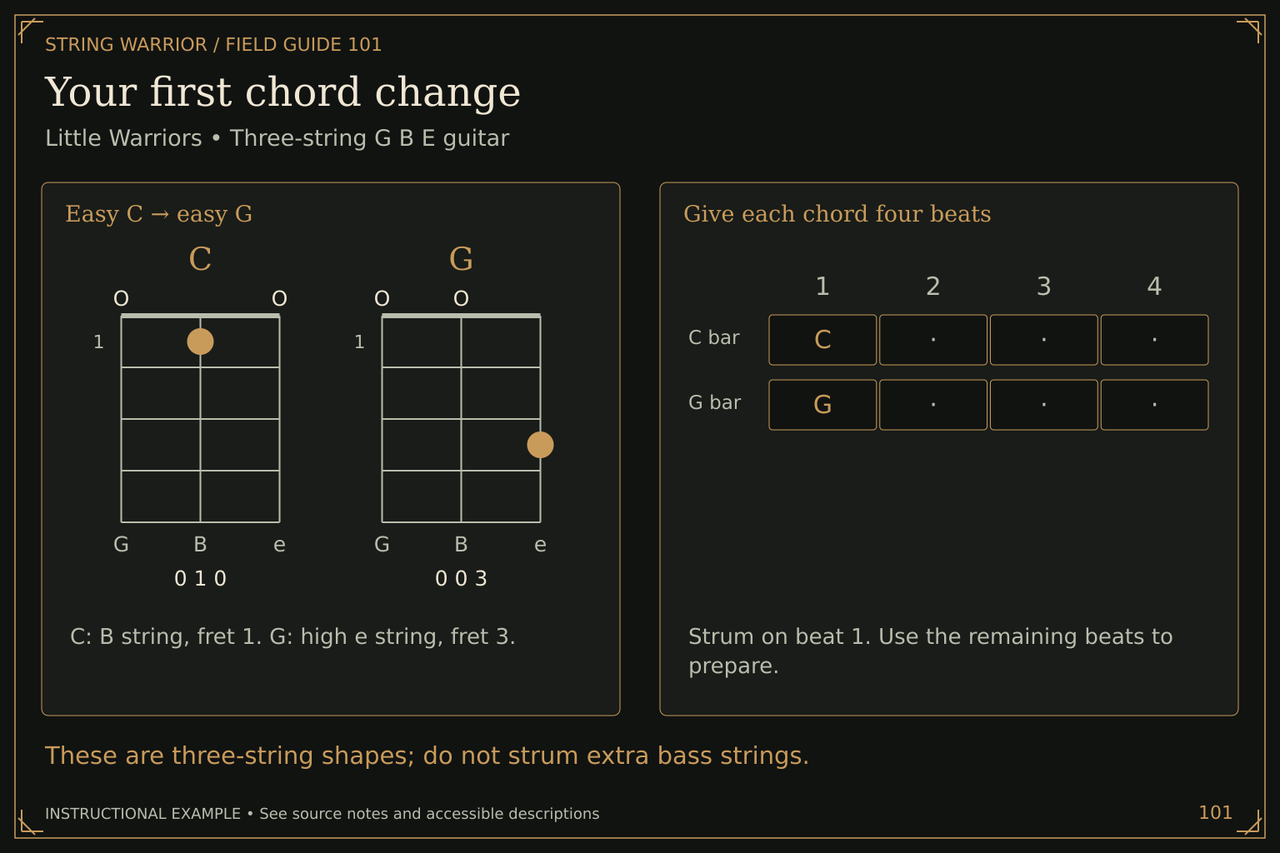
These are three-string shapes; do not strum extra bass strings. Open the full Your first chord change illustration

Easy C to easy G: C: B string, fret 1. G: high e string, fret 3.

Give each chord four beats: Strum on beat 1. Use the remaining beats to prepare. C bar | C, , , G bar | G, , ,

Three strings to six
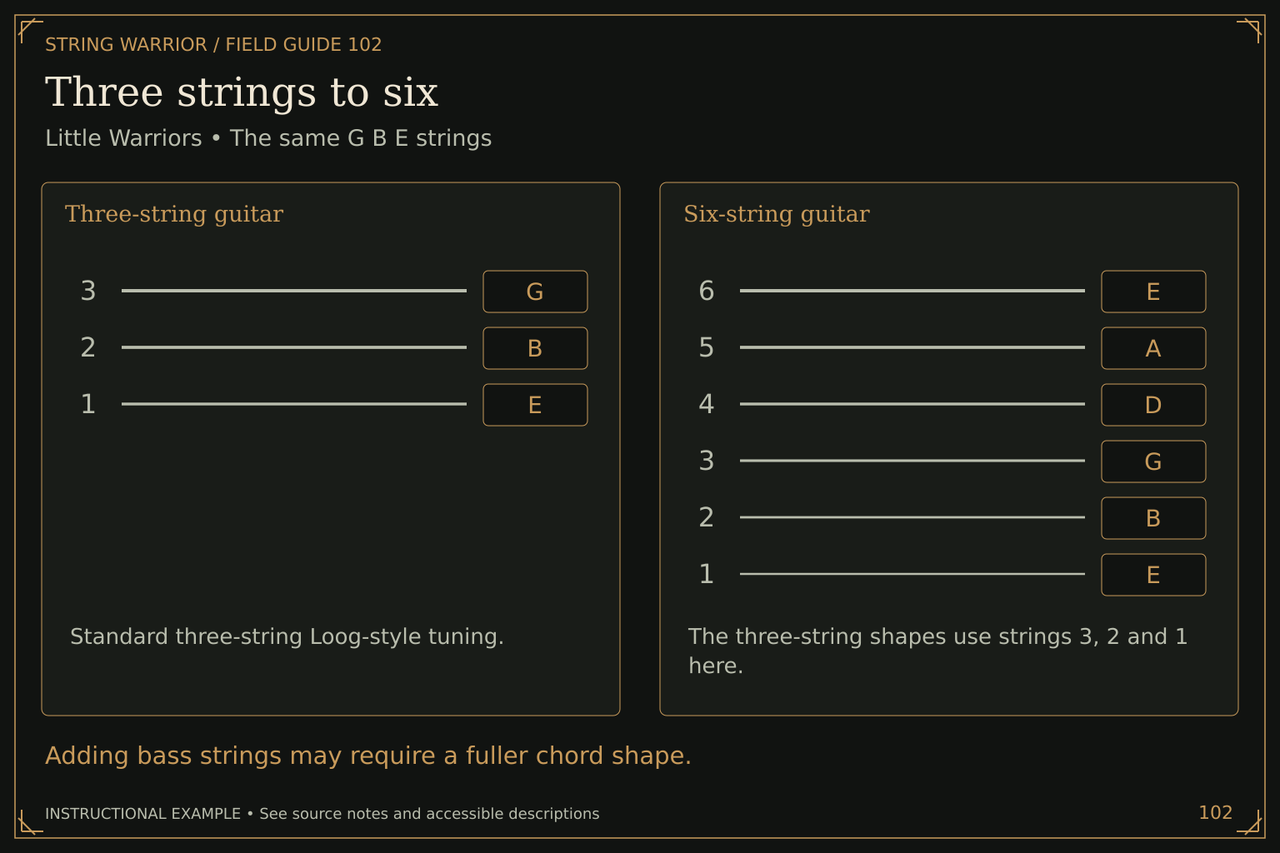
Adding bass strings may require a fuller chord shape. Open the full Three strings to six illustration

Three-string guitar: Standard three-string Loog-style tuning.

Six-string guitar: The three-string shapes use strings 3, 2 and 1 here.

Practice tools
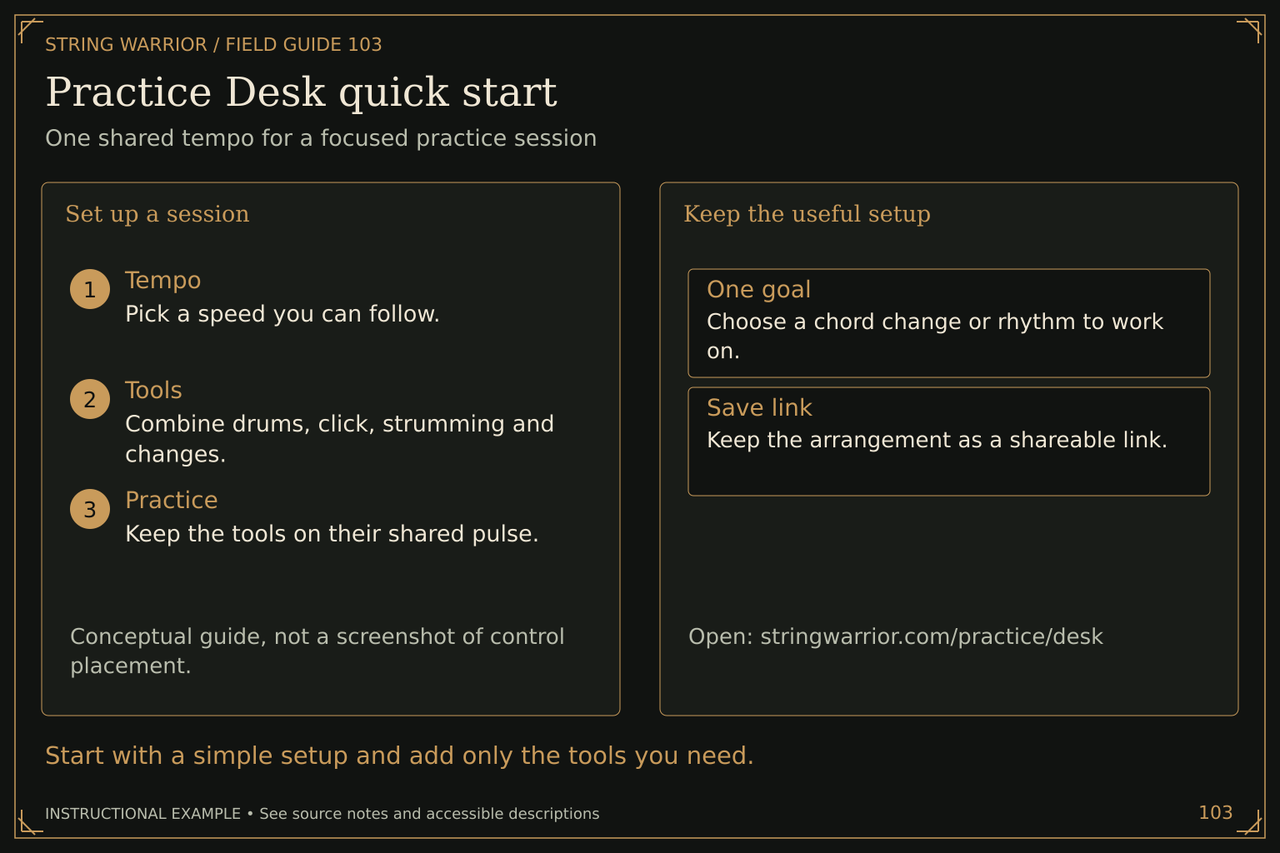
Practice Desk quick start
Start with a simple setup and add only the tools you need. Open the full Practice Desk quick start illustration

Set up a session: Conceptual guide, not a screenshot of control placement. Tempo: Pick a speed you can follow. Tools: Combine drums, click, strumming and changes. Practice: Keep the tools on their shared pulse.

Keep the useful setup: Open: stringwarrior.com/practice/desk

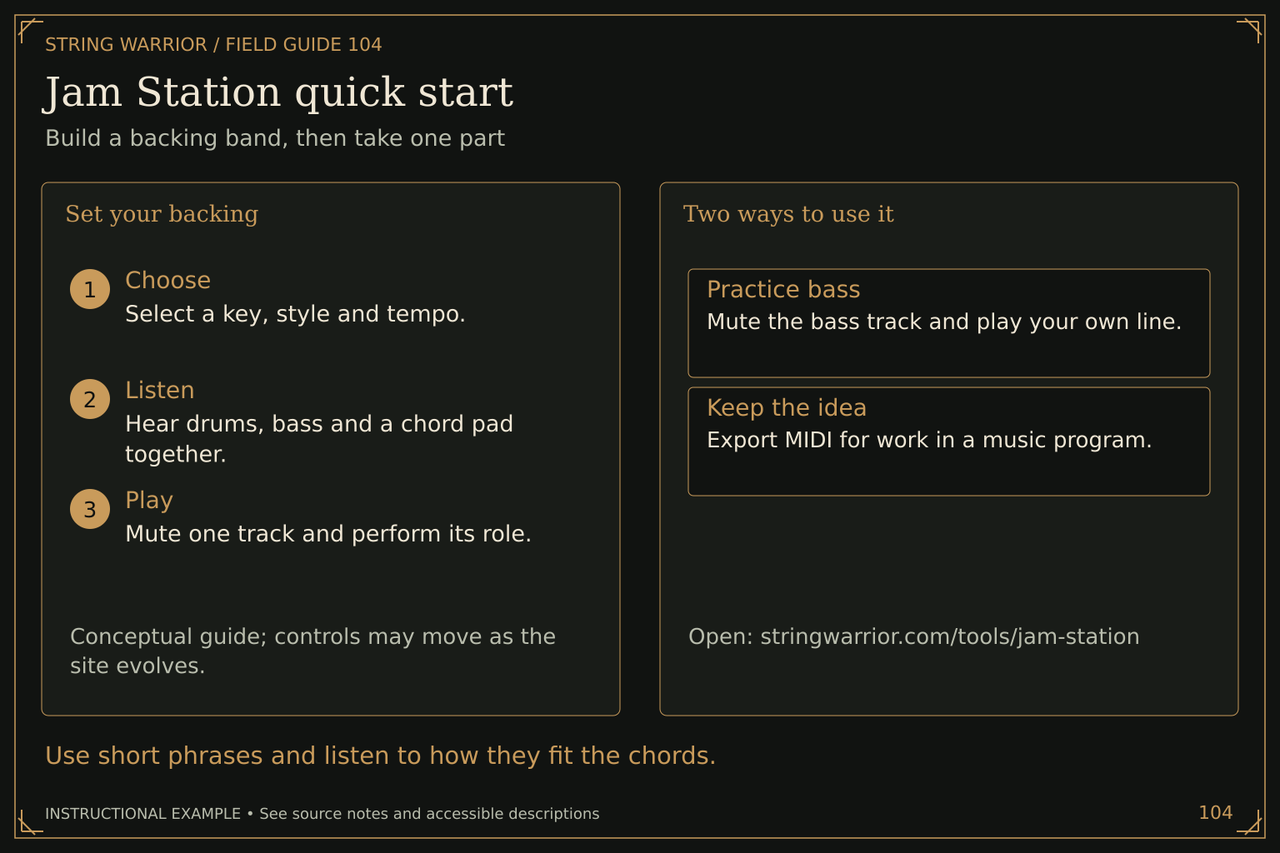
Jam Station quick start
Use short phrases and listen to how they fit the chords. Open the full Jam Station quick start illustration

Set your backing: Conceptual guide; controls may move as the site evolves. Choose: Select a key, style and tempo. Listen: Hear drums, bass and a chord pad together. Play: Mute one track and perform its role.

Two ways to use it: Open: stringwarrior.com/tools/jam-station

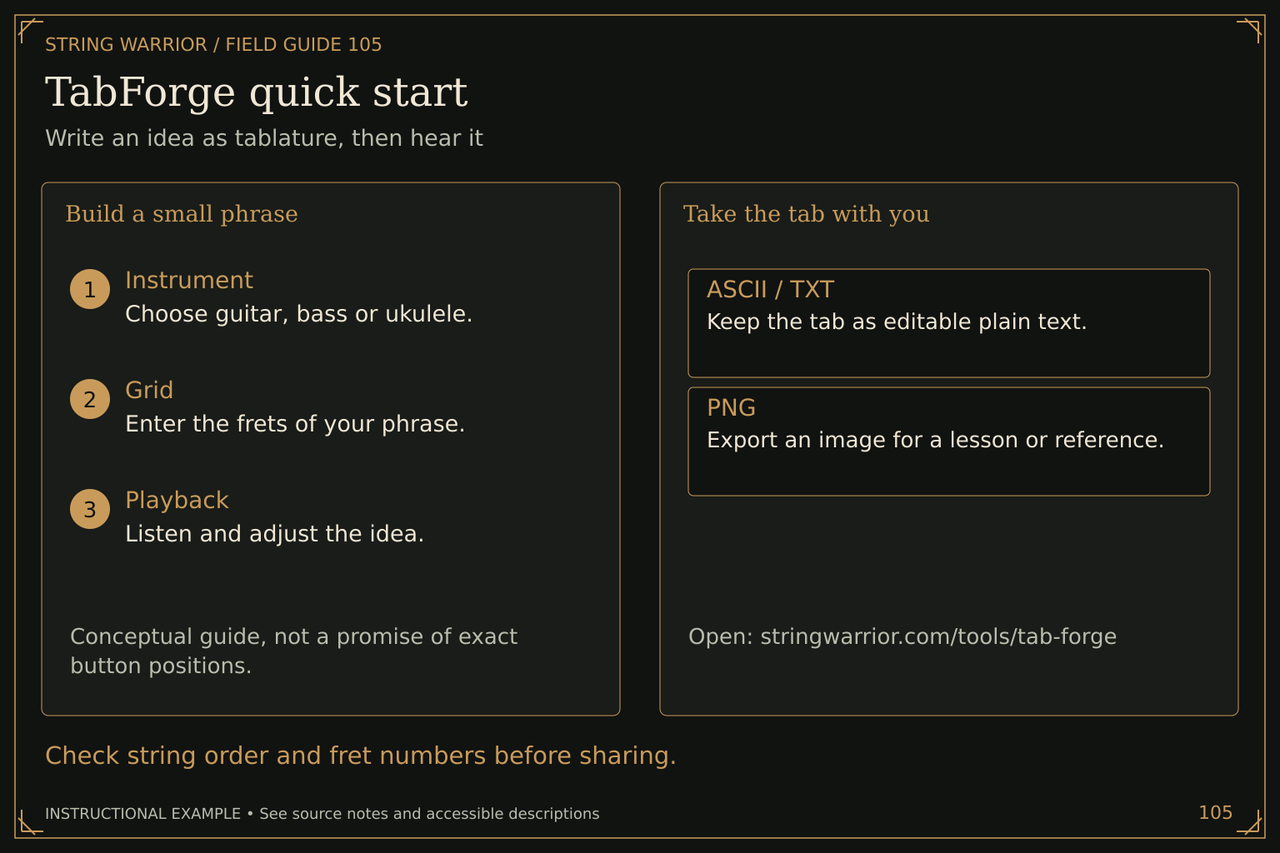
TabForge quick start
Check string order and fret numbers before sharing. Open the full TabForge quick start illustration

Build a small phrase: Conceptual guide, not a promise of exact button positions. Instrument: Choose guitar, bass or ukulele. Grid: Enter the frets of your phrase. Review: Check the idea in Tab Forge.

Take the tab with you: Open: stringwarrior.com/tools/tab-forge

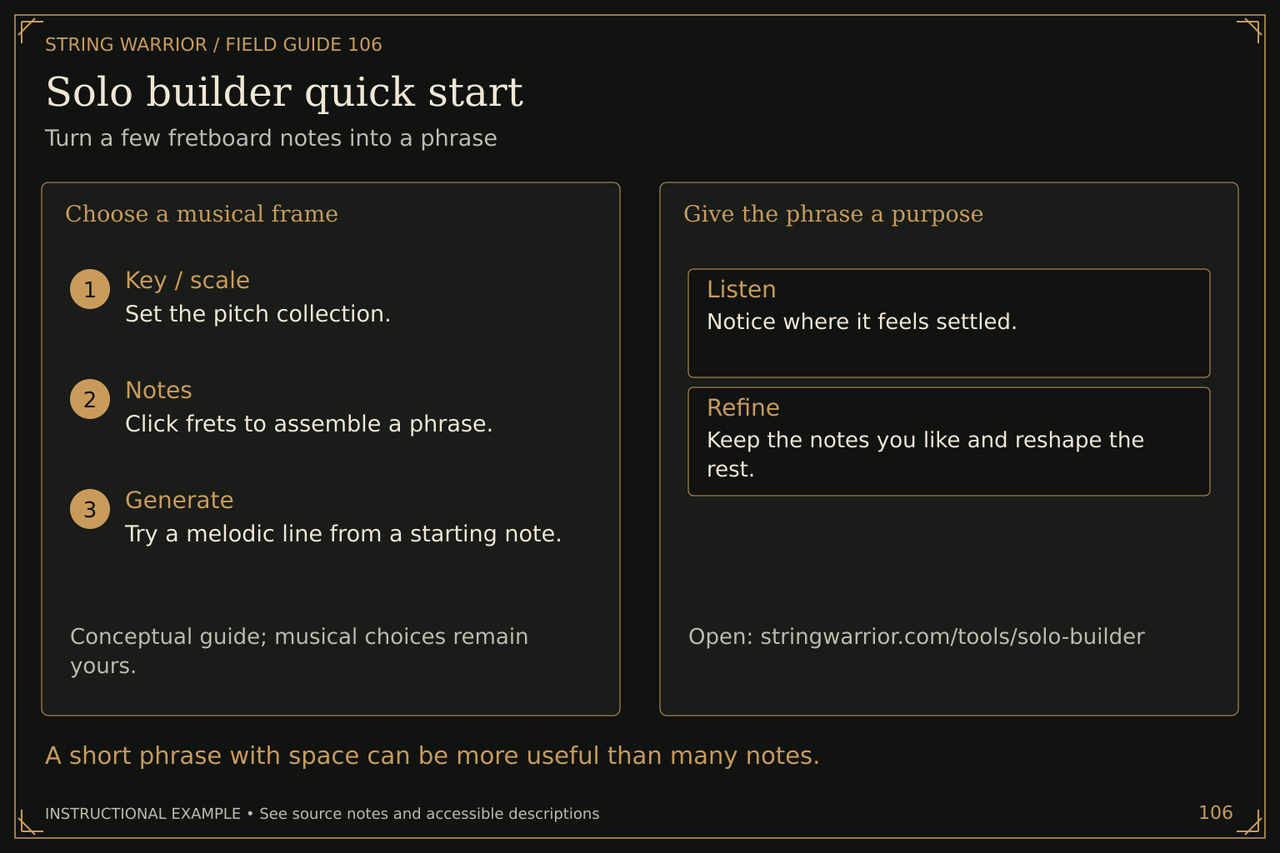
Solo builder quick start
A short phrase with space can be more useful than many notes. Open the full Solo builder quick start illustration

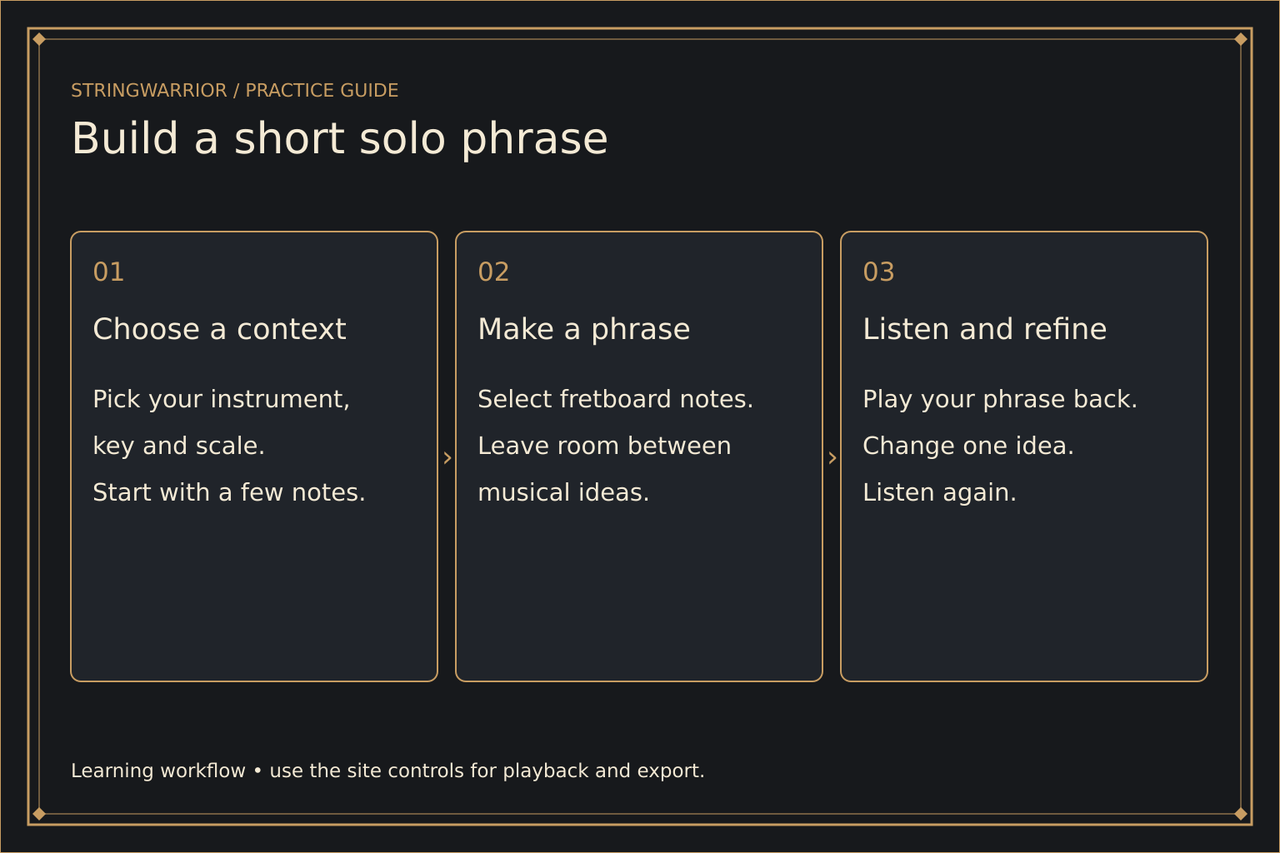
Choose a musical frame: Conceptual guide; musical choices remain yours. Key / scale: Set the pitch collection. Notes: Click frets to assemble a phrase. Generate: Try a melodic line from a starting note.

Give the phrase a purpose: Open: stringwarrior.com/tools/solo-builder

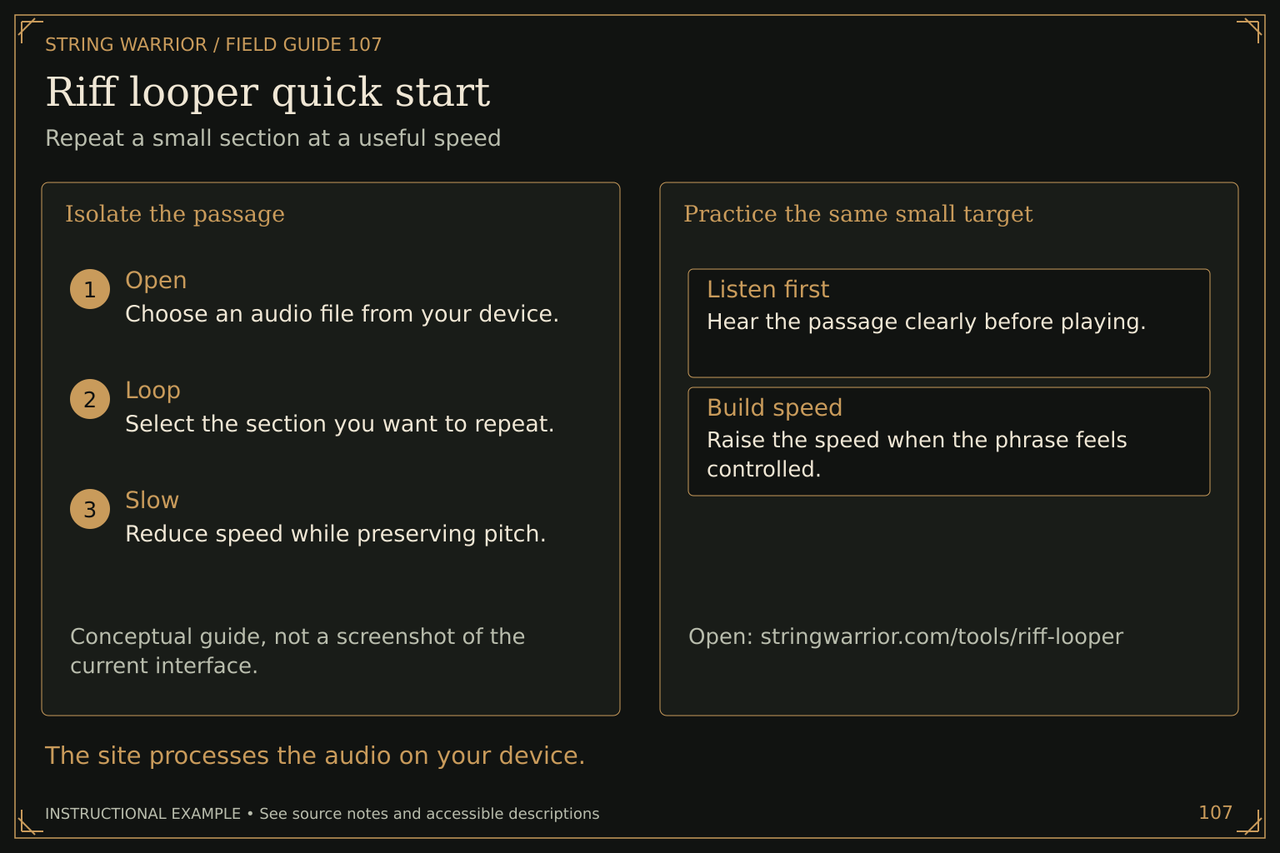
Riff looper quick start
Riff Looper uses a recording selected on your device. Open the full Riff looper quick start illustration

Isolate the passage: Conceptual guide, not a screenshot of the current interface. In Riff Looper, choose a recording from your device. Loop: Select the section you want to repeat. Slow: Reduce speed while preserving pitch.

Practice the same small target: Open: stringwarrior.com/tools/riff-looper

Mandolin and banjo
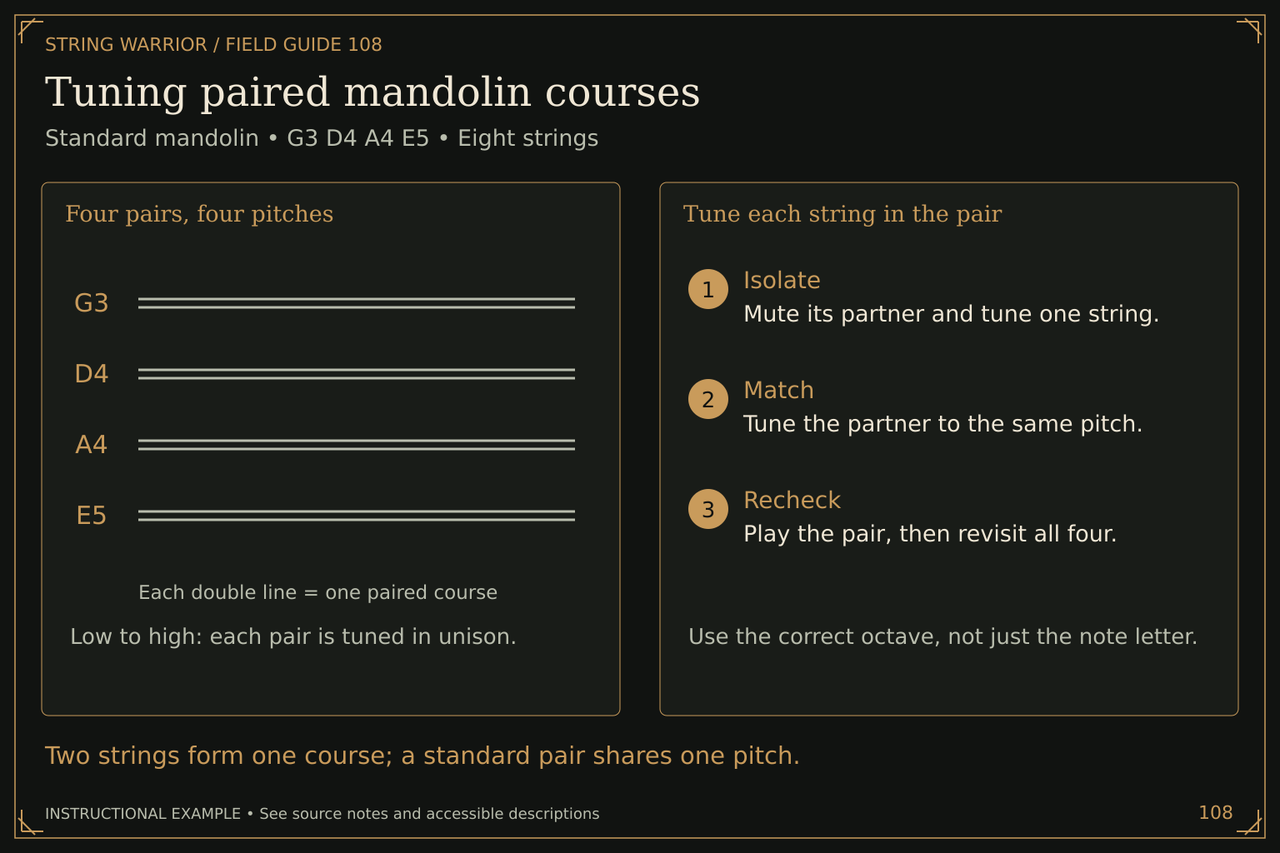
Tuning paired mandolin courses
Two strings form one course; a standard pair shares one pitch. Open the full Tuning paired mandolin courses illustration

Four pairs, four pitches: Low to high: each pair is tuned in unison.

Tune each string in the pair: Use the correct octave, not just the note letter. Isolate: Mute its partner and tune one string. Match: Tune the partner to the same pitch. Recheck: Play the pair, then revisit all four.

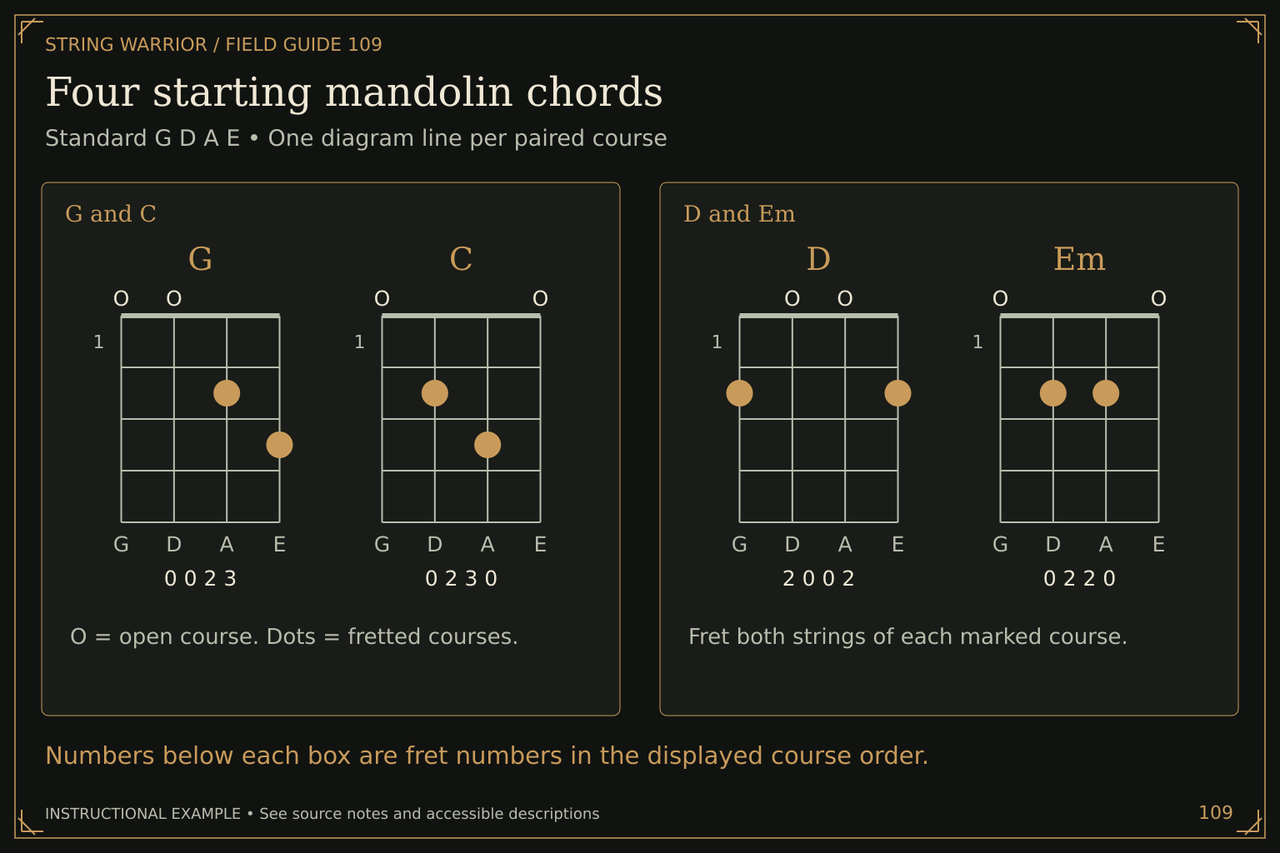
Four starting mandolin chords
Numbers below each box are fret numbers in the displayed course order. Open the full Four starting mandolin chords illustration

G and C: O = open course. Dots = fretted courses.

D and Em: Fret both strings of each marked course.

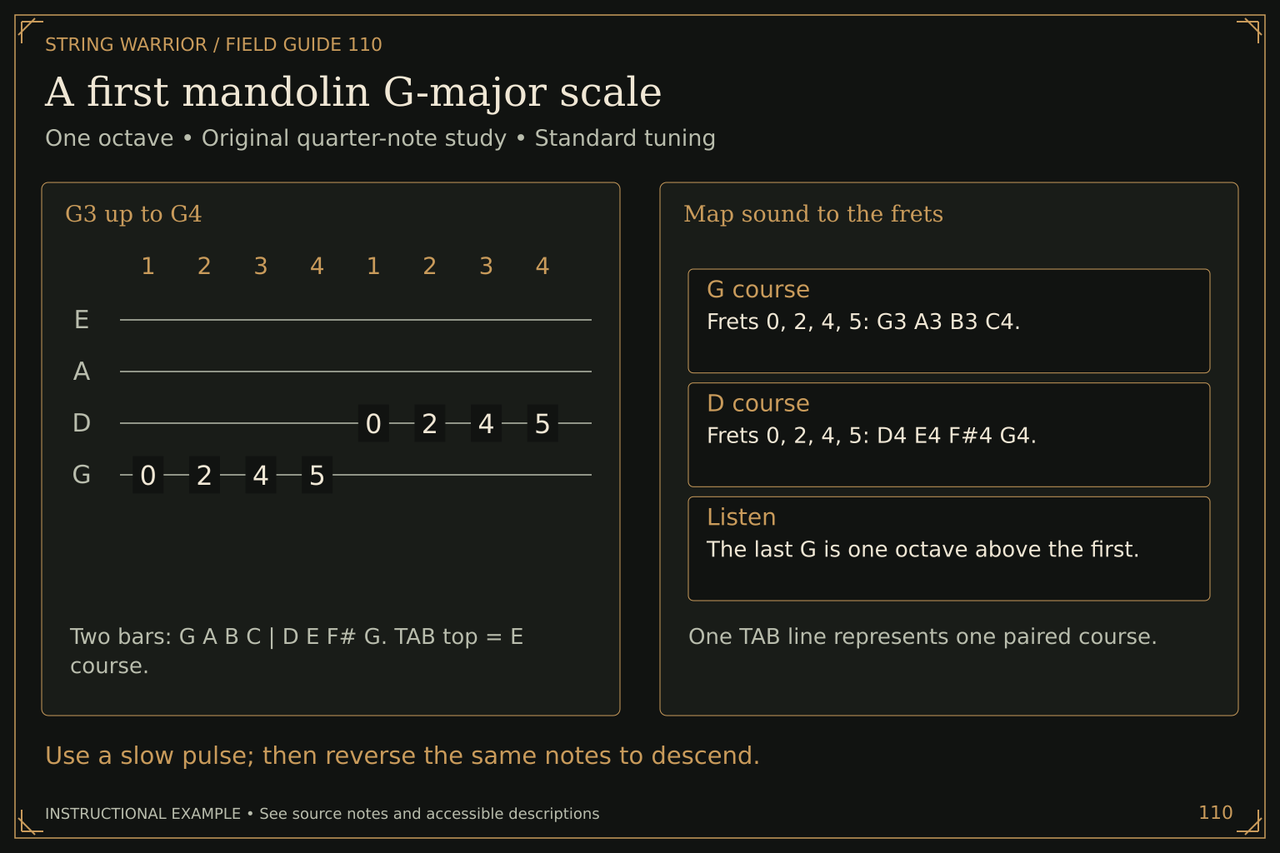
A first mandolin G-major scale
Use a slow pulse; then reverse the same notes to descend. Open the full A first mandolin G-major scale illustration

G3 up to G4: Two bars: G A B C | D E F# G. TAB top = E course.

Map sound to the frets: One TAB line represents one paired course.

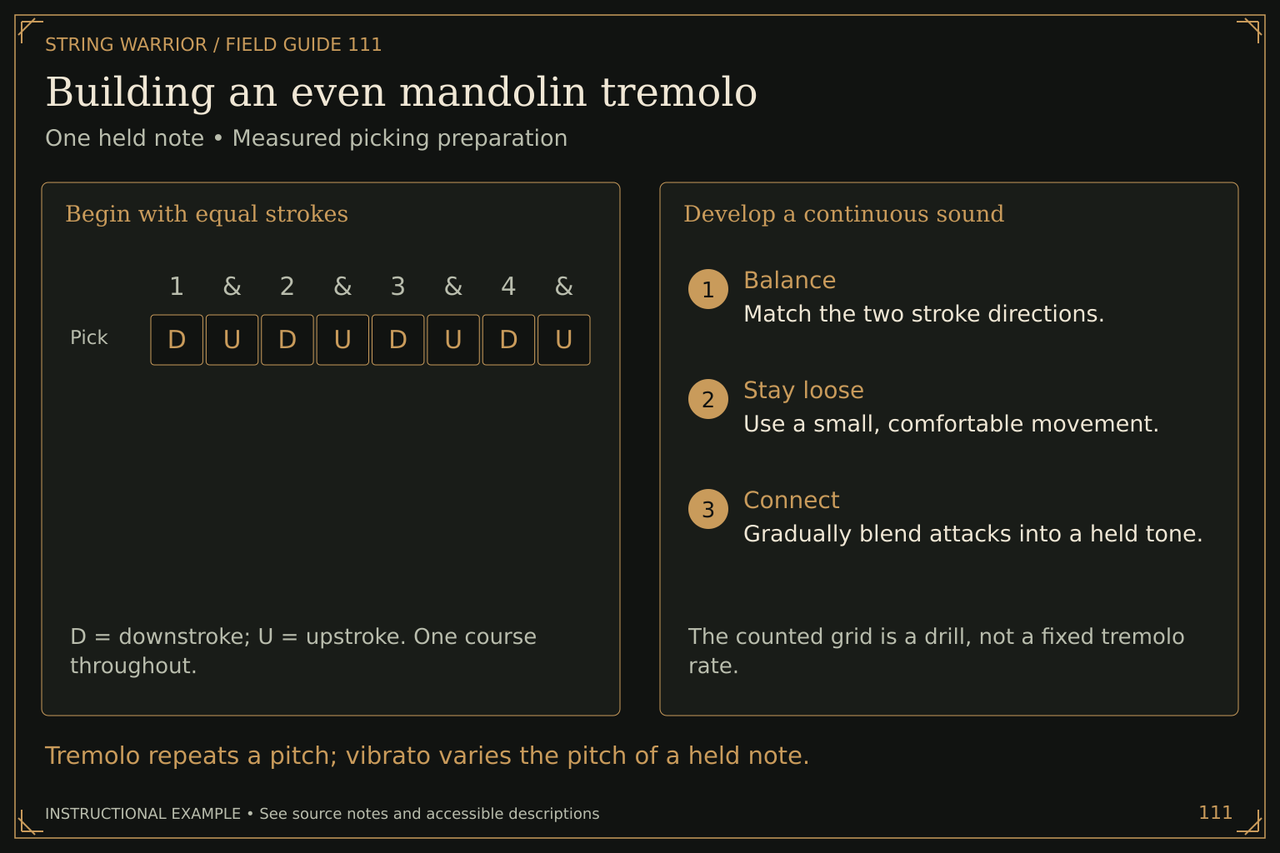
Building an even mandolin tremolo
Tremolo repeats a pitch; vibrato varies the pitch of a held note. Open the full Building an even mandolin tremolo illustration

Begin with equal strokes: D = downstroke; U = upstroke. One course throughout. Pick | D, U, D, U, D, U, D, U

Develop a continuous sound: The counted grid is a drill, not a fixed tremolo rate. Balance: Match the two stroke directions. Stay loose: Use a small, comfortable movement. Connect: Gradually blend attacks into a held tone.

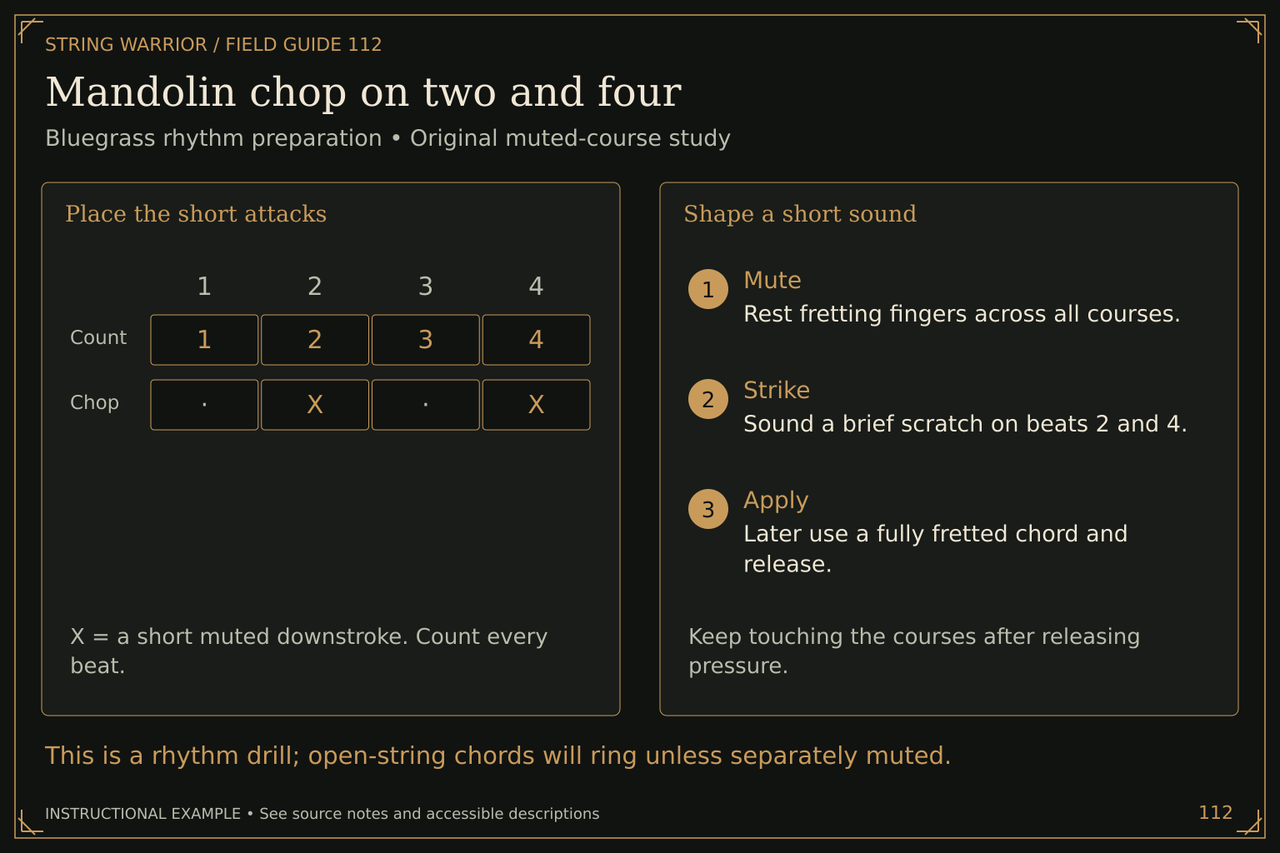
Mandolin chop on two and four
This is a rhythm drill; open-string chords will ring unless separately muted. Open the full Mandolin chop on two and four illustration

Place the short attacks: X = a short muted downstroke. Count every beat. Count | 1, 2, 3, 4 Chop | , X, , X

Shape a short sound: Keep touching the courses after releasing pressure. Mute: Rest fretting fingers across all courses. Strike: Sound a brief scratch on beats 2 and 4. Apply: Later use a fully fretted chord and release.

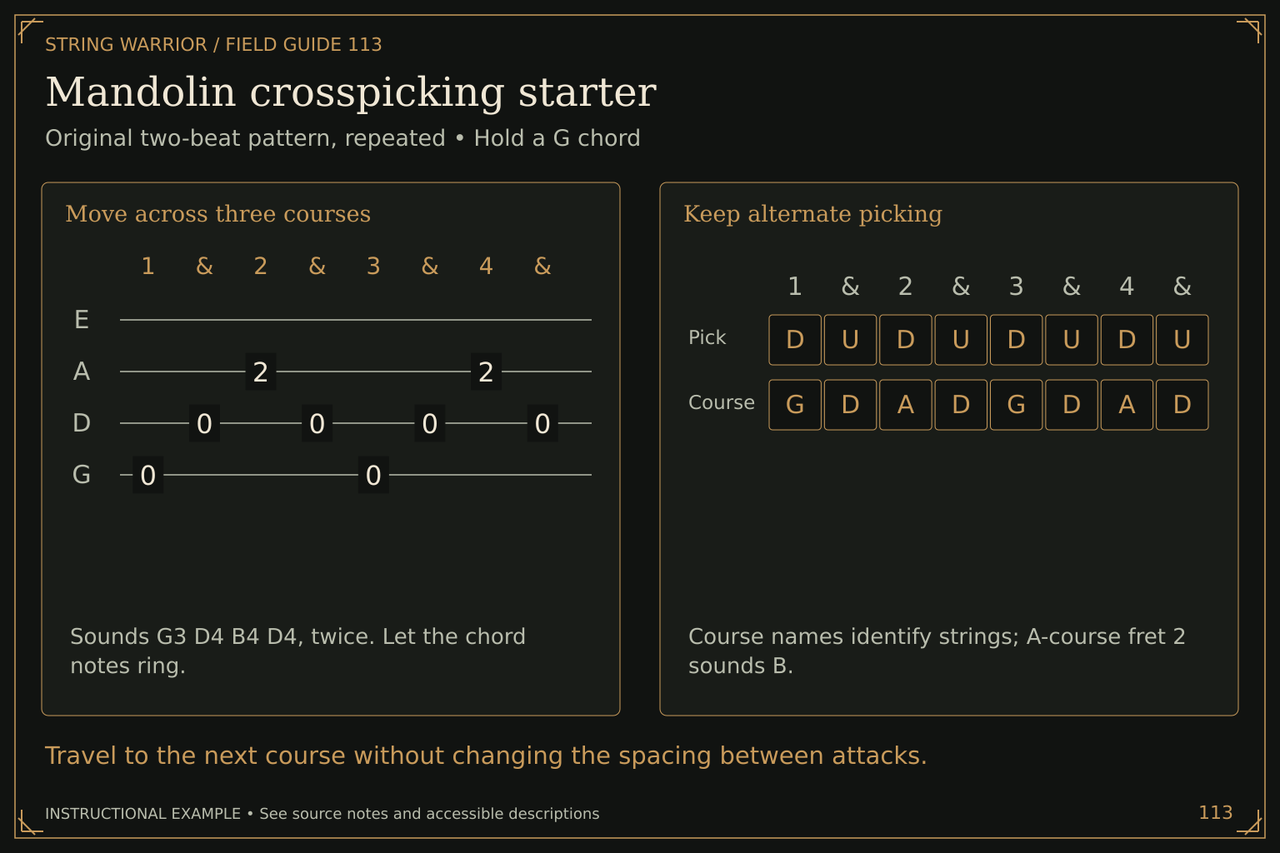
Mandolin crosspicking starter
Travel to the next course without changing the spacing between attacks. Open the full Mandolin crosspicking starter illustration

Move across three courses: Sounds G3 D4 B4 D4, twice. Let the chord notes ring.

Keep alternate picking: Course names identify strings; A-course fret 2 sounds B. Pick | D, U, D, U, D, U, D, U Course | G, D, A, D, G, D, A, D

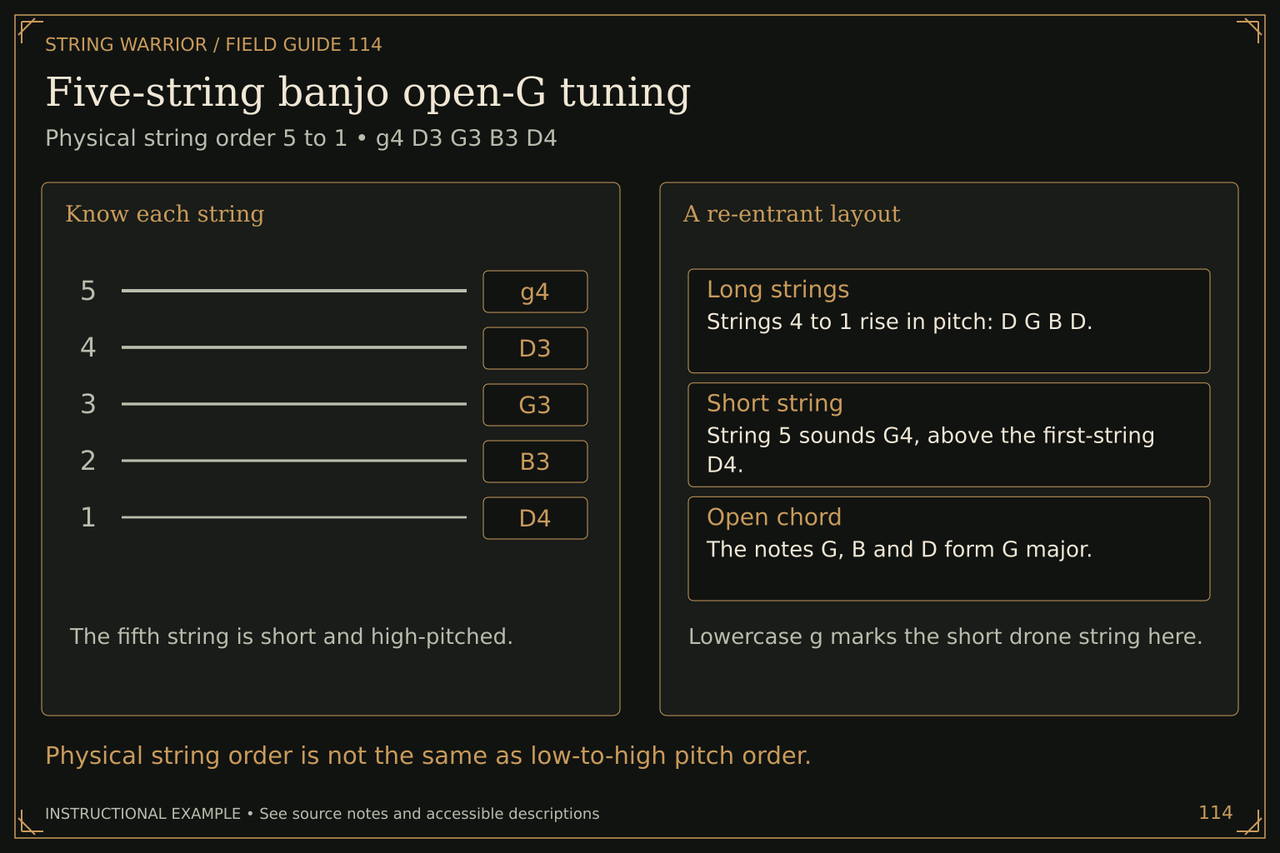
Five-string banjo open-G tuning
Physical string order is not the same as low-to-high pitch order. Open the full Five-string banjo open-G tuning illustration

Know each string: The fifth string is short and high-pitched.

A re-entrant layout: Lowercase g marks the short drone string here.

Reading five-string banjo TAB
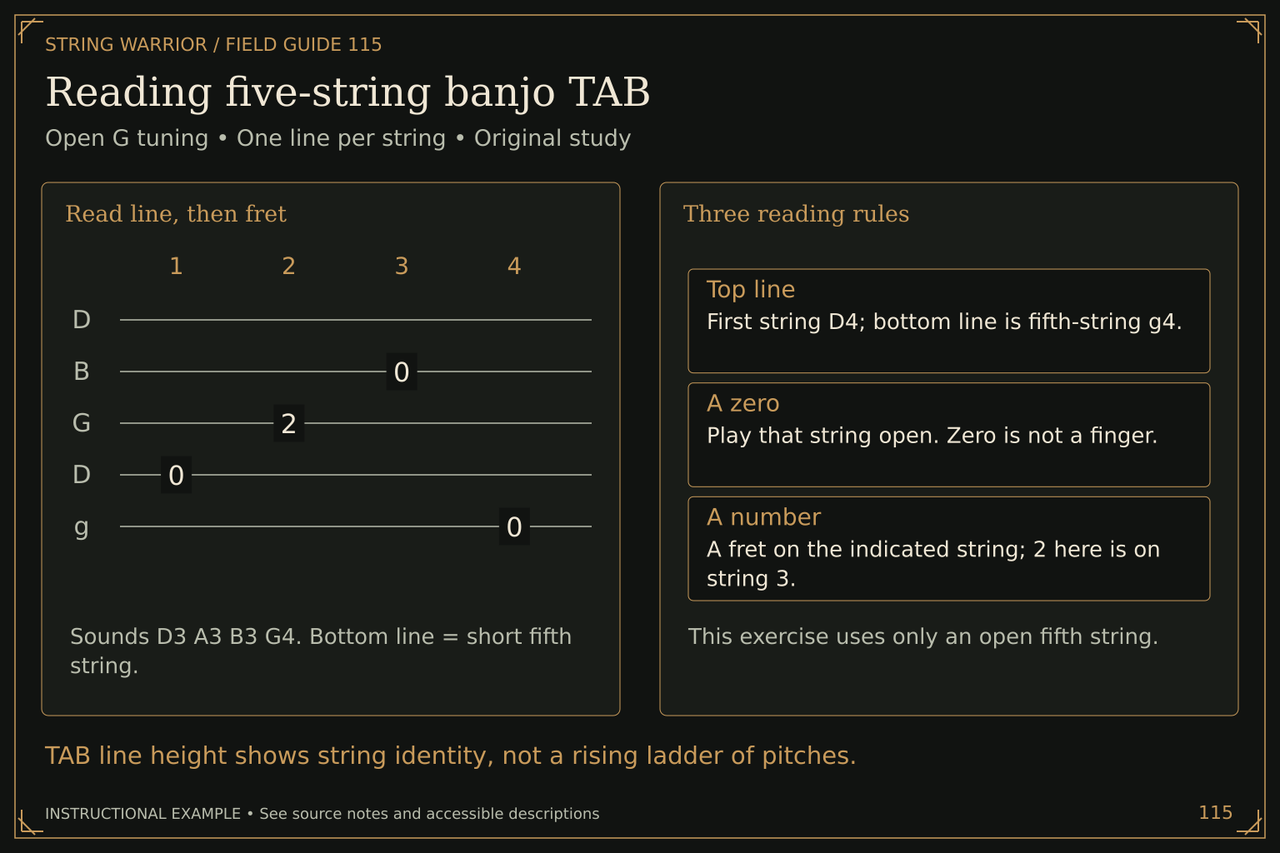
TAB line height shows string identity, not a rising ladder of pitches. Open the full Reading five-string banjo TAB illustration

Read line, then fret: Sounds D3 A3 B3 G4. Bottom line = short fifth string.

Three reading rules: This exercise uses only an open fifth string.

A first banjo forward-roll pattern
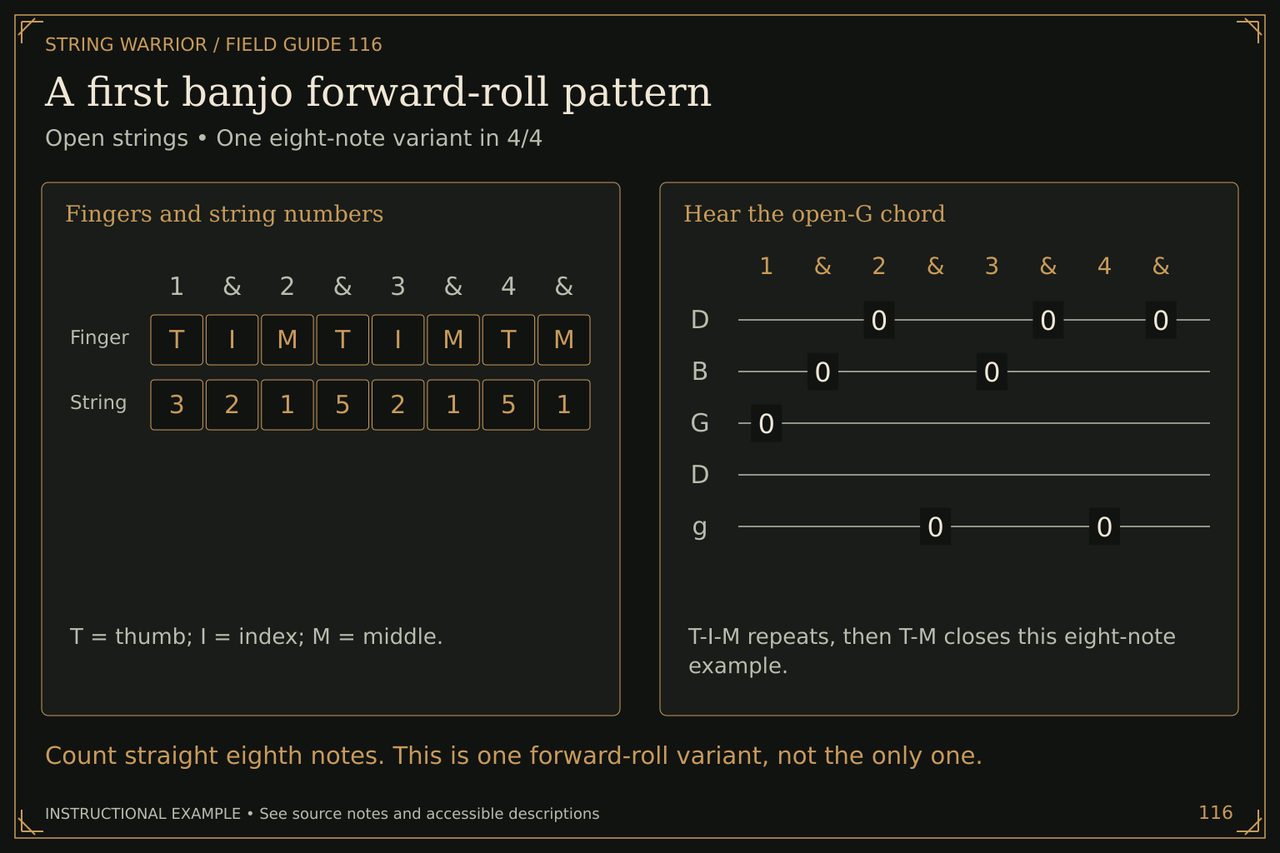
Count straight eighth notes. This is one forward-roll variant, not the only one. Open the full A first banjo forward-roll pattern illustration

Fingers and string numbers: T = thumb; I = index; M = middle. Finger | T, I, M, T, I, M, T, M String | 3, 2, 1, 5, 2, 1, 5, 1

Hear the open-G chord: T-I-M repeats, then T-M closes this eight-note example.

Banjo alternating-thumb roll
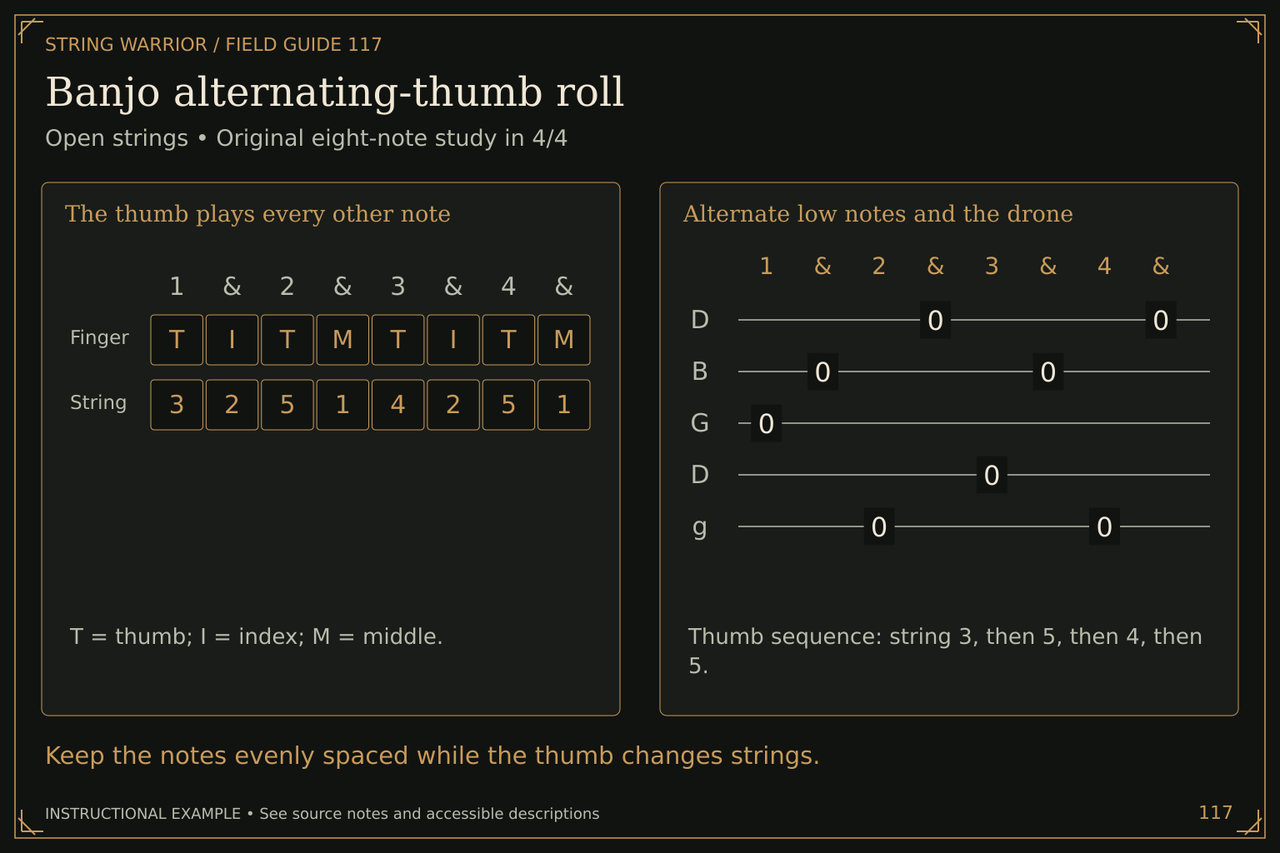
Keep the notes evenly spaced while the thumb changes strings. Open the full Banjo alternating-thumb roll illustration

The thumb plays every other note: T = thumb; I = index; M = middle. Finger | T, I, T, M, T, I, T, M String | 3, 2, 5, 1, 4, 2, 5, 1

Alternate low notes and the drone: Thumb sequence: string 3, then 5, then 4, then 5.

Banjo G C and D chord shapes
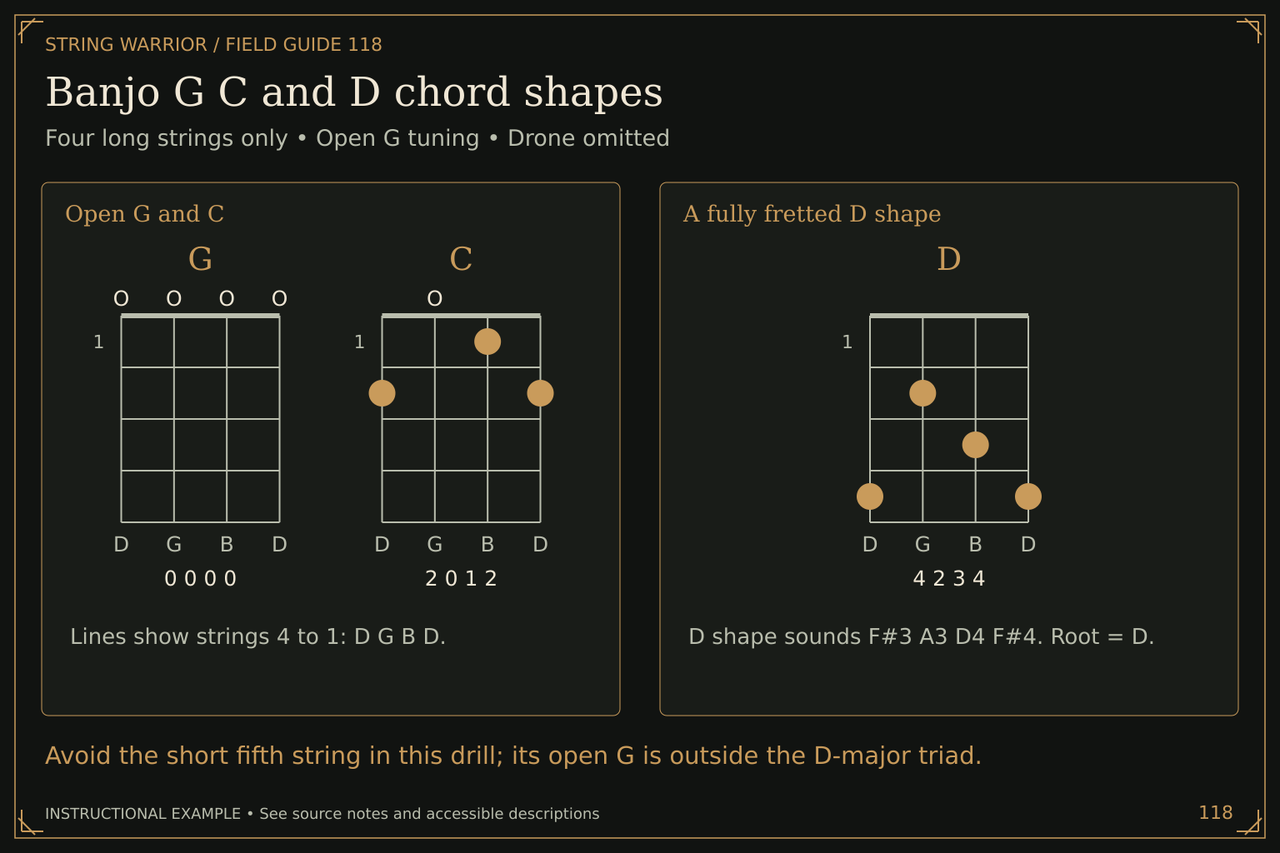
Avoid the short fifth string in this drill; its open G is outside the D-major triad. Open the full Banjo G C and D chord shapes illustration

Open G and C: Lines show strings 4 to 1: D G B D.

A fully fretted D shape: D shape sounds F#3 A3 D4 F#4. Root = D.

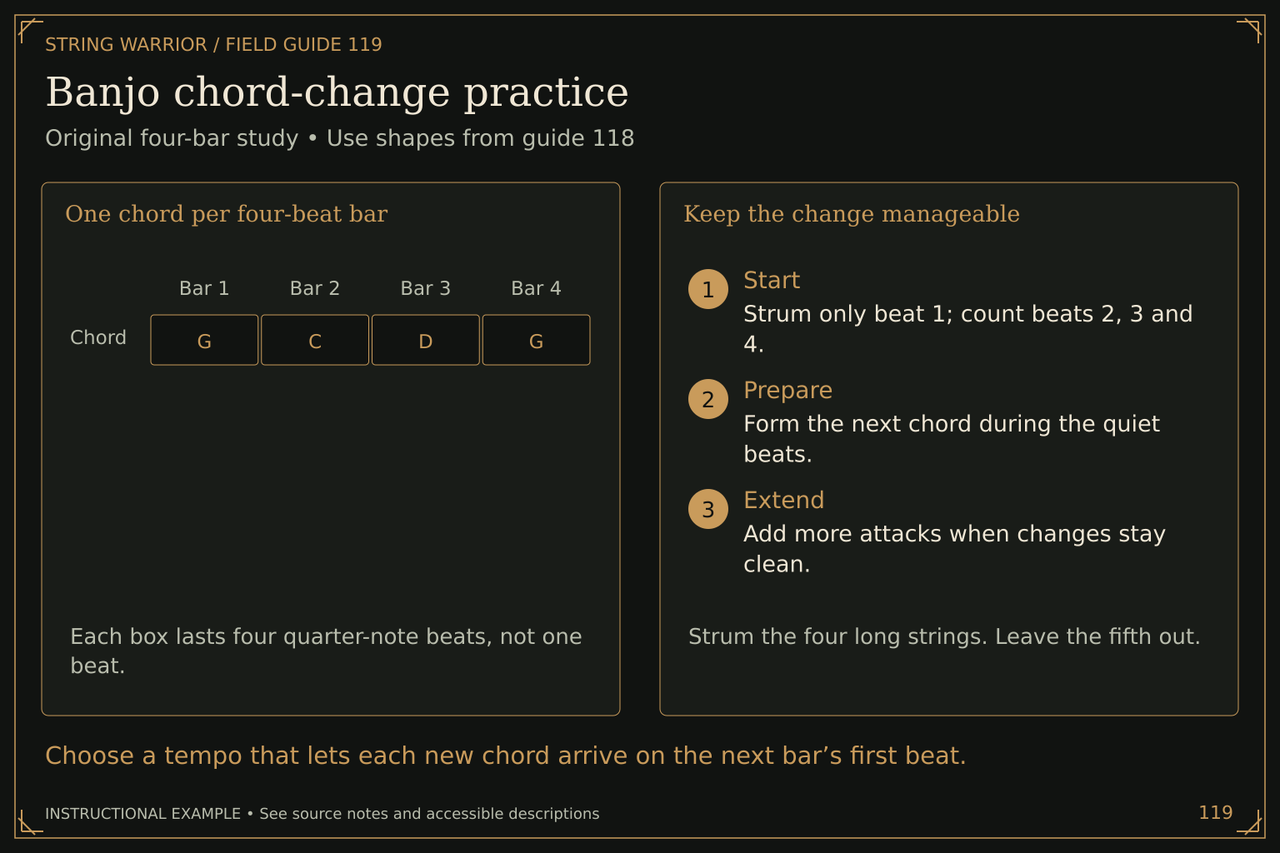
Banjo chord-change practice
Choose a tempo that lets each new chord arrive on the next bar’s first beat. Open the full Banjo chord-change practice illustration

One chord per four-beat bar: Each box lasts four quarter-note beats, not one beat. Chord | G, C, D, G

Keep the change manageable: Strum the four long strings. Leave the fifth out. Start: Strum only beat 1; count beats 2, 3 and 4. Prepare: Form the next chord during the quiet beats. Extend: Add more attacks when changes stay clean.

Bowed strings
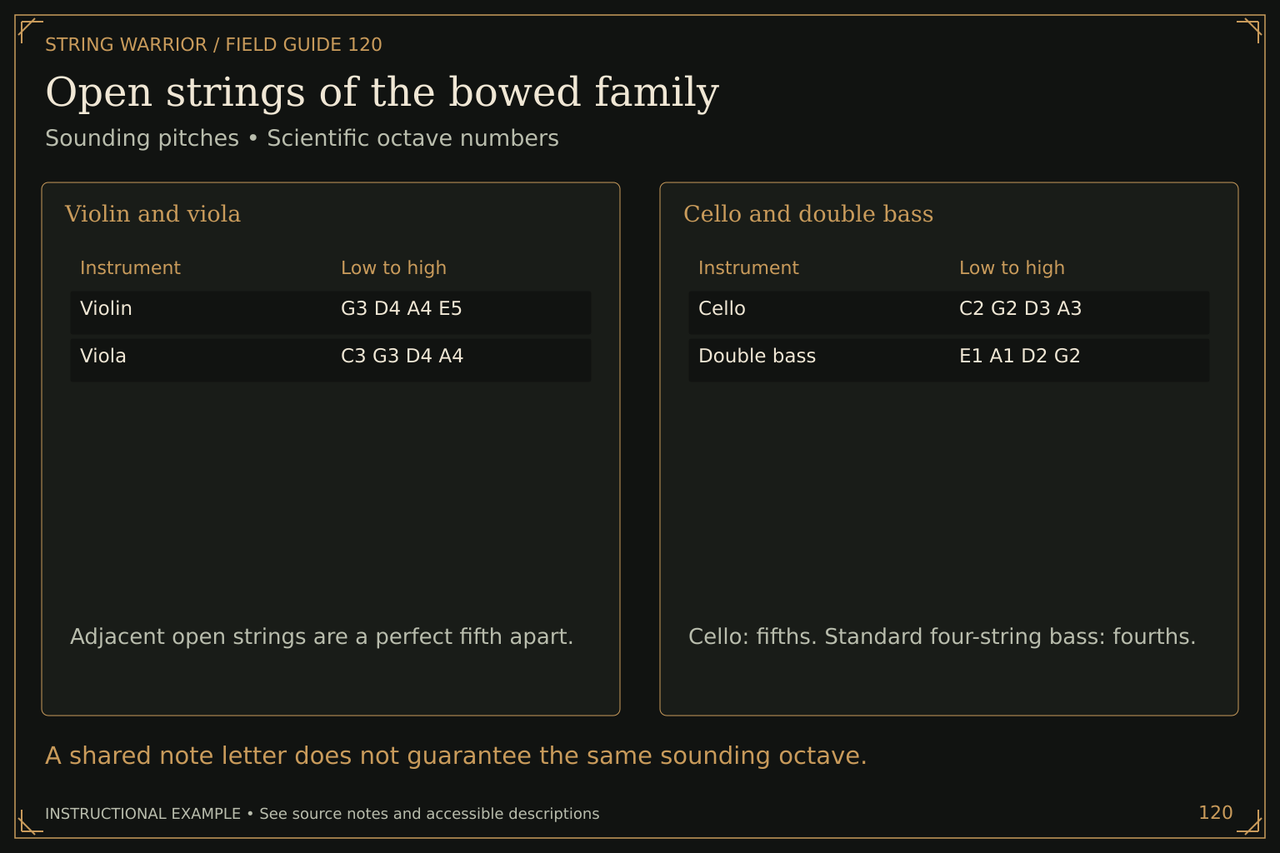
Open strings of the bowed family
Open strings of the bowed family. Sounding pitches • Scientific octave numbers. A shared note letter does not guarantee the same sounding octave.
A shared note letter does not guarantee the same sounding octave. Open the full Open strings of the bowed family illustration

Violin and viola: Adjacent open strings are a perfect fifth apart. Violin | G3 D4 A4 E5 Viola | C3 G3 D4 A4

Cello and double bass: Cello: fifths. Standard four-string bass: fourths. Cello | C2 G2 D3 A3 Double bass | E1 A1 D2 G2

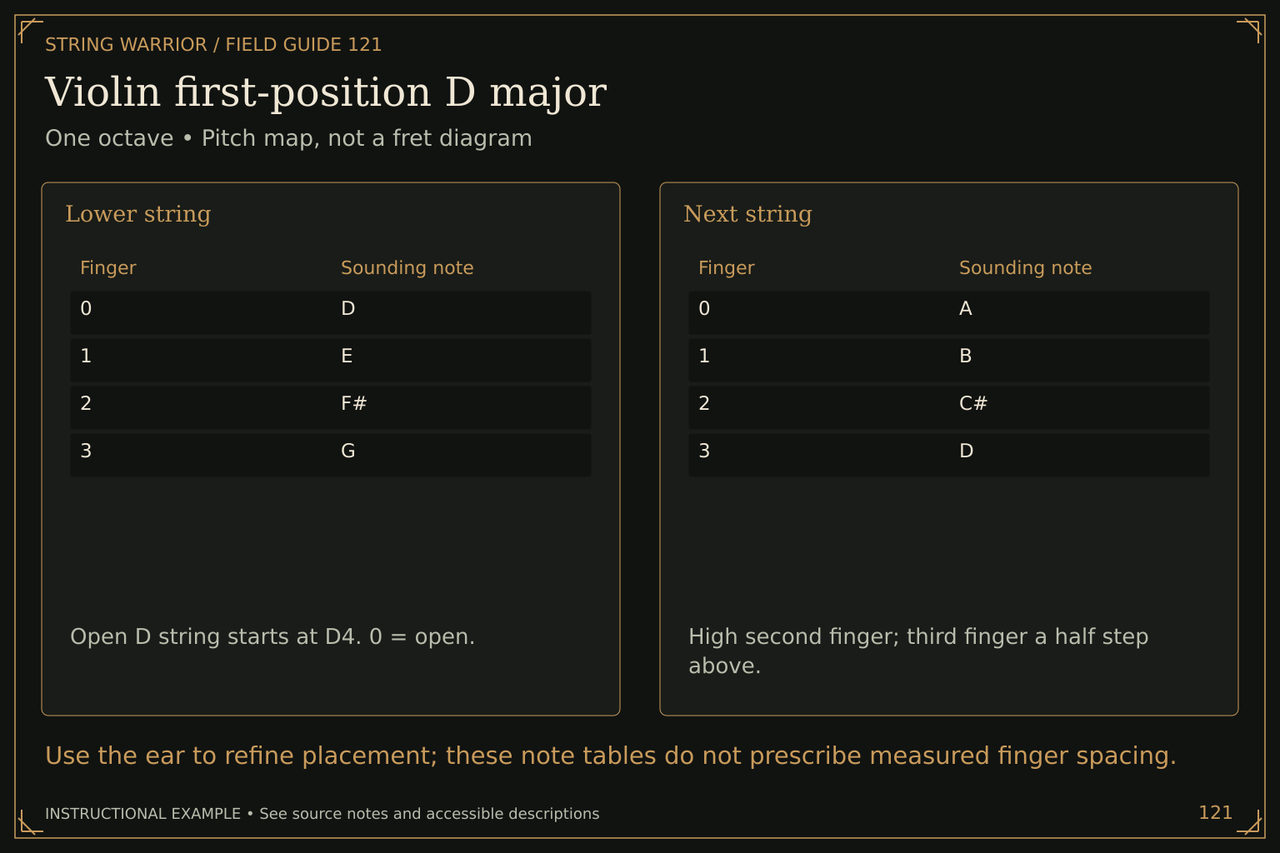
Violin first-position D major
Violin first-position D major. One octave • Pitch map, not a fret diagram. Use the ear to refine placement; these note tables do not prescribe measured finger spacing.
Use the ear to refine placement; these note tables do not prescribe measured finger spacing. Open the full Violin first-position D major illustration

Lower string: Open D string starts at D4. 0 = open. 0 | D 1 | E 2 | F# 3 | G

Next string: High second finger; third finger a half step above. 0 | A 1 | B 2 | C# 3 | D

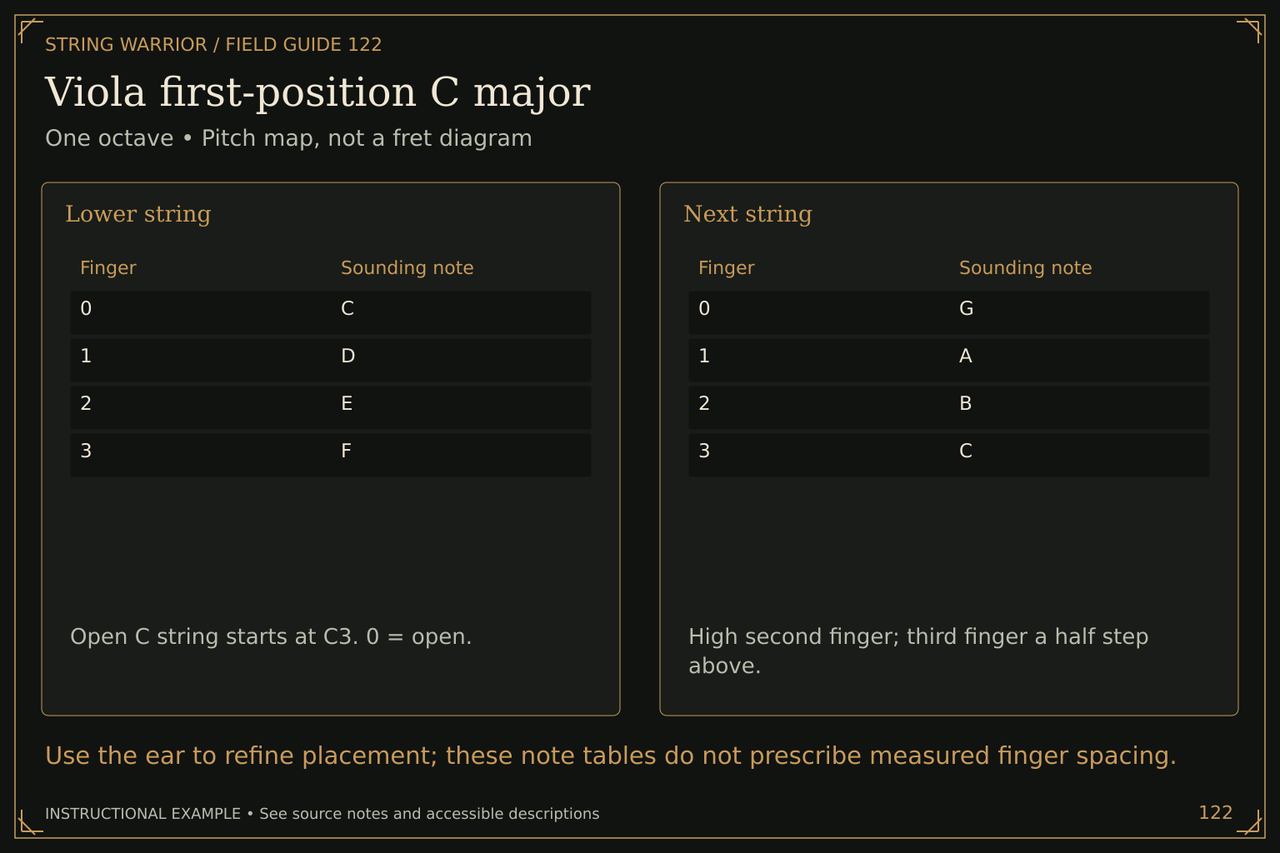
Viola first-position C major
Viola first-position C major. One octave • Pitch map, not a fret diagram. Use the ear to refine placement; these note tables do not prescribe measured finger spacing.
Use the ear to refine placement; these note tables do not prescribe measured finger spacing. Open the full Viola first-position C major illustration

Lower string: Open C string starts at C3. 0 = open. 0 | C 1 | D 2 | E 3 | F

Next string: High second finger; third finger a half step above. 0 | G 1 | A 2 | B 3 | C

Cello first-position C major
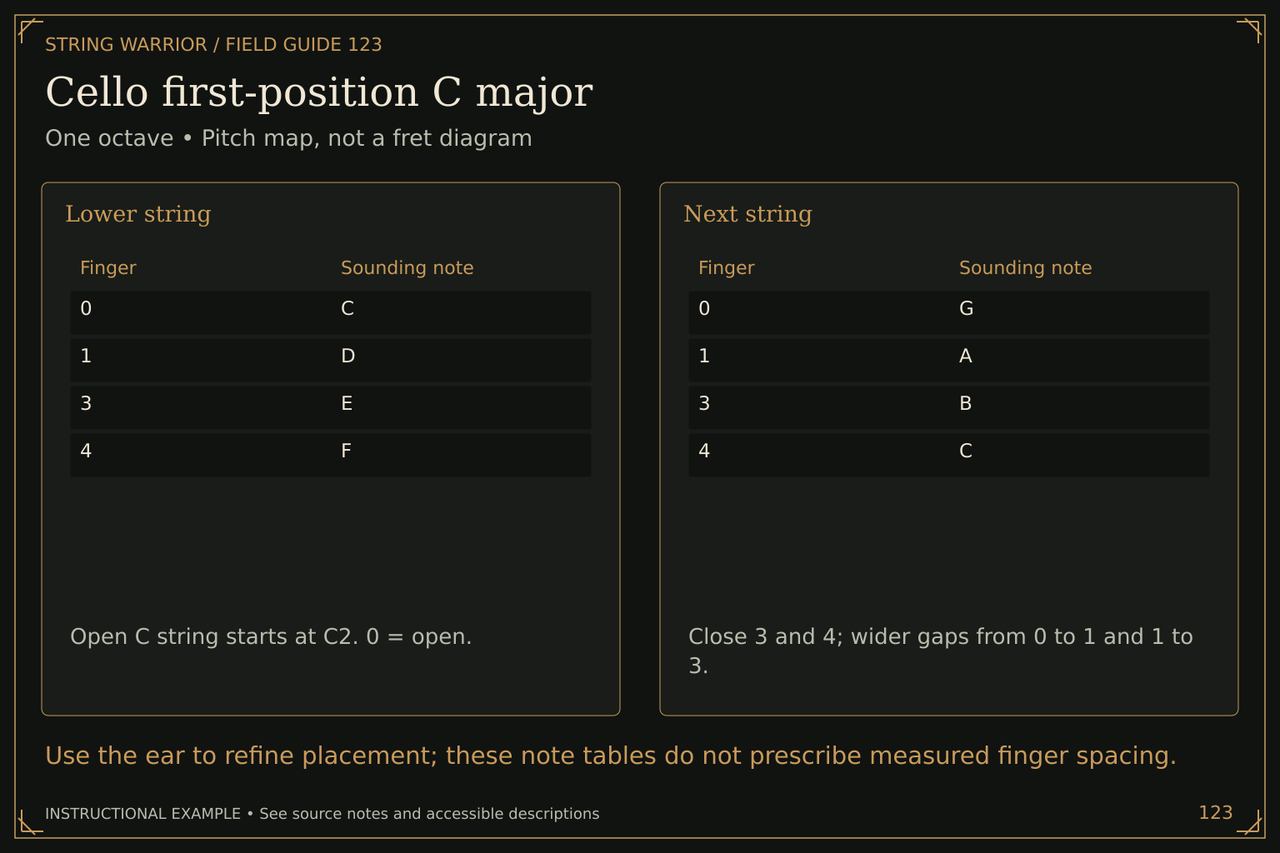
Cello first-position C major. One octave • Pitch map, not a fret diagram. Use the ear to refine placement; these note tables do not prescribe measured finger spacing.
Use the ear to refine placement; these note tables do not prescribe measured finger spacing. Open the full Cello first-position C major illustration

Lower string: Open C string starts at C2. 0 = open. 0 | C 1 | D 3 | E 4 | F

Next string: Close 3 and 4; wider gaps from 0 to 1 and 1 to 3. 0 | G 1 | A 3 | B 4 | C

Upright bass half-position map
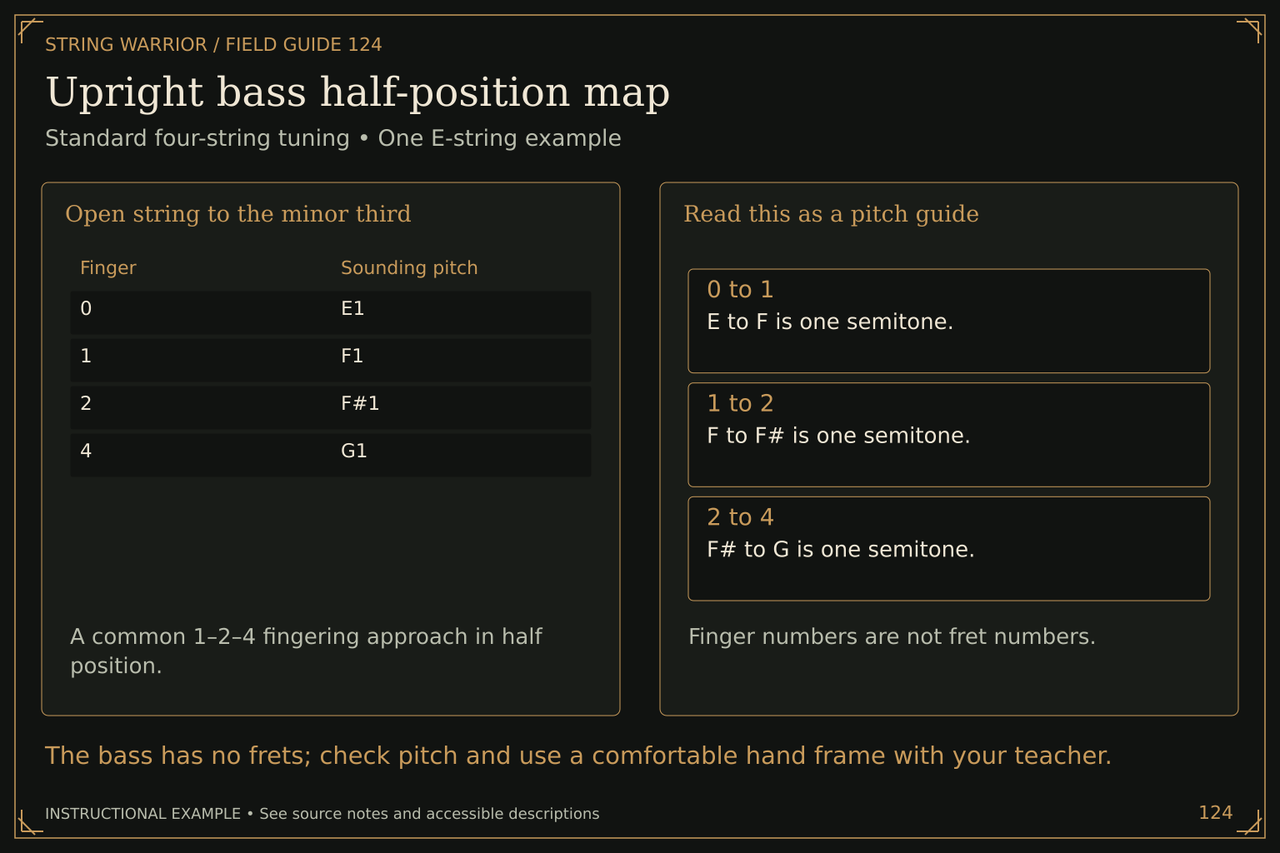
Upright bass half-position map. Standard four-string tuning • One E-string example. The bass has no frets; check pitch and use a comfortable hand frame with your teacher.
The bass has no frets; check pitch and use a comfortable hand frame with your teacher. Open the full Upright bass half-position map illustration

Open string to the minor third: A common 1–2–4 fingering approach in half position. 0 | E1 1 | F1 2 | F#1 4 | G1

Read this as a pitch guide: Finger numbers are not fret numbers.

Separate and connected bow strokes
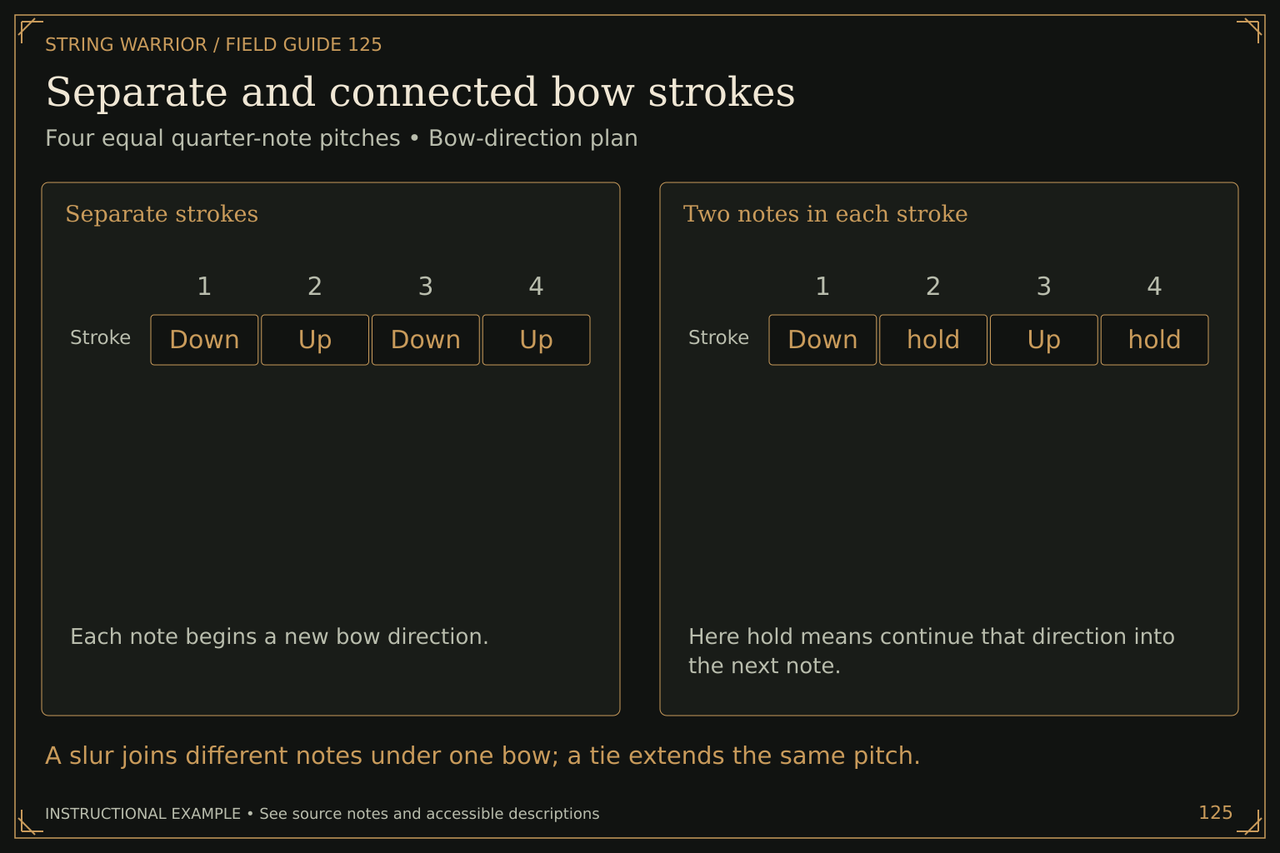
Separate and connected bow strokes. Four equal quarter-note pitches • Bow-direction plan. A slur joins different notes under one bow; a tie extends the same pitch.
A slur joins different notes under one bow; a tie extends the same pitch. Open the full Separate and connected bow strokes illustration

Separate strokes: Each note begins a new bow direction. Stroke | Down, Up, Down, Up

Two notes in each stroke: Here hold means continue that direction into the next note. Stroke | Down, hold, Up, hold

Instrument tuning and register
Seven- and eight-string guitar tuning
Seven- and eight-string guitar tuning. Common standard configurations • Low to high. Choose the matching string count and tuning before using any chord or scale diagram.
Choose the matching string count and tuning before using any chord or scale diagram. Open the full Seven- and eight-string guitar tuning illustration
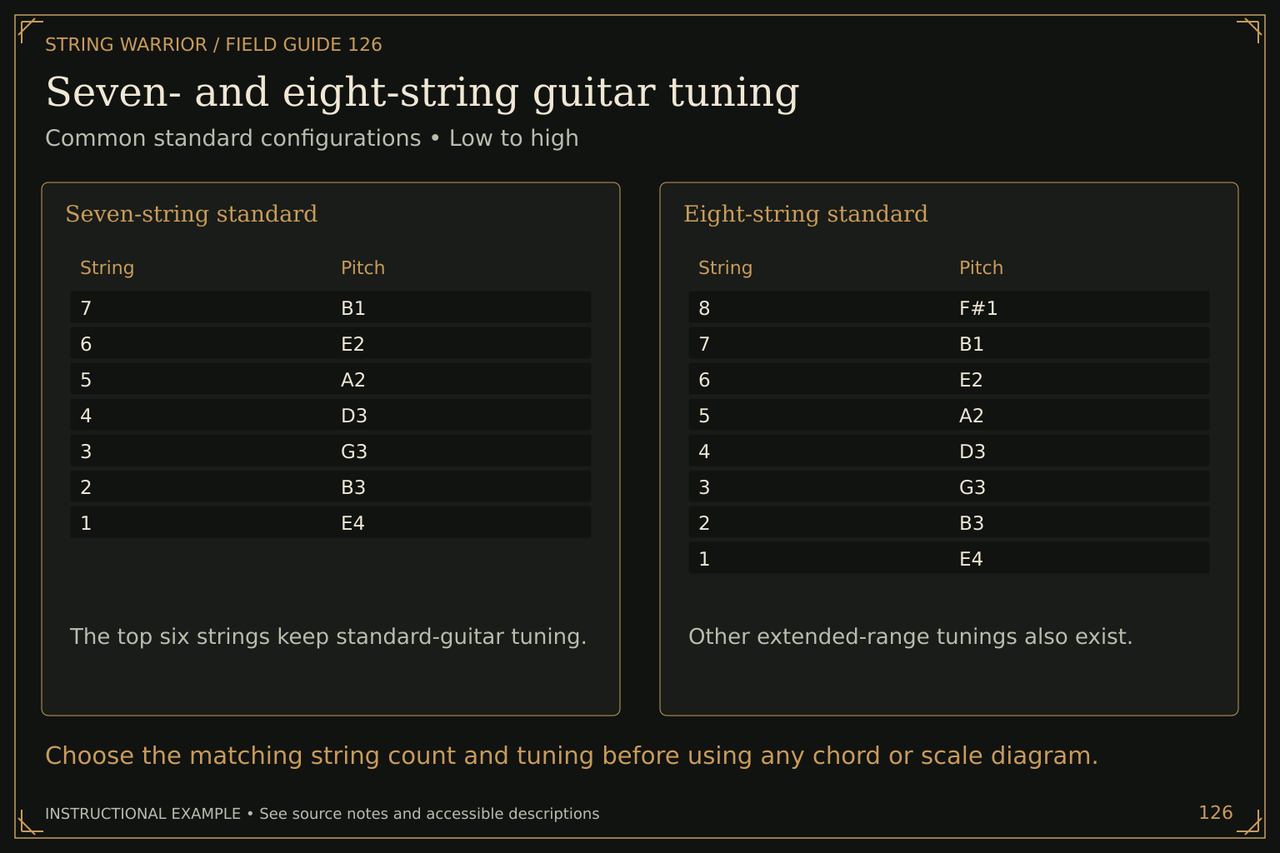
Seven-string standard: The top six strings keep standard-guitar tuning. 7 | B1 6 | E2 5 | A2 4 | D3 3 | G3 2 | B3 1 | E4

Eight-string standard: Other extended-range tunings also exist. 8 | F#1 7 | B1 6 | E2 5 | A2 4 | D3 3 | G3 2 | B3 1 | E4

Five- and six-string bass tuning
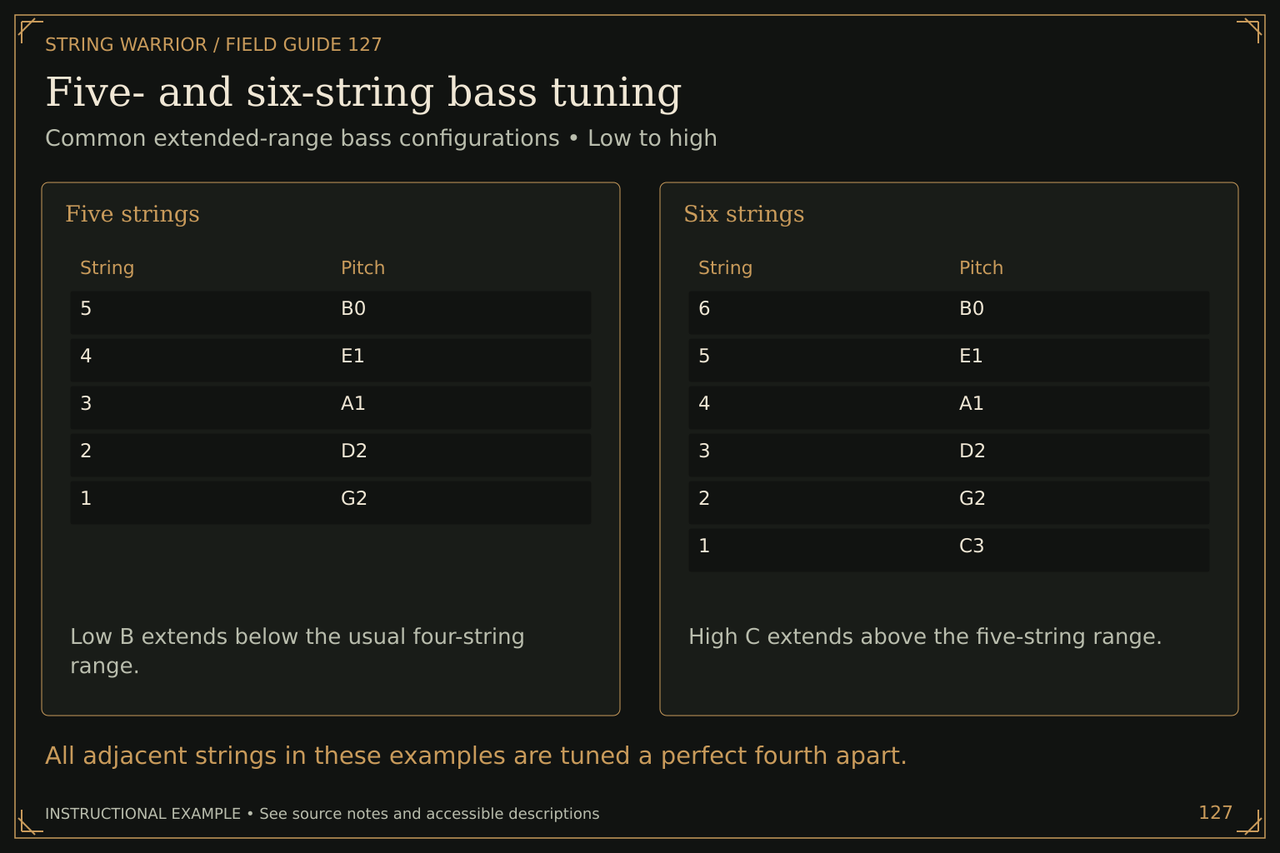
Five- and six-string bass tuning. Common extended-range bass configurations • Low to high. All adjacent strings in these examples are tuned a perfect fourth apart.
All adjacent strings in these examples are tuned a perfect fourth apart. Open the full Five- and six-string bass tuning illustration

Five strings: Low B extends below the usual four-string range. 5 | B0 4 | E1 3 | A1 2 | D2 1 | G2

Six strings: High C extends above the five-string range. 6 | B0 5 | E1 4 | A1 3 | D2 2 | G2 1 | C3

Baritone guitar and familiar shapes
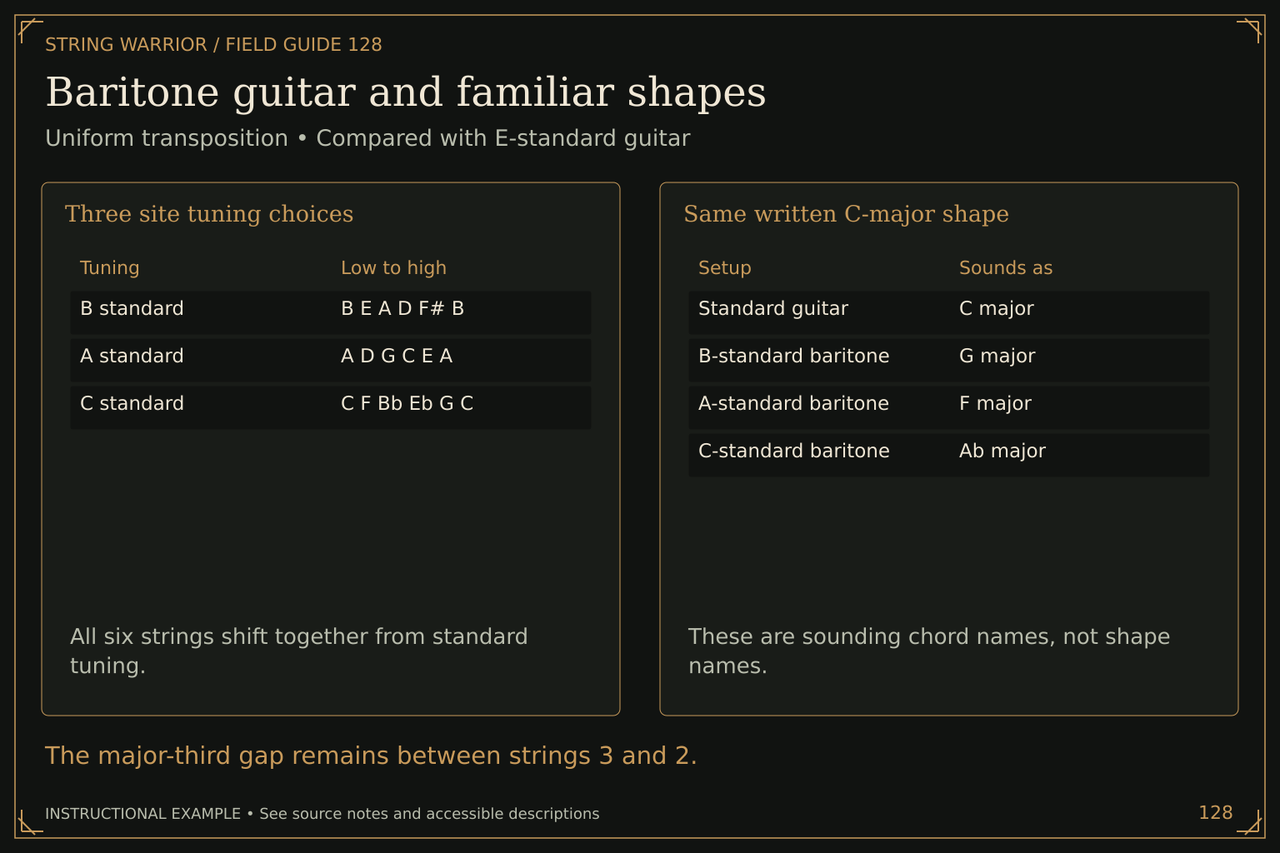
Baritone guitar and familiar shapes. Uniform transposition • Compared with E-standard guitar. The major-third gap remains between strings 3 and 2.
The major-third gap remains between strings 3 and 2. Open the full Baritone guitar and familiar shapes illustration

Baritone tuning choices: All six strings shift together from standard tuning. B standard | B E A D F# B A standard | A D G C E A C standard | C F Bb Eb G C

Same written C-major shape: These are sounding chord names, not shape names. Standard guitar | C major B-standard baritone | G major A-standard baritone | F major C-standard baritone | Ab major

Bass VI is an octave-lower guitar
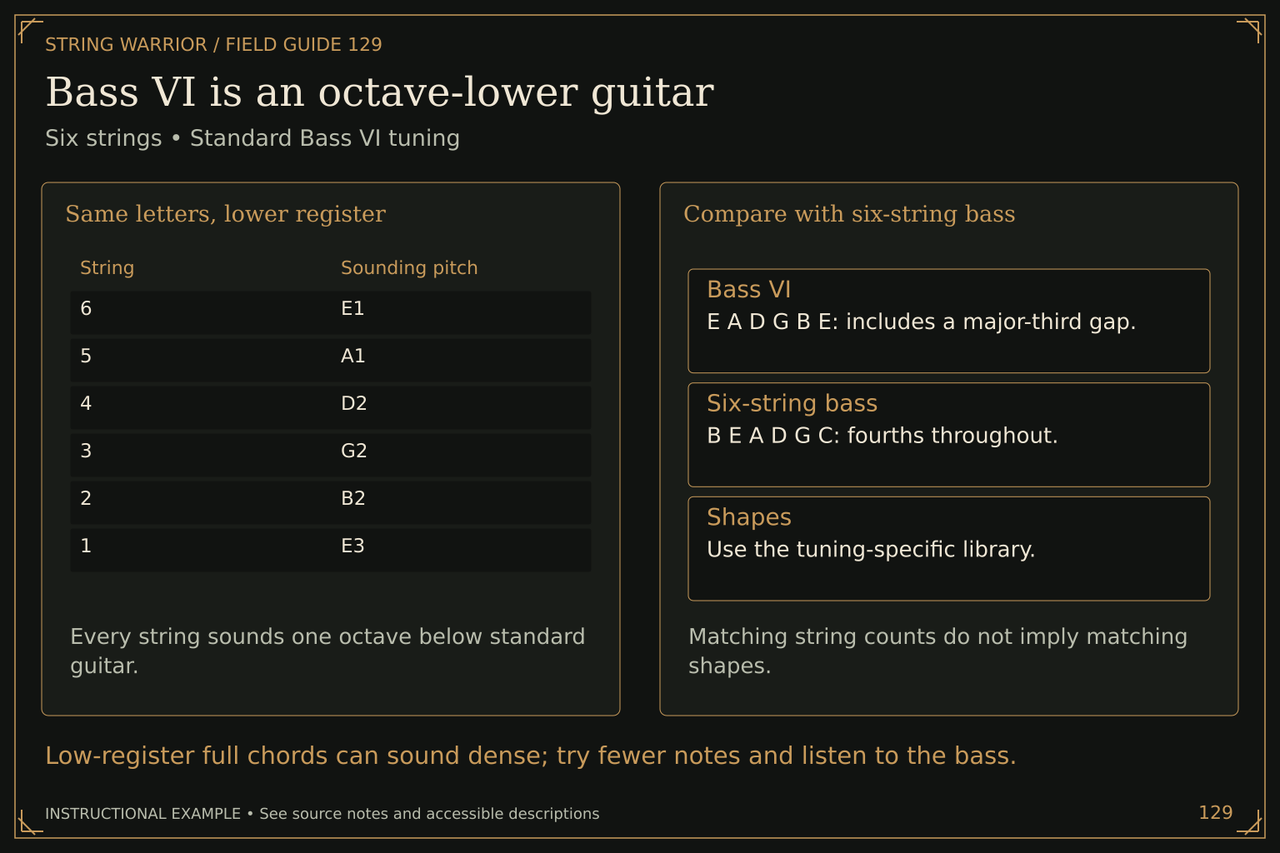
Bass VI is an octave-lower guitar. Six strings • Standard Bass VI tuning. Low-register full chords can sound dense; try fewer notes and listen to the bass.
Low-register full chords can sound dense; try fewer notes and listen to the bass. Open the full Bass VI is an octave-lower guitar illustration

Same letters, lower register: Every string sounds one octave below standard guitar. 6 | E1 5 | A1 4 | D2 3 | G2 2 | B2 1 | E3

Compare with six-string bass: Matching string counts do not imply matching shapes.

Twelve-string octave and unison pairs
Twelve-string octave and unison pairs. A common E-standard setup • Six courses. Tune each string individually. Pair order and some G-course setups vary by instrument.
Tune each string individually. Pair order and some G-course setups vary by instrument. Open the full Twelve-string octave and unison pairs illustration
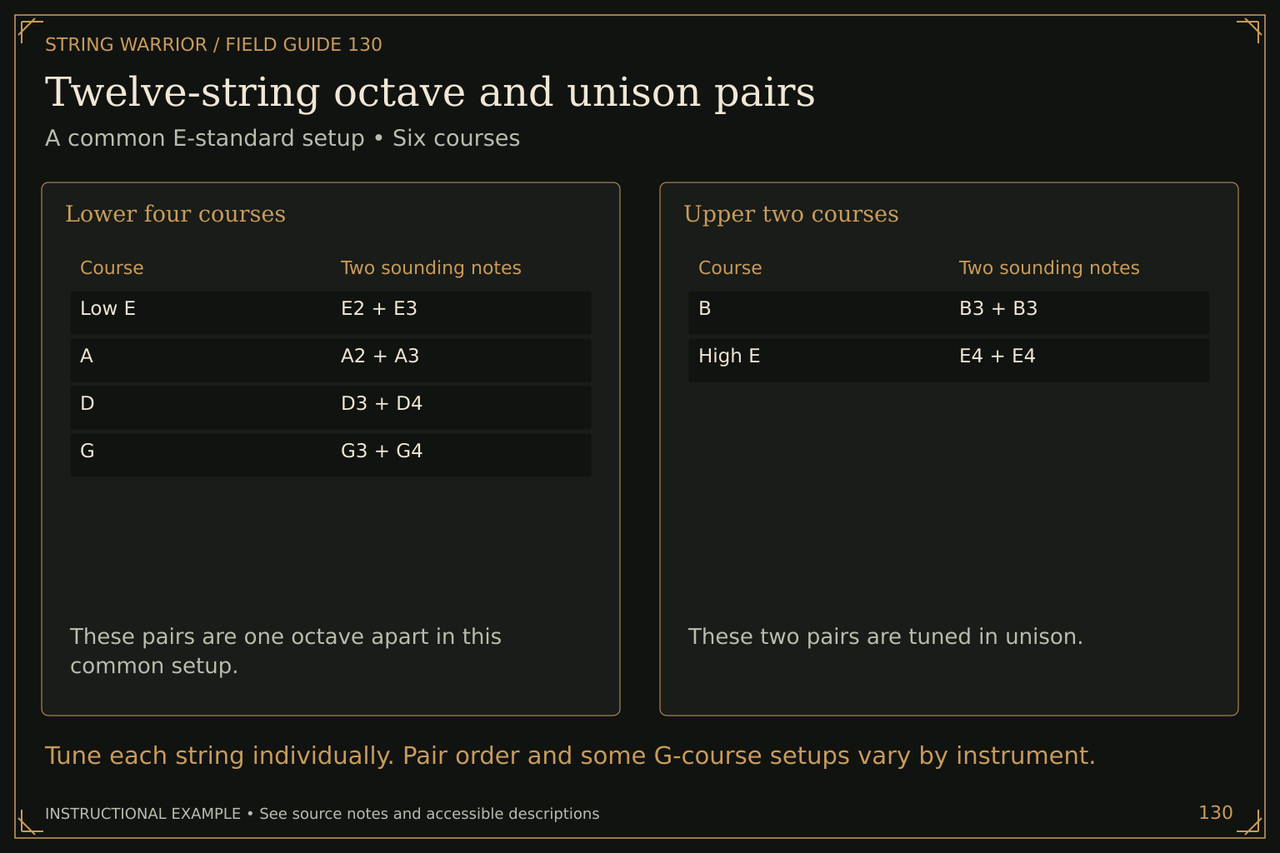
Lower four courses: These pairs are one octave apart in this common setup. Low E | E2 + E3 A | A2 + A3 D | D3 + D4 G | G3 + G4

Upper two courses: These two pairs are tuned in unison. B | B3 + B3 High E | E4 + E4

Guitalele requinto and terz shapes
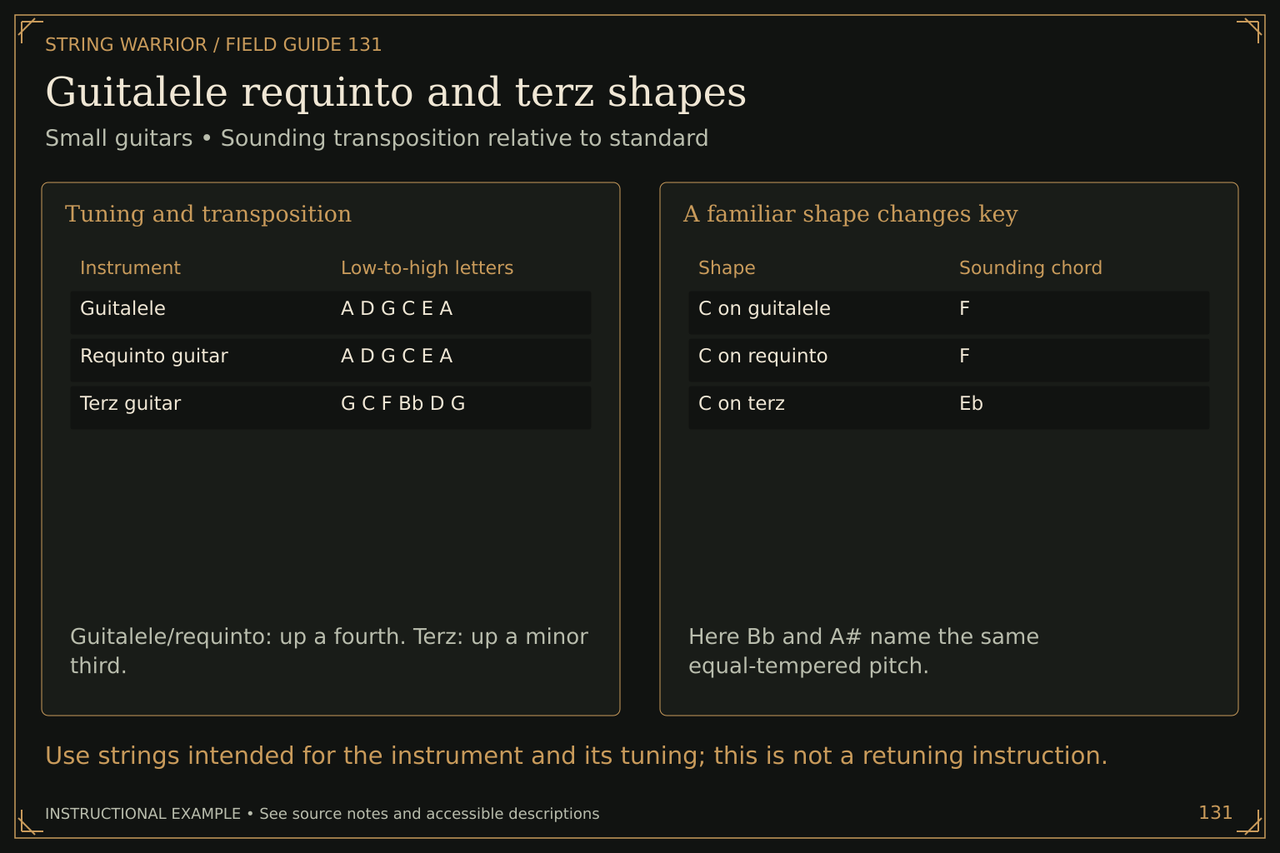
Guitalele requinto and terz shapes. Small guitars • Sounding transposition relative to standard. Use strings intended for the instrument and its tuning; this is not a retuning instruction.
Use strings intended for the instrument and its tuning; this is not a retuning instruction. Open the full Guitalele requinto and terz shapes illustration

Tuning and transposition: Guitalele/requinto: up a fourth. Terz: up a minor third. Guitalele | A D G C E A Requinto guitar | A D G C E A Terz guitar | G C F Bb D G

A familiar shape changes key: Here Bb and A# name the same equal-tempered pitch. C on guitalele | F C on requinto | F C on terz | Eb

Four banjo tuning families
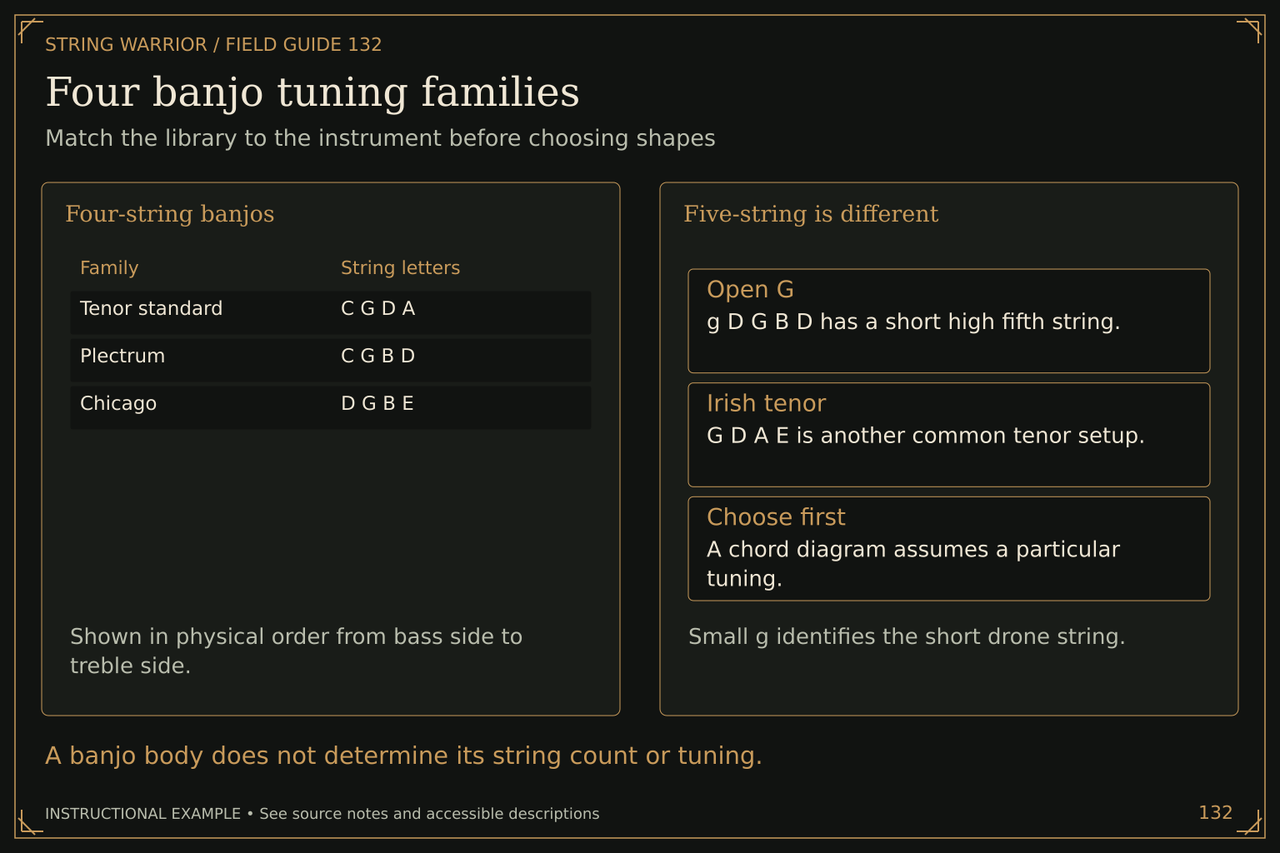
Four banjo tuning families. Match the library to the instrument before choosing shapes. A banjo body does not determine its string count or tuning.
A banjo body does not determine its string count or tuning. Open the full Four banjo tuning families illustration

Four-string banjos: Shown in physical order from bass side to treble side. Tenor standard | C G D A Plectrum | C G B D Chicago | D G B E

Five-string is different: Small g identifies the short drone string.

Ukulele relatives use different registers
Ukulele relatives use different registers. Baritone ukulele, banjolele and U-bass. Choose by tuning and register, not by body size alone.
Choose by tuning and register, not by body size alone. Open the full Ukulele relatives use different registers illustration
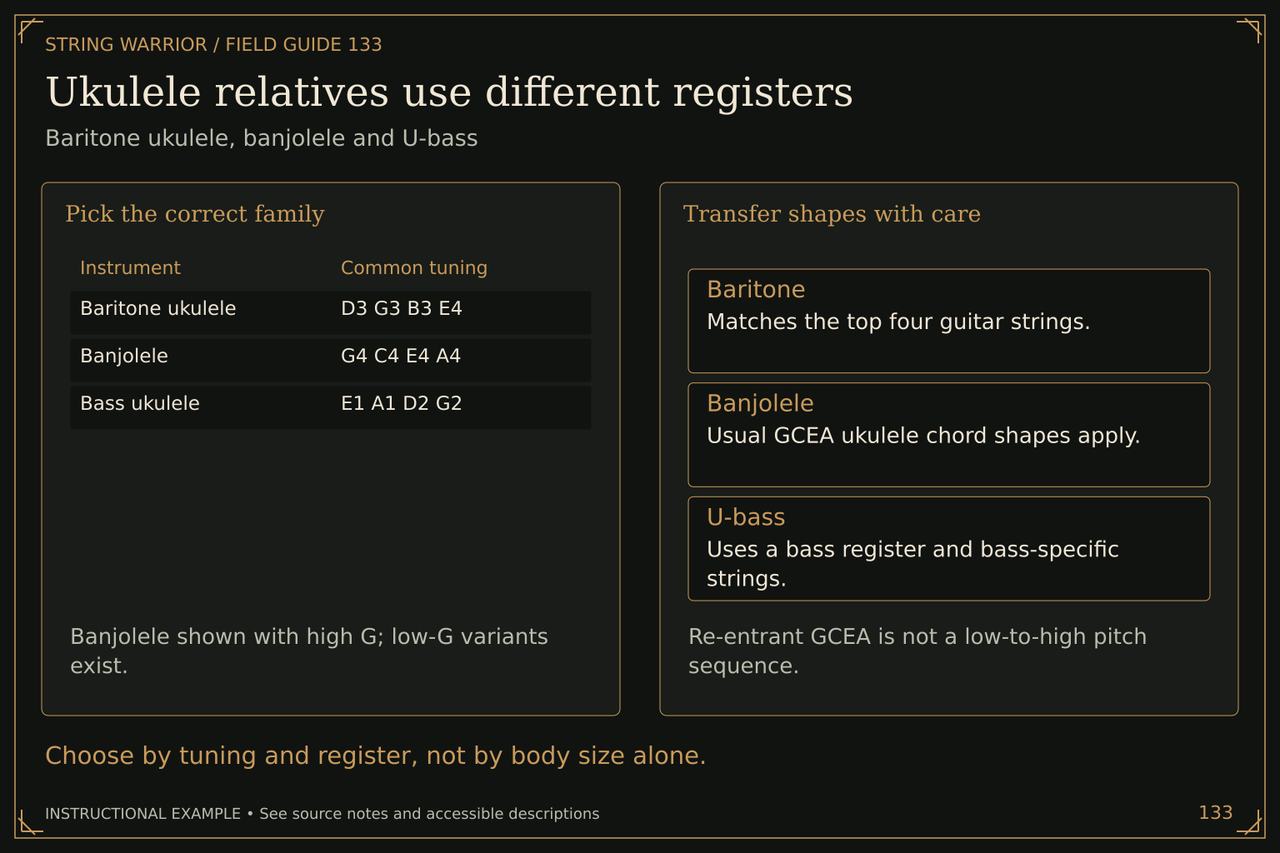
Pick the correct family: Banjolele shown with high G; low-G variants exist. Baritone ukulele | D3 G3 B3 E4 Banjolele | G4 C4 E4 A4 Bass ukulele | E1 A1 D2 G2

Transfer shapes with care: Re-entrant GCEA is not a low-to-high pitch sequence.

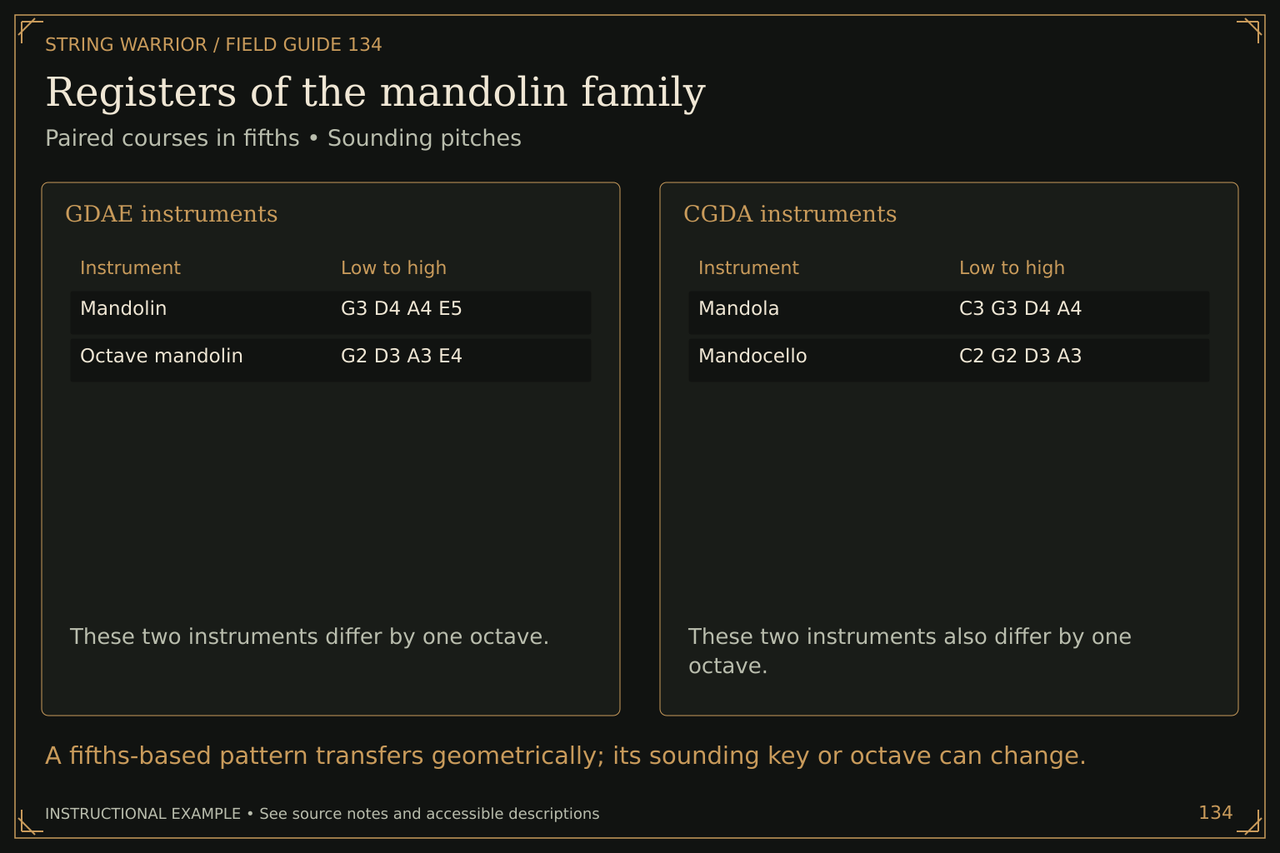
Registers of the mandolin family
Registers of the mandolin family. Paired courses in fifths • Sounding pitches. A fifths-based pattern transfers geometrically; its sounding key or octave can change.
A fifths-based pattern transfers geometrically; its sounding key or octave can change. Open the full Registers of the mandolin family illustration

GDAE instruments: These two instruments differ by one octave. Mandolin | G3 D4 A4 E5 Octave mandolin | G2 D3 A3 E4

CGDA instruments: These two instruments also differ by one octave. Mandola | C3 G3 D4 A4 Mandocello | C2 G2 D3 A3

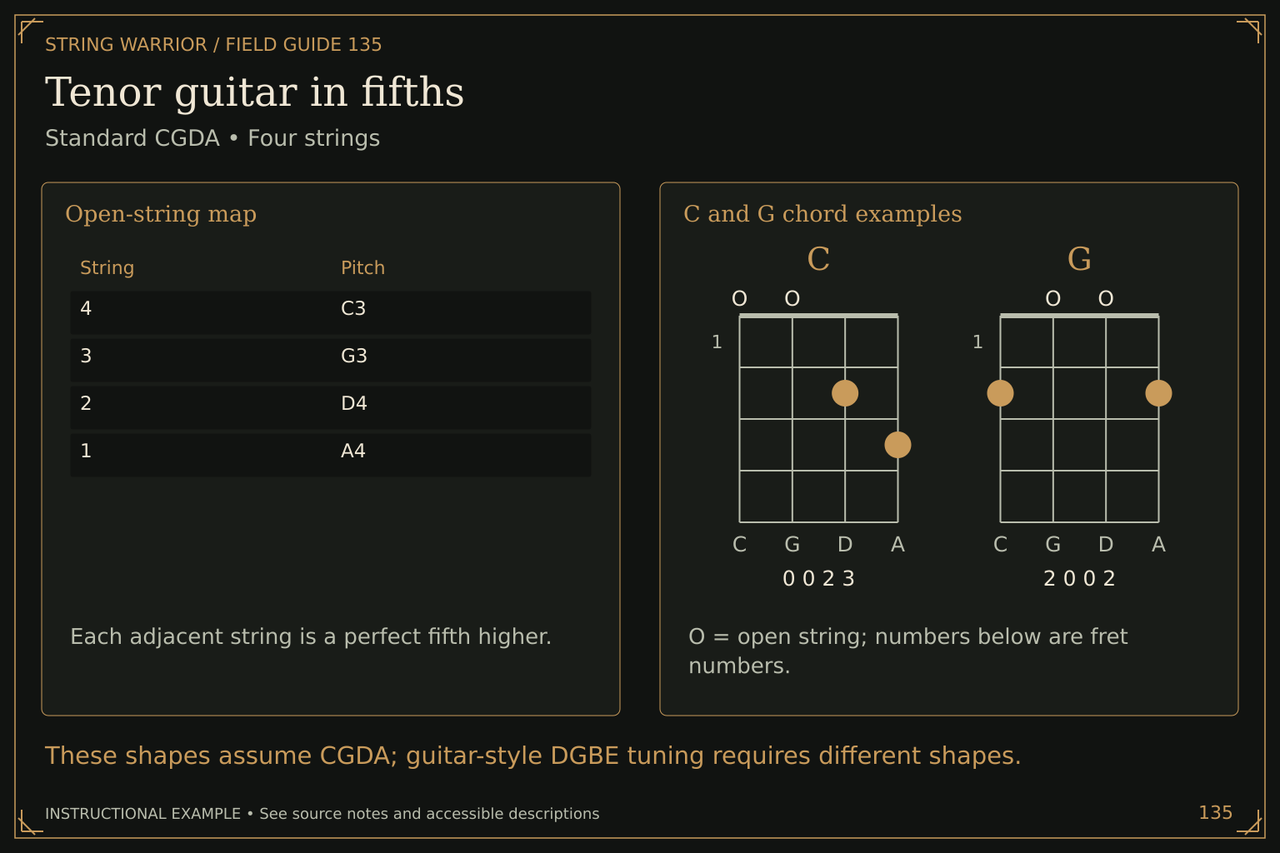
Tenor guitar in fifths
Tenor guitar in fifths. Standard CGDA • Four strings. These shapes assume CGDA; guitar-style DGBE tuning requires different shapes.
These shapes assume CGDA; guitar-style DGBE tuning requires different shapes. Open the full Tenor guitar in fifths illustration

Open-string map: Each adjacent string is a perfect fifth higher. 4 | C3 3 | G3 2 | D4 1 | A4

C and G chord examples: O = open string; numbers below are fret numbers.

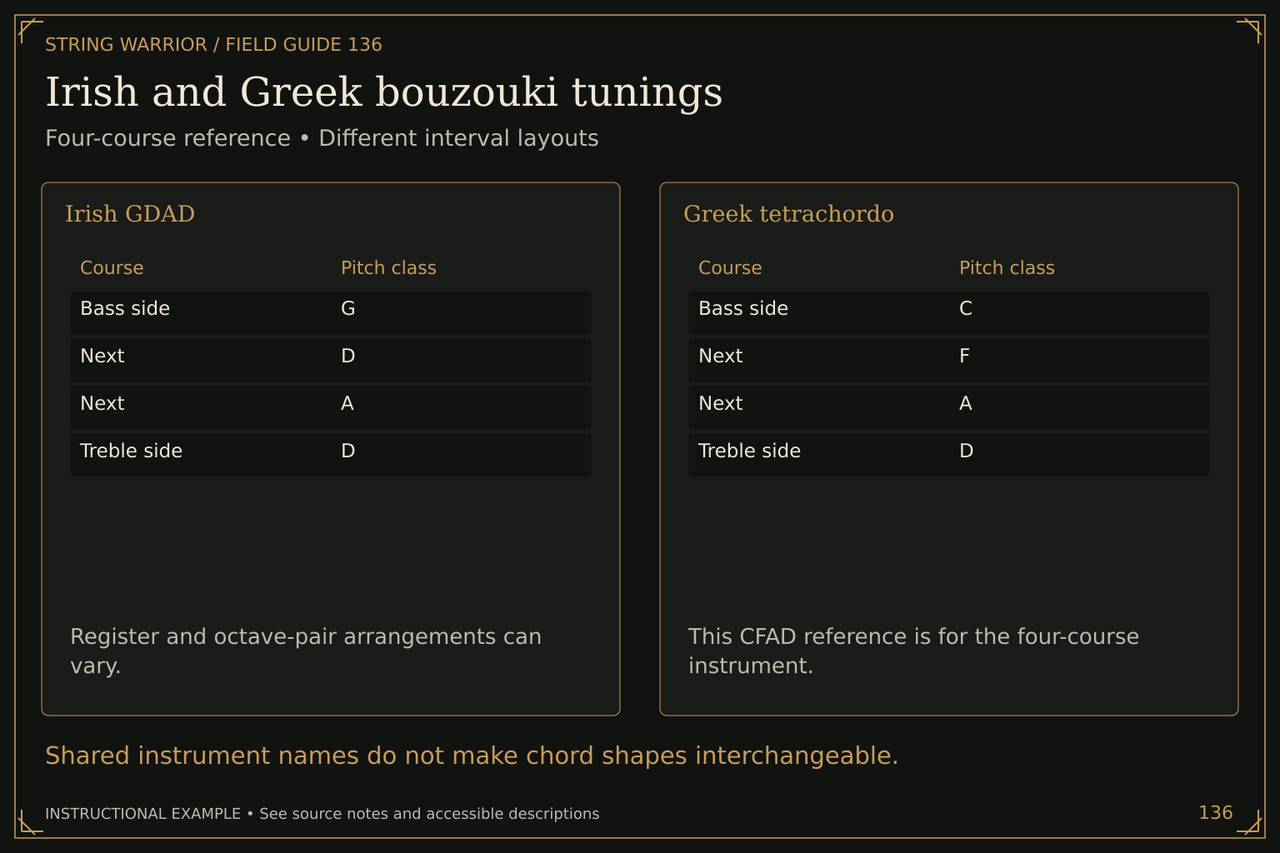
Irish and Greek bouzouki tunings
Irish and Greek bouzouki tunings. Four-course reference • Different interval layouts. Shared instrument names do not make chord shapes interchangeable.
Shared instrument names do not make chord shapes interchangeable. Open the full Irish and Greek bouzouki tunings illustration

Irish GDAD: Register and octave-pair arrangements can vary. Bass side | G Next | D Next | A Treble side | D

Greek tetrachordo: This CFAD reference is for the four-course instrument. Bass side | C Next | F Next | A Treble side | D

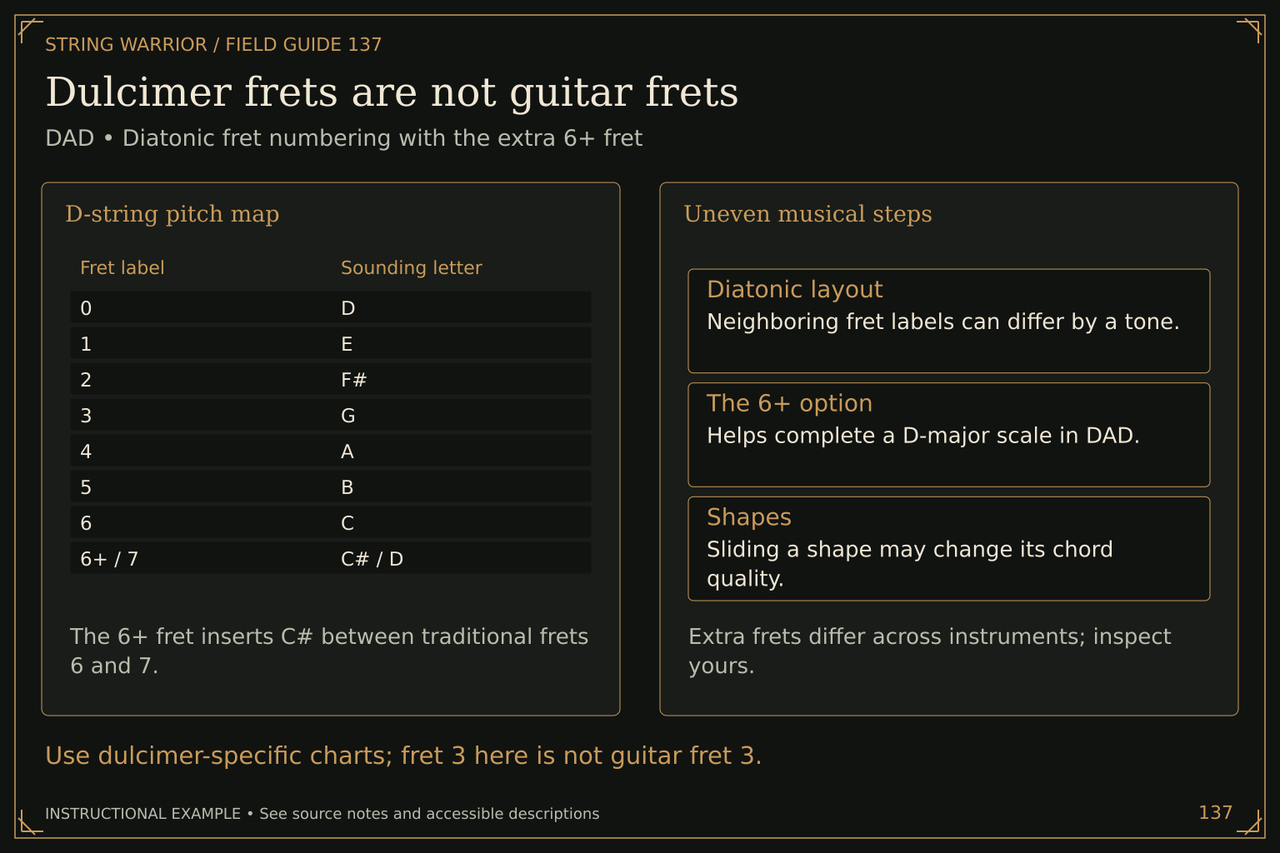
Dulcimer frets are not guitar frets
Dulcimer frets are not guitar frets. DAD • Diatonic fret numbering with the extra 6+ fret. Use dulcimer-specific charts; fret 3 here is not guitar fret 3.
Use dulcimer-specific charts; fret 3 here is not guitar fret 3. Open the full Dulcimer frets are not guitar frets illustration

D-string pitch map: The 6+ fret inserts C# between traditional frets 6 and 7. 0 | D 1 | E 2 | F# 3 | G 4 | A 5 | B 6 | C 6+ / 7 | C# / D

Uneven musical steps: Extra frets differ across instruments; inspect yours.

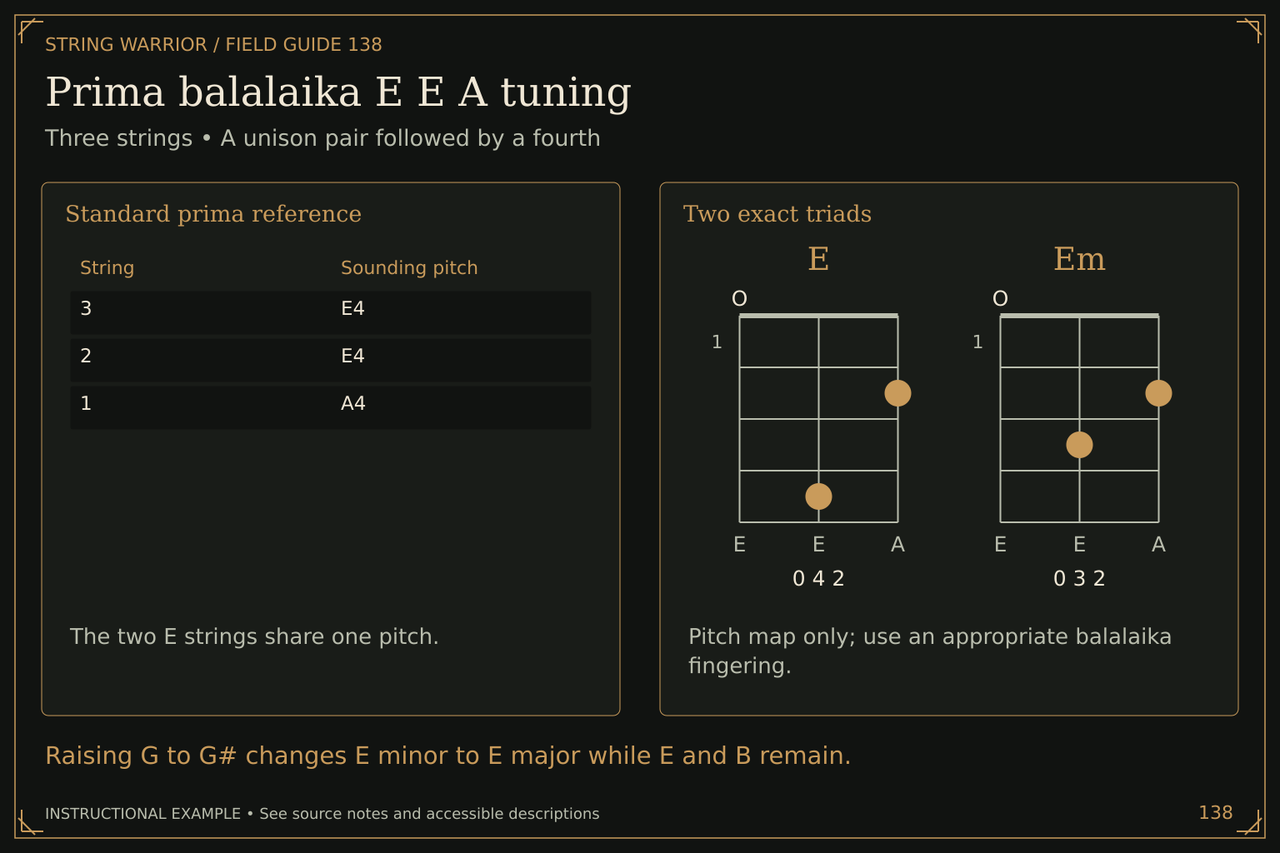
Prima balalaika E E A tuning
Prima balalaika E E A tuning. Three strings • A unison pair followed by a fourth. Raising G to G# changes E minor to E major while E and B remain.
Raising G to G# changes E minor to E major while E and B remain. Open the full Prima balalaika E E A tuning illustration

Standard prima reference: The two E strings share one pitch. 3 | E4 2 | E4 1 | A4

Two exact triads: Pitch map only; use an appropriate balalaika fingering.

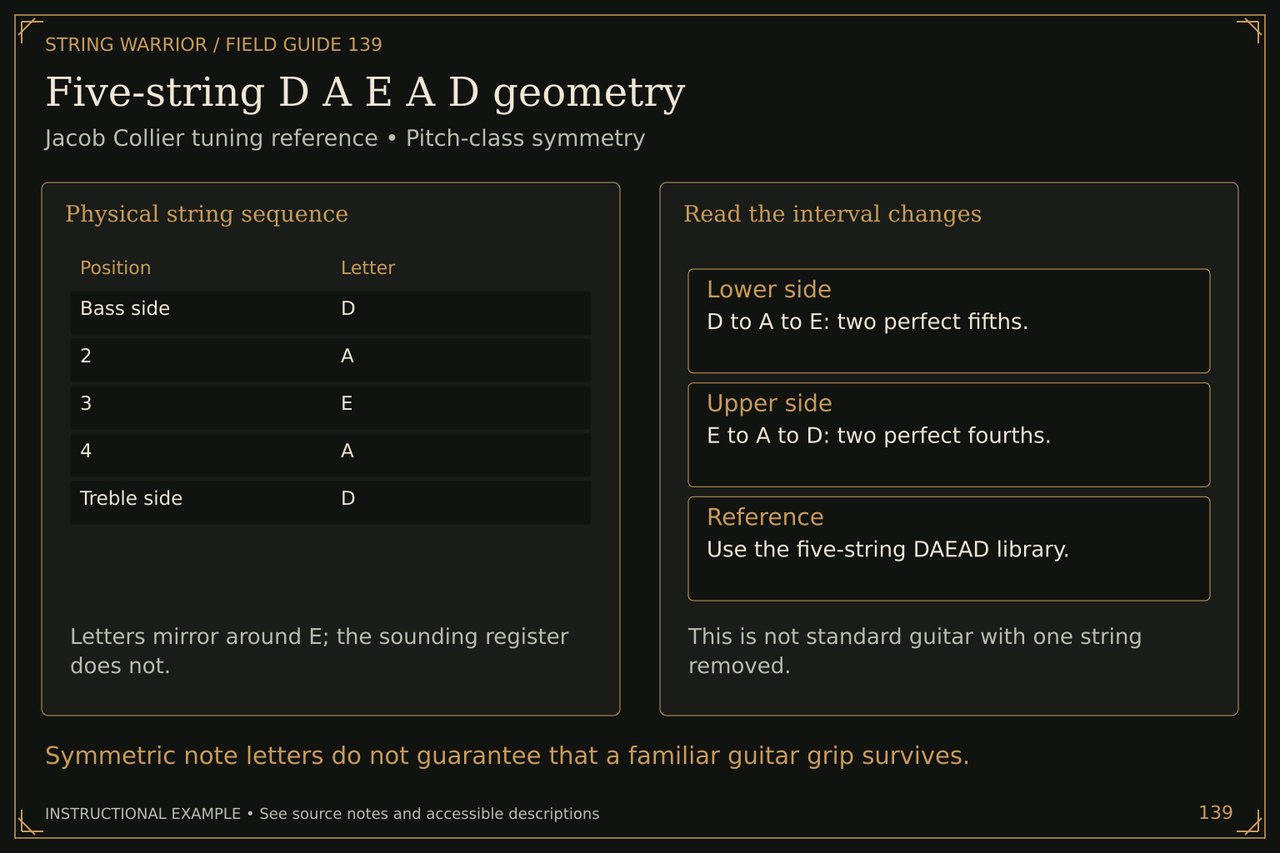
Five-string tuning layout
Five-string D A E A D geometry. Jacob Collier tuning reference • Pitch-class symmetry. Symmetric note letters do not guarantee that a familiar guitar grip survives.
Symmetric note letters do not guarantee that a familiar guitar grip survives. Open the full Five-string D A E A D geometry illustration

Physical string sequence: Letters mirror around E; the sounding register does not. Bass side | D 2 | A 3 | E 4 | A Treble side | D

Read the interval changes: This is not standard guitar with one string removed.

Charango courses and re-entrant pitch
Charango courses and re-entrant pitch. A common ten-string charango setup • Five pairs. A pitch-class chart labels E once even when that course sounds two octaves of E.
A pitch-class chart labels E once even when that course sounds two octaves of E. Open the full Charango courses and re-entrant pitch illustration
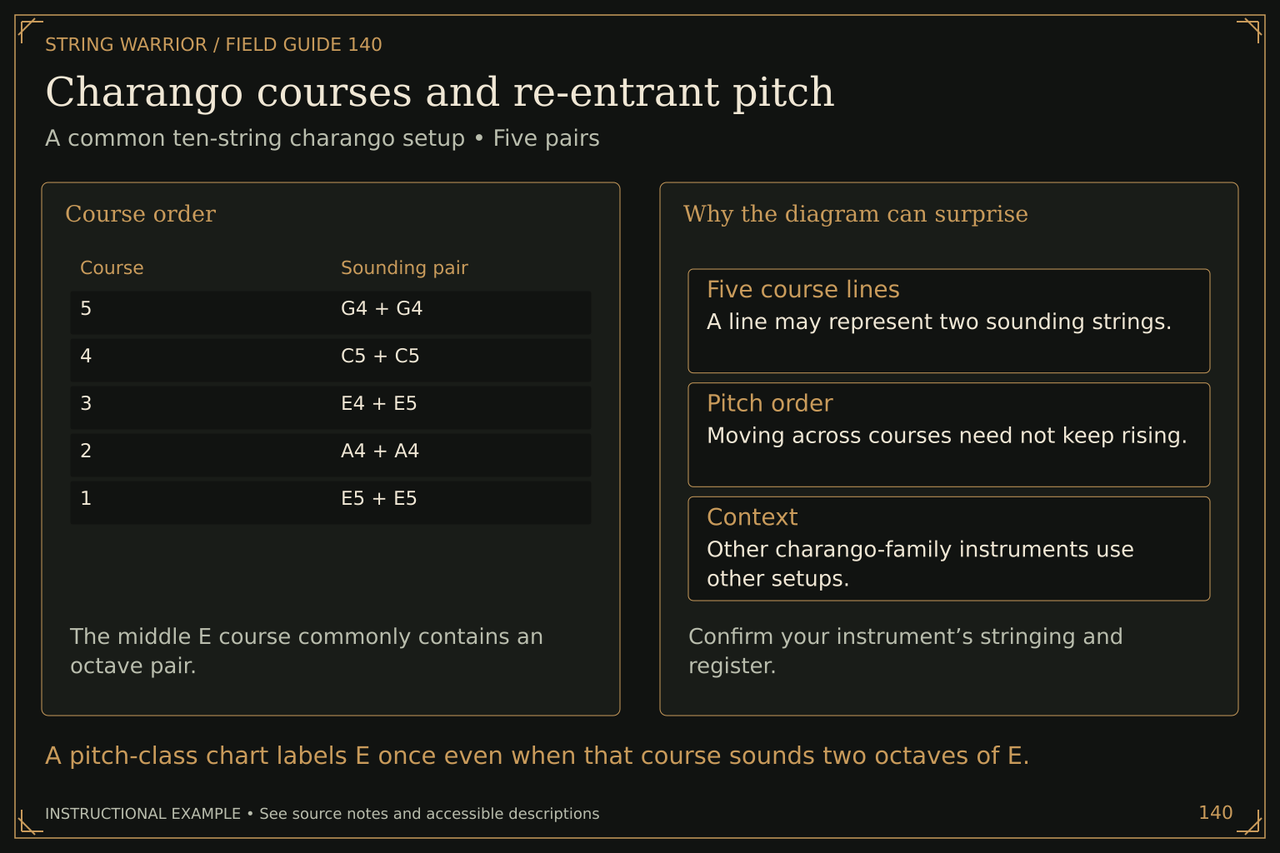
Course order: The middle E course commonly contains an octave pair. 5 | G4 + G4 4 | C5 + C5 3 | E4 + E5 2 | A4 + A4 1 | E5 + E5

Why the diagram can surprise: Confirm your instrument’s stringing and register.

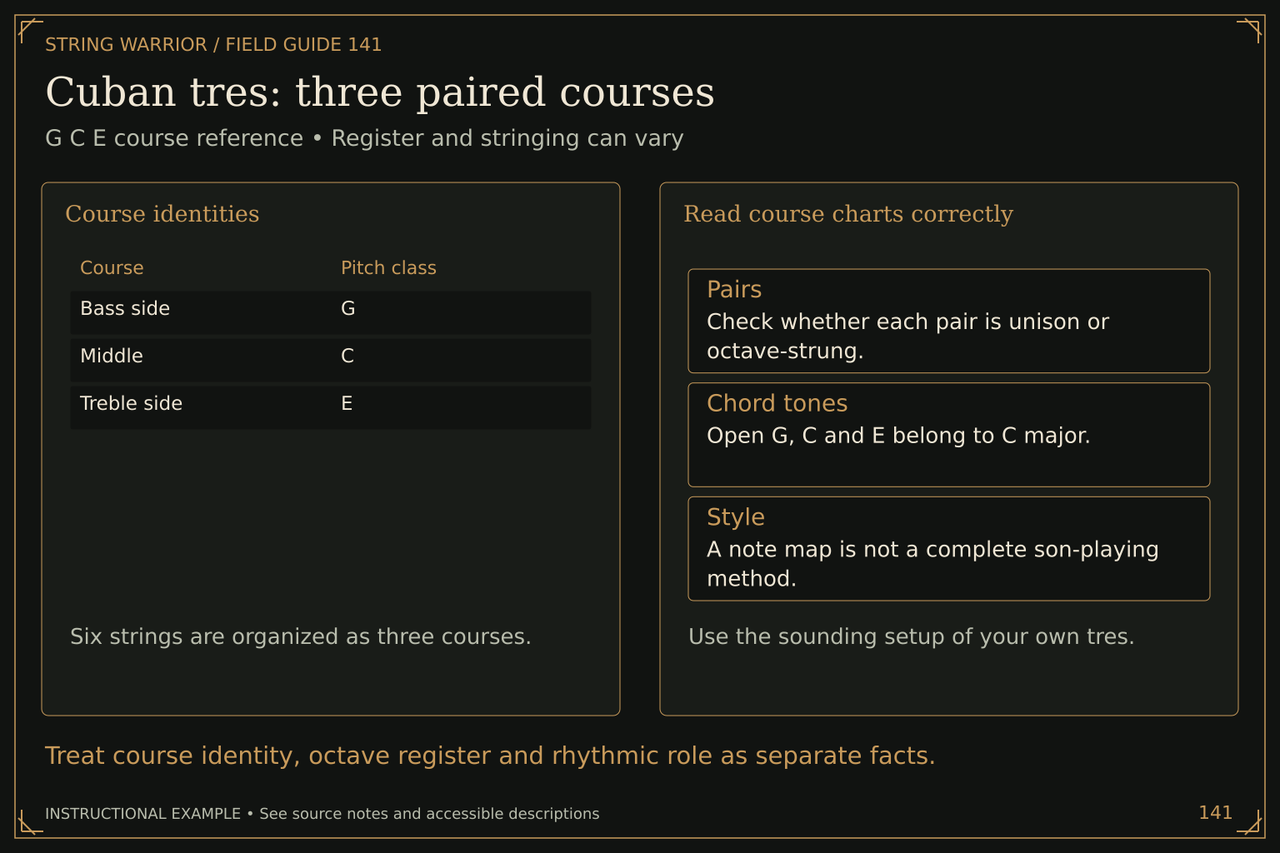
Cuban tres: three paired courses
Cuban tres: three paired courses. G C E course reference • Register and stringing can vary. Treat course identity, octave register and rhythmic role as separate facts.
Treat course identity, octave register and rhythmic role as separate facts. Open the full Cuban tres: three paired courses illustration

Course identities: Six strings are organized as three courses. Bass side | G Middle | C Treble side | E

Read course charts correctly: Use the sounding setup of your own tres.

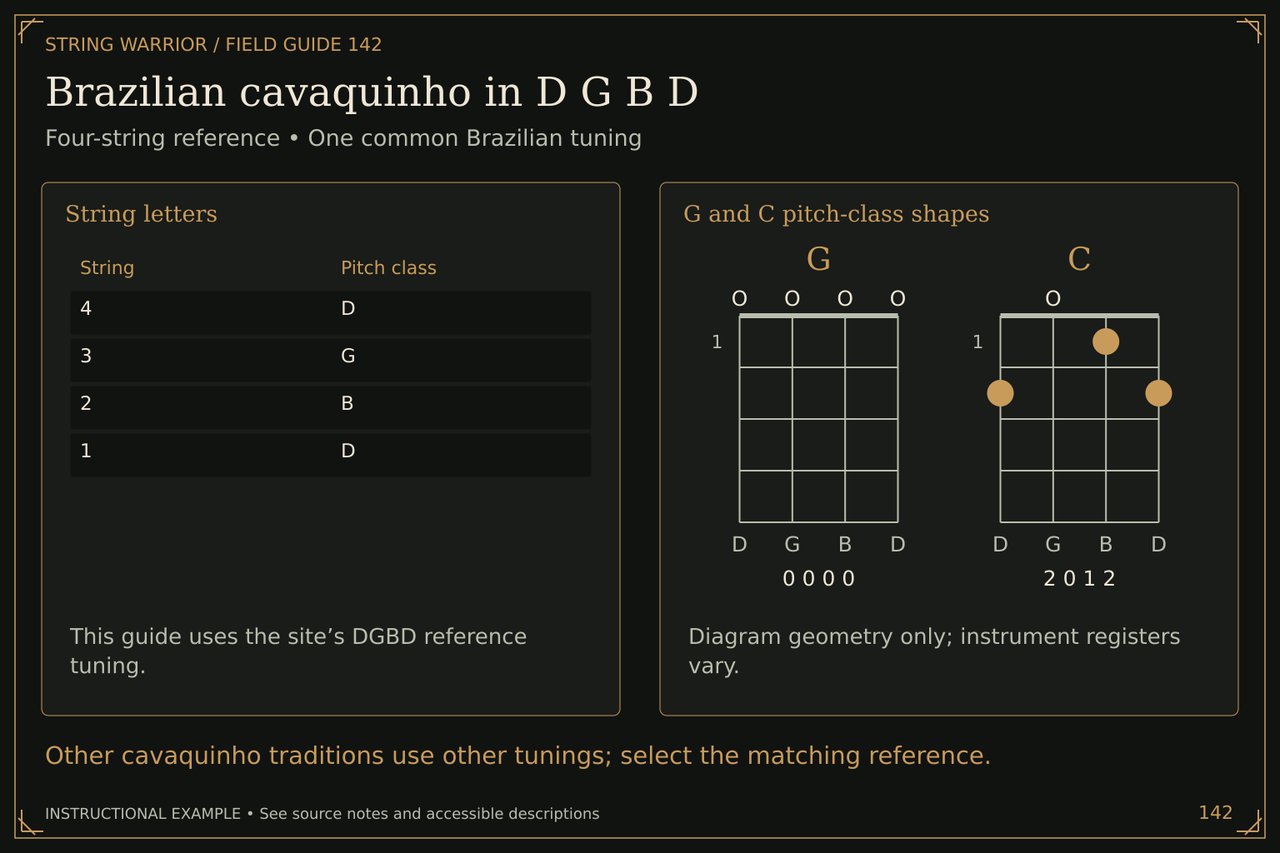
Brazilian cavaquinho in D G B D
Brazilian cavaquinho in D G B D. Four-string reference • One common Brazilian tuning. Other cavaquinho traditions use other tunings; select the matching reference.
Other cavaquinho traditions use other tunings; select the matching reference. Open the full Brazilian cavaquinho in D G B D illustration

String letters: This guide uses the site’s DGBD reference tuning. 4 | D 3 | G 2 | B 1 | D

G and C pitch-class shapes: Diagram geometry only; instrument registers vary.

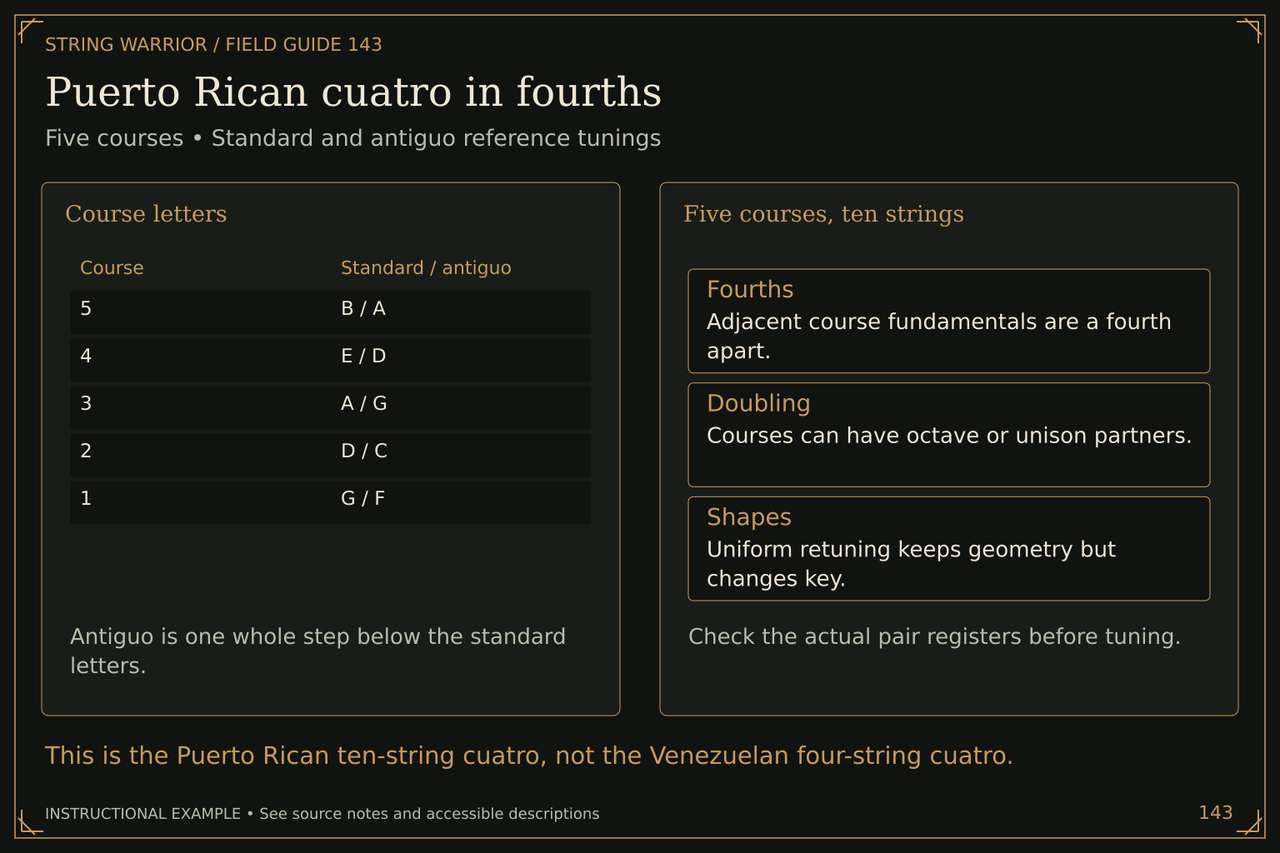
Puerto Rican cuatro in fourths
Puerto Rican cuatro in fourths. Five courses • Standard and antiguo reference tunings. This is the Puerto Rican ten-string cuatro, not the Venezuelan four-string cuatro.
This is the Puerto Rican ten-string cuatro, not the Venezuelan four-string cuatro. Open the full Puerto Rican cuatro in fourths illustration

Course letters: Antiguo is one whole step below the standard letters. 5 | B / A 4 | E / D 3 | A / G 2 | D / C 1 | G / F

Five courses, ten strings: Check the actual pair registers before tuning.

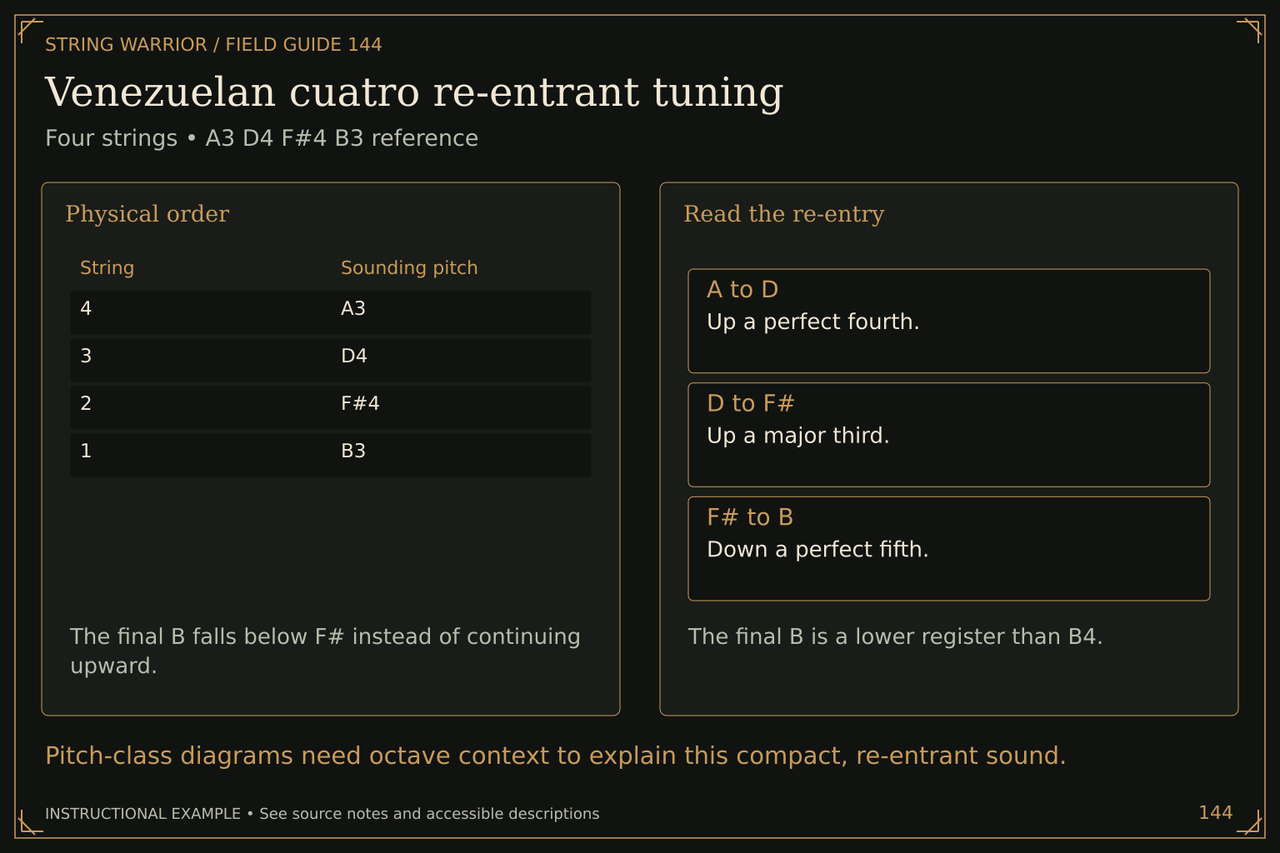
Venezuelan cuatro re-entrant tuning
Venezuelan cuatro re-entrant tuning. Four strings • A3 D4 F#4 B3 reference. Pitch-class diagrams need octave context to explain this compact, re-entrant sound.
Pitch-class diagrams need octave context to explain this compact, re-entrant sound. Open the full Venezuelan cuatro re-entrant tuning illustration

Physical order: The final B falls below F# instead of continuing upward. 4 | A3 3 | D4 2 | F#4 1 | B3

Read the re-entry: The final B is a lower register than B4.

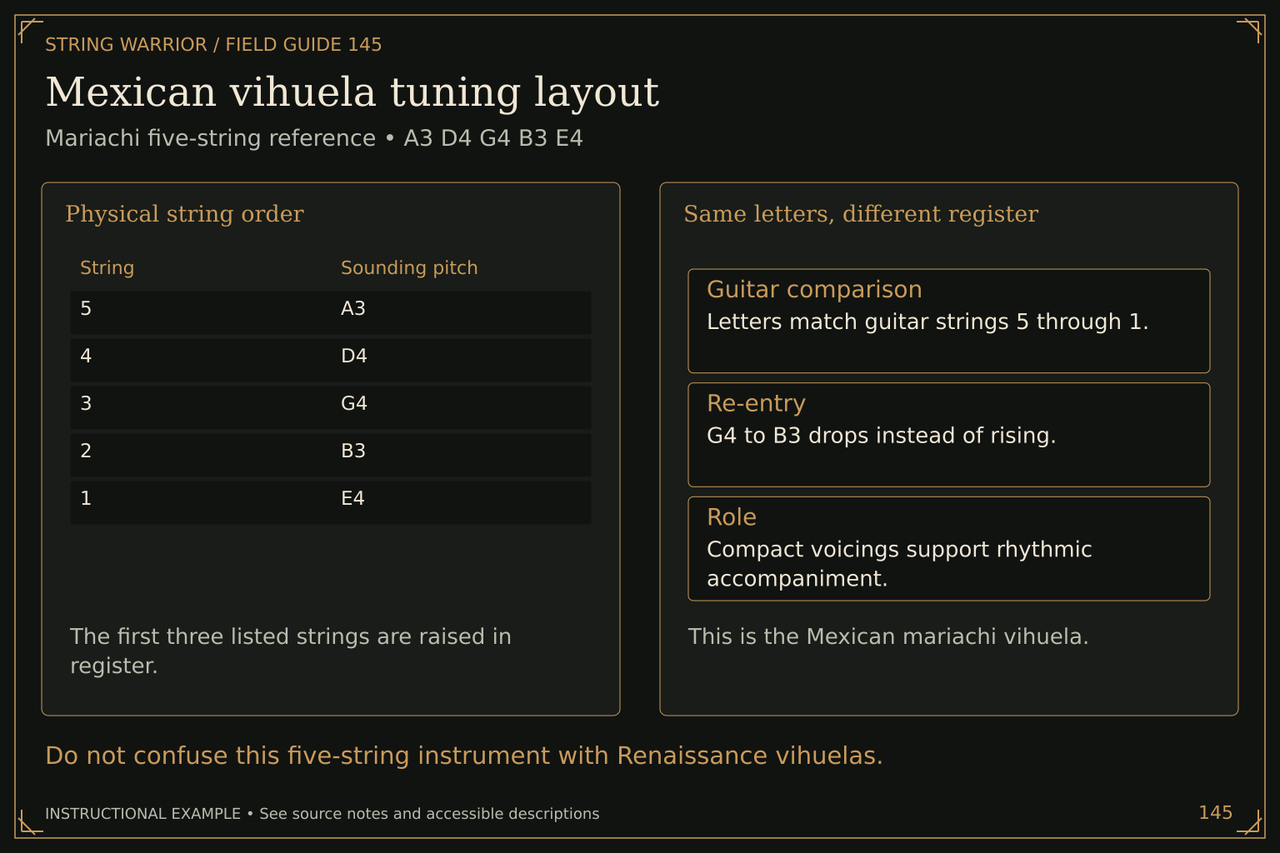
Mexican vihuela tuning layout
Mexican vihuela tuning layout. Mariachi five-string reference • A3 D4 G4 B3 E4. Do not confuse this five-string instrument with Renaissance vihuelas.
Do not confuse this five-string instrument with Renaissance vihuelas. Open the full Mexican vihuela tuning layout illustration

Physical string order: The first three listed strings are raised in register. 5 | A3 4 | D4 3 | G4 2 | B3 1 | E4

Same letters, different register: This is the Mexican mariachi vihuela.

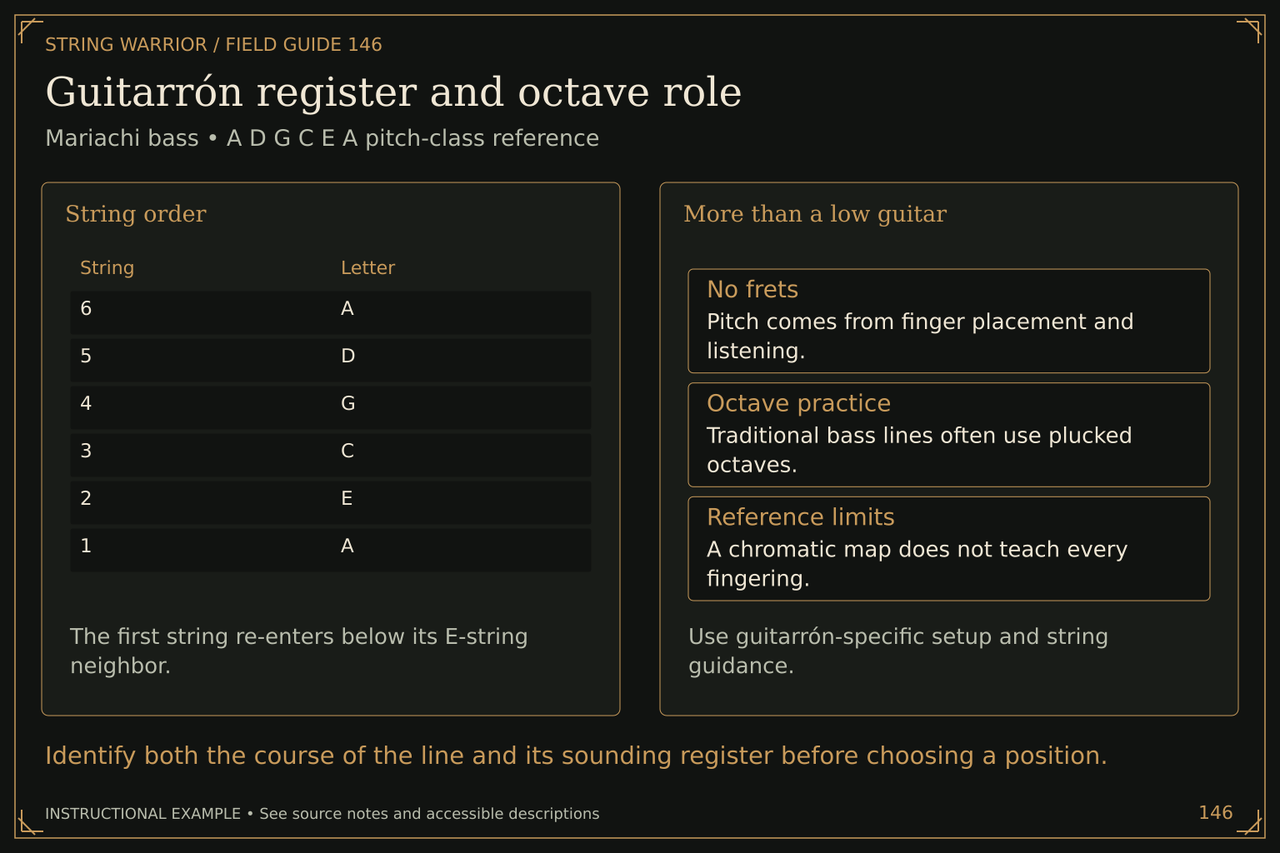
Guitarrón register and octave role
Guitarrón register and octave role. Mariachi bass • A D G C E A pitch-class reference. Identify both the course of the line and its sounding register before choosing a position.
Identify both the course of the line and its sounding register before choosing a position. Open the full Guitarrón register and octave role illustration

String order: The first string re-enters below its E-string neighbor. 6 | A 5 | D 4 | G 3 | C 2 | E 1 | A

More than a low guitar: Use guitarrón-specific setup and string guidance.

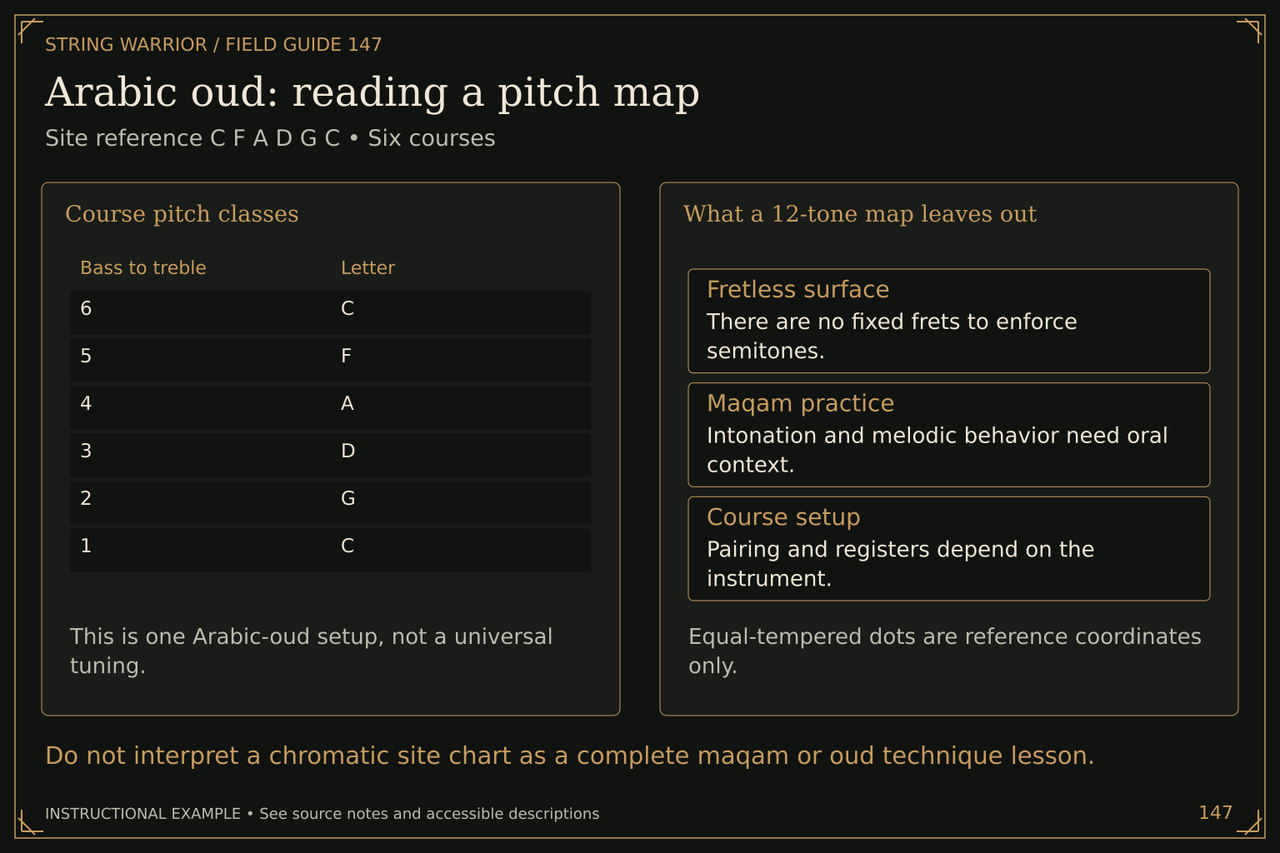
Arabic oud: reading a pitch map
Arabic oud: reading a pitch map. Site reference C F A D G C • Six courses. Do not interpret a chromatic site chart as a complete maqam or oud technique lesson.
Do not interpret a chromatic site chart as a complete maqam or oud technique lesson. Open the full Arabic oud: reading a pitch map illustration

Course pitch classes: This is one Arabic-oud setup, not a universal tuning. 6 | C 5 | F 4 | A 3 | D 2 | G 1 | C

What a 12-tone map leaves out: Equal-tempered dots are reference coordinates only.

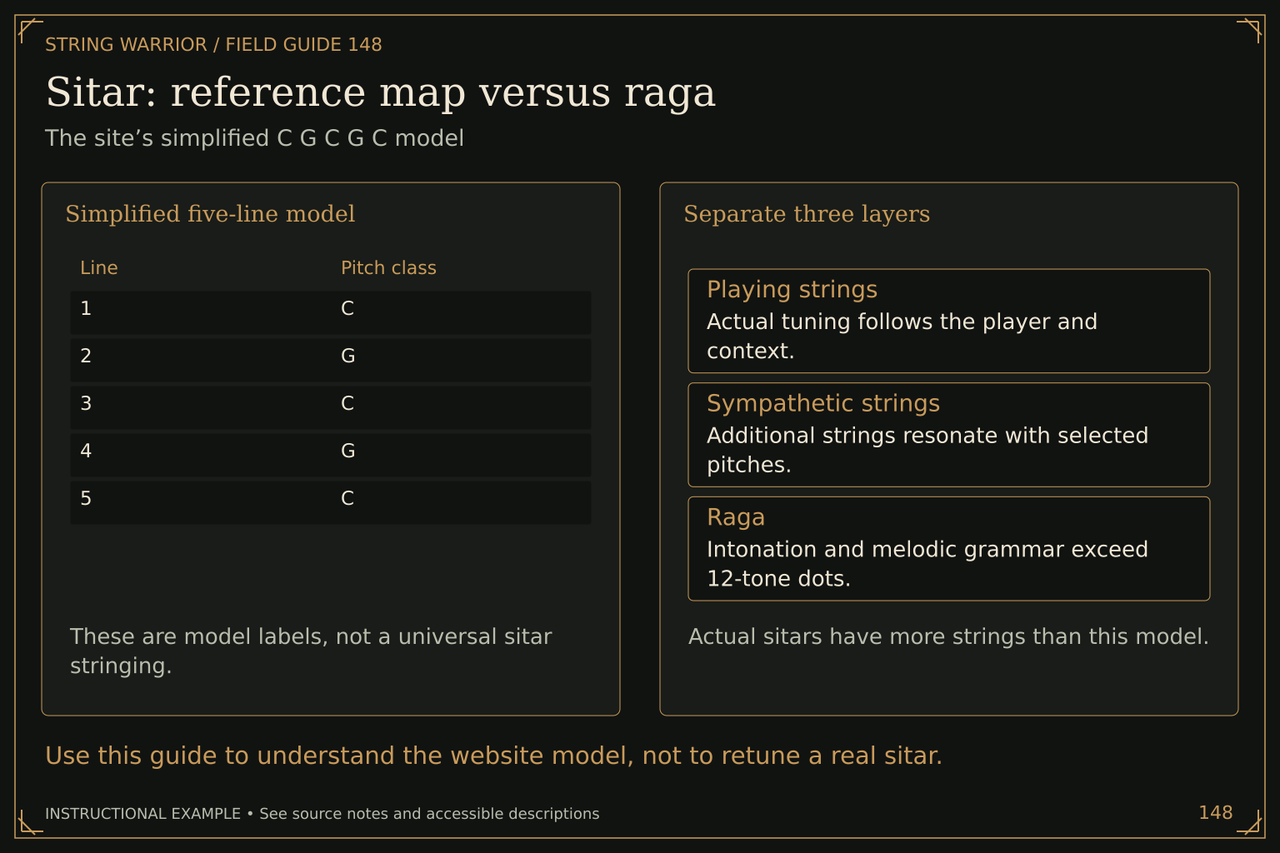
Sitar: reference map versus raga
Sitar: reference map versus raga. The site’s simplified C G C G C model. Use this guide to understand the website model, not to retune a real sitar.
Use this guide to understand the website model, not to retune a real sitar. Open the full Sitar: reference map versus raga illustration

Simplified five-line model: These are model labels, not a universal sitar stringing. 1 | C 2 | G 3 | C 4 | G 5 | C

Separate three layers: Actual sitars have more strings than this model.

C6 lap steel: notes under a straight bar
C6 lap steel: notes under a straight bar. Six-string C E G A C E tuning • Low to high. Steel charts describe bar positions and chosen strings, not independent finger frets.
Steel charts describe bar positions and chosen strings, not independent finger frets. Open the full C6 lap steel: notes under a straight bar illustration
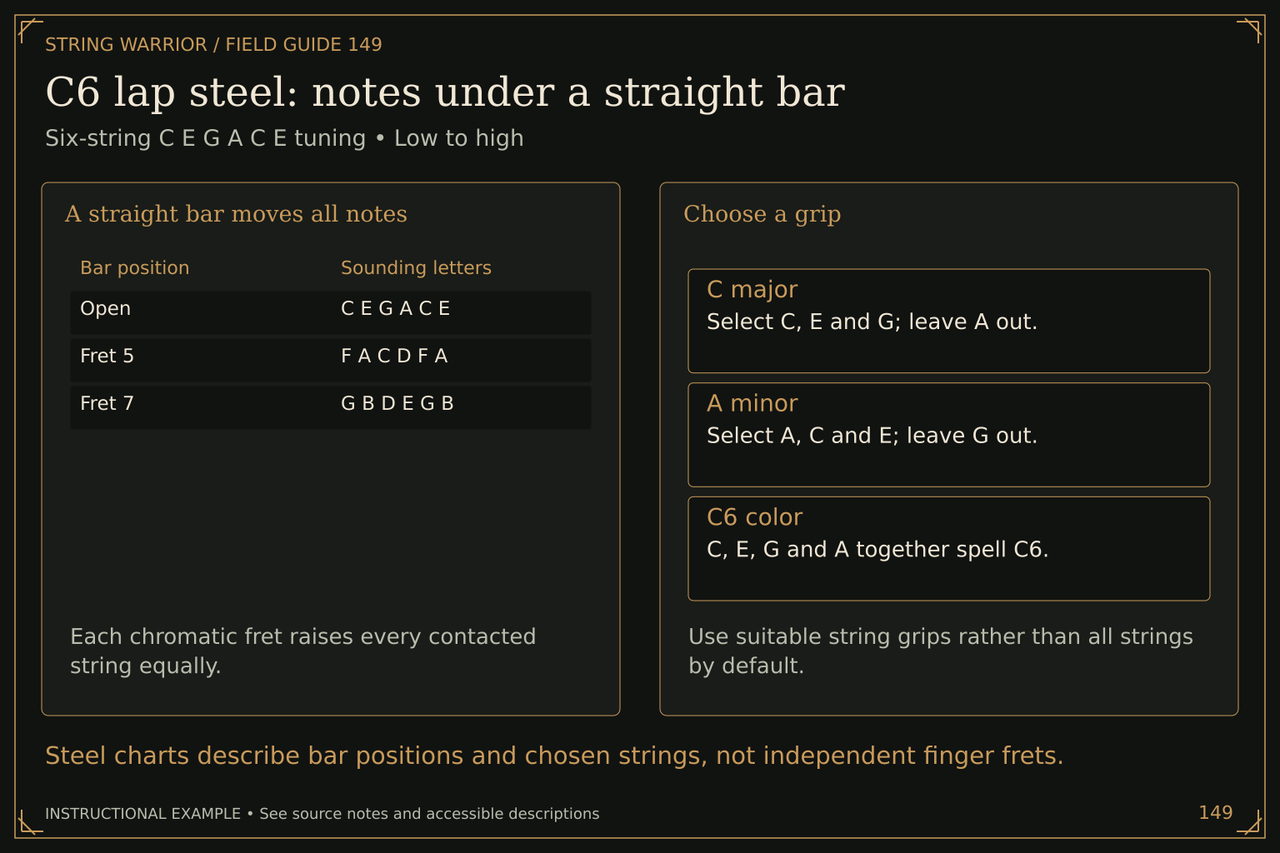
A straight bar moves all notes: Each chromatic fret raises every contacted string equally. Open | C E G A C E Fret 5 | F A C D F A Fret 7 | G B D E G B

Choose a grip: Use suitable string grips rather than all strings by default.

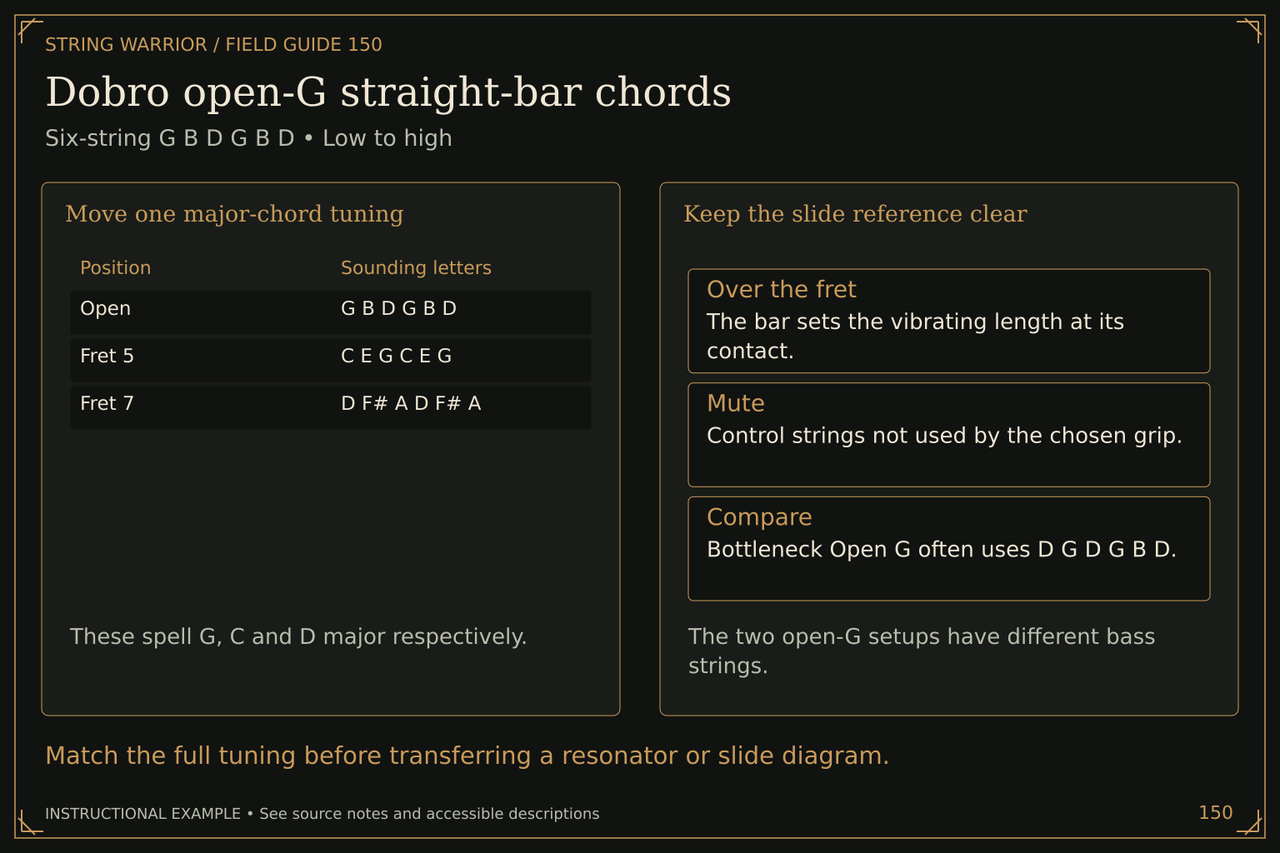
Dobro open-G straight-bar chords
Dobro open-G straight-bar chords. Six-string G B D G B D • Low to high. Match the full tuning before transferring a resonator or slide diagram.
Match the full tuning before transferring a resonator or slide diagram. Open the full Dobro open-G straight-bar chords illustration

Move one major-chord tuning: These spell G, C and D major respectively. Open | G B D G B D Fret 5 | C E G C E G Fret 7 | D F# A D F# A

Keep the slide reference clear: The two open-G setups have different bass strings.

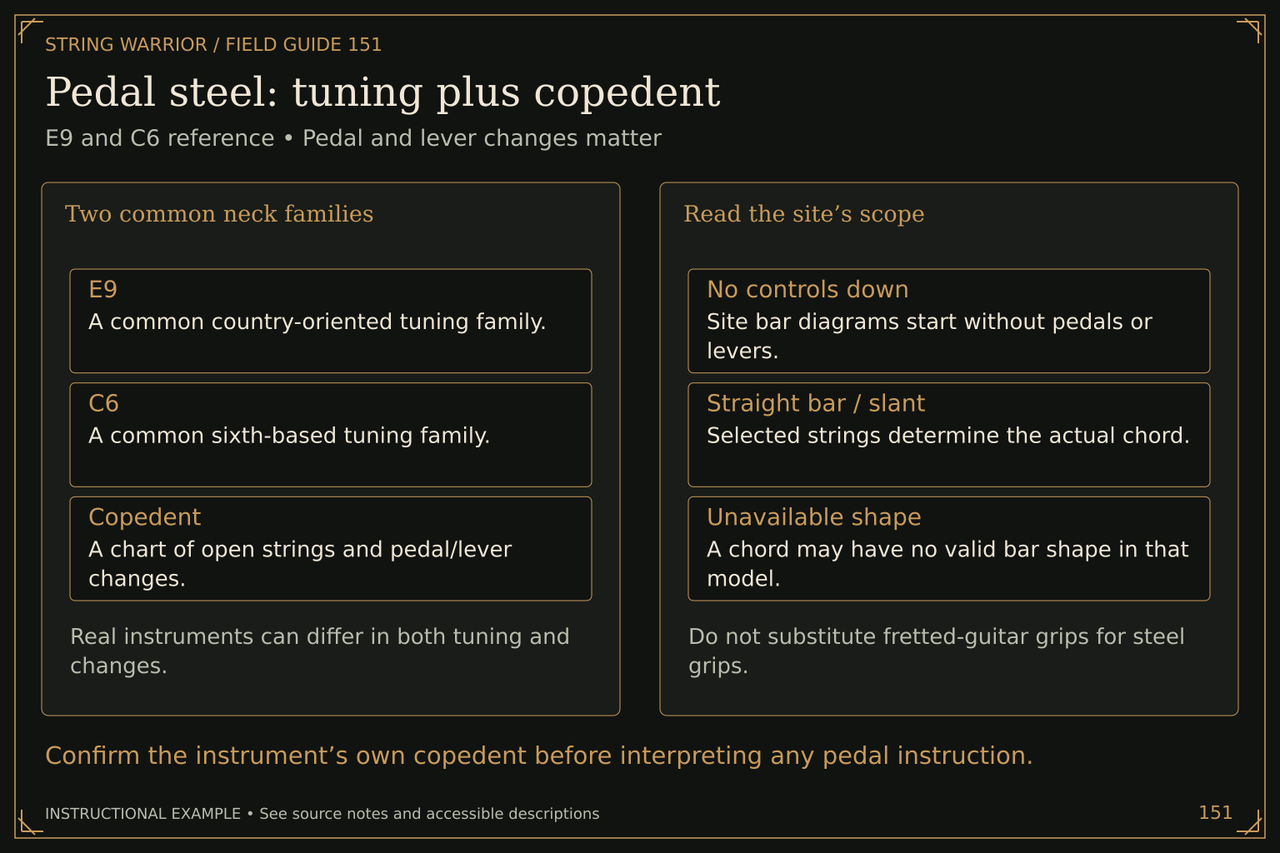
Pedal steel: tuning plus copedent
Pedal steel: tuning plus copedent. E9 and C6 reference • Pedal and lever changes matter. Confirm the instrument’s own copedent before interpreting any pedal instruction.
Confirm the instrument’s own copedent before interpreting any pedal instruction. Open the full Pedal steel: tuning plus copedent illustration

Two common neck families: Real instruments can differ in both tuning and changes.

Read the site’s scope: Do not substitute fretted-guitar grips for steel grips.

Slide pitch follows the contact point
Slide pitch follows the contact point. A schematic fret reference • Not a hand-position photograph. A fretting finger sits behind a fret; a slide or bar sets pitch at its own contact.
A fretting finger sits behind a fret; a slide or bar sets pitch at its own contact. Open the full Slide pitch follows the contact point illustration
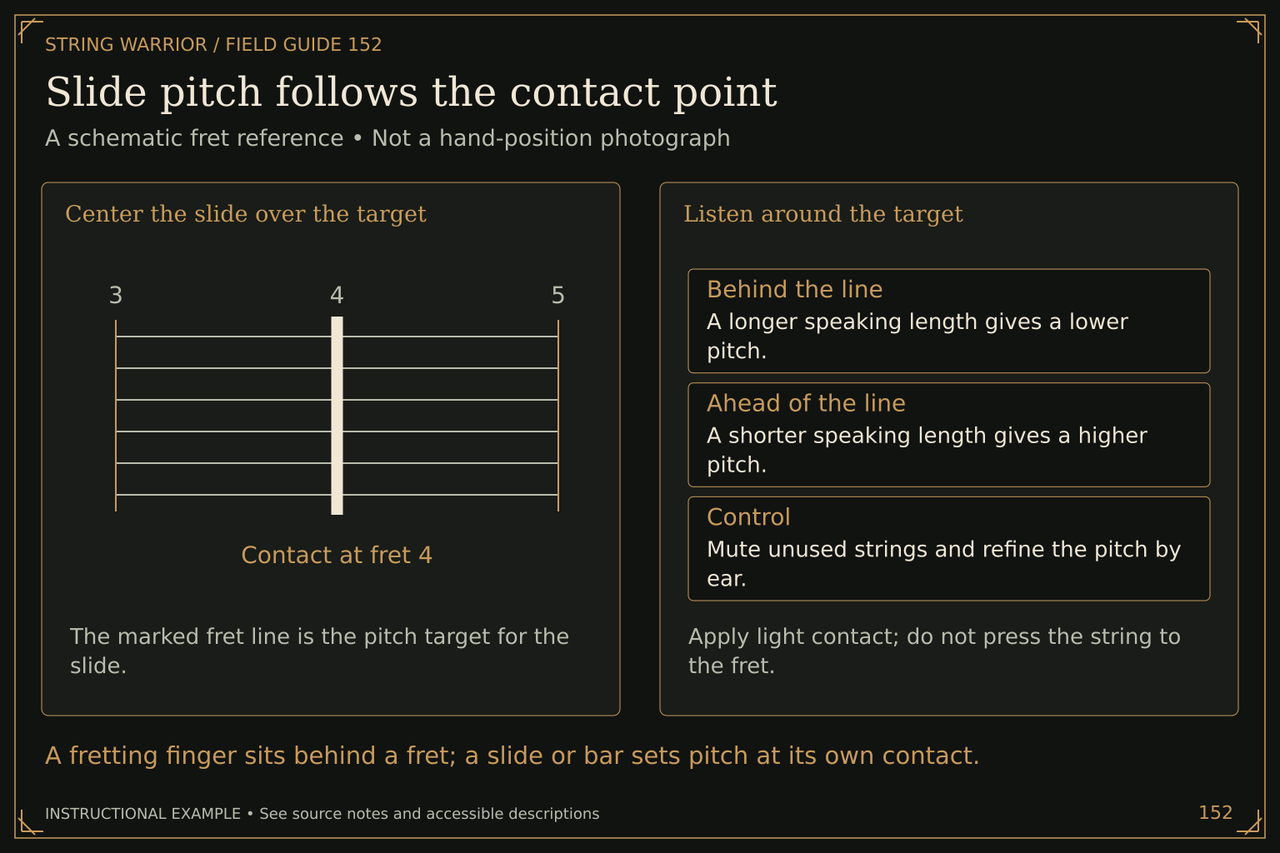
Center the slide over the target: The marked fret line is the pitch target for the slide.

Listen around the target: Apply light contact; do not press the string to the fret.

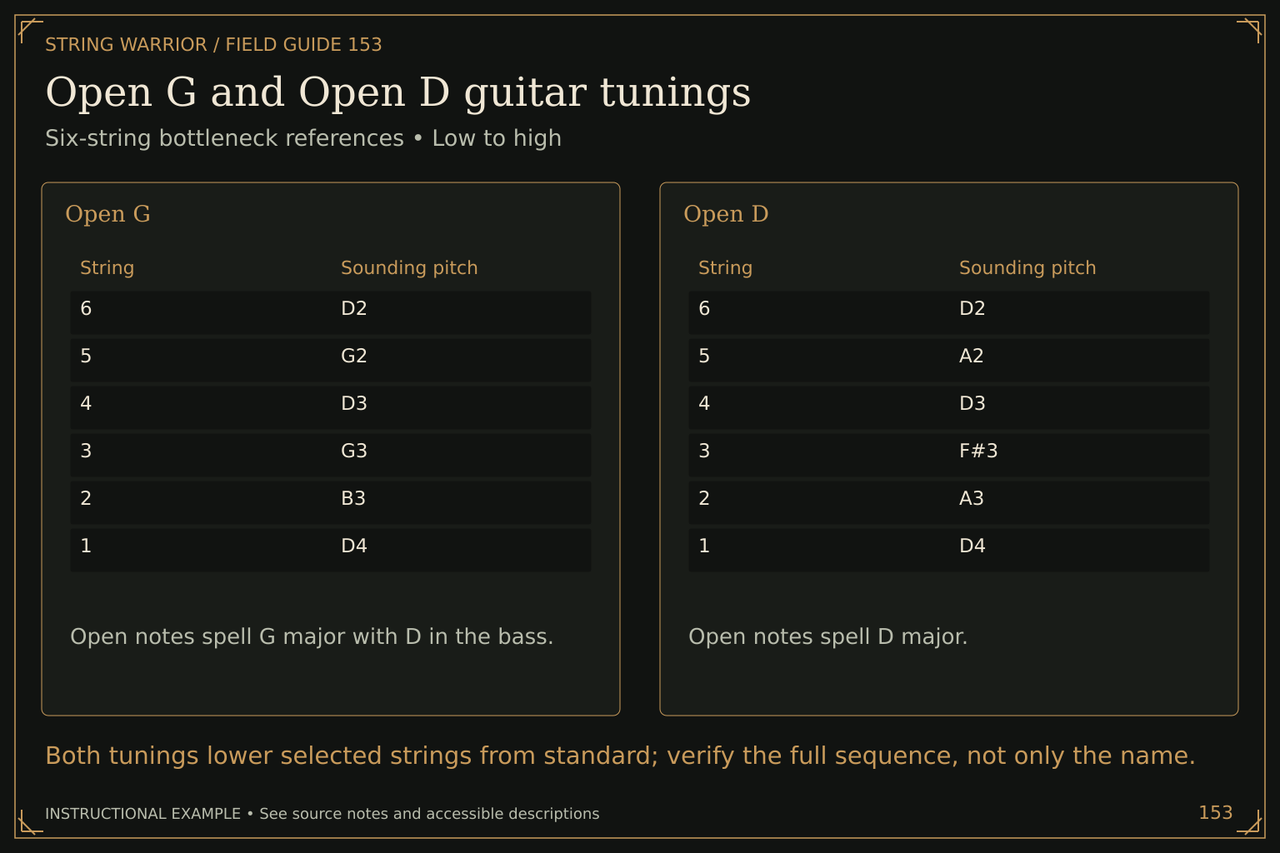
Open G and Open D guitar tunings
Open G and Open D guitar tunings. Six-string bottleneck references • Low to high. Both tunings lower selected strings from standard; verify the full sequence, not only the name.
Both tunings lower selected strings from standard; verify the full sequence, not only the name. Open the full Open G and Open D guitar tunings illustration

Open G: Open notes spell G major with D in the bass. 6 | D2 5 | G2 4 | D3 3 | G3 2 | B3 1 | D4

Open D: Open notes spell D major. 6 | D2 5 | A2 4 | D3 3 | F#3 2 | A3 1 | D4

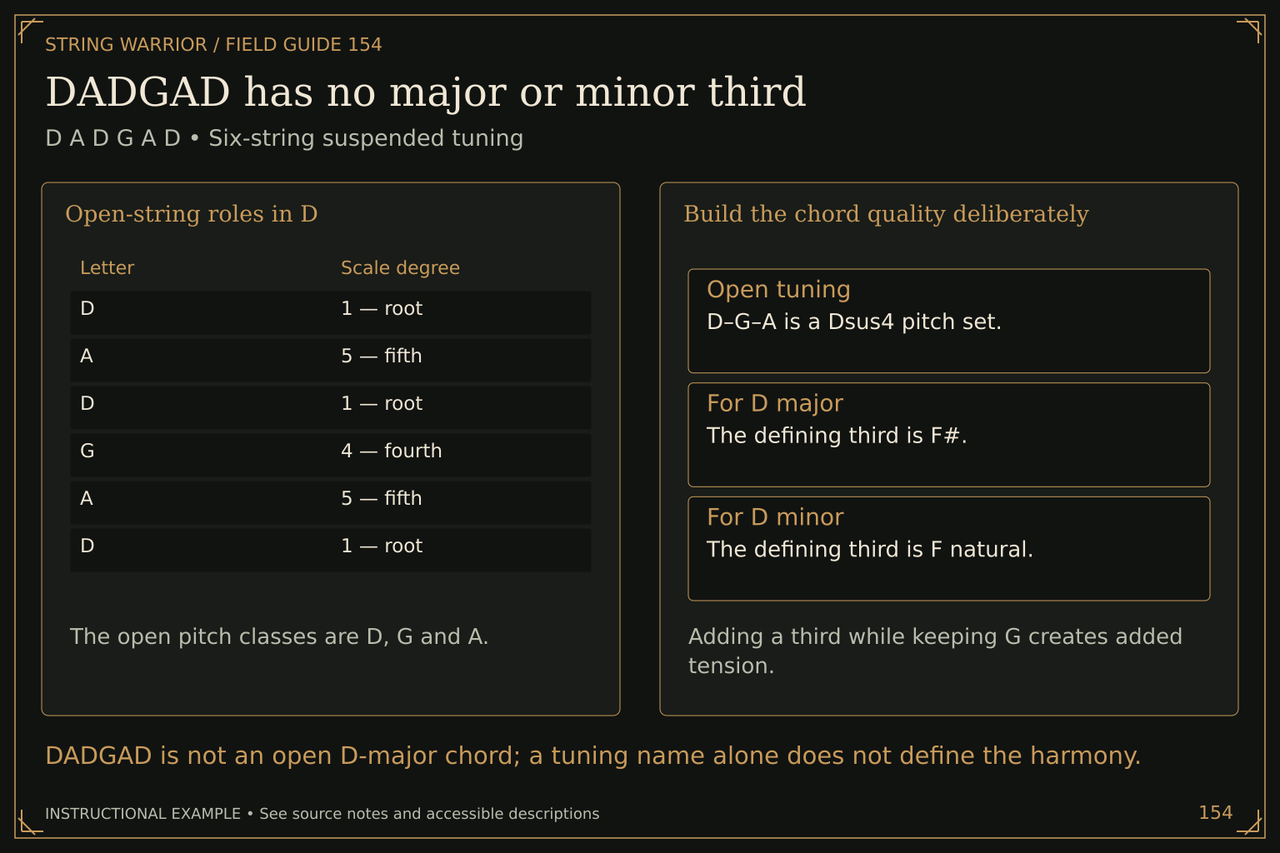
DADGAD has no major or minor third
DADGAD has no major or minor third. D A D G A D • Six-string suspended tuning. DADGAD is not an open D-major chord; a tuning name alone does not define the harmony.
DADGAD is not an open D-major chord; a tuning name alone does not define the harmony. Open the full DADGAD has no major or minor third illustration

Open-string roles in D: The open pitch classes are D, G and A. D | 1 — root A | 5 — fifth D | 1 — root G | 4 — fourth A | 5 — fifth D | 1 — root

Build the chord quality deliberately: Adding a third while keeping G creates added tension.

Music reading and harmony
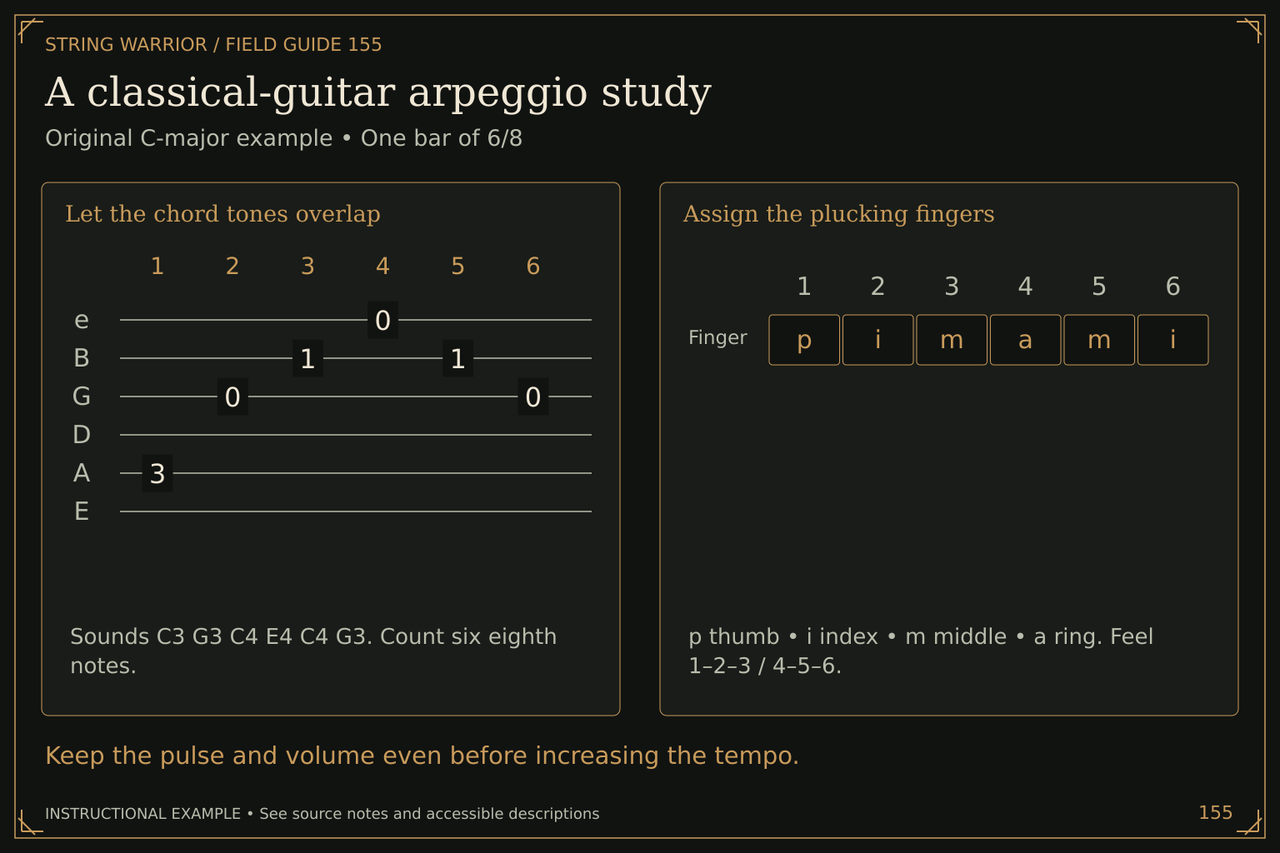
A classical-guitar arpeggio study
A classical-guitar arpeggio study. Original C-major example • One bar of 6/8. Keep the pulse and volume even before increasing the tempo.
Keep the pulse and volume even before increasing the tempo. Open the full A classical-guitar arpeggio study illustration

Let the chord tones overlap: Sounds C3 G3 C4 E4 C4 G3. Count six eighth notes.

Assign the plucking fingers: p thumb • i index • m middle • a ring. Feel 1–2–3 / 4–5–6. Finger | p, i, m, a, m, i

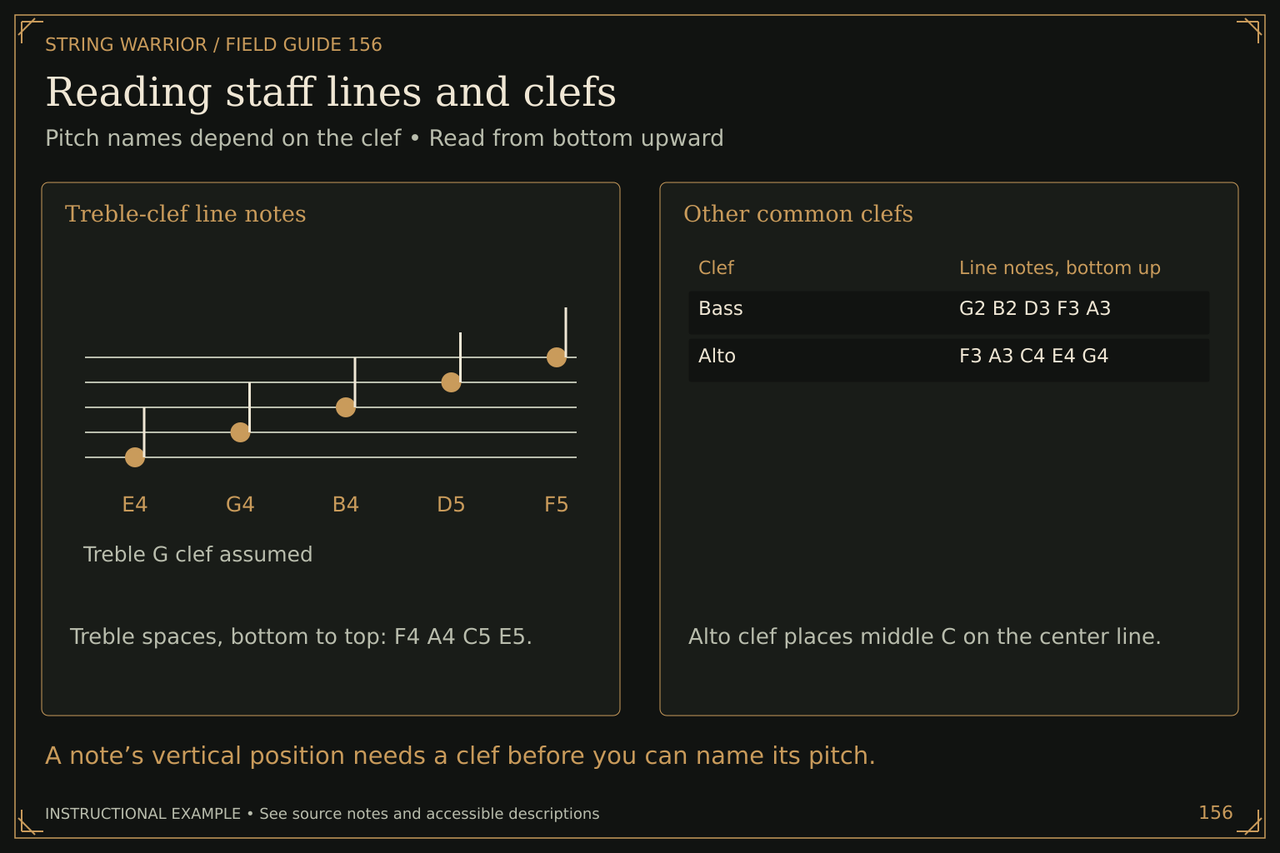
Reading staff lines and clefs
Reading staff lines and clefs. Pitch names depend on the clef • Read from bottom upward. A note’s vertical position needs a clef before you can name its pitch.
A note’s vertical position needs a clef before you can name its pitch. Open the full Reading staff lines and clefs illustration

Treble-clef line notes: Treble spaces, bottom to top: F4 A4 C5 E5.

Other common clefs: Alto clef places middle C on the center line. Bass | G2 B2 D3 F3 A3 Alto | F3 A3 C4 E4 G4

Note lengths dots and ties
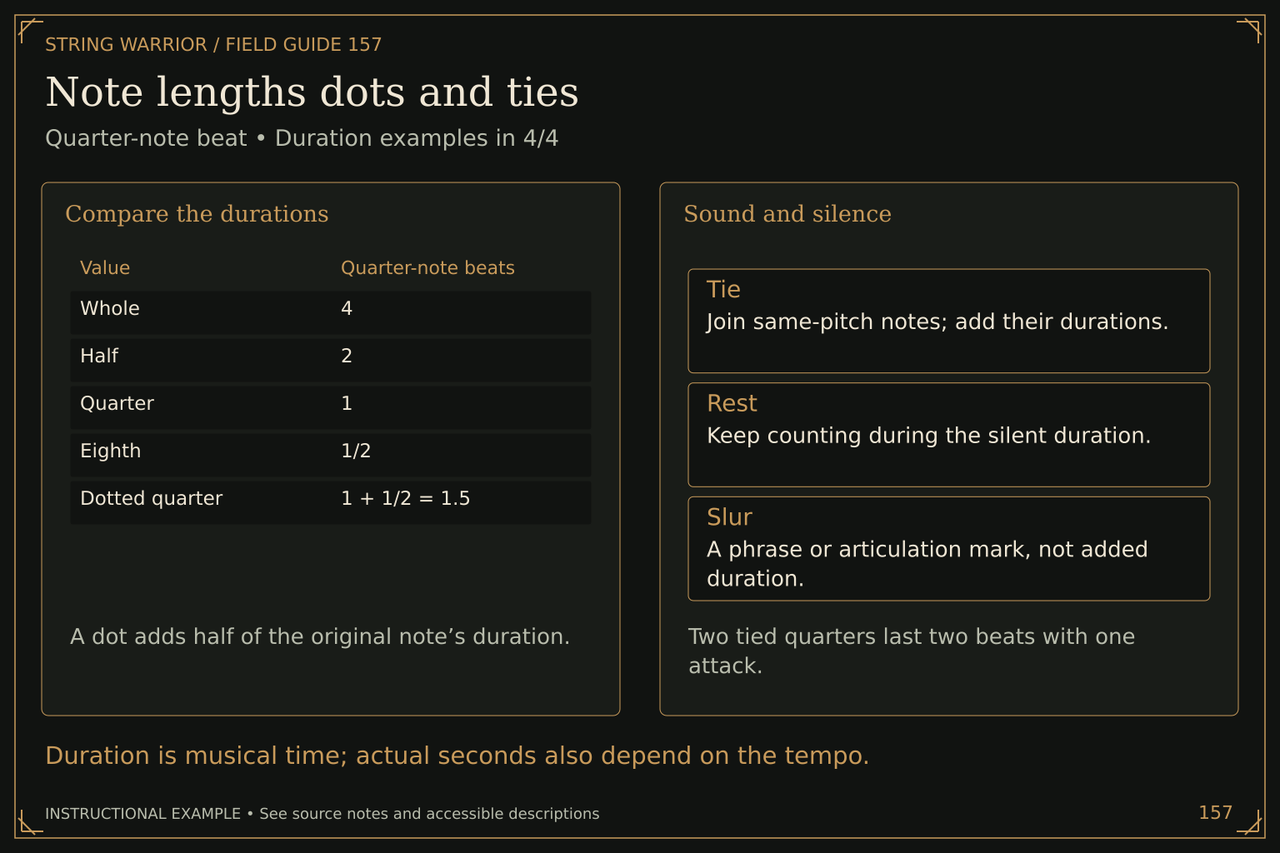
Note lengths dots and ties. Quarter-note beat • Duration examples in 4/4. Duration is musical time; actual seconds also depend on the tempo.
Duration is musical time; actual seconds also depend on the tempo. Open the full Note lengths dots and ties illustration

Compare the durations: A dot adds half of the original note’s duration. Whole | 4 Half | 2 Quarter | 1 Eighth | 1/2 Dotted quarter | 1 + 1/2 = 1.5

Sound and silence: Two tied quarters last two beats with one attack.

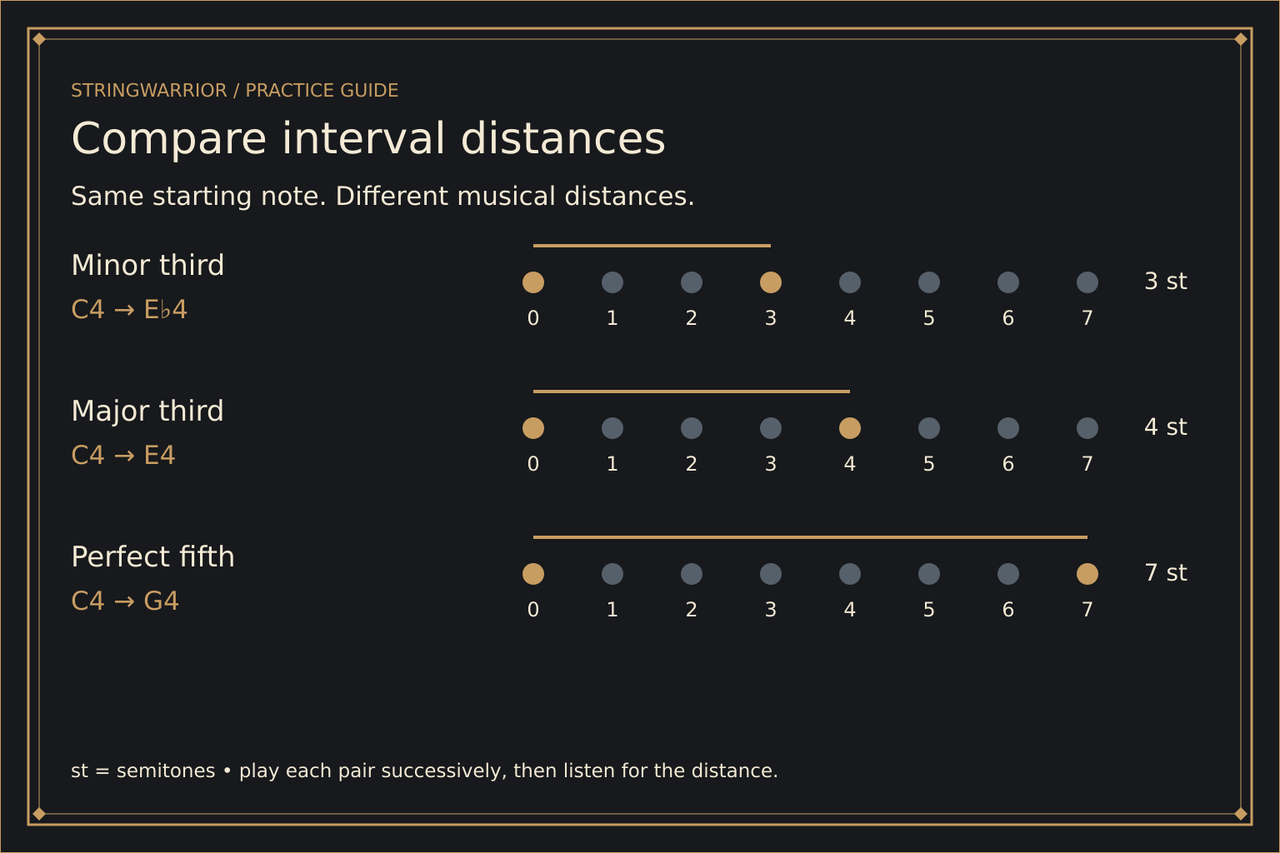
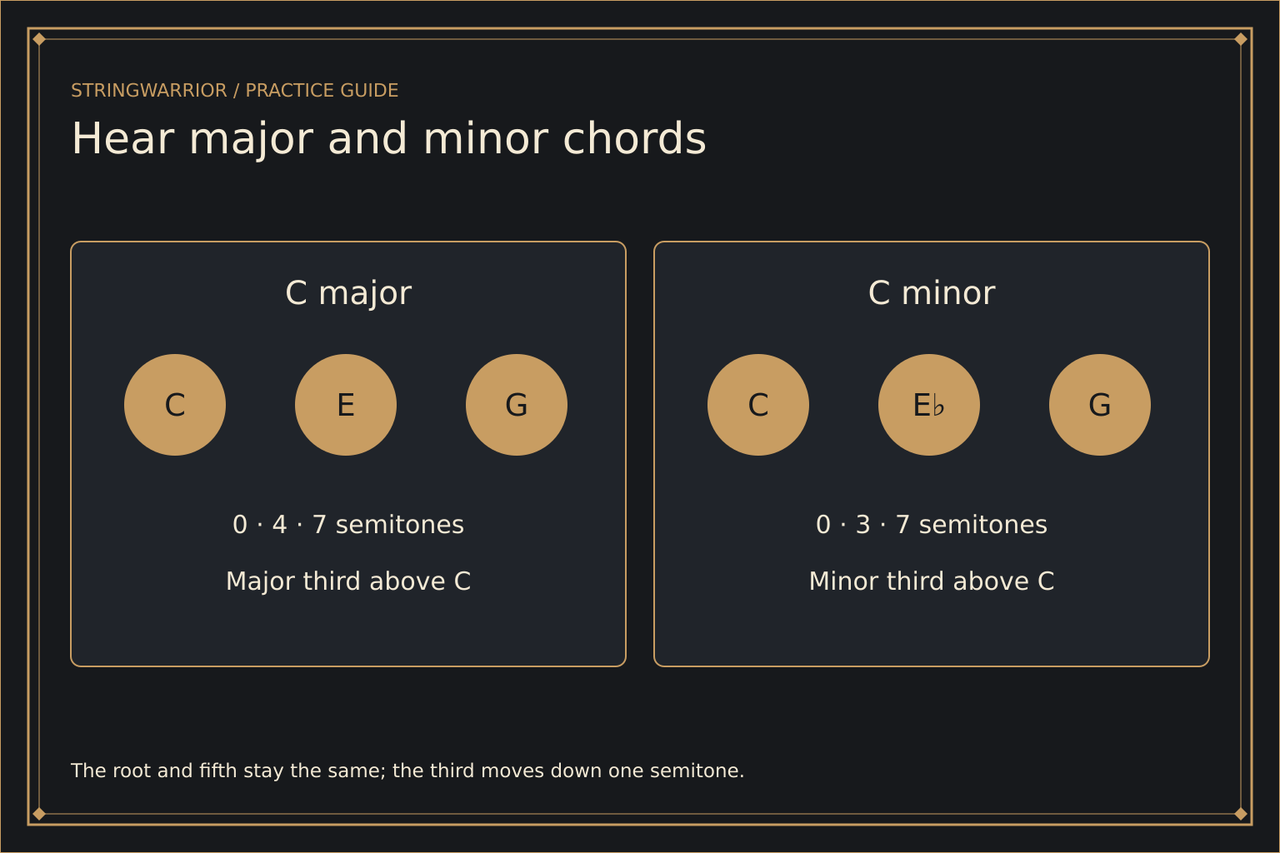
Hear major and minor triads
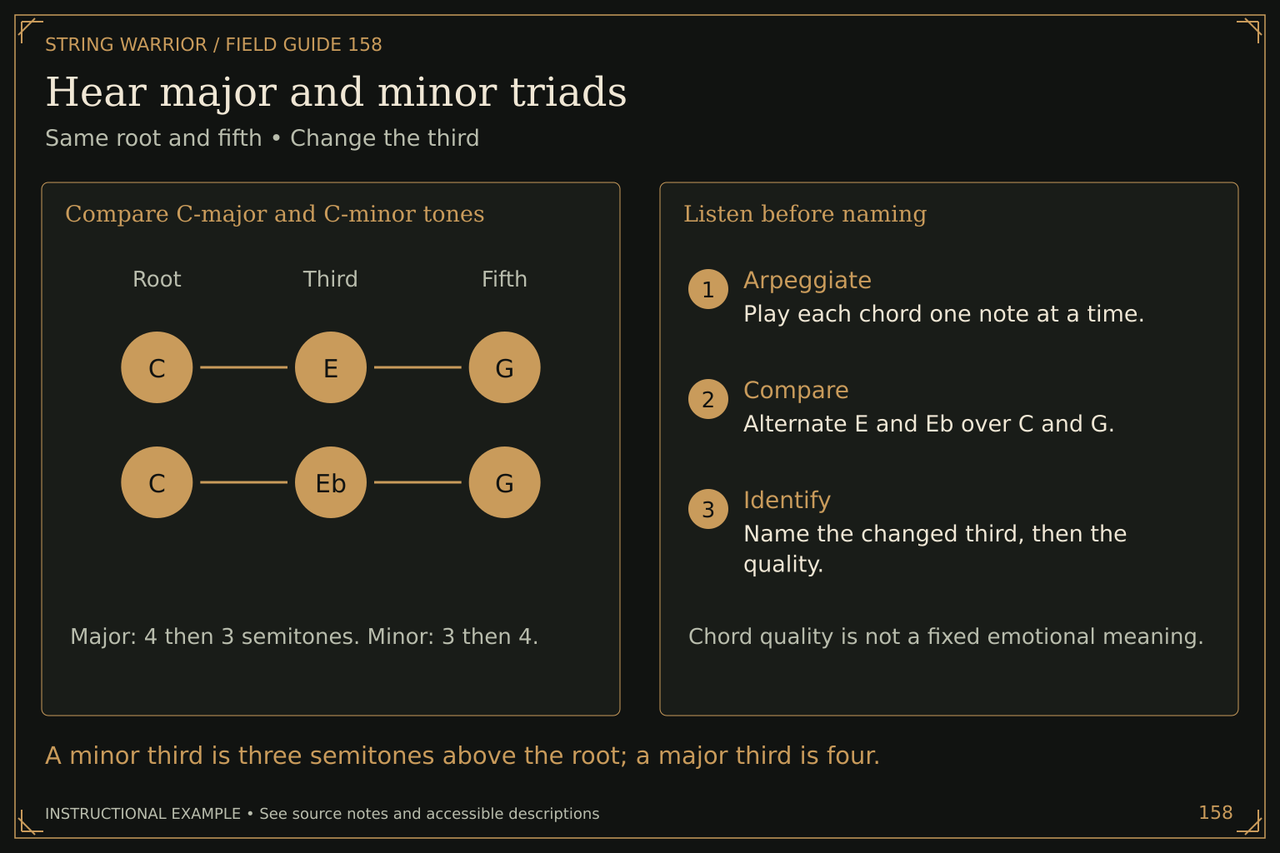
Hear major and minor triads. Same root and fifth • Change the third. A minor third is three semitones above the root; a major third is four.
A minor third is three semitones above the root; a major third is four. Open the full Hear major and minor triads illustration

Compare C-major and C-minor tones: Major: 4 then 3 semitones. Minor: 3 then 4.

Listen before naming: Chord quality is not a fixed emotional meaning. Arpeggiate: Play each chord one note at a time. Compare: Alternate E and Eb over C and G. Identify: Name the changed third, then the quality.

Transpose a chord progression
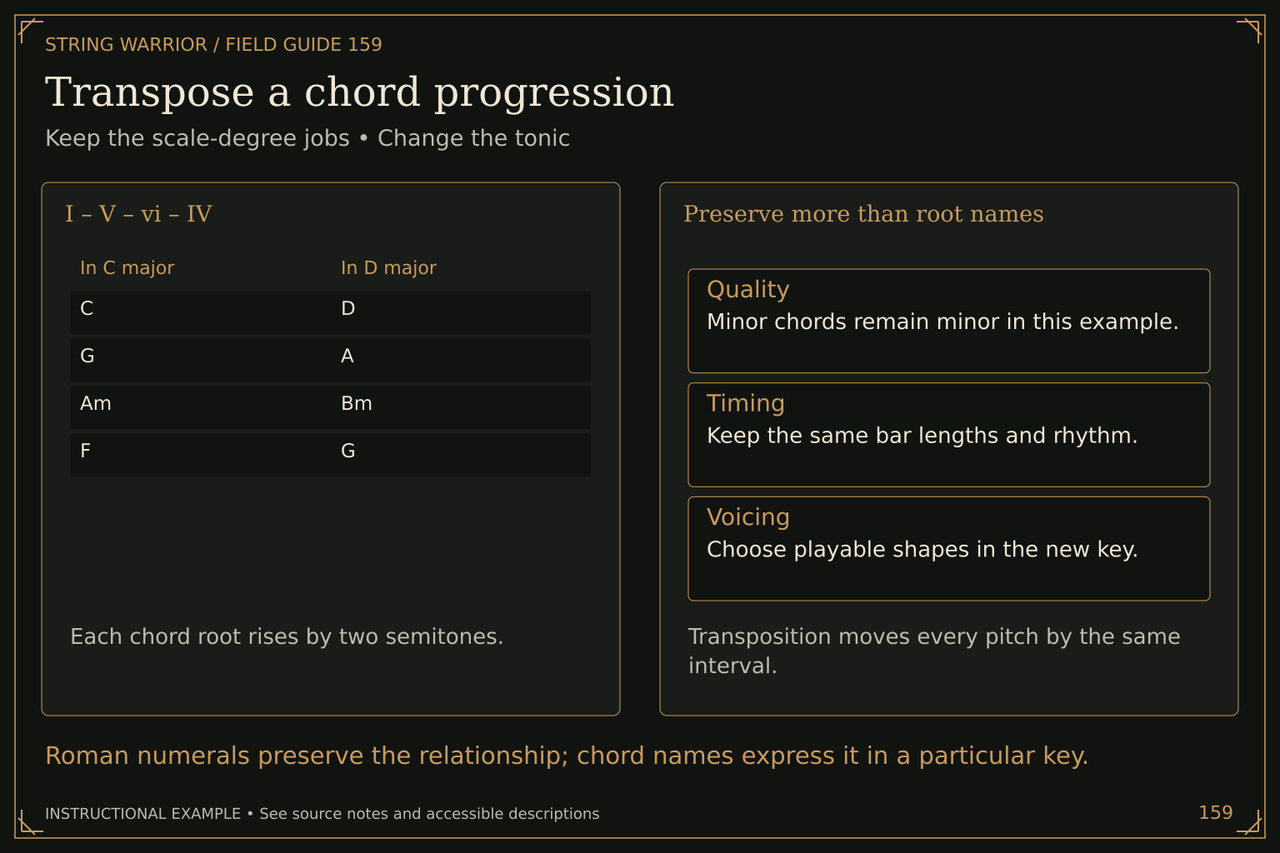
Transpose a chord progression. Keep the scale-degree jobs • Change the tonic. Roman numerals preserve the relationship; chord names express it in a particular key.
Roman numerals preserve the relationship; chord names express it in a particular key. Open the full Transpose a chord progression illustration

I – V – vi – IV: Each chord root rises by two semitones. C | D G | A Am | Bm F | G

Preserve more than root names: Transposition moves every pitch by the same interval.

Guide tones connect jazz chords
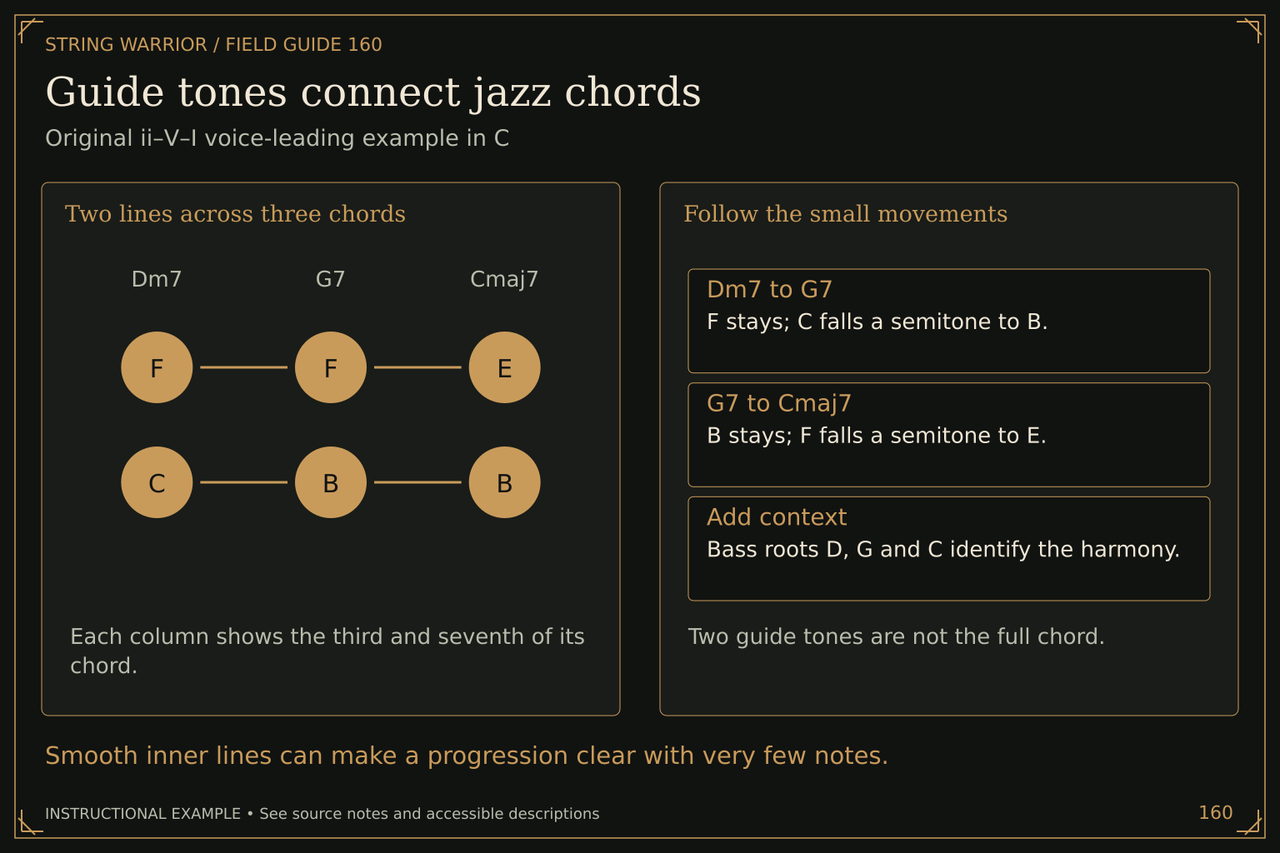
Guide tones connect jazz chords. Original ii–V–I voice-leading example in C. Smooth inner lines can make a progression clear with very few notes.
Smooth inner lines can make a progression clear with very few notes. Open the full Guide tones connect jazz chords illustration

Two lines across three chords: Each column shows the third and seventh of its chord.

Follow the small movements: Two guide tones are not the full chord.

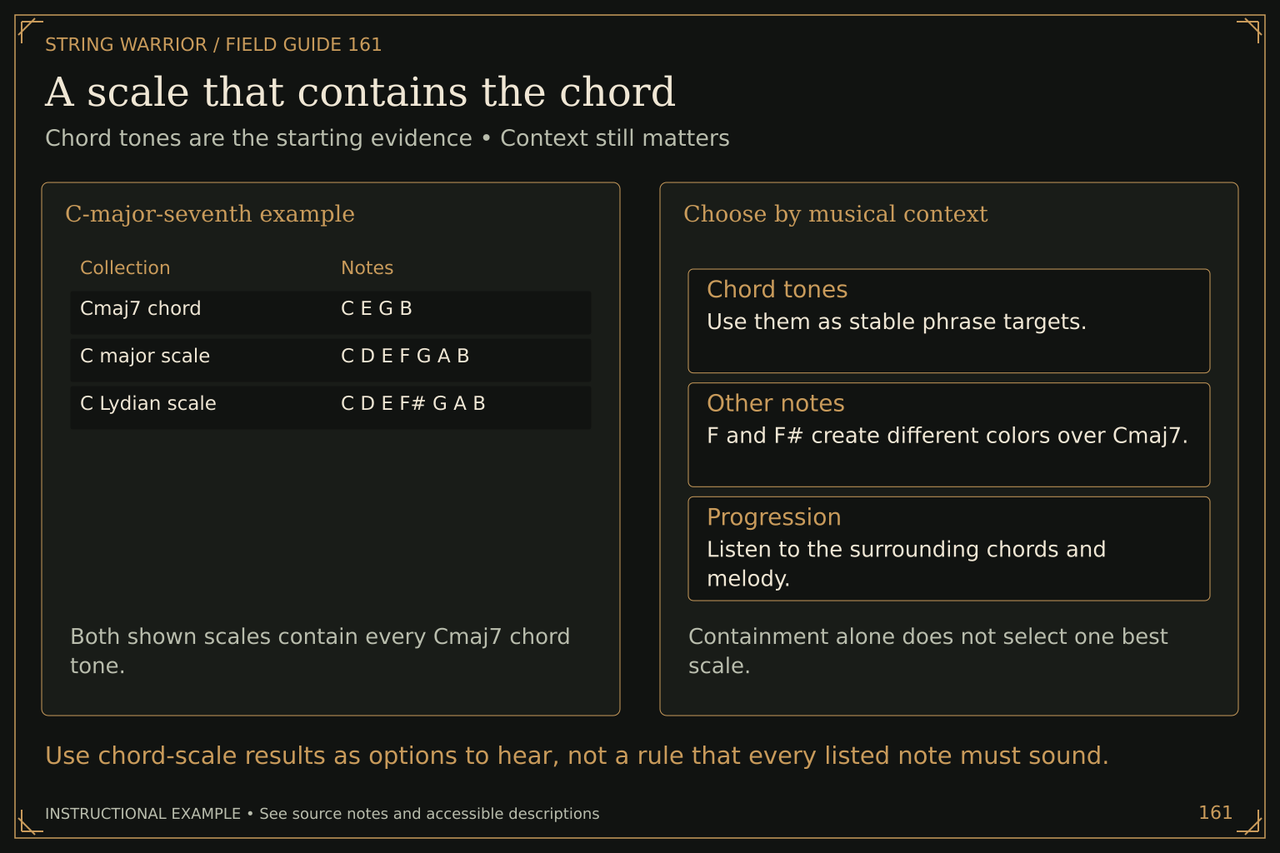
A scale that contains the chord
A scale that contains the chord. Chord tones are the starting evidence • Context still matters. Use chord-scale results as options to hear, not a rule that every listed note must sound.
Use chord-scale results as options to hear, not a rule that every listed note must sound. Open the full A scale that contains the chord illustration

C-major-seventh example: Both shown scales contain every Cmaj7 chord tone. Cmaj7 chord | C E G B C major scale | C D E F G A B C Lydian scale | C D E F# G A B

Choose by musical context: Containment alone does not select one best scale.

Tools and practice
A pitch reference and a time reference
A pitch reference and a time reference. Two tools, two separate jobs. Set pitch first, then practice consistent timing.
Set pitch first, then practice consistent timing. Open the full A pitch reference and a time reference illustration
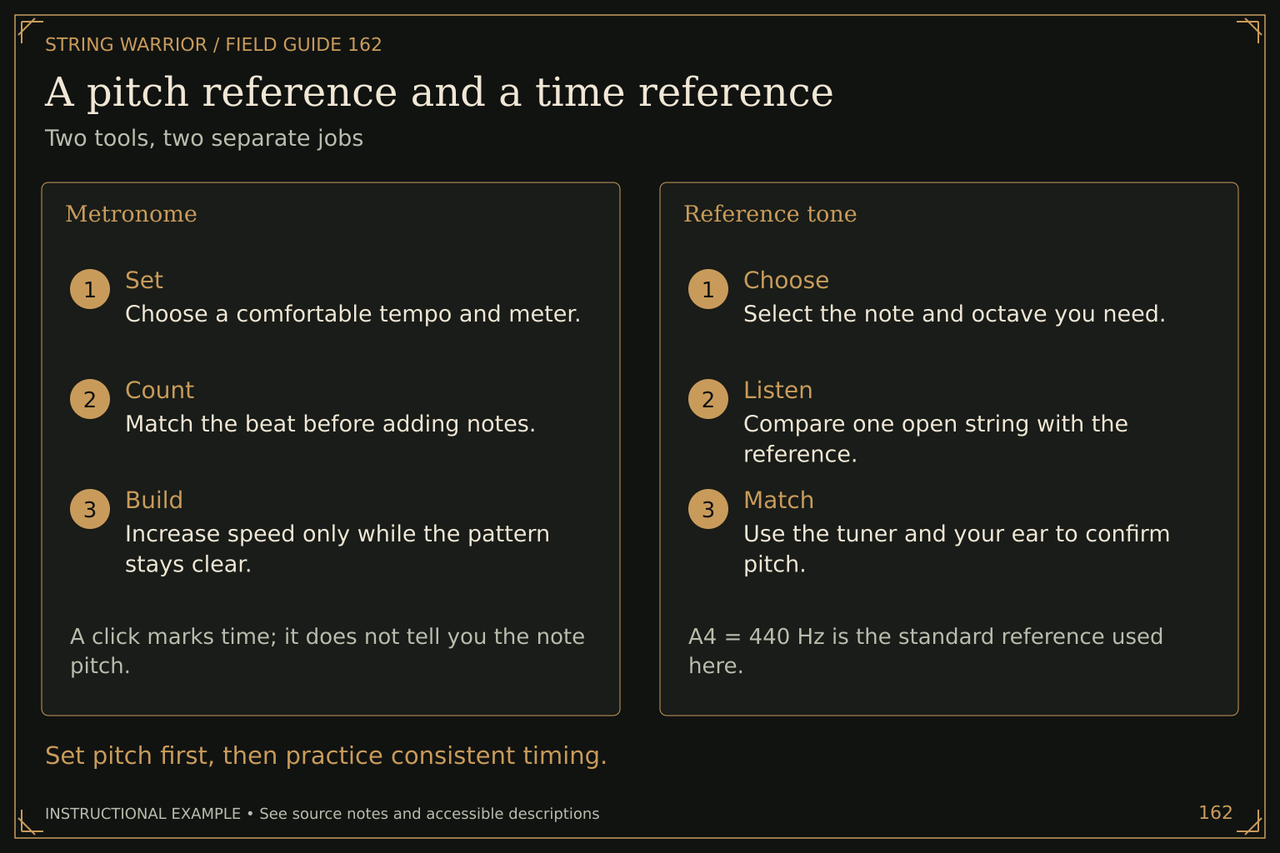
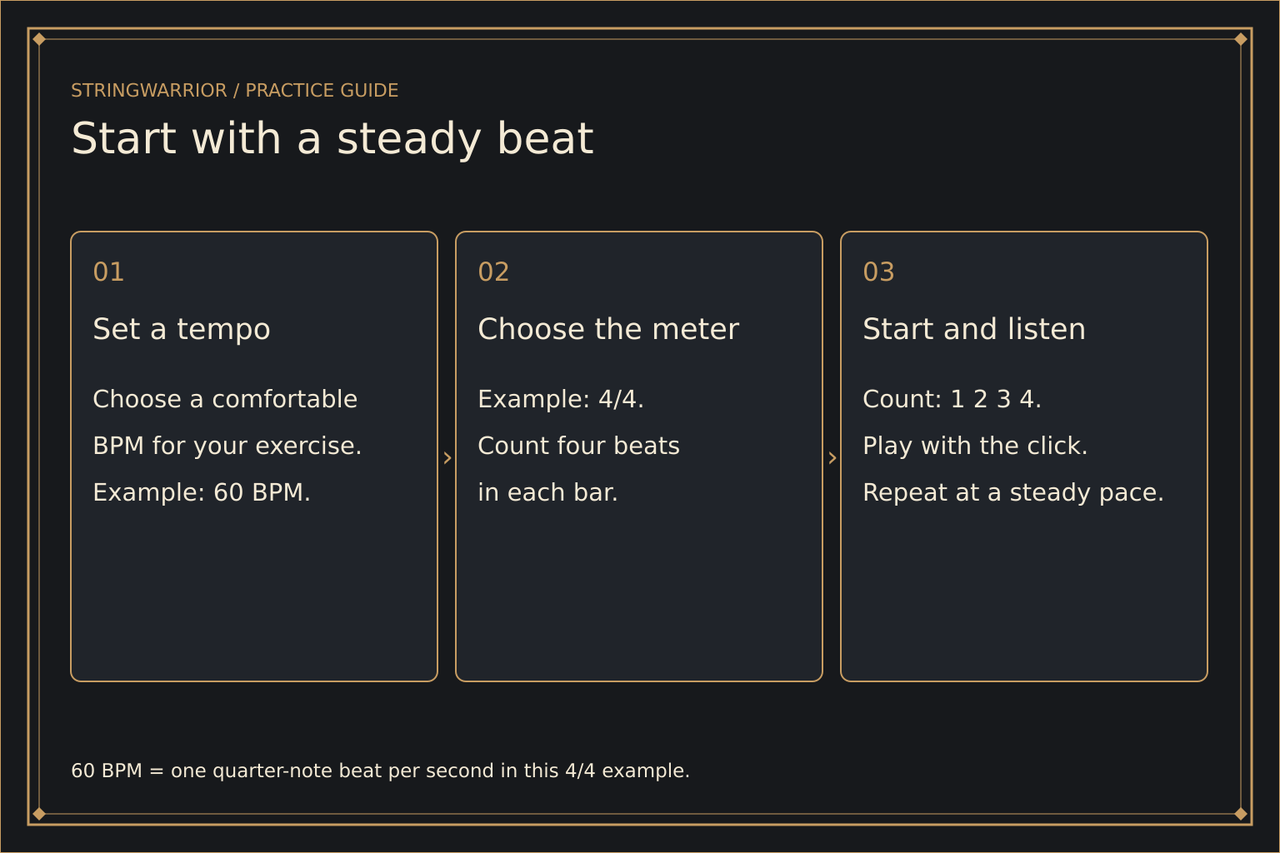
Metronome: A click marks time; it does not tell you the note pitch. Set: Choose a comfortable tempo and meter. Count: Match the beat before adding notes. Build: Increase speed only while the pattern stays clear.

Reference tone: A4 = 440 Hz is the standard reference used here. Choose: Select the note and octave you need. Listen: Compare one open string with the reference. Match: Use the tuner and your ear to confirm pitch.

From interval ears to progression ears
From interval ears to progression ears. Two listening tasks that build on one another. Quality describes a chord; function describes its job in the current key.
Quality describes a chord; function describes its job in the current key. Open the full From interval ears to progression ears illustration
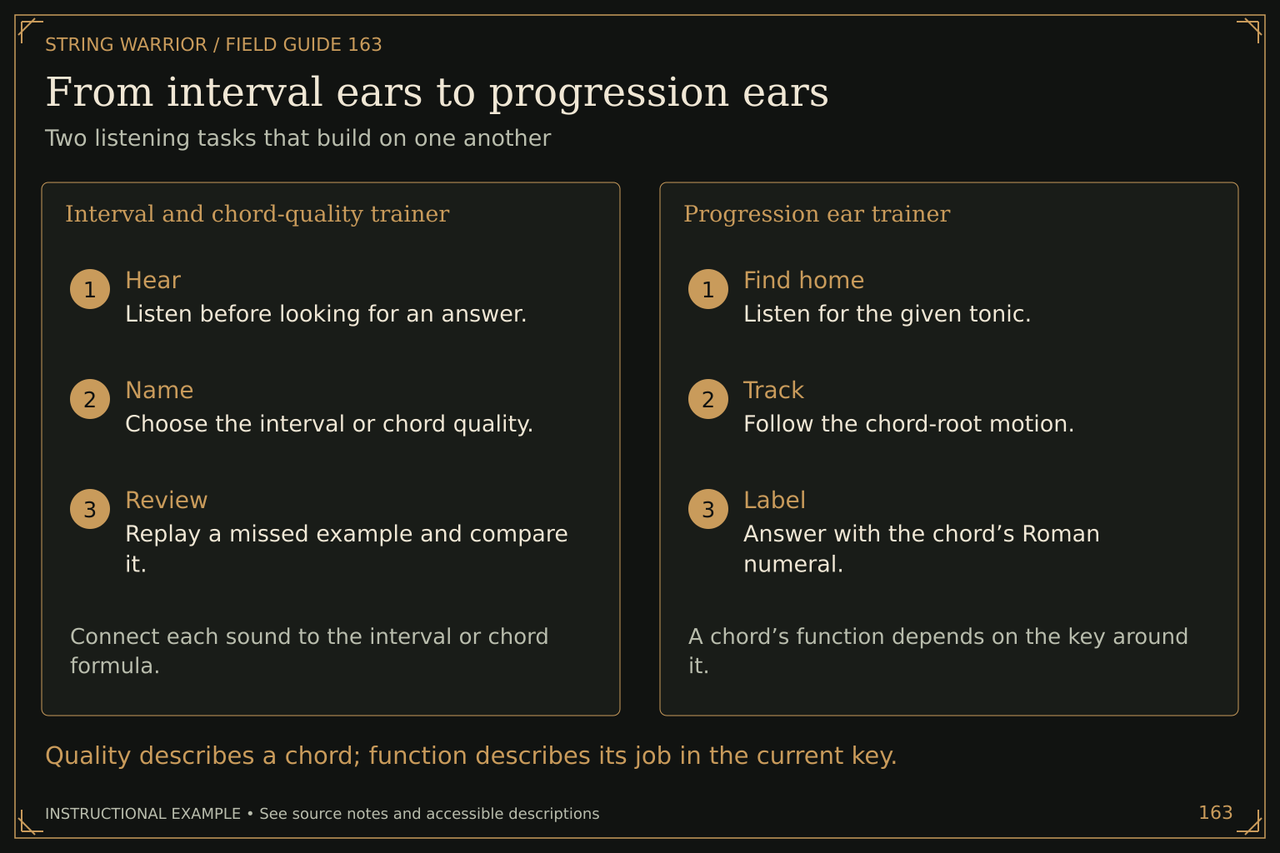
Interval and chord-quality trainer: Connect each sound to the interval or chord formula. Hear: Listen before looking for an answer. Name: Choose the interval or chord quality. Review: Replay a missed example and compare it.

Progression ear trainer: A chord’s function depends on the key around it. Find home: Listen for the given tonic. Track: Follow the chord-root motion. Label: Answer with the chord’s Roman numeral.

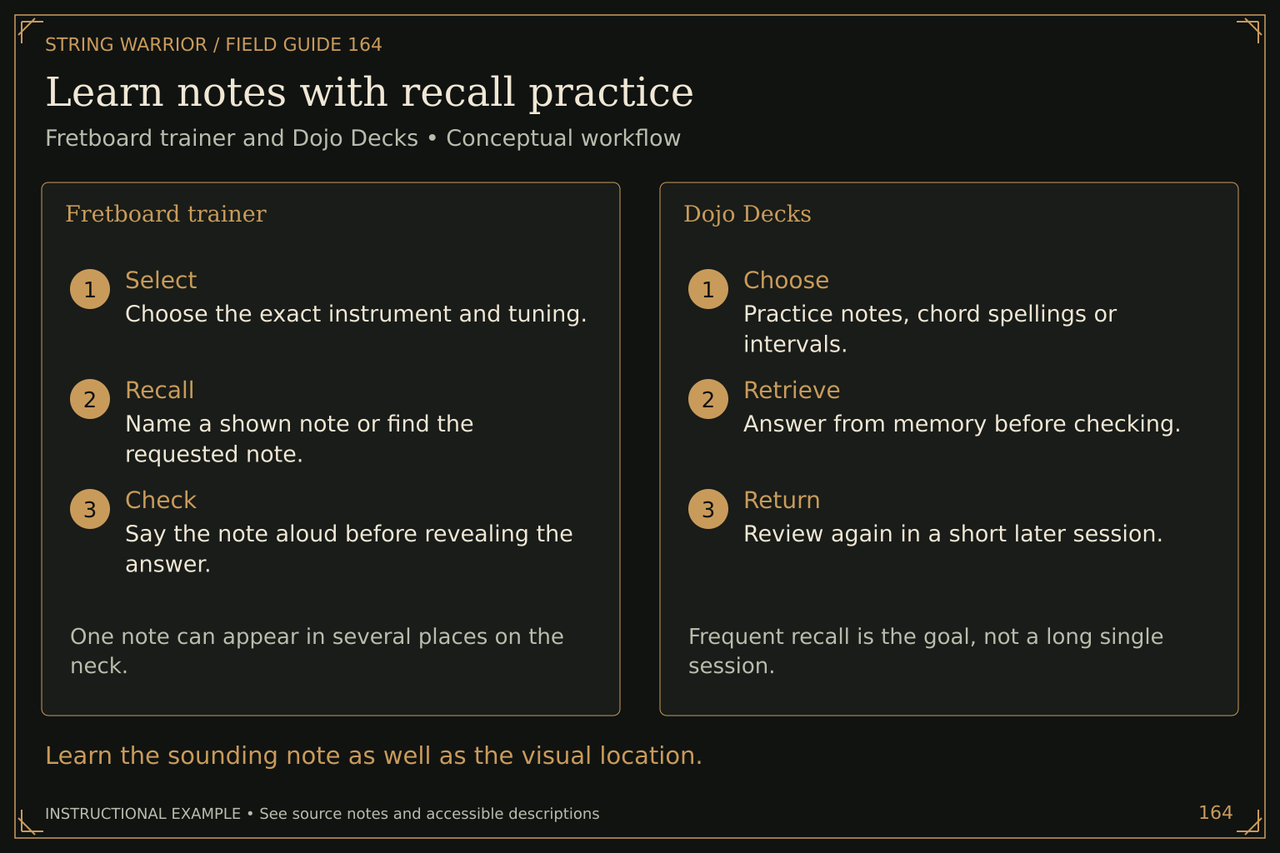
Learn notes with recall practice
Learn notes with recall practice. Fretboard trainer and Dojo Decks • Conceptual workflow. Learn the sounding note as well as the visual location.
Learn the sounding note as well as the visual location. Open the full Learn notes with recall practice illustration

Fretboard trainer: One note can appear in several places on the neck. Select: Choose the exact instrument and tuning. Recall: Name a shown note or find the requested note. Check: Say the note aloud before revealing the answer.

Dojo Decks: Frequent recall is the goal, not a long single session. Choose: Practice notes, chord spellings or intervals. Retrieve: Answer from memory before checking. Return: Review again in a short later session.

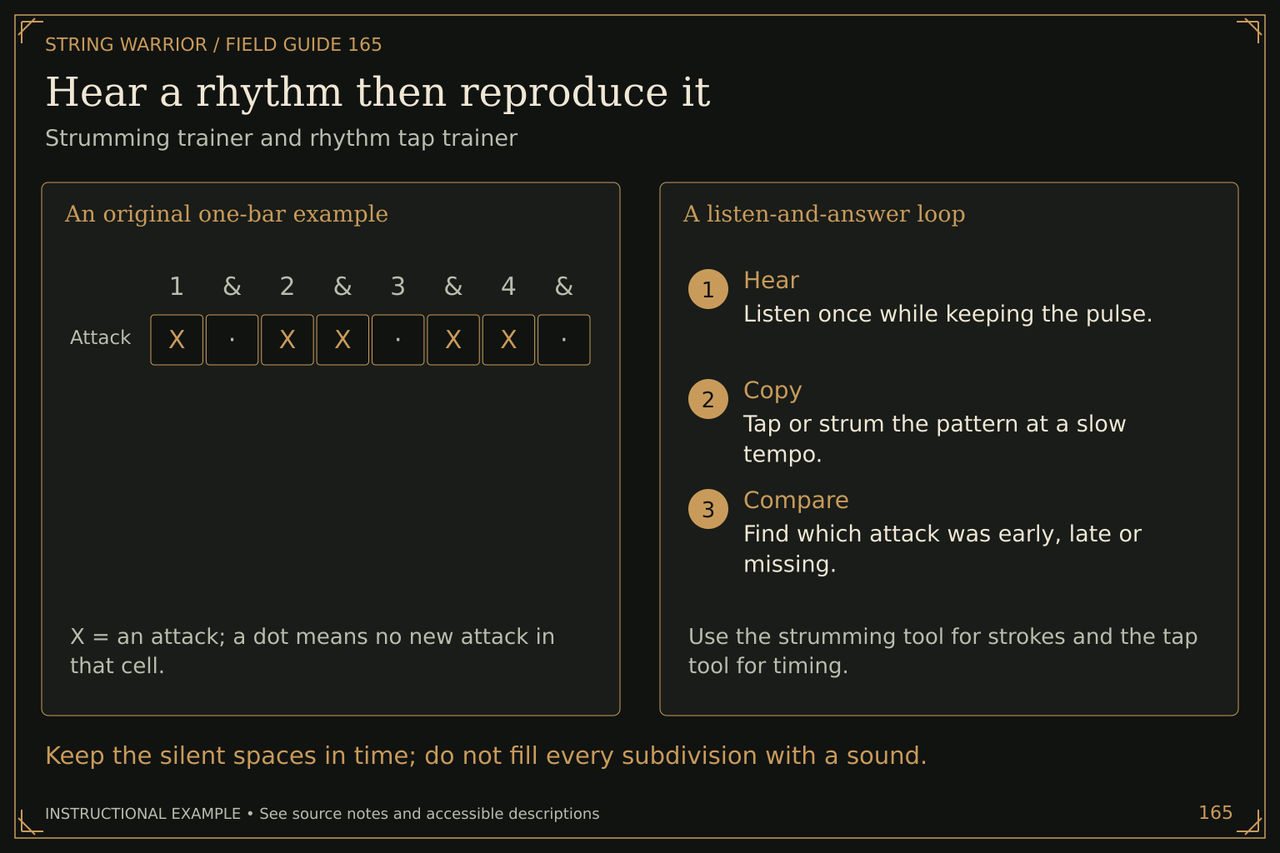
Hear a rhythm then reproduce it
Hear a rhythm then reproduce it. Strumming trainer and rhythm tap trainer. Keep the silent spaces in time; do not fill every subdivision with a sound.
Keep the silent spaces in time; do not fill every subdivision with a sound. Open the full Hear a rhythm then reproduce it illustration

An original one-bar example: X = an attack; a dot means no new attack in that cell. Attack | X, , X, X, , X, X,

A listen-and-answer loop: Use the strumming tool for strokes and the tap tool for timing. Hear: Listen once while keeping the pulse. Copy: Tap or strum the pattern at a slow tempo. Compare: Find which attack was early, late or missing.

Build a progression and check its key
Build a progression and check its key. Progression builder and key-from-chords workflow. Chord-root matching suggests keys; musical context establishes the tonic.
Chord-root matching suggests keys; musical context establishes the tonic. Open the full Build a progression and check its key illustration
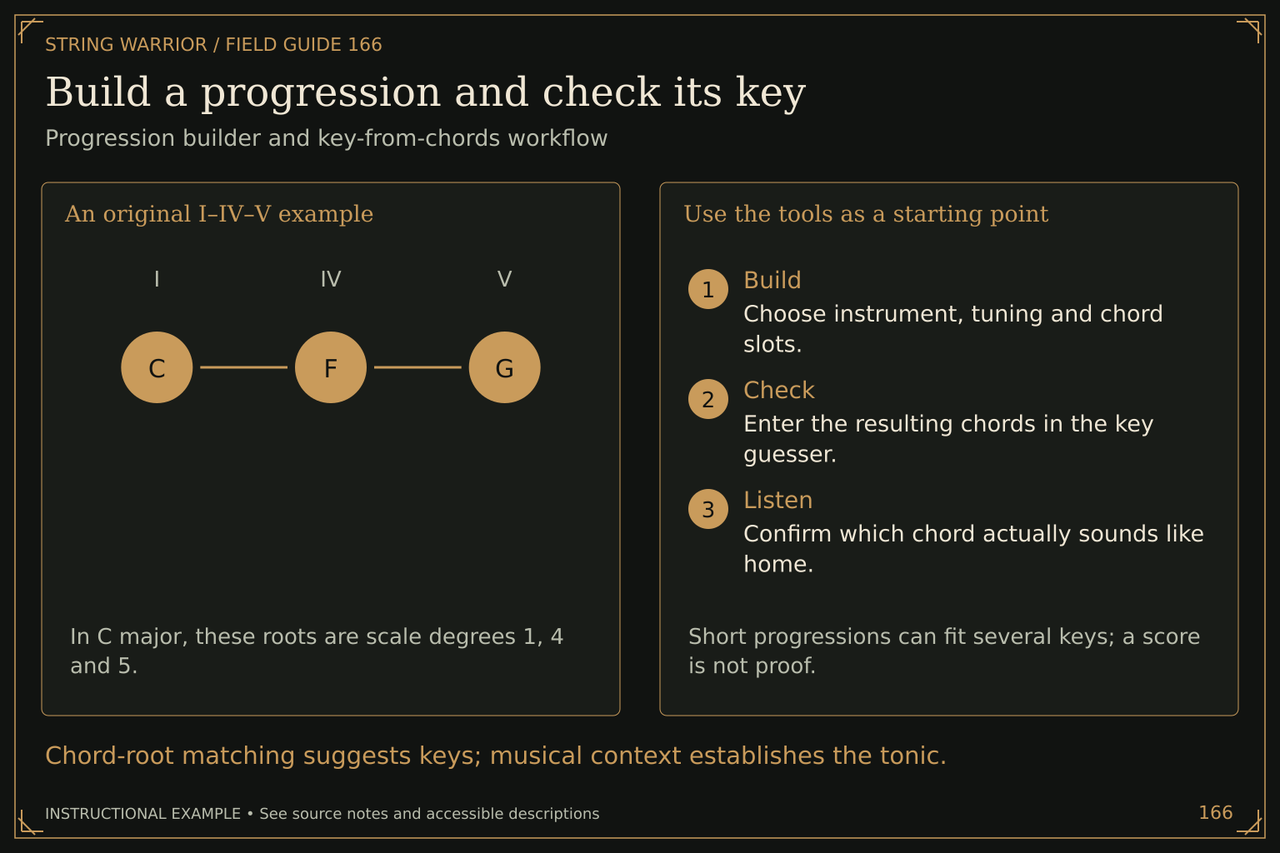
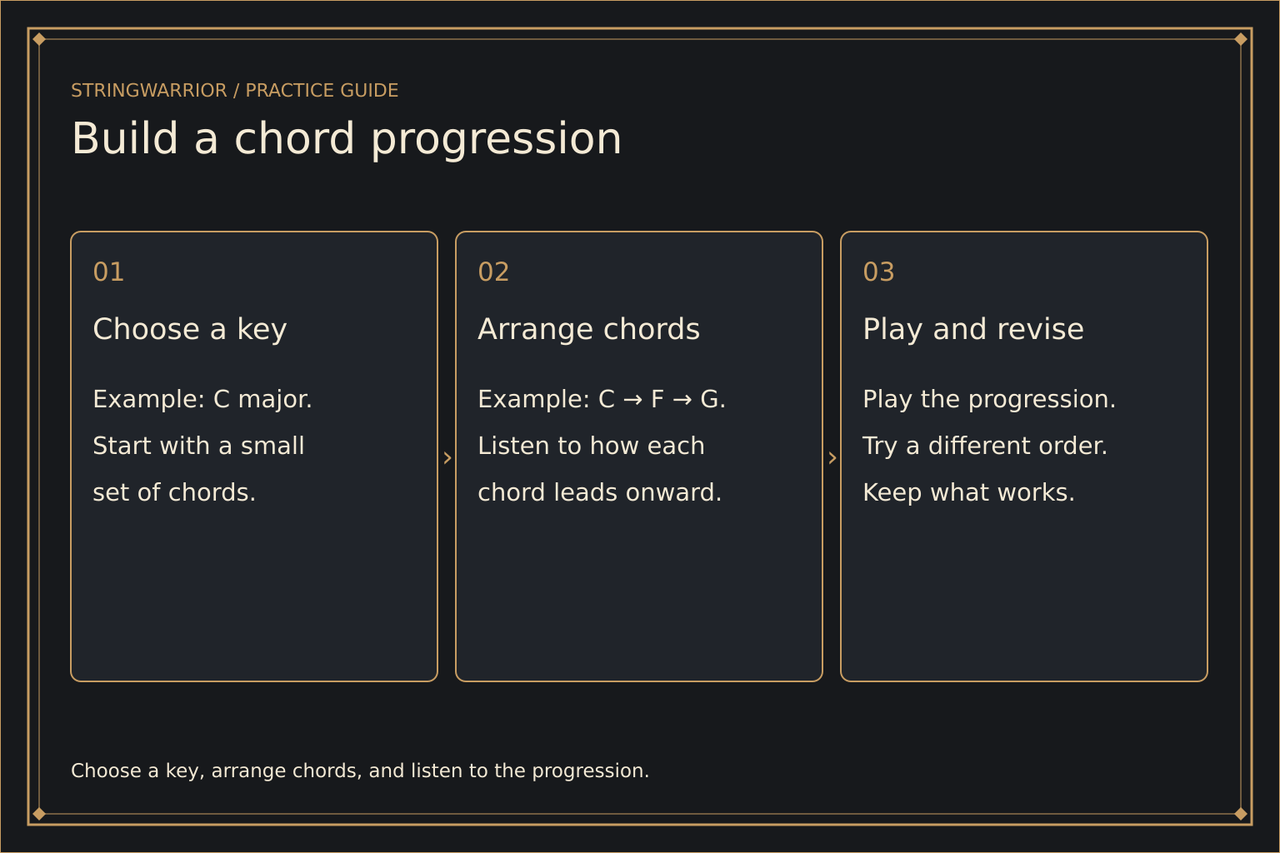
An original I–IV–V example: In C major, these roots are scale degrees 1, 4 and 5.

Use the tools as a starting point: Short progressions can fit several keys; a score is not proof. Build: Choose instrument, tuning and chord slots. Check: Enter the resulting chords in the key guesser. Listen: Confirm which chord actually sounds like home.

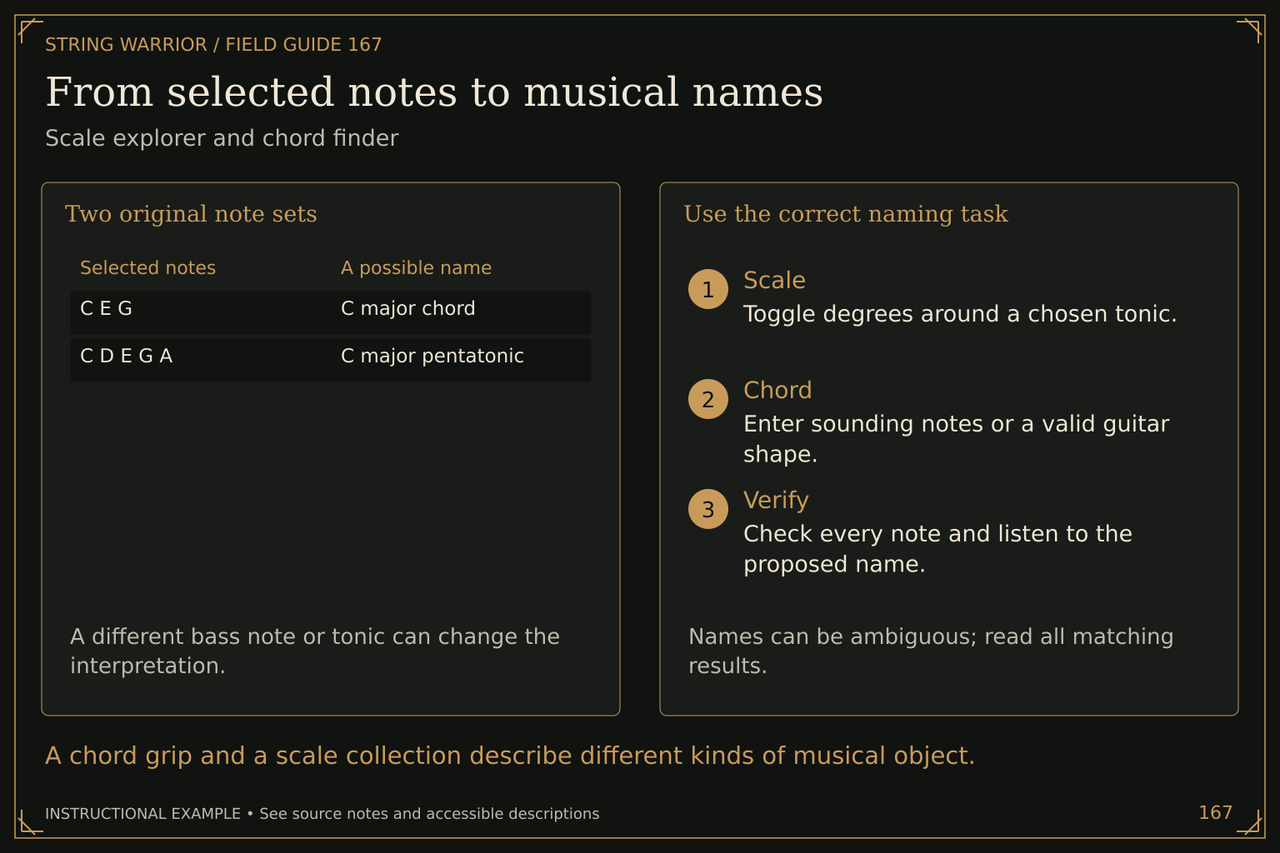
From selected notes to musical names
From selected notes to musical names. Scale explorer and chord finder. A chord grip and a scale collection describe different kinds of musical object.
A chord grip and a scale collection describe different kinds of musical object. Open the full From selected notes to musical names illustration

Two original note sets: A different bass note or tonic can change the interpretation. C E G | C major chord C D E G A | C major pentatonic

Use the correct naming task: Names can be ambiguous; read all matching results. Scale: Toggle degrees around a chosen tonic. Chord: Enter sounding notes or a valid guitar shape. Verify: Check every note and listen to the proposed name.

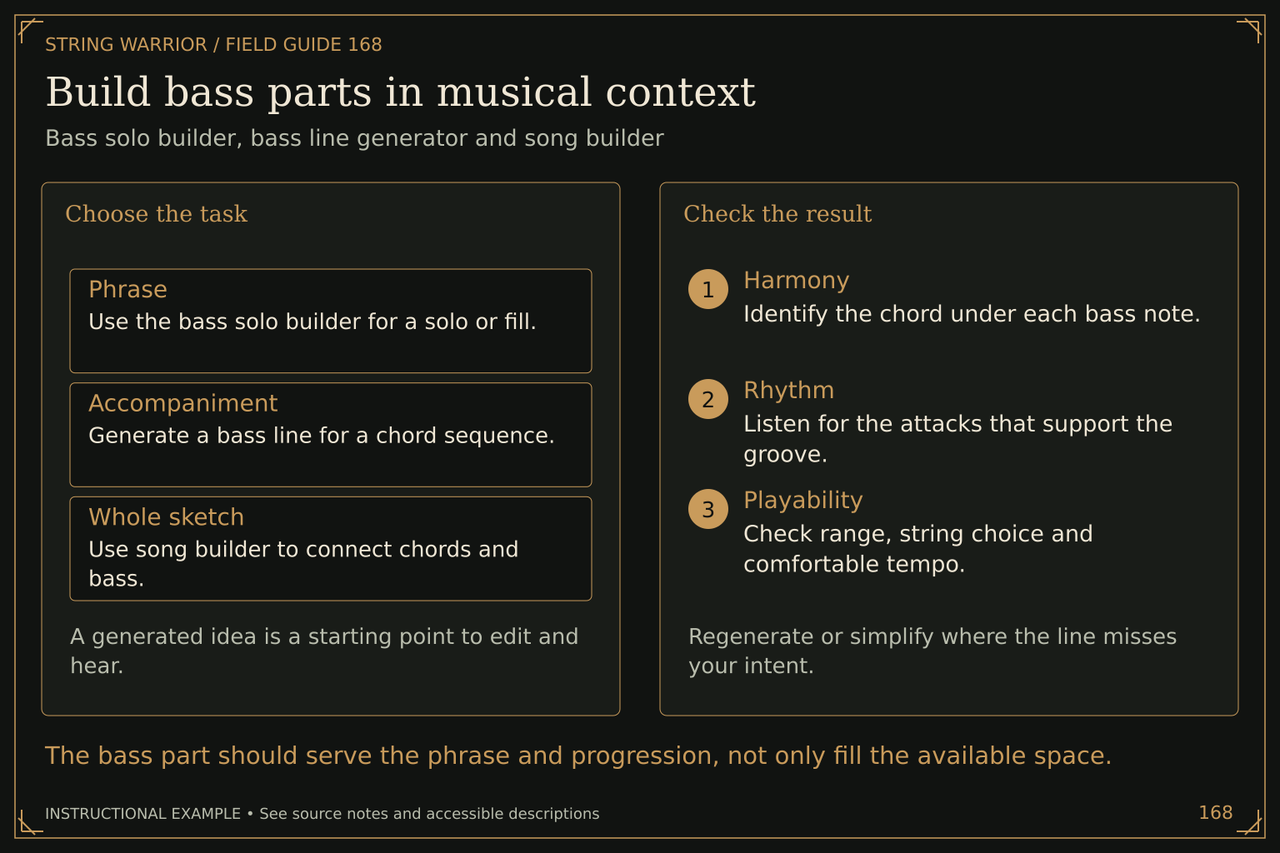
Build bass parts in musical context
Build bass parts in musical context. Bass solo builder, bass line generator and song builder. The bass part should serve the phrase and progression, not only fill the available space.
The bass part should serve the phrase and progression, not only fill the available space. Open the full Build bass parts in musical context illustration

Choose the task: A generated idea is a starting point to edit and hear.

Check the result: Regenerate or simplify where the line misses your intent. Harmony: Identify the chord under each bass note. Rhythm: Listen for the attacks that support the groove. Playability: Check range, string choice and comfortable tempo.

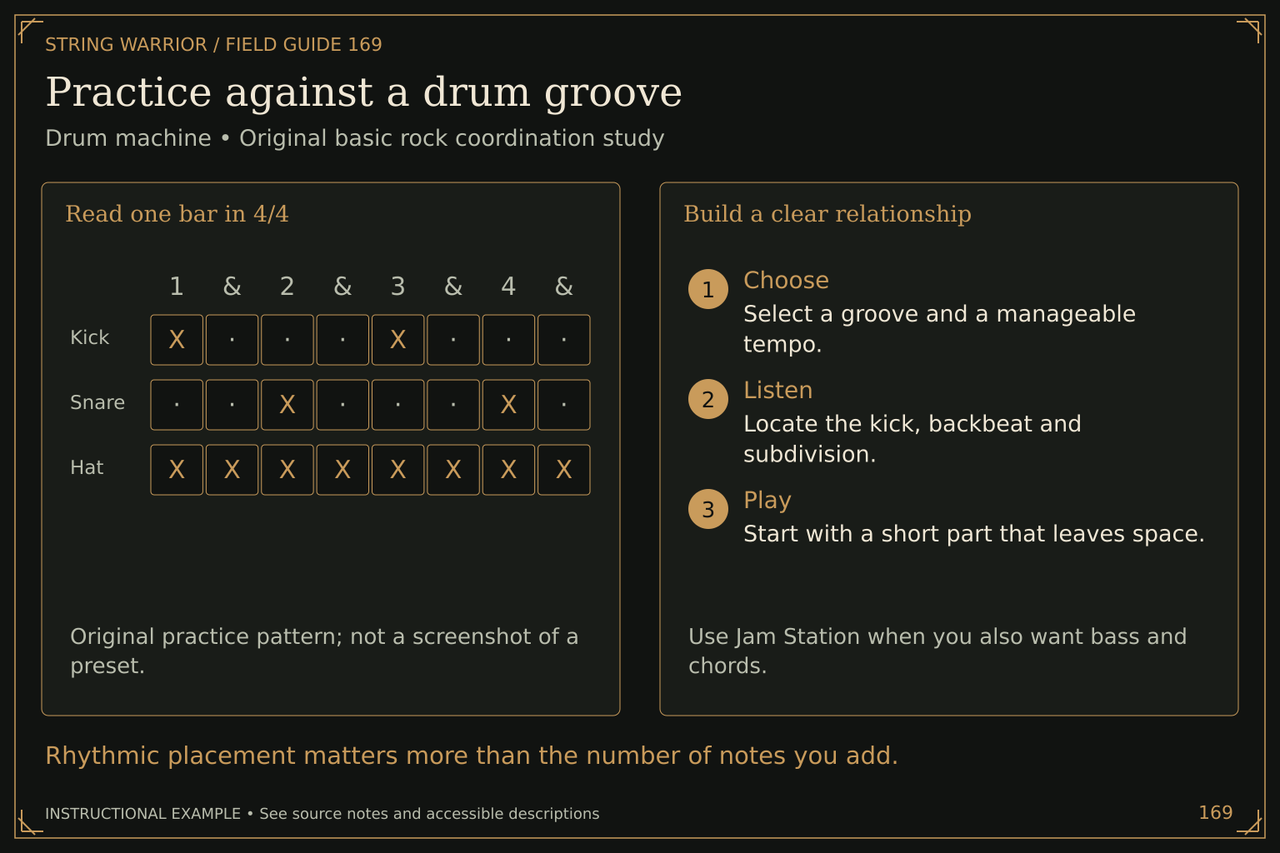
Practice against a drum groove
Practice against a drum groove. Drum machine • Original basic rock coordination study. Rhythmic placement matters more than the number of notes you add.
Rhythmic placement matters more than the number of notes you add. Open the full Practice against a drum groove illustration

Read one bar in 4/4: Original practice pattern; not a screenshot of a preset. Kick | X, , , , X, , , Snare | , , X, , , , X, Hat | X, X, X, X, X, X, X, X

Build a clear relationship: Use Jam Station when you also want bass and chords. Choose: Select a groove and a manageable tempo. Listen: Locate the kick, backbeat and subdivision. Play: Start with a short part that leaves space.

Capo shapes and chord-sheet transposition
Capo shapes and chord-sheet transposition. A capo changes sounding pitch; a transposer changes labels. Avoid transposing the chord names twice when a capo is already accounted for.
Avoid transposing the chord names twice when a capo is already accounted for. Open the full Capo shapes and chord-sheet transposition illustration
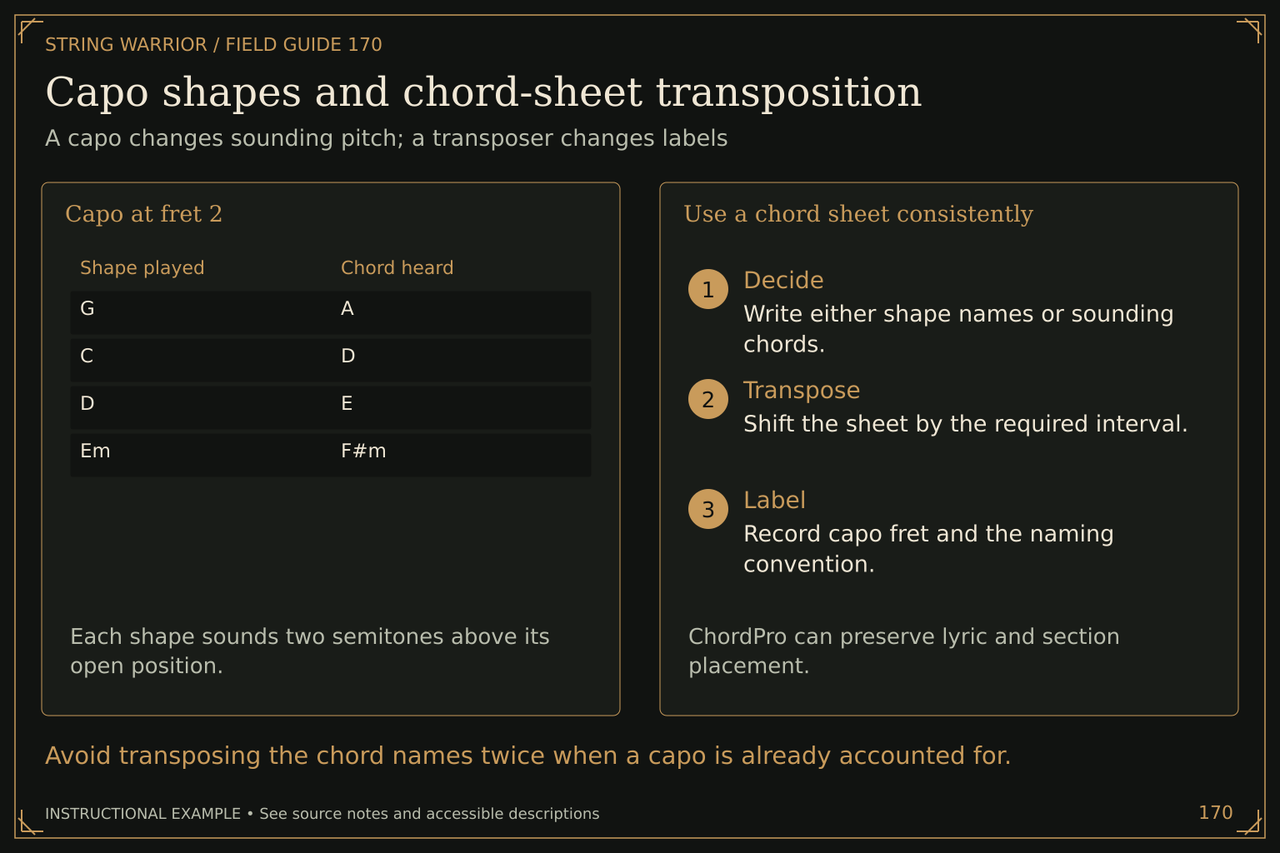
Capo at fret 2: Each shape sounds two semitones above its open position. G | A C | D D | E Em | F#m

Use a chord sheet consistently: ChordPro can preserve lyric and section placement. Decide: Write either shape names or sounding chords. Transpose: Shift the sheet by the required interval. Label: Record capo fret and the naming convention.

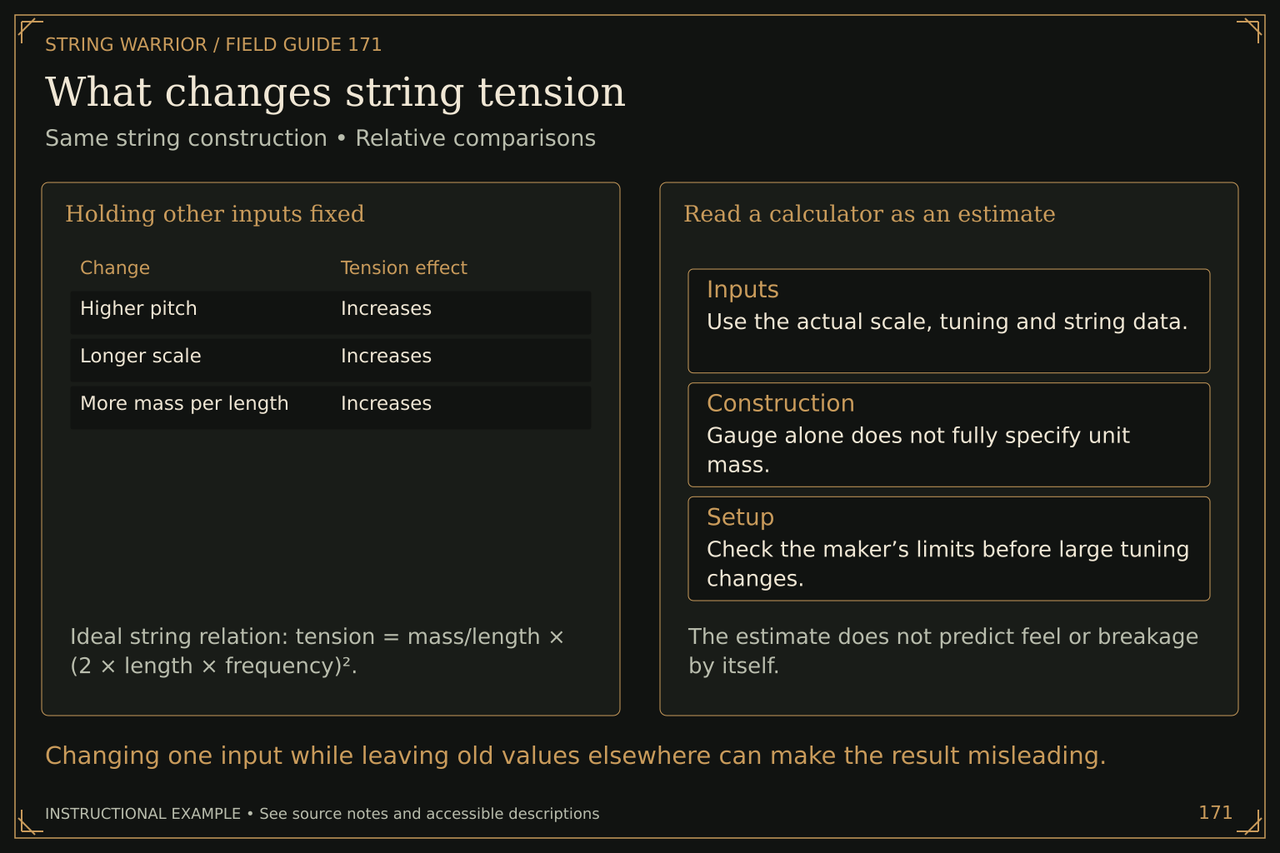
What changes string tension
What changes string tension. Same string construction • Relative comparisons. Changing one input while leaving old values elsewhere can make the result misleading.
Changing one input while leaving old values elsewhere can make the result misleading. Open the full What changes string tension illustration

Holding other inputs fixed: Ideal string relation: tension = mass/length × (2 × length × frequency)². Higher pitch | Increases Longer scale | Increases More mass per length | Increases

Read a calculator as an estimate: The estimate does not predict feel or breakage by itself.

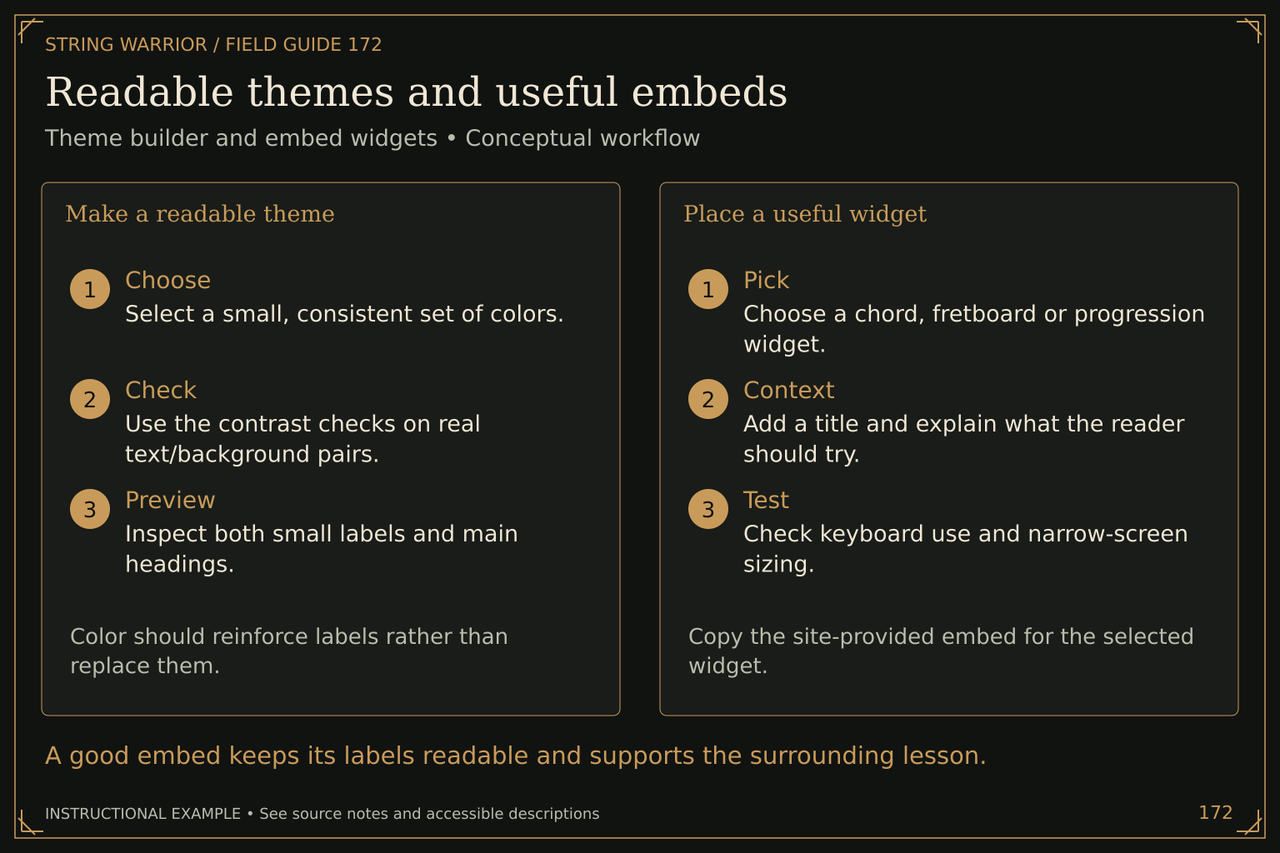
Readable themes and useful embeds
Readable themes and useful embeds. Theme builder and embed widgets • Conceptual workflow. A good embed keeps its labels readable and supports the surrounding lesson.
A good embed keeps its labels readable and supports the surrounding lesson. Open the full Readable themes and useful embeds illustration

Make a readable theme: Color should reinforce labels rather than replace them. Choose: Select a small, consistent set of colors. Check: Use the contrast checks on real text/background pairs. Preview: Inspect both small labels and main headings.

Place a useful widget: Copy the site-provided embed for the selected widget. Pick: Choose a chord, fretboard or progression widget. Context: Add a title and explain what the reader should try. Test: Check keyboard use and narrow-screen sizing.

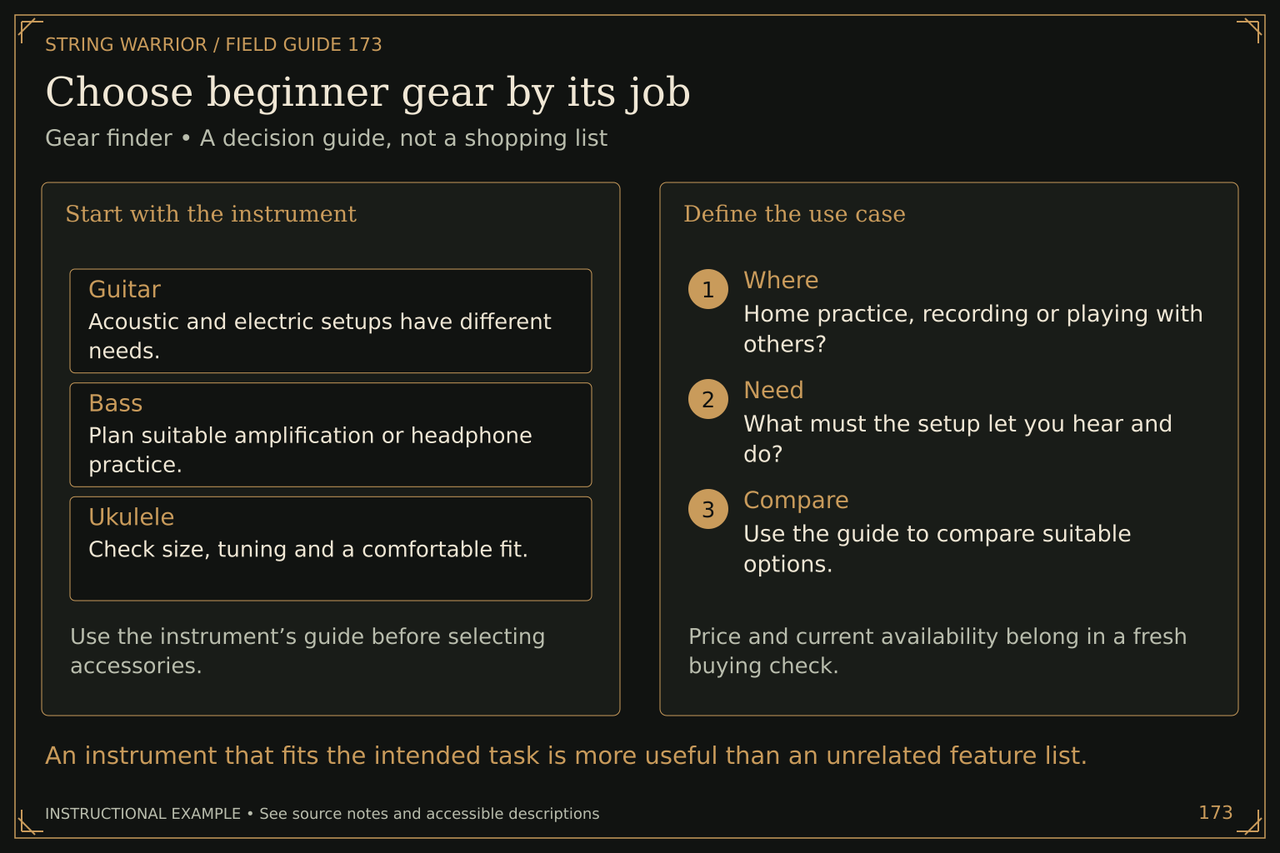
Choose beginner gear by its job
Choose beginner gear by its job. Gear finder • A decision guide, not a shopping list. An instrument that fits the intended task is more useful than an unrelated feature list.
An instrument that fits the intended task is more useful than an unrelated feature list. Open the full Choose beginner gear by its job illustration

Start with the instrument: Use the instrument’s guide before selecting accessories.

Define the use case: Price and current availability belong in a fresh buying check. Where: Home practice, recording or playing with others? Need: What must the setup let you hear and do? Compare: Use the guide to compare suitable options.

Turn a song page into a practice plan
Turn a song page into a practice plan. A reusable workflow for the StringWarrior songbook. Learn a small passage accurately, then extend the uninterrupted phrase.
Learn a small passage accurately, then extend the uninterrupted phrase. Open the full Turn a song page into a practice plan illustration
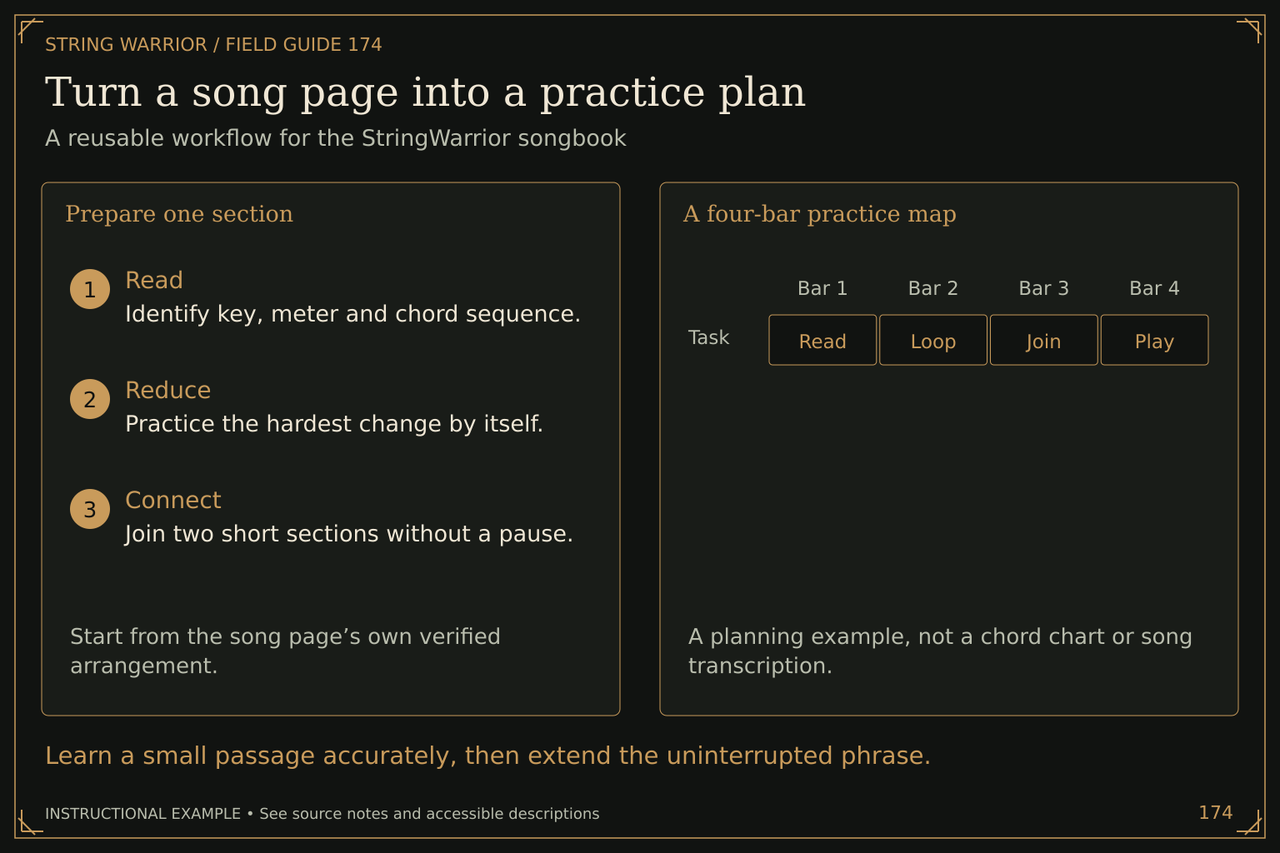
Prepare one section: Start from the song page’s own verified arrangement. Read: Identify key, meter and chord sequence. Reduce: Practice the hardest change by itself. Connect: Join two short sections without a pause.

A four-bar practice map: A planning example, not a chord chart or song transcription. Task | Read, Loop, Join, Play

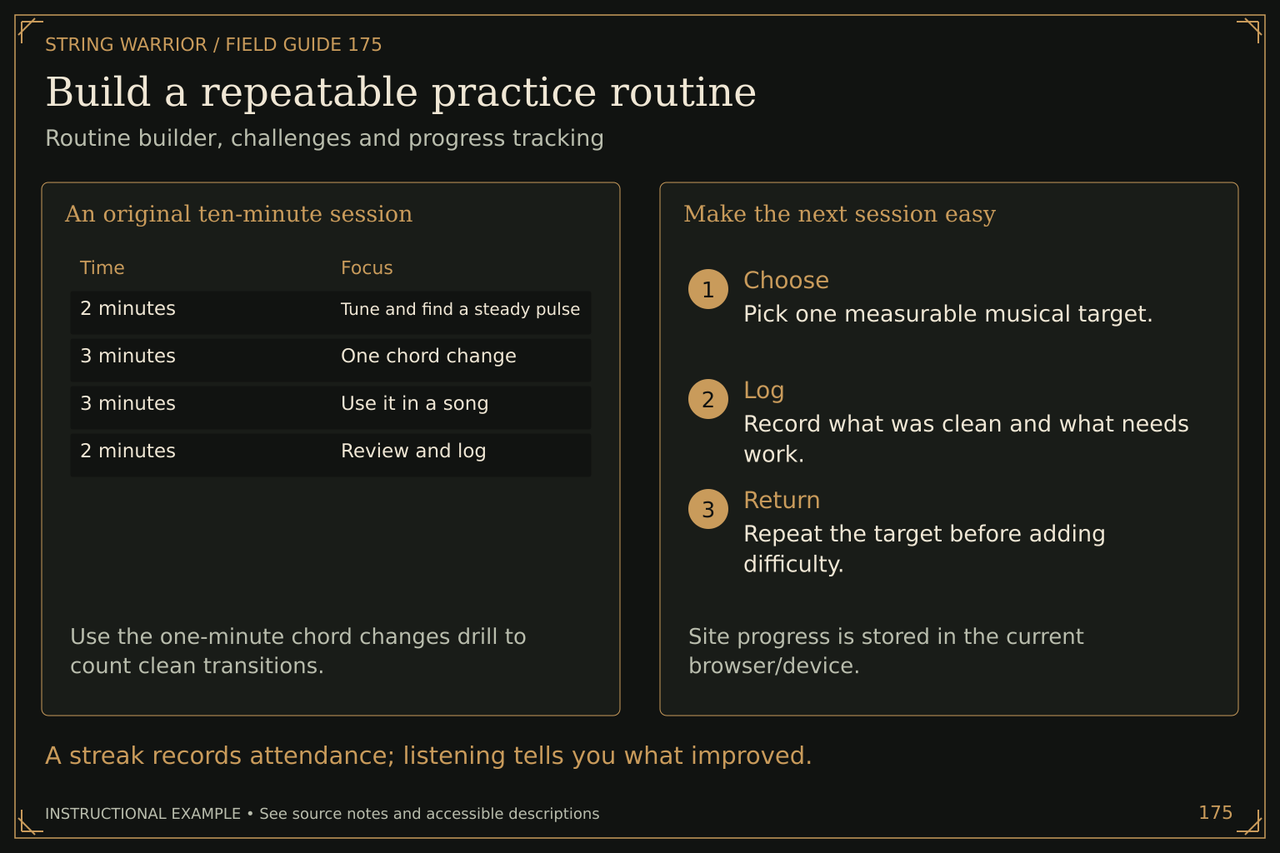
Build a repeatable practice routine
Build a repeatable practice routine. Routine builder, challenges and progress tracking. A streak records attendance; listening tells you what improved.
A streak records attendance; listening tells you what improved. Open the full Build a repeatable practice routine illustration

An original ten-minute session: Use the one-minute chord changes drill to count clean transitions. 2 minutes | Tune and find a steady pulse 3 minutes | One chord change 3 minutes | Use it in a song 2 minutes | Review and log

Make the next session easy: Site progress is stored in the current browser/device. Choose: Pick one measurable musical target. Log: Record what was clean and what needs work. Return: Repeat the target before adding difficulty.

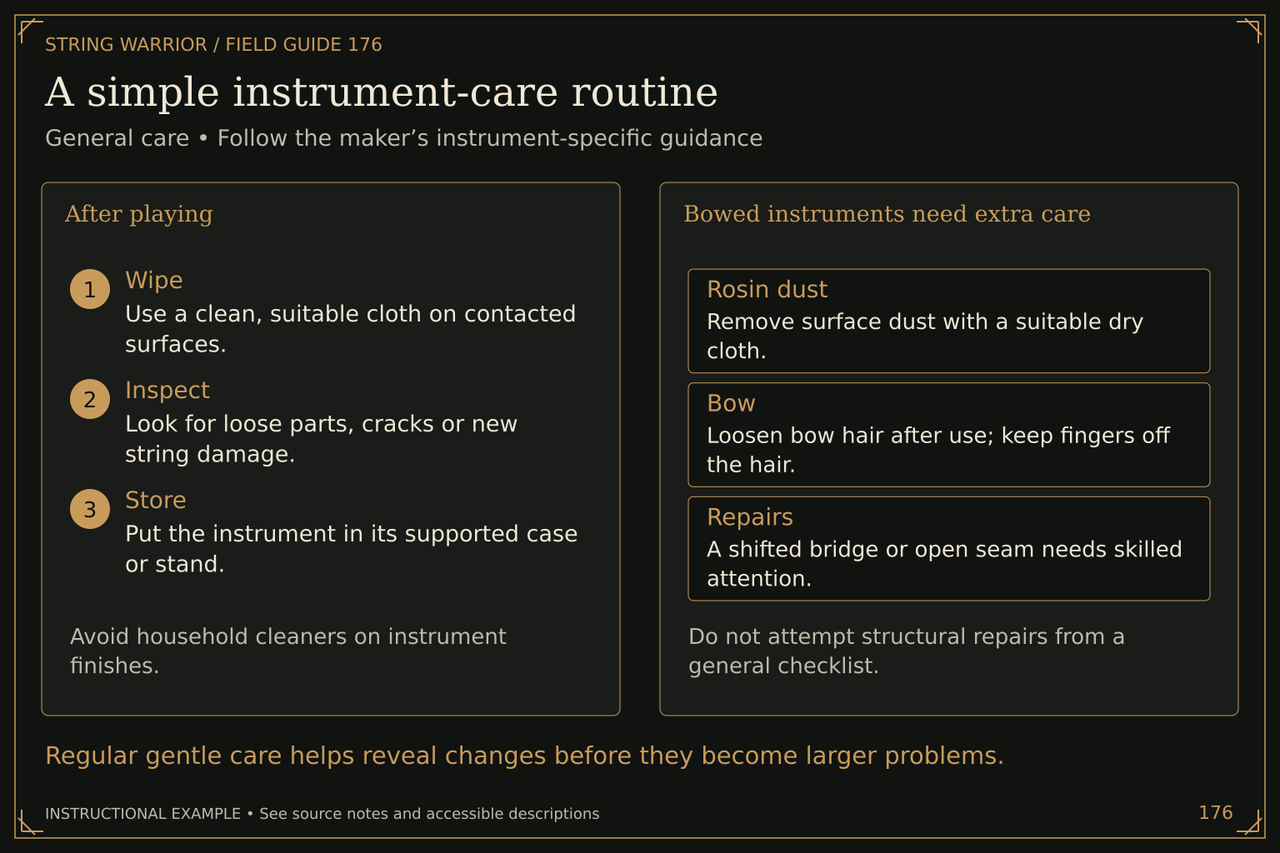
A simple instrument-care routine
A simple instrument-care routine. General care • Follow the maker’s instrument-specific guidance. Regular gentle care helps reveal changes before they become larger problems.
Regular gentle care helps reveal changes before they become larger problems. Open the full A simple instrument-care routine illustration

After playing: Avoid household cleaners on instrument finishes. Wipe: Use a clean, suitable cloth on contacted surfaces. Inspect: Look for loose parts, cracks or new string damage. Store: Put the instrument in its supported case or stand.

Bowed instruments need extra care: Do not attempt structural repairs from a general checklist.

Stable storage for wooden instruments
Stable storage for wooden instruments. Temperature and humidity changes affect wood. A case protects against knocks; it does not guarantee a stable climate.
A case protects against knocks; it does not guarantee a stable climate. Open the full Stable storage for wooden instruments illustration
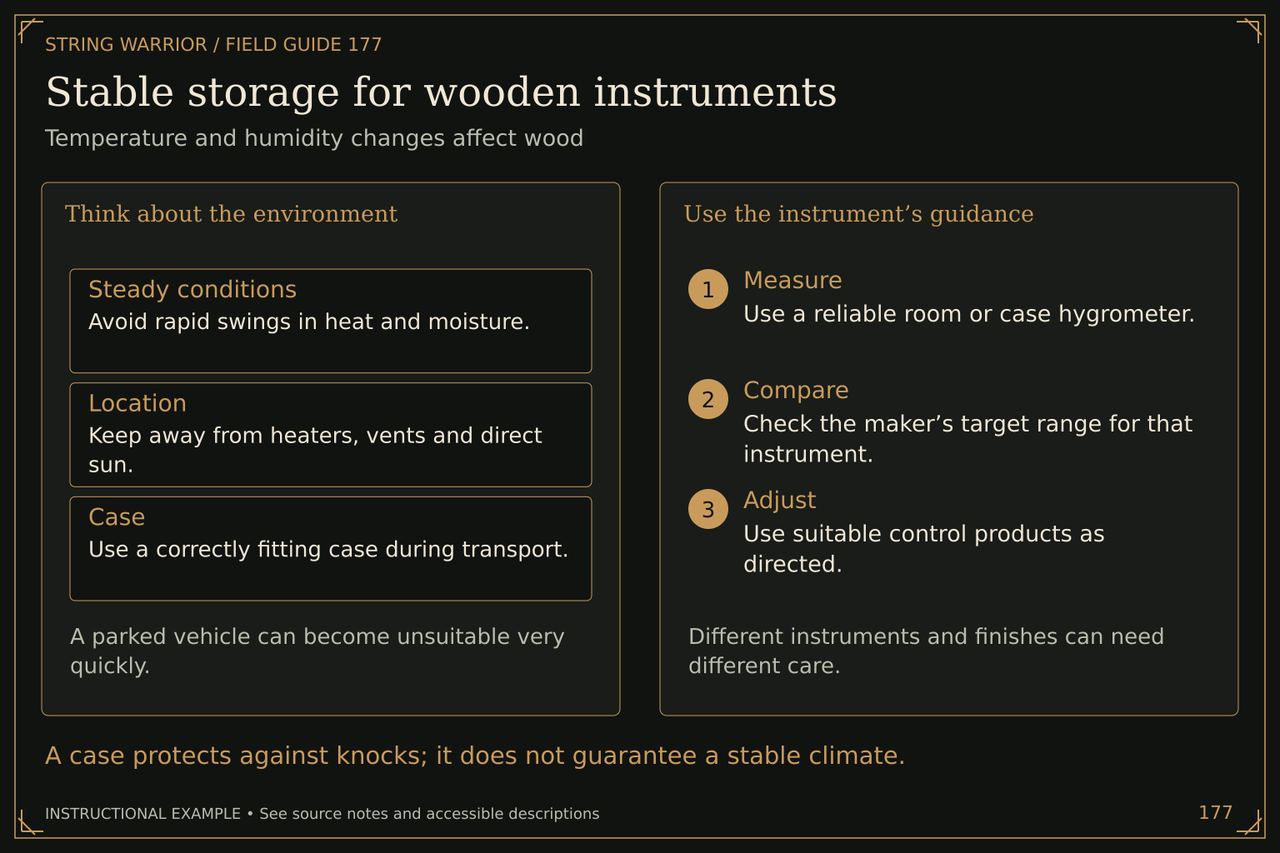
Think about the environment: A parked vehicle can become unsuitable very quickly.

Use the instrument’s guidance: Different instruments and finishes can need different care. Measure: Use a reliable room or case hygrometer. Compare: Check the maker’s target range for that instrument. Adjust: Use suitable control products as directed.

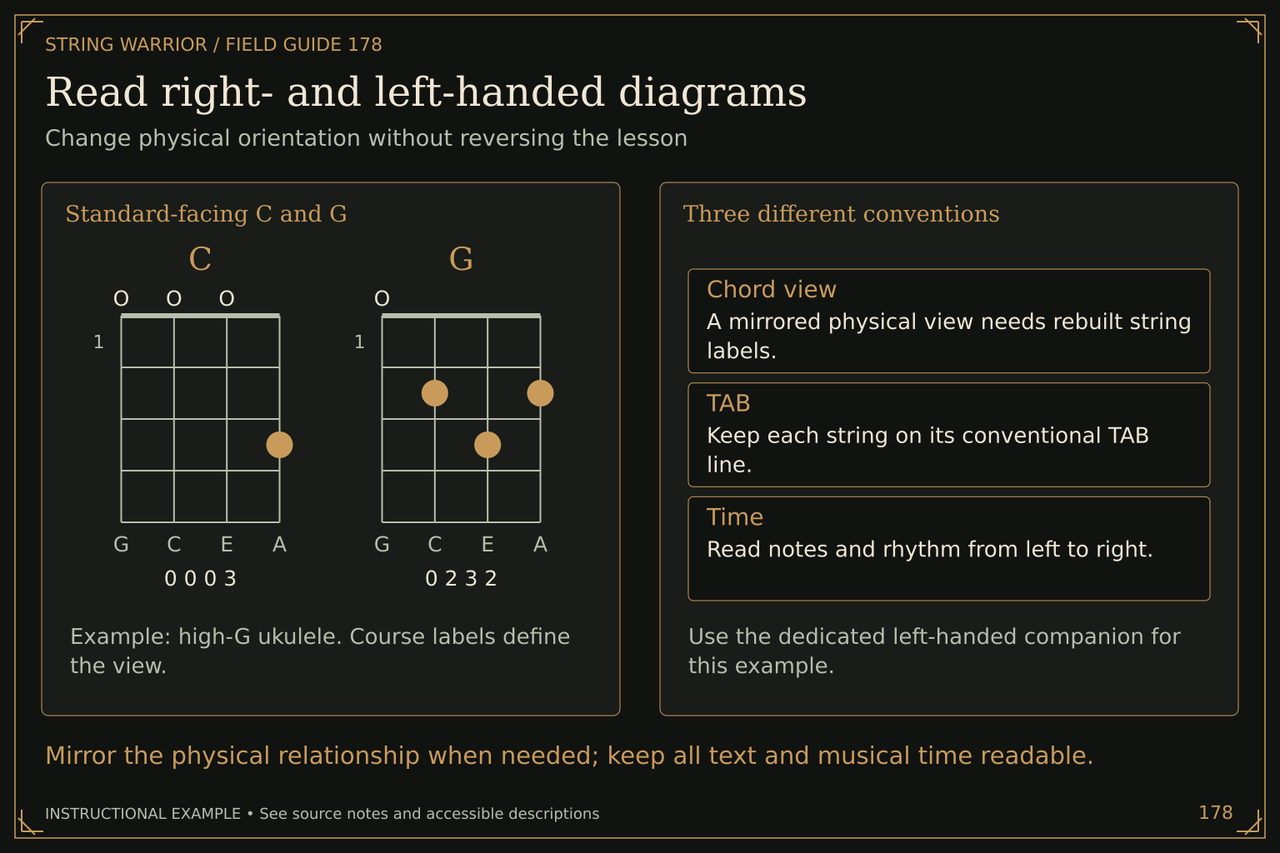
Read right- and left-handed diagrams
Read right- and left-handed diagrams. Change physical orientation without reversing the lesson. Mirror the physical relationship when needed; keep all text and musical time readable.
Mirror the physical relationship when needed; keep all text and musical time readable. Open the full Read right- and left-handed diagrams illustration

Standard-facing C and G: Example: high-G ukulele. Course labels define the view.

Three different conventions: Use the dedicated left-handed companion for this example.

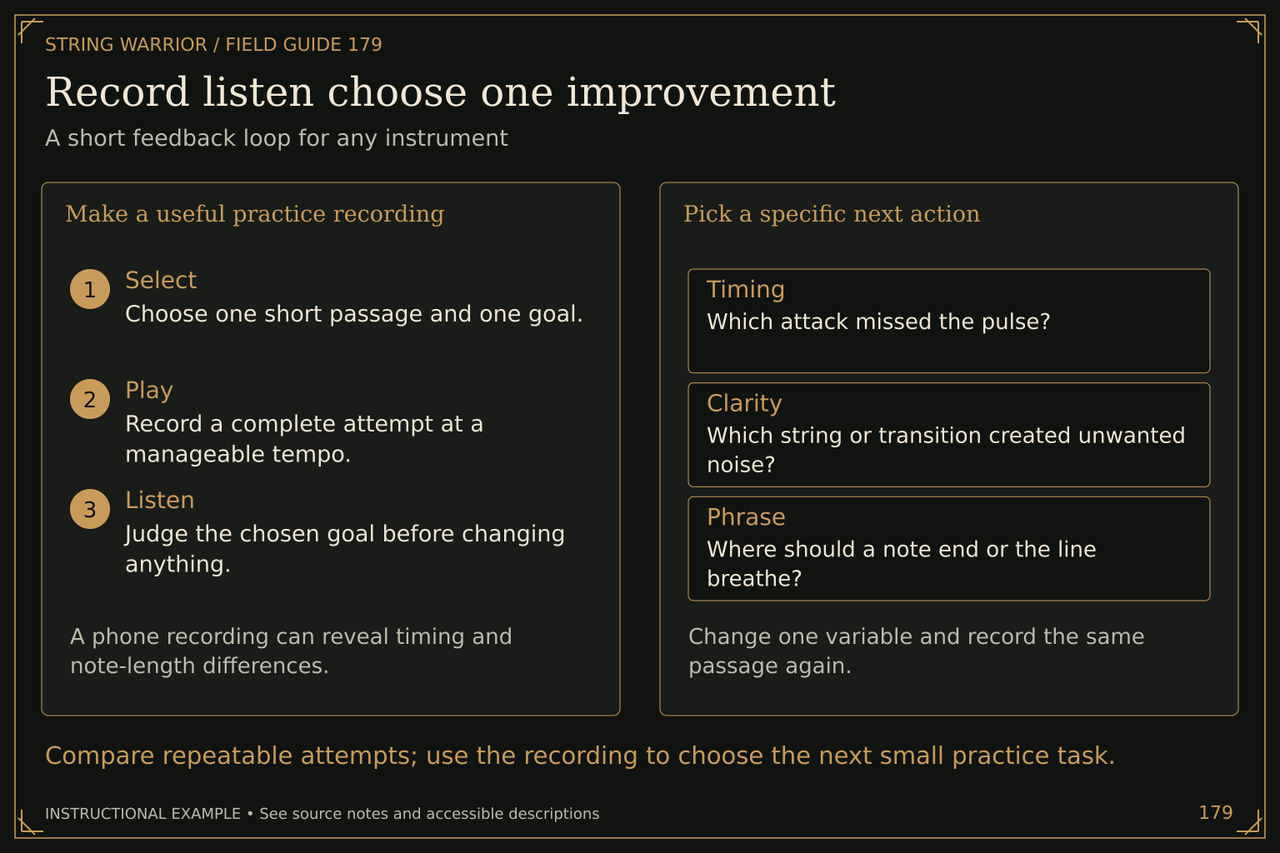
Record listen choose one improvement
Record listen choose one improvement. A short feedback loop for any instrument. Compare repeatable attempts; use the recording to choose the next small practice task.
Compare repeatable attempts; use the recording to choose the next small practice task. Open the full Record listen choose one improvement illustration

Make a useful practice recording: A phone recording can reveal timing and note-length differences. Select: Choose one short passage and one goal. Play: Record a complete attempt at a manageable tempo. Listen: Judge the chosen goal before changing anything.

Pick a specific next action: Change one variable and record the same passage again.

Recording and listening
Electric guitar direct recording

A musician in bronze-trimmed armor plays a six-string electric guitar beside a recording interface and laptop. Open the full Electric guitar direct recording illustration
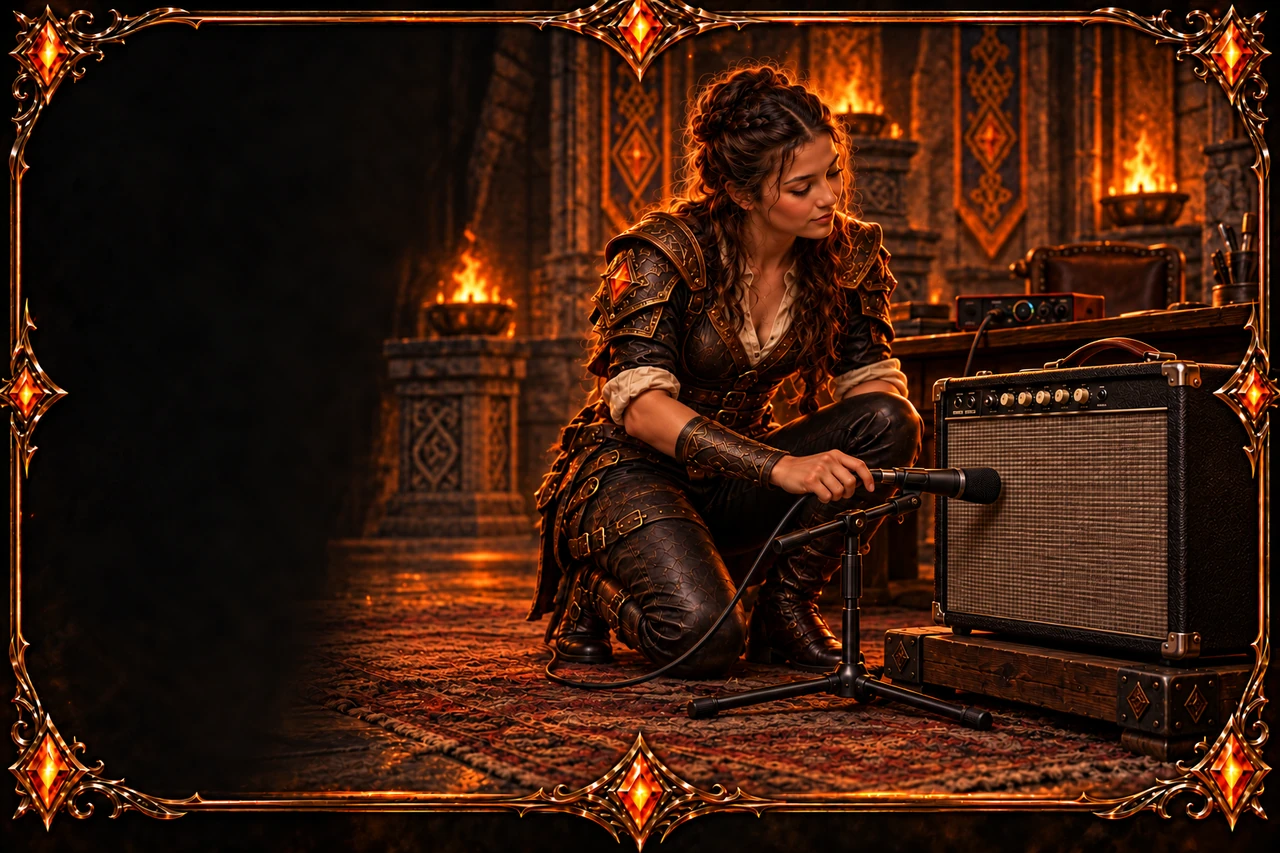
Miking a guitar amplifier
A musician positions a dynamic microphone in front of a guitar amplifier in a bronze-framed recording study. Open the full Miking a guitar amplifier illustration
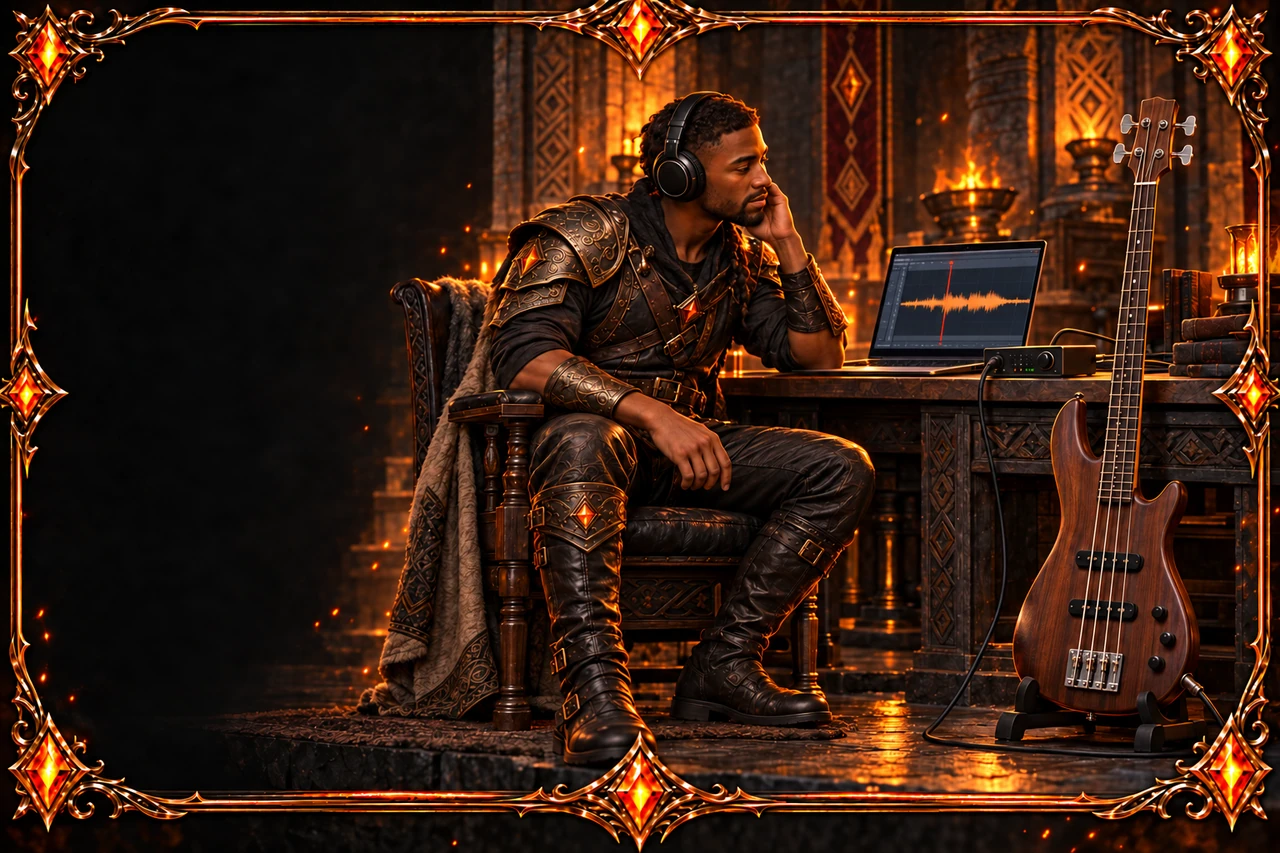
Four-string bass direct recording
A musician listens beside a four-string electric bass, recording interface and recording laptop. Open the full Four-string bass direct recording illustration
Headphone monitoring
A musician wearing headphones adjusts a recording interface level knob beside a laptop. Open the full Headphone monitoring illustration
Songbook scenes
Folk and traditional
A musician sits at a cabin table with a mug, an acoustic guitar beside the fireplace and mountains beyond the window. Open the full Folk and traditional illustration
Sea shanties
A seafarer rests on a ship's deck beside a guitar case, ropes and crates as the sun sets over the water. Open the full Sea shanties illustration
Christmas carols
A musician carries a guitar case up snowy steps toward a candlelit doorway decorated with winter greenery. Open the full Christmas carols illustration
Spirituals and gospel
A musician holds a book in a candlelit church, with a group gathered behind her and an acoustic guitar nearby. Open the full Spirituals and gospel illustration
Nursery songs
An adult and child share an open book on a lantern-lit terrace, with a guitar case beside them. Open the full Nursery songs illustration
Stephen Foster collection
An acoustic guitar rests beside an ornate wooden bench and an open book on a small table. Open the full Stephen Foster collection illustration
Practice scenes
Practice desk
A musician wearing headphones studies a tablet at a practice desk surrounded by books and a guitar case. Open the full Practice desk illustration
Routine builder
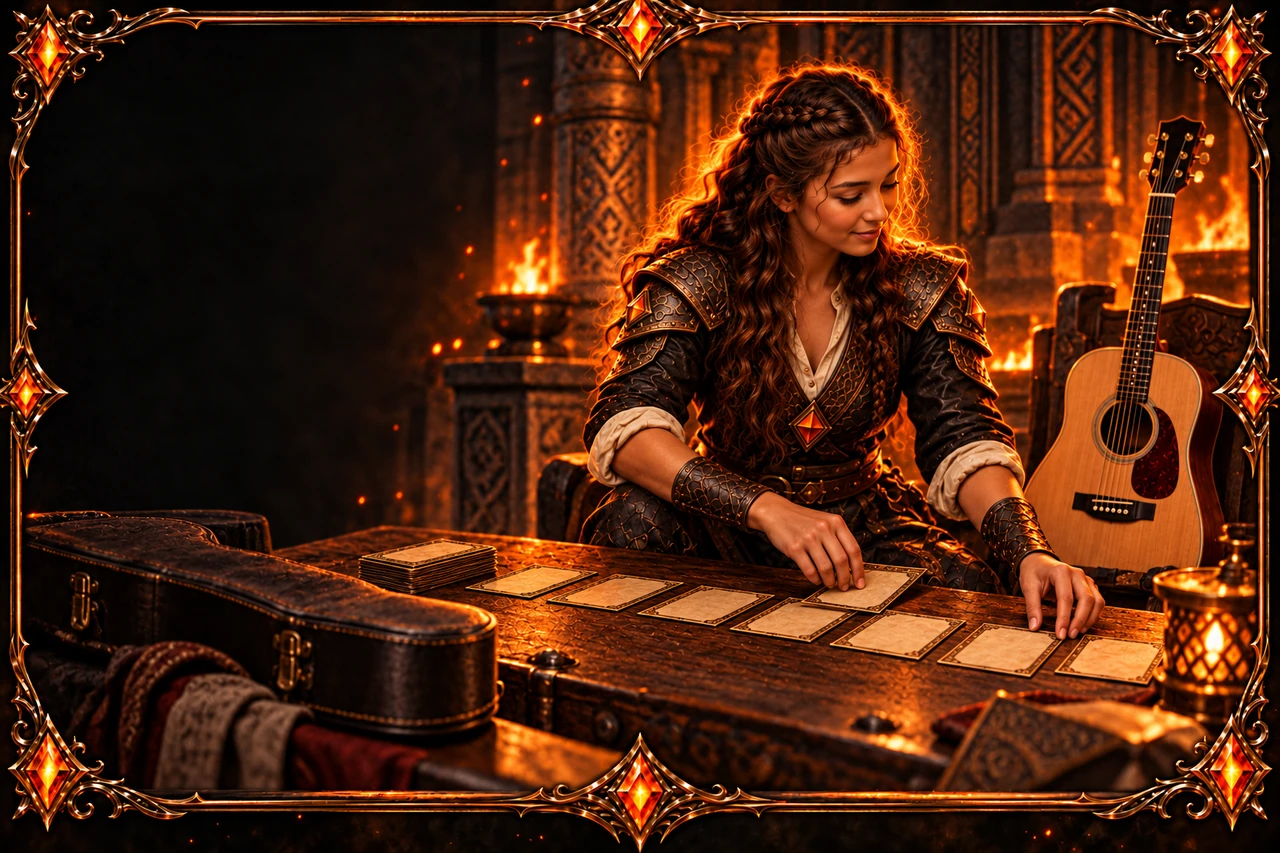
A musician arranges a row of practice cards on a desk beside an acoustic guitar. Open the full Routine builder illustration
Thirty-day practice challenges
A musician enters a practice room carrying a guitar case; a wall calendar and another guitar mark the workspace. Open the full Thirty-day practice challenges illustration
Practice stats
A musician reviews a colored grid on a tablet beside an open notebook and an acoustic guitar. Open the full Practice stats illustration
Dojo Decks
A musician examines a practice card drawn from a stack on the desk. Open the full Dojo Decks illustration
Practice session complete
A musician rests after practice with an acoustic guitar beside a desk, books and a mechanical metronome. Open the full Practice session complete illustration
Ensemble and expression
Acoustic duo
Two musicians sit together playing ukulele and acoustic guitar. Open the full Acoustic duo illustration
Guitar and bass partnership
Two musicians sit side by side playing electric guitar and bass. Open the full Guitar and bass partnership illustration
Bluegrass trio
Three musicians gather with an acoustic guitar, mandolin and banjo. Open the full Bluegrass trio illustration
Small string ensemble
A small ensemble gathers with violin, acoustic guitar and cello behind music stands. Open the full Small string ensemble illustration
Dynamics and touch
A seated guitarist places one hand over the acoustic guitar's strings while the other forms a shape on the fretboard. Open the full Dynamics and touch illustration
Musical phrasing
A guitarist holds an acoustic guitar across his lap and looks upward during a pause. Open the full Musical phrasing illustration
Rhythmic accents
A musician sits at a table beside a mechanical metronome and a closed book. Open the full Rhythmic accents illustration
Call and response
A ukulele player and an acoustic guitarist face one another during a musical exchange. Open the full Call and response illustration
Leaving space in music
A musician pauses with an acoustic guitar across her lap beside a music stand. Open the full Leaving space in music illustration
Articulation and note endings
An electric guitar stands beside an open notebook on a practice table. Open the full Articulation and note endings illustration
Tone and workshop
Clean tone
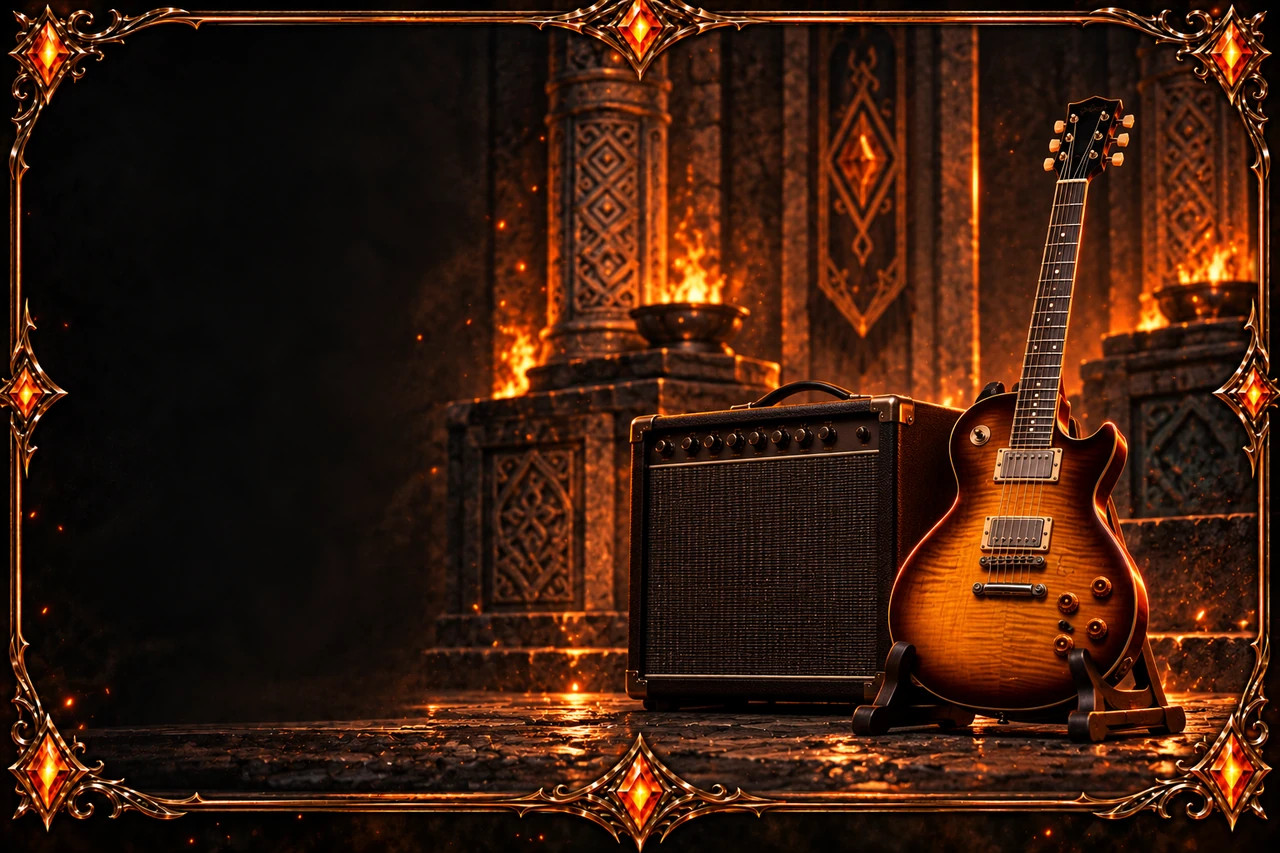
An electric guitar rests on a stand beside a compact amplifier. Open the full Clean tone illustration
Overdrive
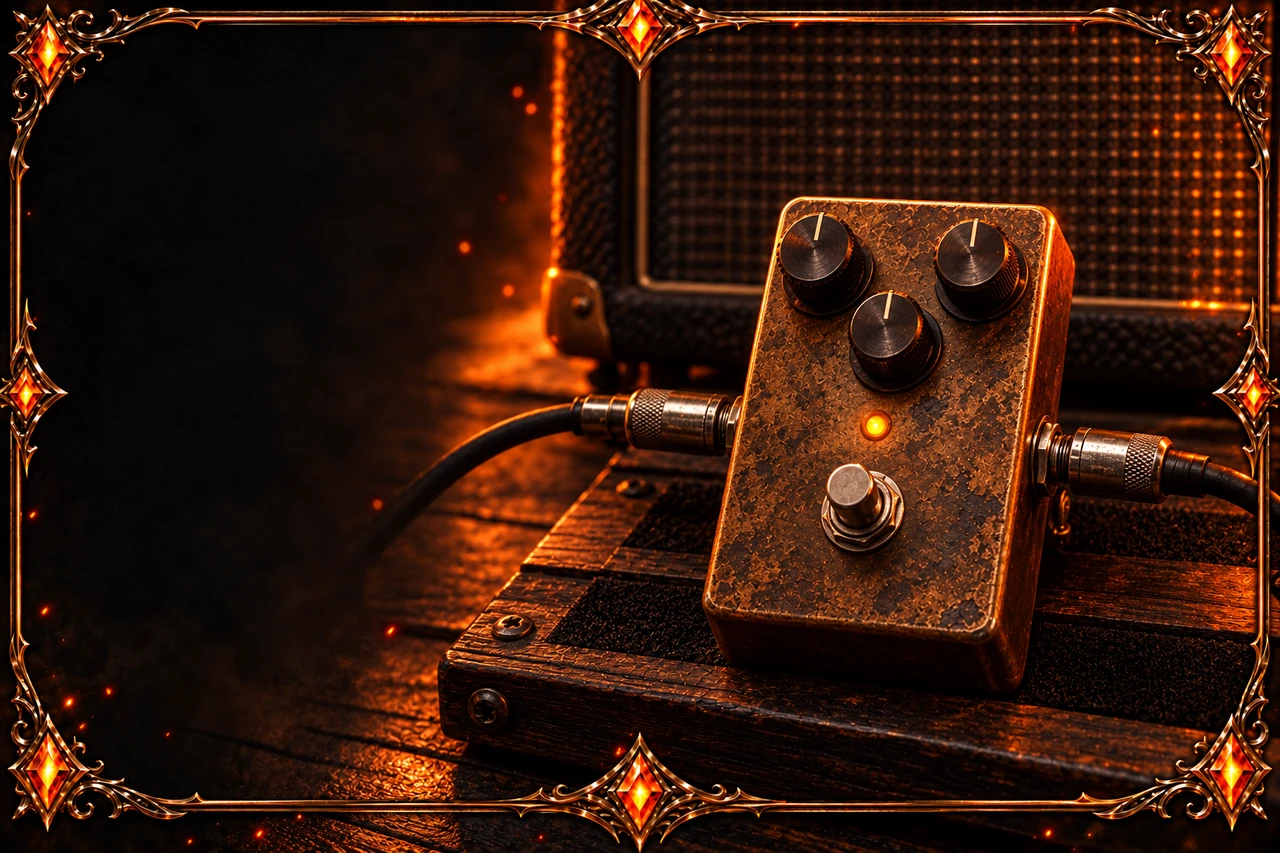
A three-knob overdrive pedal has cables connected on both sides and an illuminated indicator. Open the full Overdrive illustration
Distortion
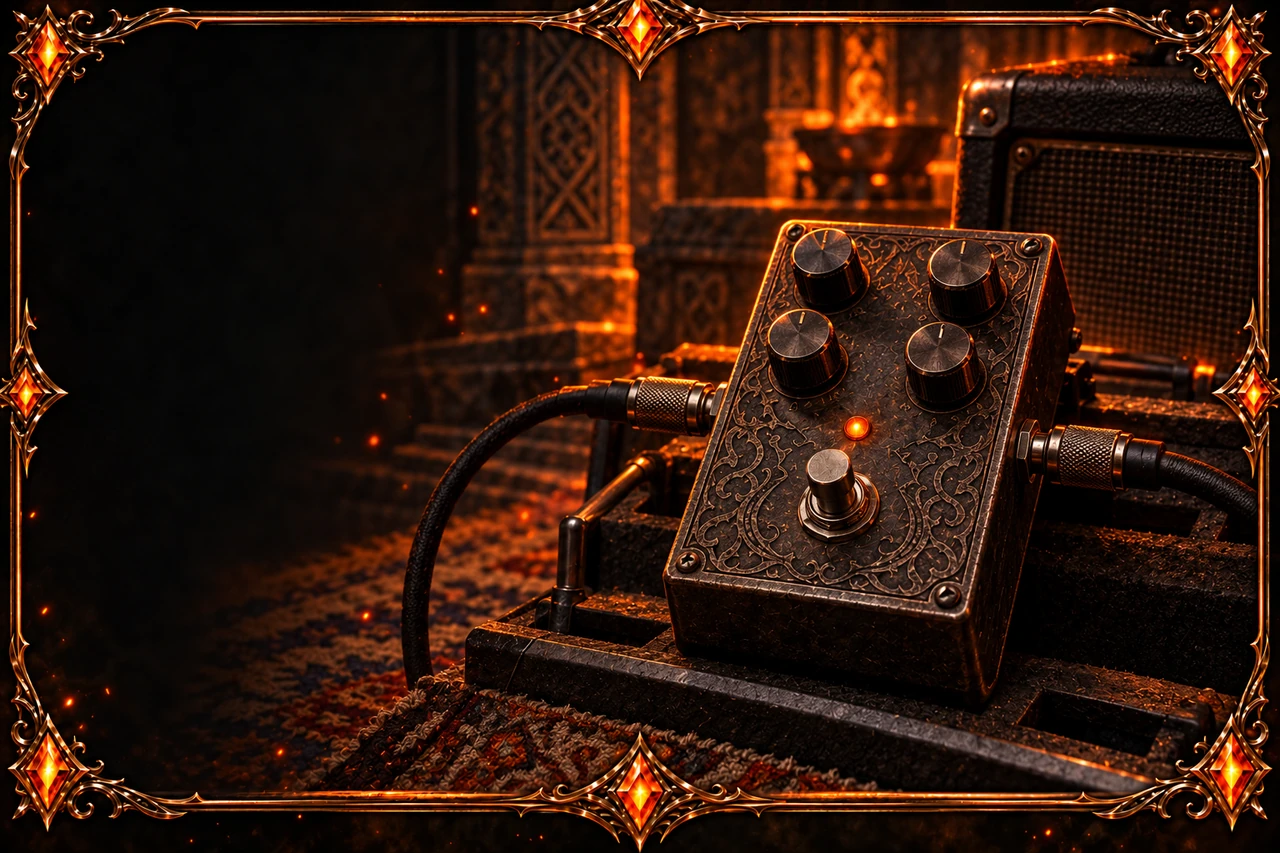
A four-knob distortion pedal sits in front of an amplifier with cables connected on both sides. Open the full Distortion illustration
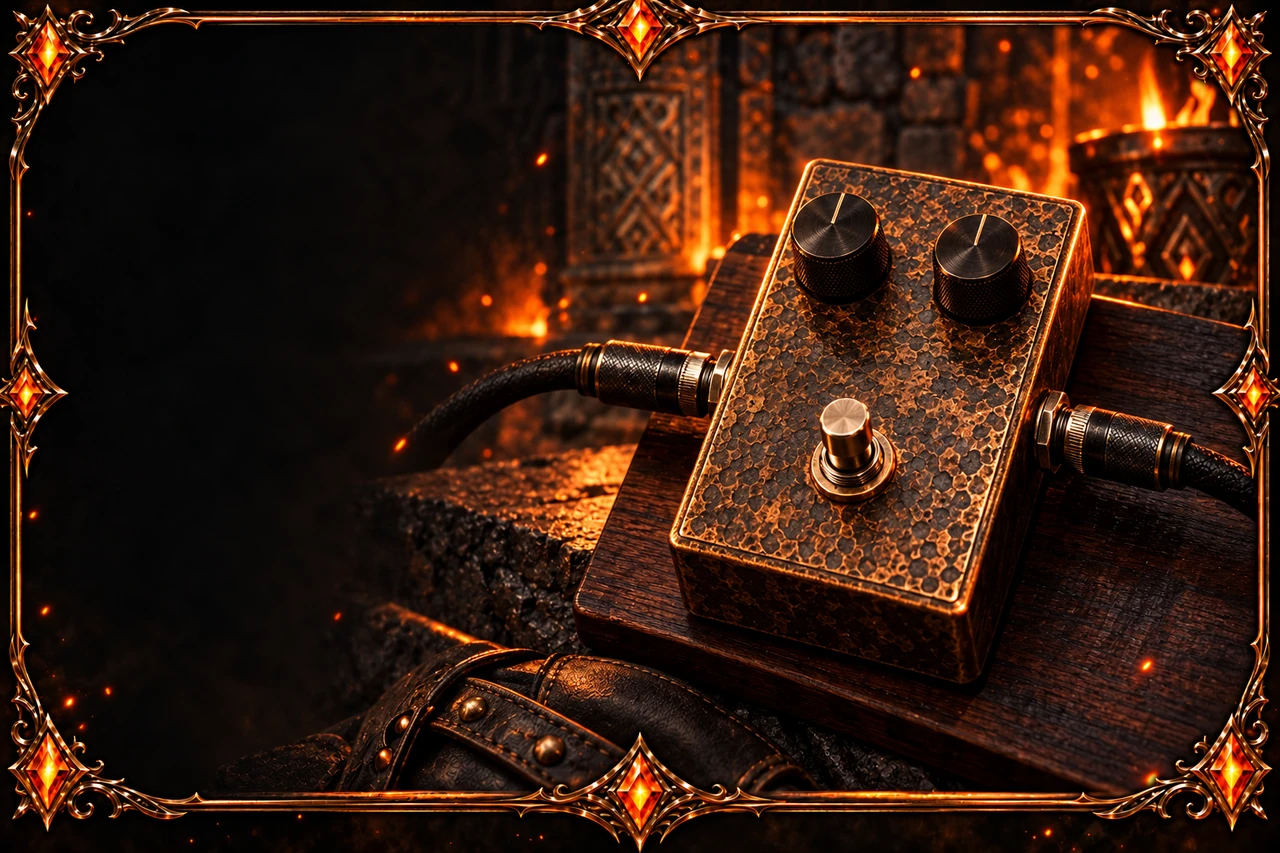
Fuzz
A two-knob fuzz pedal with a footswitch sits beside coiled cables and an amplifier. Open the full Fuzz illustration
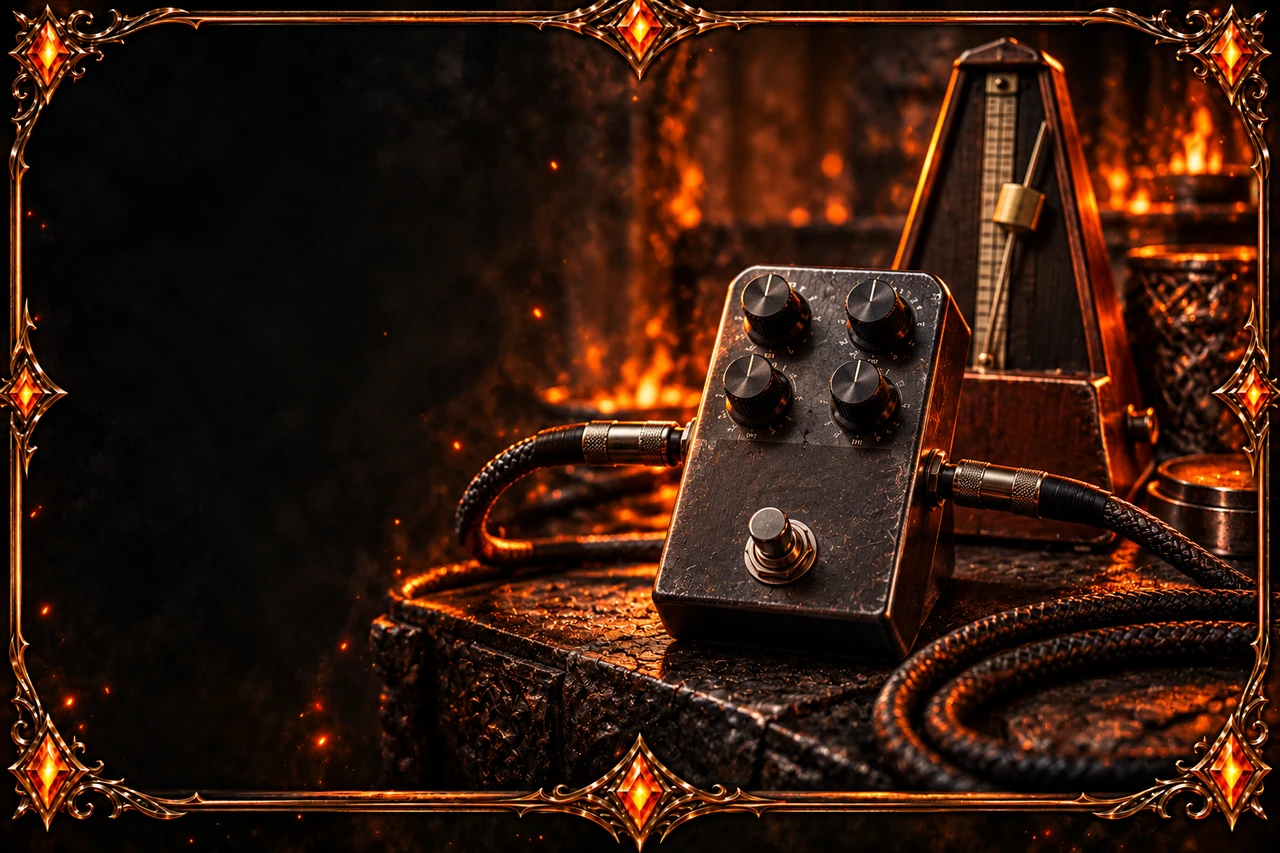
Modulation
A four-knob modulation pedal has cables connected on both sides, with a mechanical metronome behind it. Open the full Modulation illustration
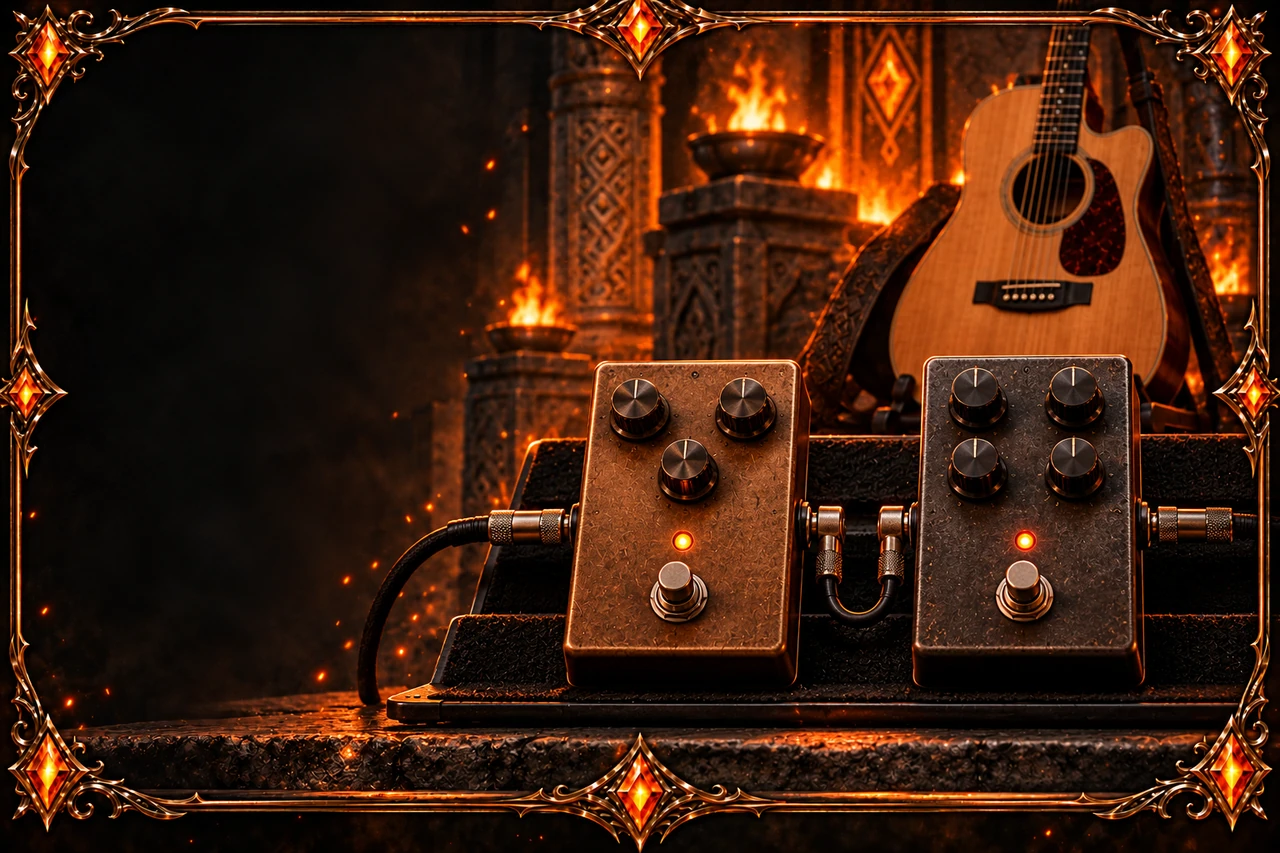
Delay and reverb
Two effects pedals sit side by side with connecting cables and an acoustic guitar behind them. Open the full Delay and reverb illustration
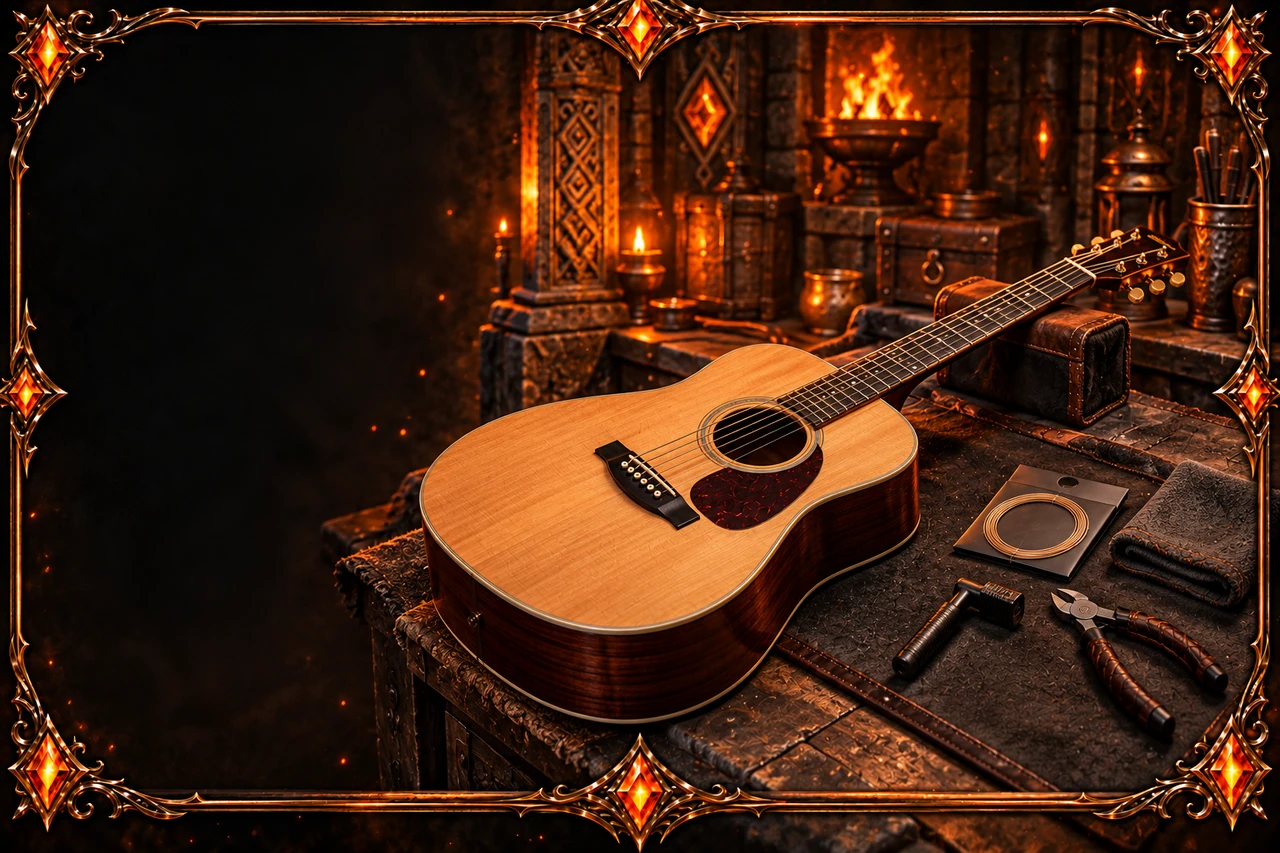
Restringing workbench
An acoustic guitar lies on a supported workbench beside pliers and restringing supplies. Open the full Restringing workbench illustration
Instrument cleaning
A musician wipes the back of an acoustic guitar with a soft cloth. Open the full Instrument cleaning illustration
Instrument storage
A musician places an acoustic guitar into a padded hard case. Open the full Instrument storage illustration
Cable checks
A coiled instrument cable and its plugs sit beside a small test box with colored indicator lights. Open the full Cable checks illustration
Setup inspection
A musician checks a guitar's fretboard with a straightedge at a supported workbench. Open the full Setup inspection illustration
Luthier repair bench
A musician inspects a small guitar part at a bench with hand tools and an acoustic guitar. Open the full Luthier repair bench illustration
Tool symbols
Tuner
A clip-on tuner has its indicator needle centered on an unlabeled dial. Open the full Tuner illustration
Metronome
A wooden mechanical metronome shows its pendulum and sliding weight. Open the full Metronome illustration
Ear training
Over-ear headphones have padded ear cups and a curved headband. Open the full Ear training illustration
TAB
Parallel horizontal lines form a tablature emblem inside a metal frame. Open the full TAB illustration
Looping
A looping emblem surrounds a central knob with two curved arrows. Open the full Looping illustration
Saved items
A ribbon-shaped bookmark emblem carries a glowing diamond. Open the full Saved items illustration
Search
A magnifying glass has a round lens, a metal rim and a short handle. Open the full Search illustration
Print
A desktop printer holds blank paper in its upper tray and lower output slot. Open the full Print illustration
Tool workflows
Tuner feedback
Three tuner feedback states with −20, 0 and +20 cents shown accurately. Open the full Tuner feedback illustration
Metronome first session
Start with a steady beat Open the full Metronome first session illustration
Progression workflow
Build a chord progression Open the full Progression workflow illustration
Solo workflow
Build a short solo phrase Open the full Solo workflow illustration
Genre and songbook covers
Blues club
A blues guitarist seated beside a six-string electric guitar in an amber-lit club. Open the full Blues club illustration
Bluegrass gathering
Two musicians beside a mandolin and acoustic guitar in a lodge music room. Open the full Bluegrass gathering illustration
Jazz rehearsal
A jazz guitarist beside an archtop guitar and amplifier in a rehearsal studio. Open the full Jazz rehearsal illustration
Country stage
A country singer beside an acoustic guitar and microphone on a warm stage. Open the full Country stage illustration
Metal studio
A metal guitarist beside an angular six-string electric guitar and amplifier. Open the full Metal studio illustration
Flamenco courtyard
A flamenco musician beside a nylon-string guitar in a tiled courtyard. Open the full Flamenco courtyard illustration
Campfire songbook
An acoustic guitar and closed songbook beside a forest campfire. Open the full Campfire songbook illustration
Beginner singalong
A teacher and two children singing together beside an acoustic guitar. Open the full Beginner singalong illustration
Blues songbook
An archtop guitar, songbook, microphone and amplifier in a blues club. Open the full Blues songbook illustration
Listening, states and world instruments
Hear sing find
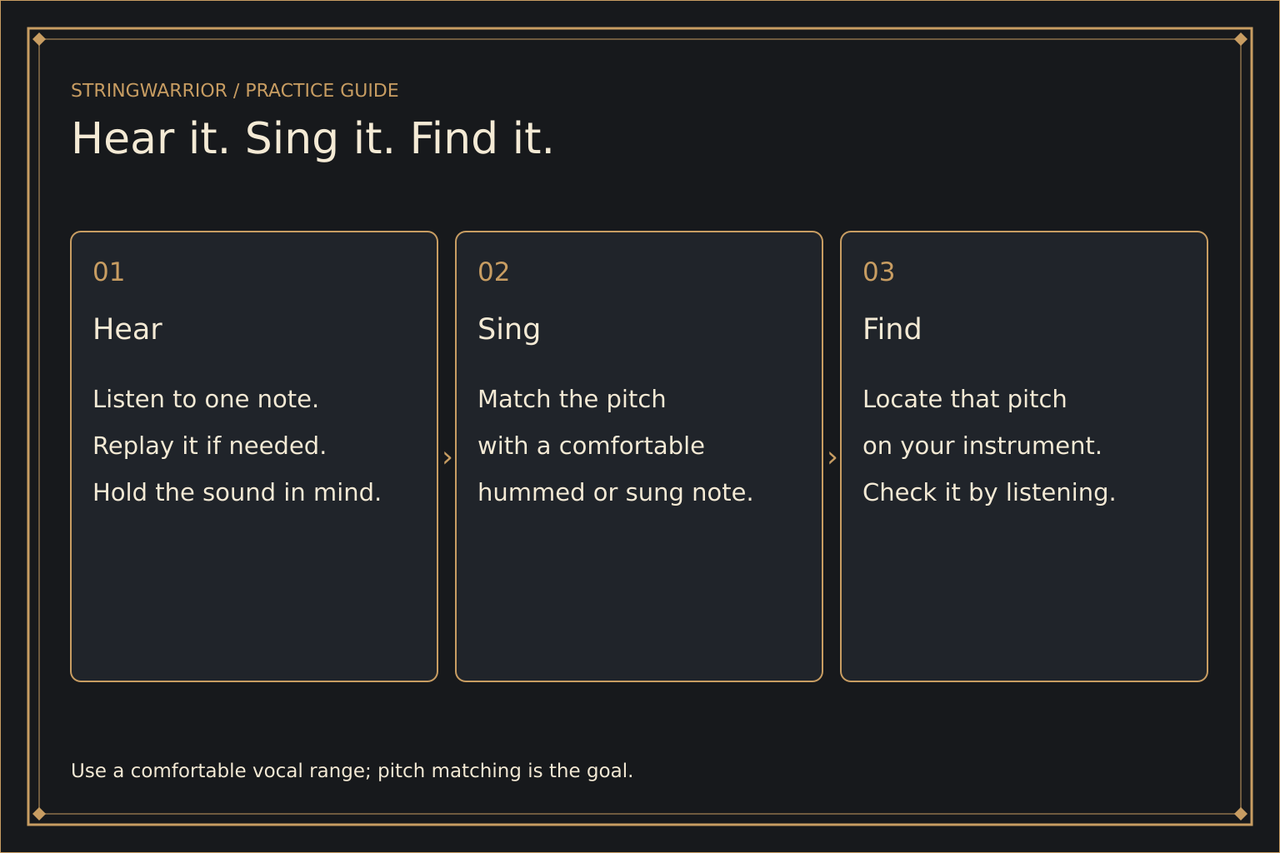
Hear it. Sing it. Find it. Open the full Hear sing find illustration
Interval comparison
Minor third: 3 semitones; major third: 4; perfect fifth: 7, all above C4. Open the full Interval comparison illustration
Major minor listening
C major C–E–G versus C minor C–Eb–G; no fixed happy/sad guarantee. Open the full Major minor listening illustration
Empty saved collection
An empty open leather folio with blank ivory pages and a bronze bookmark. Open the full Empty saved collection illustration
No search results
An empty bronze-trimmed library drawer beside a magnifying glass. Open the full No search results illustration
Puerto rican cuatro
A musician beside the wooden back of a Puerto Rican cuatro with ten tuners. Open the full Puerto rican cuatro illustration
Arabic oud
A musician beside an Arabic oud with a fretless neck and ribbed wooden bowl. Open the full Arabic oud illustration
Indian sitar
A musician seated beside a modern sitar in a quiet practice room. Open the full Indian sitar illustration
Andean charango
A musician beside the wooden back of a small ten-tuner charango. Open the full Andean charango illustration
Worksheets and page state
Blank chord worksheet
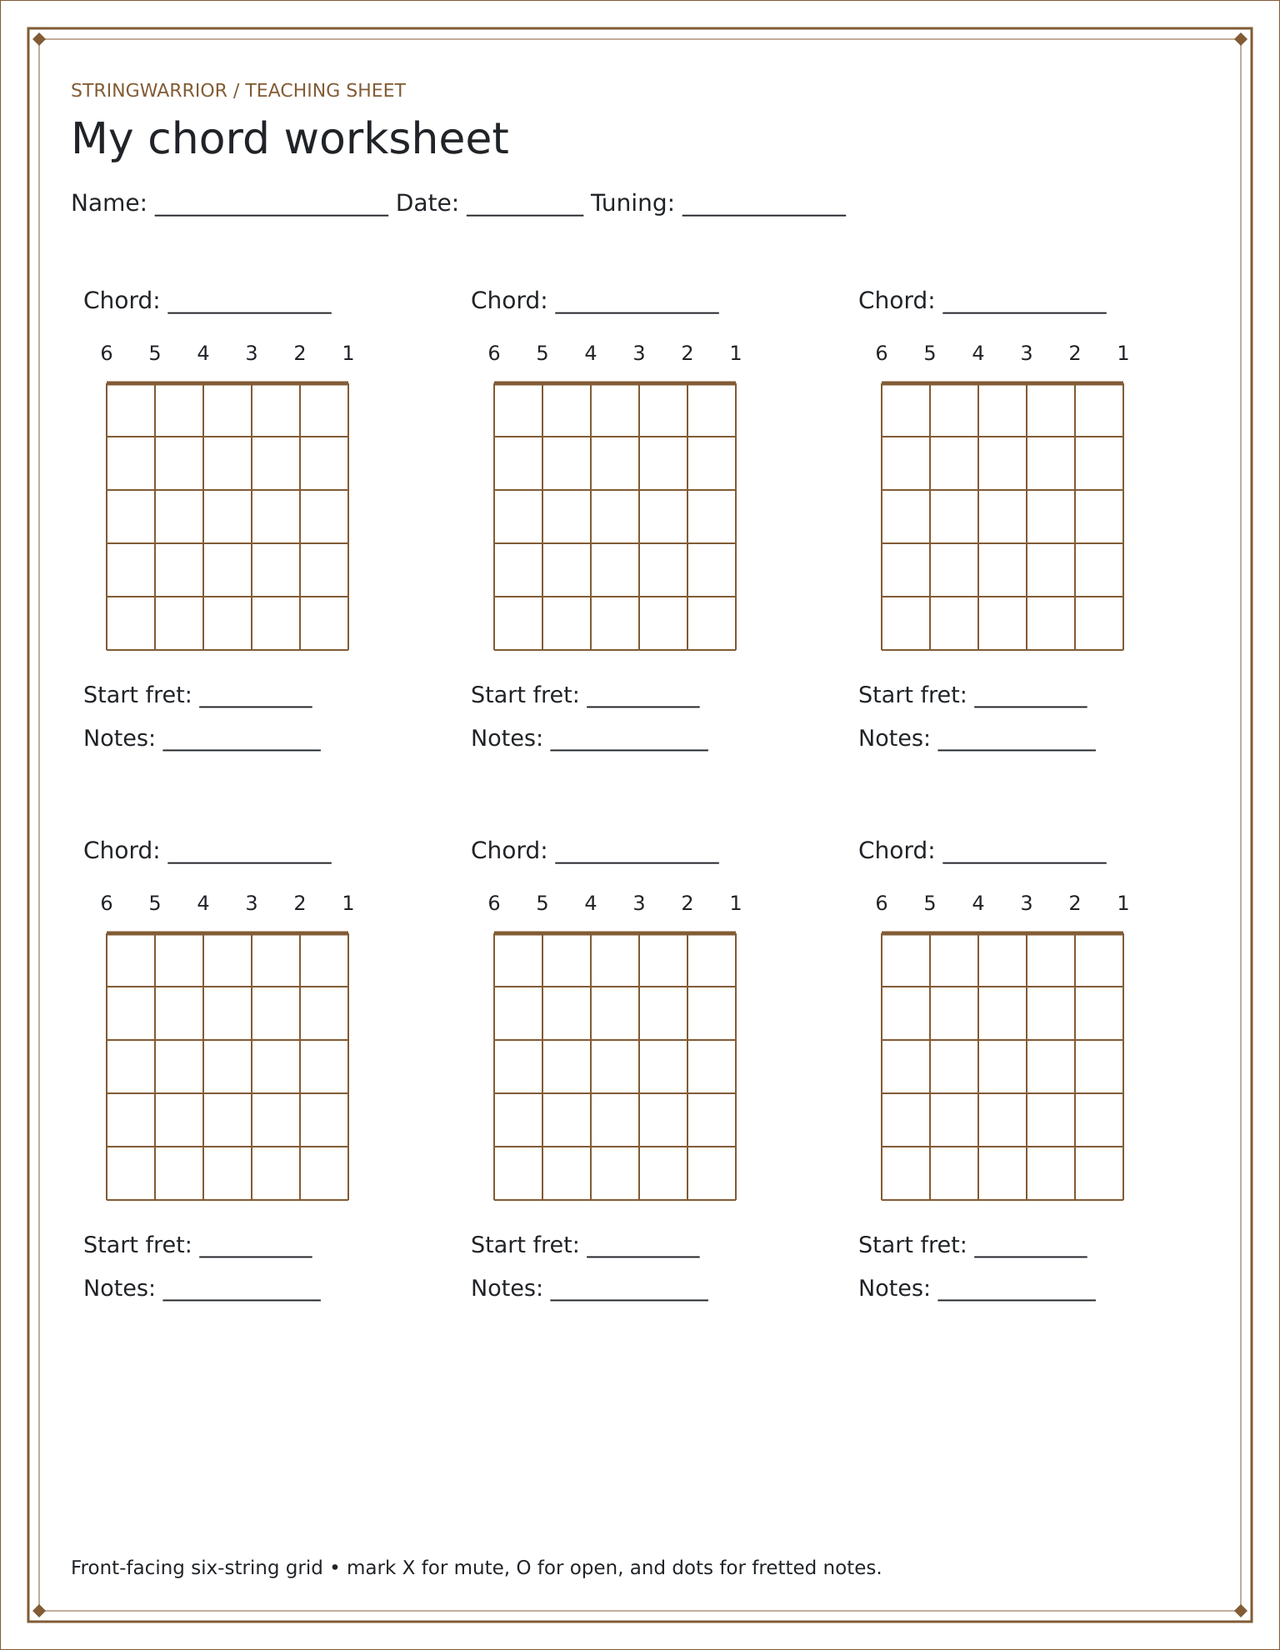
Six blank five-fret chord grids; string numbers 6 to 1 left to right. Open the full Blank chord worksheet illustration
Weekly practice card
Seven-day practice record with goal and reflection fields. Open the full Weekly practice card illustration
Lesson notes worksheet
Printable lesson-note sheet with four writing sections. Open the full Lesson notes worksheet illustration
Unavailable page
A closed bronze-trimmed stone doorway with an amber jewel. Open the full Unavailable page illustration
First steps and technique comparisons
Palm muting: contact matters
Near-bridge contact gives a controllable muted sound; placement and pressure change the result. Open the full Palm muting: contact matters illustration
Pick grip: control with less tension
Use enough grip to control the pick, then experiment with less tension. Thumb and index shown in detail. Open the full Pick grip: control with less tension illustration
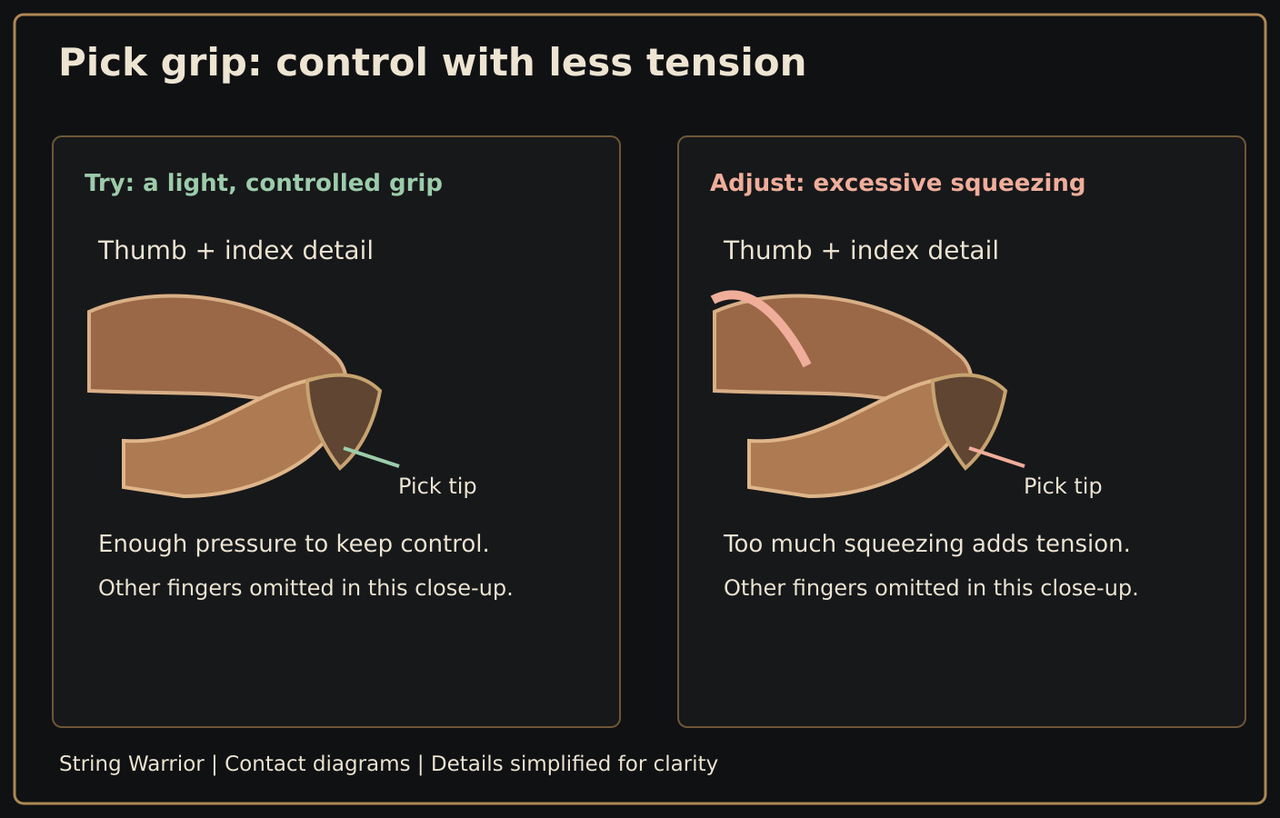
Bow contact: hair on the string
The bow hair contacts the string while the stick remains clear. This side-view diagram shows one string. Open the full Bow contact: hair on the string illustration
Your first five minutes
Choose an instrument, tune it, then play a comfortable first chord. Six-string guitar C major is shown as an example.
A three-step start: choose your instrument, tune it, and try a comfortable first chord. C-major diagram is a six-string standard-tuning example. Open the full Your first five minutes illustration
Little Warriors scenes and belt artwork
Meet your guitar

A young guitarist in leather armour sits on a stone step, smiling at an acoustic guitar on its stand. Open the full Meet your guitar illustration
Which hand
A young guitarist holds an acoustic guitar in playing position, one hand over the soundhole, one on the neck. Open the full Which hand illustration
String names song
A young guitarist leans over an acoustic guitar laid flat on a table, touching one string at a time. Open the full String names song illustration
Thumb plucks
A young guitarist plucks a string over the soundhole with the thumb while the other hand holds the neck. Open the full Thumb plucks illustration
First pressed note
A young guitarist presses one fingertip onto a string on the neck of an acoustic guitar. Open the full First pressed note illustration
Hot cross buns
A young guitarist plays a melody on one glowing string, a closed songbook resting on the step beside them. Open the full Hot cross buns illustration
Make the needle happy
A young guitarist turns a tuning peg while watching a clip-on tuner on the guitar’s headstock. Open the full Make the needle happy illustration
First chord
A smiling young guitarist sits cross-legged, holding a chord shape on the neck of an acoustic guitar. Open the full First chord illustration
Strum on the beat
A young guitarist strums an acoustic guitar beside a metronome on the stone step. Open the full Strum on the beat illustration
One chord jam
A young guitarist strums a chord while a smiling adult plays a frame drum alongside. Open the full One chord jam illustration
Second chord
A young guitarist on stone steps forms a new chord shape, a closed book resting beside them. Open the full Second chord illustration
The big switch
A young guitarist watches the fretting hand closely as it moves to a new chord on the neck. Open the full The big switch illustration
Two chord songs
A young guitarist and an adult sit side by side, both playing chords on acoustic guitars. Open the full Two chord songs illustration
The g chord
A young guitarist plays a chord beside a glowing crystal set on a carved stone pedestal. Open the full The g chord illustration
The c chord
A curly-haired young guitarist leans over the guitar, eyes on the fretting hand as it shapes a chord. Open the full The c chord illustration
The d chord
A young guitarist with long dark hair sits on stone steps and strums a chord on an acoustic guitar. Open the full The d chord illustration
The d du strum
A young guitarist strums while glowing arrows curve down and back up across the strings. Open the full The d du strum illustration
Three chord songs
Three young guitarists sit side by side on stone steps, each playing an acoustic guitar. Open the full Three chord songs illustration
Note ninja challenge
A curly-haired young guitarist frets a note high on the neck, eyes fixed on the fretting hand. Open the full Note ninja challenge illustration
Clap along challenge
A young guitarist claps along beside a metronome, the acoustic guitar resting on its stand. Open the full Clap along challenge illustration
Chart reader
A young guitarist plays an acoustic guitar while reading from a book open on a music stand. Open the full Chart reader illustration
Play for someone
A young guitarist plays for a smiling adult who sits close by, listening. Open the full Play for someone illustration
The recital
A young guitarist performs on a raised stone stage, audience silhouettes in the foreground. Open the full The recital illustration
Your next dojo
A young guitarist carries a guitar case along a glowing path into a grand hall with a pipe organ. Open the full Your next dojo illustration
Belt white
A knotted white martial-arts belt in front of a glowing bronze crest crowned with a guitar pick. Open the full Belt white illustration
Belt yellow
A knotted yellow martial-arts belt in front of a glowing bronze crest crowned with a guitar pick. Open the full Belt yellow illustration
Belt orange
A knotted orange martial-arts belt in front of a glowing bronze crest crowned with a guitar pick. Open the full Belt orange illustration
Belt green
A knotted green martial-arts belt in front of a glowing bronze crest crowned with a guitar pick. Open the full Belt green illustration
Belt blue
A knotted blue martial-arts belt in front of a glowing bronze crest crowned with a guitar pick. Open the full Belt blue illustration
Belt brown
A knotted brown martial-arts belt in front of a glowing bronze crest crowned with a guitar pick. Open the full Belt brown illustration
Belt black
A knotted black martial-arts belt in front of a glowing bronze crest crowned with a guitar pick. Open the full Belt black illustration
Learning paths and milestones
Path guitar beginner

A guitarist in leather armour sits on temple steps, smiling at an acoustic guitar on its stand. Open the full Path guitar beginner illustration
Path guitar intermediate
A guitarist stands, hand on hip, beside a sunburst electric guitar on its stand in a torch-lit hall. Open the full Path guitar intermediate illustration
Path bass beginner
A bassist in leather armour stands in a torch-lit hall beside an electric bass on its stand. Open the full Path bass beginner illustration
Path ukulele beginner
A musician with a flower in their hair sits on a stone ledge, looking at a ukulele on its stand. Open the full Path ukulele beginner illustration
Path banjo beginner
A smiling bearded musician stands in a torch-lit hall beside a banjo on its stand. Open the full Path banjo beginner illustration
Milestone first step
A carved bronze guitar pick rests on low stone steps before open doors and a glowing path. Open the full Milestone first step illustration
Milestone building skill
Copper, iron and gold guitar picks stand on three rising stone blocks inside a glowing arch. Open the full Milestone building skill illustration
Milestone path complete
A golden guitar pick inside a laurel wreath stands before open doors to a grand hall with a pipe organ. Open the full Milestone path complete illustration
Playing position details
Pick grip
A hand pinches a pick between thumb and index finger above the soundhole of an acoustic guitar. Open the full Pick grip illustration
Clean fretted note
A fingertip presses one string just behind a fret, the thumb resting behind the neck. Open the full Clean fretted note illustration
Fingerstyle hand
A hand plucks an acoustic guitar near the soundhole, thumb and fingers resting on separate strings. Open the full Fingerstyle hand illustration
Bass plucking
Two fingers pluck a string near the pickups of a sunburst four-string electric bass. Open the full Bass plucking illustration
Bass fretting
A hand spreads its fingers across the frets of an electric bass neck, fingertip pressing one string. Open the full Bass fretting illustration
Ukulele strumming
A hand strums the strings of a wooden ukulele over its soundhole. Open the full Ukulele strumming illustration
Mandolin picking
A hand holds a pick over the paired strings of a sunburst F-style mandolin near its bridge. Open the full Mandolin picking illustration
Banjo picking
A hand with thumb and finger picks plucks the strings of an open-back banjo near its bridge. Open the full Banjo picking illustration
Violin bow hold
A relaxed hand holds a violin bow near the frog, fingers draped over the stick, thumb bent beneath. Open the full Violin bow hold illustration
Violin bow contact
A violin bow crosses the strings between the bridge and fingerboard, seen head-on at the bridge. Open the full Violin bow contact illustration
Seated guitar support
A seated player on a padded wooden stool rests an acoustic guitar on the thigh, one foot flat on the floor. Open the full Seated guitar support illustration
Fretting thumb support
A thumb rests on the back of a guitar neck while the fingers curl over the top toward the fingerboard. Open the full Fretting thumb support illustration